

Java Game Programming For Dummies - W. Holder, D. Bell
.pdfPart 1: Steppin' Out
He shoots, he scores!
After scoring a point, the P S C 0 R E case increments the player's score and checks whether the player has scored a total of 10 points (the criteria for
declaring a winner). If the player has won, g s t a t e is set to P W 0 N. If the player has not yet reached a score of 10, g s t a t e is set back to W A I T to wait
to serve the next ball. Here's the code:
case PSCORE:
// Increment player s score and check if she has won gstate = (++pScore >= MAX_SCORE ? PW0N : WAIT);
break;
This code uses Java's ++ prefix increment operator to advance p S c o r e to
the new point before checking to see if pScore has reached MAX_SCORE. If pScore equals MAX_SCORE, the code sets gstate to PW0N, else it sets
gstate to WAIT.
If the computer scores, the code in the G S C 0 R E case is nearly identical:
case GSCORE:
// Increment computer s score and check if it has won gstate = (++gScore >= MAX SCORE ? GWON : WAIT); break;
We have a winna!
When the player or the computer wins the game, you need to provide time to bask in the thrill of victory. To provide this time, code in the WA I T case initializes a variable called w i n_s h ow to a value of 100. The code also counts down wi n show's value in the code for the PW0N and GWON states. The code is the same for both states, so the case statements fall through, like this:
case PW0N: case GW0N:
// Delay while we show who won i f ( win show < 0) 1
gstate = WAIT; gScore = pScore = 0;
Chapter 2: Ponglet 2 7
Tracking User Input
Now that you have constructed the game logic, you need to add code to handle input from the user.
Entering the control zone
First, the game draws a small area at the bottom of the applet that serves as the control area for the mouse. Moving the mouse pointer into this area causes the player's paddle to start tracking the mouse's movement to the left or right. To track when the mouse has moved into this area, you need to override the mo u s e E n t e r ( ) method, like this:
public boolean mouseEnter (Event evt, int x, int y) {
pPaddle.move(x, table); mouse - i n = true;
return true;
The call to p P a d d 1 e. move (x, t a b l e) sets the position of the paddle to match the mouse's x position when m o u s e E n t e r ( ) is called. The boolean variable mo u s e_i n is set to t rue to indicate that the game can start. Code in the p a i n t ( ) method also checks m o u s e_i n so that it knows when to draw the player's paddle.
You also need to override m o u s e E x i t ( ) to provide code to set mo u s e_i n to in case the player moves the mouse out of the control area. This
resets the d e 1 a y counter in the WA I T state so that the game doesn't serve the ball until the player has had a chance to get ready (by moving the mouse back into the control area). Here's the code for
Public boolean mouseExit (Event evt, int x, int y) l
mouse-in = false;
return true
Tracking the mouse
Finally, you also need to override the mo u s e M o v e ( ) method to update the position of the player's paddle whenever the mouse moves, like this:
ublic boolean mouseMove (Event evt, int x, int y)
pPaddle.move(x, table);
return true;
28 |
Part I: Steppin' Out |
|
1Jispla ying the state
Now you're in the home stretch. Your final task is to add code to draw the Ping-Pong table, the ball, the paddles, the score, and the control area. You can put most of the new code into the pa i nt ( ) method for the applet.
Start with the same framework code that you used to create the bouncing
ball example in Chapter 1. You can use the same code from Chapter 1 that draws to an offscreen I ma g e in order to reduce flicker in the animation. You can also borrow the code that draws a checkerboard background image, or you can invent your own creative background pattern.
Here's the borrowed framework code:
public void paint (Graphics g) I i f (offscr == null) I
offscreenImage = createlmage(width, height)'; offscr = offscreenImage.getGraphics();
! / Fill offscreen buffer with a background B/W checkerboard i nt x2 = table.width >> 1;
i nt y2 = table.height >> l; offscr.setColor(Color.gray); offscr.fillRect(0, 0, x2, y2); offscr.fillRect(x2, y2, table.width - x2,
table.height - y2); offscr.setColor(Color.white); offscr.fillRect(x2, 0, table.width - x2,
table.height - y2); offscr.fillRect(0, y2, x2, y2); g.drawImage(offscreenlmage, 0, 0, this);
Your new code goes into the pa i nt ( ) method just before the call to drawImage( ) at the end of poi nt( ).
You also need to initialize a few variables in the applet's i n i t ( ) method to create a font for displaying the score and to handle a few other details for the preceding sections. Here's the code you need to write for i n i t ( )
public void init() { width = size().width; height = size().height;
// Set up table and mouse control area dimensions table = new Rectangle(width, width);
msePad = new Dimension(width, height - width);
Chapter 2: Ponglet 29
pPaddle = new Paddle(width » l, table.height - fi, 20.
3, Color.black); Player = new Point(width - width / 4, 5); game = new Point(width / 4, 5);
/ /Create offscreen image
offscreenImage = createImage(width, height); offscr = offscreenImage.getGraphics();
/ /Setup text font for displaying the score font = new Font( TimesRoman , Font.PLAIN, 14); fontMet = getFontMetrics(font);
fontHeight = fontMet.getAscent();
!Keeping score
Next, you can add code to pa i nt ( ) to draw the score, like this:
// Draw Scores |
|
offscr.setFont(font); |
|
centerText(offscr, game, Color.white, |
+ gScore); |
centerText(offscr, player, Color.gray, |
+ pScore); |
This code uses a new method called c e n t e r T e x t ( ) the screen locations given by the objects code for
to center the code on and p 1 aye r. Here's the
private void centerText (Graphics g, Point loc, Color clr, String str) {
g.setColor(clr);
g.drawString(str, loc.x - -(fontMet.stringWidth(str) / 2). l oc.y + fontHeight);
The parameter 1 o c specifies a location for c e n t e r Te x t ( ) to center the score passed in the String str and draw it in Color c l r. The
F o n t M e t r i c s object f o n t Me t is called to compute the width of the string. The value f o n t H e i g h t is added to the y value of 1 o c so that the string is centered relative to the top center of the text.
Game over
If the game is over, you need to declare the winner. The following code displays the string "Win" beneath the winning player's score. Add this code after the code to draw the score:

30 Part I: Steppin' Out
if ((gstate & (PW0N I GW0N)) != 0) {
Point winner - gstate == GWON ? game : player; Point loc = new Point(winner.x, winner.y + 15); centerText(offscr, loc, Color.black, Win );
If the game isn't over, you need code to draw the ball and the paddles. You can add this code to an e 1 s e statement that follows the code to declare a winner:
else
// Draw ball
if ((gstate & (SERVE I RETURN I PGUTTER)) != 0) ball.draw(offscr);
I/ Draw player s paddle
if (mouse- i n 1 1 ( gstate & (SERVE I RETURN.` PGUTTER I GGUTTER)) 1= 0)
pPaddle.draw(offscr);
fl Draw computer s paddle
i f (gstate == RETURN)
gPaddle.draw(offscr);
Finally, you need to add code to draw the mouse control pad at the bottom of the screen. This code also needs to prompt the player to move the mouse into the control area to start the game, like this:
// Fill in mouse pad area offscr.setColor(Color.yellow): offscr.fillRect(0, msePad.width, table.width,
msePad.height);
i f (!mousein) I
Point loc = new Point(table.width >> 1, table.height + ((msePad.height - fontHeight) )> 1));
centerText(offscr, loc, Color.black, Move Mouse Here ):
Figure 2-1 shows the completed Ponglet applet in action. You can find the complete code for Ponglet on the Java Game Programming For Dummies
CD-ROM included with the book.
Figure 2-1:
Here's
how the
completed
Ponglet
game looks.

Chapter 3
Hole In One
.I6 Eius Chapter
dating golf
Making a click-and-drag putt interface
Il |
g the physics of a ball |
erhaps you play golf as a personal pastime. Or maybe you've putted a few holes of the miniature varietY down at the family fun center. If you have, you're in good company: Golf is a hugely popular sport in the United
States, around the world, and even off the world. (Golf has the distinction of being possibly the only game played on the surface of the moon, as Alan Shepard did on February 6, 1971, during the Apollo XIV mission. Reportedly, Shepard hit his first shot about 400 yards and then badly shanked his second.)
Golf is also popular as a computer game. Dozens of versions of computer golf have appeared over the years. Some of these games present fanciful versions of the miniaturized game, some bear the names of famous players or golf courses, and some claim to be accurate simulations that model the physics and aerodynamics of real golf.
In this chapter, you won't be tackling anything as lofty as trying to calculate the wind forces on a golf ball in flight. Instead, this chapter's goal is to explore how to simplify the simulation of one aspect of golf, in this case putting, by faking the calculations just well enough to get a result that feels realistic. By the end of the chapter you'll be ready to turn this knowledge into your own H o 1 e I n 0 n e applet.
This chapter describes all the techniques used in the Ho1 e I n0ne applet. The complete code and ready-to-use applet is included on the Java Came Programming For Dummies CD-ROM at the back of this book.

32 Part I: Steppin' Out
Faking physics
Don't be shocked by the idea of faking the calculations for a game. In truth, all calculations that claim to simulate a real phenomenon are really just faking it-you can never take every single variable into account land even if you do, El Nino is just around the corner). Some calculations just happen to be less fake than others.
Your goal should be to fake (perhaps simplify sounds better) the calculations well enough to
create a realistic and fungolf simulation, while avoiding needless complications.
Think of the unpredictability of a golf ball rolling across a grassy surface. Just a single blade of grass at the edge of the hole could prevent the ball from falling in. But do you really spoil the simulation if you treat the hole as a perfectly round, sharp-edged circle? Naah - it works just fine, as this chapter
shows.
Modeling the Deceleration of a Ba!!
Chapters 1 and 2 show code that simulates a ball that bounces around the screen and that moves at a constant speed. In the real world, balls behave differently. For example, a golf ball starts out moving at a certain speed proportional to how hard it's hit by the putter. And immediately after the ball is hit, it starts to slow down as it travels toward the hole. This slowdown, or more formally, deceleration, is the result of a variety of forces acting on the ball, but deceleration of a golf ball is mostly caused by the rolling friction of the grass.
When real objects decelerate (or accelerate), Sir Isaac Newton's famous second law gets involved. Mr. Newton says that the deceleration of a real golf ball is proportional to the forces acting on it divided by the mass of the ball. Simulated golf balls don't have real mass, of course, and they don't have real forces acting on them either, but you do need some type of calculation to simulate Sir Newton's law in action.
The code in Chapters 1 and 2 moves the ball by adding values called dx and dy to the ball's x,y position. Therefore, you've certainly deduced that slowing the motion of the ball is going to require you to reduce the dx and dy values. Before you start working out the details, though, you may want to consider vector math, a new way to do these types of motion calculations.
using vectors
A vector (not to be confused with the j a v a . u t i 1 class of the same name) is another name for a pair of dx and dy values. You can think of a vector as representing the difference between two points; the dx and dy values form a
Chapter 3: Hole In One 33
vector because they represent the difference between two points along the path of the ball.
You can slow the movement of your golf ball by reducing the distance it travels in each successive animation frame. However, the tricky part is reducing the distance the ball travels without changing the direction it's moving.
If you think of dx and dy as proportional to the length of two sides of a right triangle (see Figure 3-1), the distance a ball travels when you add dx and dy is proportional to the length of the diagonal side of the same triangle. To compute the length of the diagonal you use the formula for the lengths of sides of right triangles, discovered by one Mr. Pythagoras:
a2 +b2 =C 2
dy
dx
magnitude = Math.sgrt(dx * dx + dy * dy);
By rearranging this formula, you can compute the length of the diagonal as
math.sgrttdx * dx + dy * dy)
The length of a vector's diagonal is commonly called the magnitude of the vector.
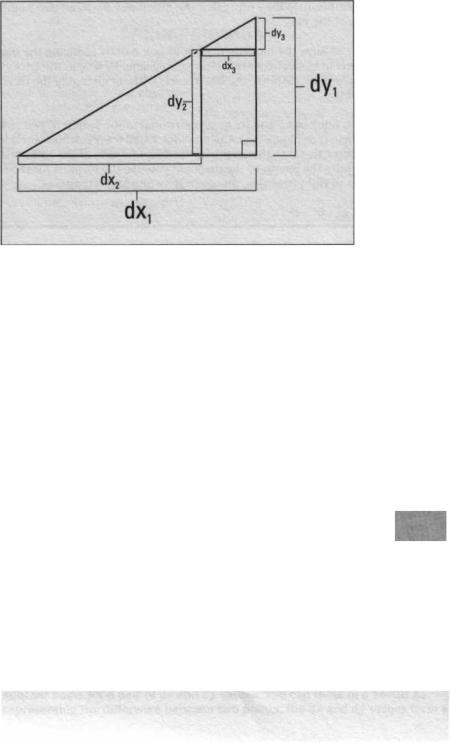
Vector magnitude is important because it's the key to understanding how to decelerate your golf ball. You can visualize what happens when you reduce the magnitude of a vector by examining the relationship between the three nested triangles in Figure 3-2.
34 Part I: Steppin' Out
Figure 3-2: To increase or decrease the magnitude of a vector, proportionally change the vector's dx and dy values.
The biggest triangle, with sides dx,/dy,, has a diagonal that is as long as the other two triangles combined. To reduce the biggest triangle so that it has
a diagonal as long as the next smaller triangle, shown with sides dx2/dye, you have to subtract the lengths of the sides of the smallest triangle, dx3/dy3, from the sides of dx,/dy,.
However, notice that you subtract more from dx, than you do from dy,. If you were to subtract the same amount from dx, and dy e, you would change the shape of the triangle rather than just the length of the diagonal (or more specifically, hypotenuse). To keep the shape of the triangle the same, you need to maintain the same ratio between the lengths of the sides defined by
dx and dy.
The secret to keeping the ratio of dx and dy the same is to divide dx and dy by the magnitude of the vector formed by dx and dy:
dx = dx / Math.sqrt(dx * dx + dy * dy) dy = dy / Math.sqrt(dx * dx + dy * dy)
Dividing by the magnitude changes dx and dy into a unit vector (see the following techno term icon), with values for dx and dy ranging from 0 to 1. The unit vector represents the direction the ball is moving, independent from the ball's speed. And because you divide dx and dy by the same number, you maintain the same ratio between dx and dy and therefore the same direction for the ball. For example, when the ball's movement is completely vertical (dx = 0), the value of dy divided by the magnitude of the vector is 1, regardless of how fast the ball is moving.
Chapter 3: Hole In One 35
When you divide a vector's dx and dy values by its magnitude, you get a new type of vector called a unit vector. The magnitude of a unit vector is always 1, hence the name. Unit vectors are used extensively in 2-D and 3-D graphics calculations because they can be used to represent a direction independent of speed.
You can also use a unit vector to calculate how to decelerate your ball without altering its direction. First, you calculate a unit vector from the ball's current motion vector. Then, because the magnitude of this unit vector is 1, you can scale it to any size you want by multiplying its dx and dy values by a value that represents the magnitude of the vector you want to create. Then, you simply subtract this vector from your original motion vector, and voila! you've reduced the speed of the ball while keeping it moving in the same direction.
Creating a vector class
The golf simulation in this chapter uses vectors extensively to do many of the motion calculations, and you need code to perform the basic vector math operations, such as adding one vector to another, computing a unit vector, and so on. So why not bundle up all these methods into a useful new utility class called V e c 2 D, like this:
public class Vec2D I public float dx, dy;
public void setVec (float dx, float dy) I this.dx = dx;
this.dy = dy;
public float mag () {
return (float) Math.sgrt(dx * dx + dy * dy);
public void addVec (Vec2D vec) I dx += vec.dx;
dy += vec.dy;
public void subVec (Vec2D vec) I dx -= vec.dx:
dy -= vec.dy;
(continued)