

Cisco Secure VPN Exam Certification Guide - Cisco press
.pdf158Chapter 4: Configuring Cisco VPN 3000 for Remote Access Using Preshared Keys
•IKE Keepalives—Monitors the continued presence of a remote peer and notifies the remote peer that the concentrator is still active. If a peer no longer responds to the keepalives, the concentrator drops the connection, preventing hung connections that could clutter the concentrator.
•Tunnel Type—You can select either LAN-to-LAN or Remote Access as the tunnel type. If you select LAN-to-LAN, you do not need to complete the remainder of this screen.
•Group Lock—Checking this field forces the user to be a member of this group when authenticating to the concentrator.
•Authentication—This field selects the method of user authentication to use. The available options are as follows:
—None—No user authentication occurs. Use this with L2TP over IPSec.
—RADIUS—Uses an external RADIUS server for authentication. The server address is configured elsewhere.
—RADIUS with Expiry—Uses an external RADIUS server for authentication. If the user’s password has expired, this method gives the user the opportunity to create a new password.
—NT Domain—Uses an external Windows NT Domain system for user authentication.
—SDI—Uses an external RSA Security, Inc., SecurID system for user authentication.
—Internal—Uses the internal VPN concentrator authentication server for user authentication.
•IPComp—This option permits the use of the Lempel Zif Stac (LZS) compression algorithm for IP traffic developed by Stac Electronics. This can speed connections for users connecting through low-speed dial-up circuits.
•Reauthentication on Rekey—During IKE phase 1, the VPN concentrator prompts the user to enter an ID and password. When you enable reauthentication, the concentrator prompts for user authentication whenever a rekey occurs, such as when the IKE SA lifetime expires. If the SA lifetime is set too short, this could be an annoyance to your users, but it provides an additional layer of security.
•Mode Configuration—During SA negotiations, this option permits the exchange of configuration parameters with the client. To pass configuration information to the client, such as DNS or WINS addresses, you must enable this option. If you check this box, you need to continue to the Mode Config tab to complete the selection of attributes there.

VPN Concentrator Configuration 159
Figure 4-22 Configuration | User Management | Groups | Modify > IPSec
Modify Groups— Client Config Tab
The Client Config tab screen is shown in Figure 4-23. Configuration of the attributes on this screen is only necessary if you selected Mode Configuration from the IPSec tab screen. The attributes on this page have the following meanings:
•Banner—You can enter up to a 510-character greeting banner that is displayed to IPSec software clients each time they log in to the system.
•Allow Password Storage on Client—This option allows the client PC to store the user’s password. For security reasons, this is not a good policy. The default is to have this capability disabled.
•IPSec over UDP—This option permits clients to connect to the VPN concentrator via UDP through a firewall or router using NAT.
•IPSec over UDP Port—This attribute lets you set the port to use through the firewall. The default is 10,000.

160Chapter 4: Configuring Cisco VPN 3000 for Remote Access Using Preshared Keys
•IPSec Backup Servers—This attribute is used on Cisco VPN 3002 Hardware Clients and is not required for remote access users.
•Intercept DHCP Configure Message—Enable DHCP intercept to permit Microsoft Windows XP clients to perform split tunneling with the VPN concentrator. When you enable this field, the VPN concentrator replies to the Microsoft Windows XP client DHCP Inform message. This capability allows the VPN concentrator to provide the client with a subnet mask, domain name, and classless static routes for the tunnel IP address when a DHCP server is not available.
•Subnet Mask—Enter a valid subnet mask for Microsoft Windows clients requesting DHCP services.
•Split Tunneling Policy—This option, disabled by default, permits clients to specify some types of traffic as not requiring IPSec protection. This traffic is sent in clear text. The options within this attribute are as follows:
—Tunnel everything—All data use the secure IPSec tunnel.
—Allow networks in list to bypass the tunnel—All data use the secure IPSec tunnel except for data being sent to addresses on the network list. This option gives users who have elected to tunnel all traffic the ability to access devices such as printers on their local networks without having that traffic encrypted.
—Only tunnel networks in list—Uses the secure IPSec tunnel for data sent to addresses on the network list. All other traffic is sent as clear text. This option allows remote users to access public networks without requiring IPSec tunneling through the corporate network.
•Split Tunneling Network List—If you select the Allow networks in list to bypass the tunnel option, then this list is an exclusion list, allowing traffic to pass over the network without going through IPSec. If you select the Only tunnel networks in list option, then this list is an inclusion list that determines which traffic is handled via IPSec. You can establish these lists elsewhere in the concentrator, or you can use the VPN Client Local LAN option.
•Default Domain Name—If you supply a domain name here, the concentrator passes this name to the client. Fully qualified domain names sent over the IPSec tunnel have this domain name appended to the end.
•Split DNS Names—Enter a list of domain names that you want the VPN concentrator’s internal DNS server to resolve for traffic going over the tunnel. This option is useful in split-tunneling connections, permitting the internal DNS server to resolve domain names for traffic through the tunnel. The ISP-assigned DNS servers resolve DNS requests that travel in the clear to the Internet.

VPN Concentrator Configuration 161
Figure 4-23 Configuration | User Management | Groups | Modify > Client Config

162 Chapter 4: Configuring Cisco VPN 3000 for Remote Access Using Preshared Keys
That is all that you need to configure on the VPN concentrator. Click the Modify button to save your work to the active configuration and return to the Groups screen shown in Figure 4-19. Be sure to click the Save Needed icon to save your configuration changes to the boot configuration. To configure the client firewall capability or hardware client features, or if you are using either the PPTP or L2TP tunneling protocols, continue configuring the group settings using the Client FW, HW Client, and PPTP/L2TP tabs discussed in the following sections.
Modify Groups— Client FW Tab
The Client FW tab permits you to configure firewall options for Cisco VPN Clients running on a Microsoft Windows platform. Client firewall support is disabled by default but can be enabled on this tab. A stateful firewall is built into the VPN Client, but other commercially available firewalls can be used and operate as a separate application that runs on the Windows platform. Firewalls inspect each inbound and outbound packet to determine if the packet should be forwarded toward its destination or whether the packet should be dropped. These decisions are made using rules defined in firewall policies. Firewalls provide an extra measure of protection to systems and corporate networks, especially when split tunneling is used.
The VPN concentrator can support client firewalls in three different ways:
•Each client can individually manage its own personal firewall policy.
•The VPN concentrator can push a centralized firewall policy to each client.
•A separate, standalone firewall server can be used to manage and enforce firewall policy usage on VPN Client devices.
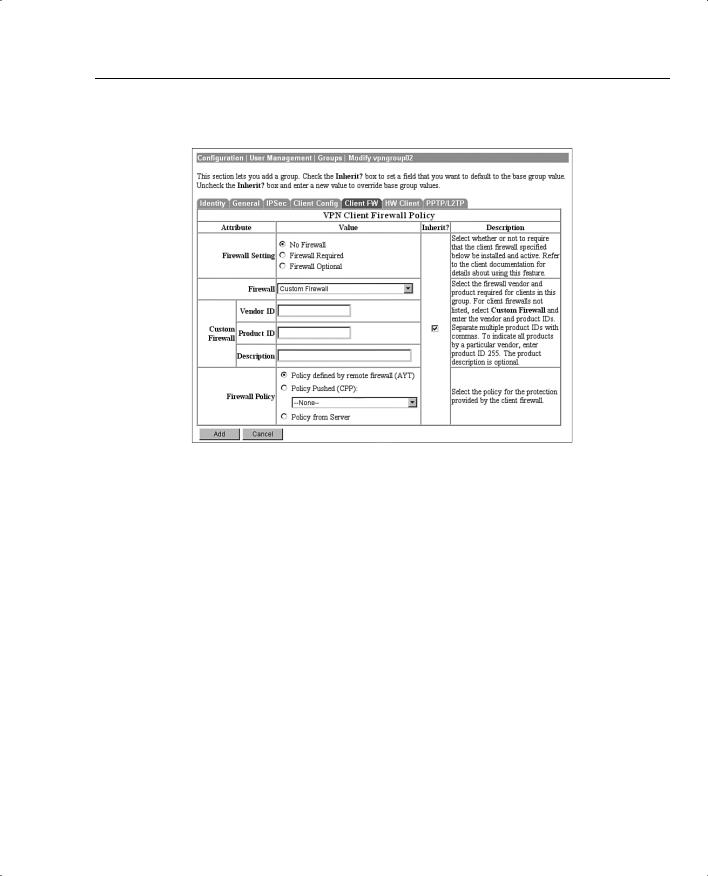
Figure 4-24 shows the configuration options that are available on the Client FW tab for these three types of firewall management. The following bulleted items discuss the options shown on the Client FW tab screen:
•Firewall Setting—This attribute is used to enable or disable firewall support for the users connecting through this group. The available settings are as follows:
—No Firewall—This is the default setting for a new group. When this option is checked, the VPN concentrator ignores VPN Client firewall settings.
—Firewall Required—When this option is checked, every VPN Client peer that connects through this group must use the firewall specified for this group. If the peer is not using the correct firewall, the VPN concentrator drops the connection and notifies the VPN Client of the mismatch.
—Firewall Optional—Setting the firewall to optional can be used when all your VPN Client users are not currently running firewalls on their systems. Choosing this option lets users without firewalls connect, giving them a warning message. Those users with firewalls installed must be using the correct firewall; the VPN concentrator and VPN Client then manage the firewall policy according to the settings contained on this Client FW tab.

VPN Concentrator Configuration 163
•Firewall—Select the firewall that members of the group are to use. The available options are as follows:
—Cisco Integrated Client Firewall—The stateful firewall built into the VPN Client.
—Network ICE BlackICE Defender—The Network ICE BlackICE Agent or Defender personal firewall.
—Zone Labs ZoneAlarm—The Zone Labs ZoneAlarm personal firewall.
—Zone Labs ZoneAlarm Pro—The Zone Labs ZoneAlarm Pro personal firewall.
—Zone Labs ZoneAlarm or ZoneAlarm Pro—Either the Zone Labs ZoneAlarm personal firewall or the Zone Labs ZoneAlarm Pro personal firewall.
—Zone Labs Integrity—The Zone Labs Integrity Client.
—Custom Firewall—This option is primarily for future use. Choose this option when you cannot use any of the previous options or when you want to combine two or more of these options. When you choose this option, you must detail your firewall selection(s) in the Custom Firewall attribute settings.
•Custom Firewall—All the supported options are currently selectable from the list available in the Firewall attribute setting. In the future, additional options might be available. At that time, you could use this section to identify those new firewalls.
—Vendor ID—You can only enter one vendor ID code in this field. Currently, the available vendor codes are Cisco Systems (Vendor ID 1), Zone Labs (Vendor ID 2), and Network ICE (Vendor ID 3).
—Product ID—For the vendor selected, you can enter multiple product ID codes in this field. When entering multiple code numbers, separate them with a comma or use a hyphen to designate a range, such as 1-3 for Zone Labs. To use all available products for a given vendor, enter 255 as the Product ID. Table 4-3 shows the current product codes.
Table 4-3 |
Custom Firewall Product Codes |
|
|
|
|
|
|
|
Vendor |
Product |
Product Code |
|
|
|
|
|
Cisco |
Cisco Integrated Client (CIC) |
1 |
|
|
|
|
|
Zone Labs |
Zone Alarm |
1 |
|
|
|
|
|
|
Zone Alarm Pro |
2 |
|
|
|
|
|
|
Zone Labs Integrity |
3 |
|
|
|
|
|
Network ICE |
BlackIce Defender/Agent |
1 |
|
|
|
|
—Description—You can enter an optional description for your custom firewall in this field.

164Chapter 4: Configuring Cisco VPN 3000 for Remote Access Using Preshared Keys
•Firewall Policy—You can select from three different methods for administering the firewall policy for your VPN Client systems. Those methods are as follows:
—Policy Defined by Remote Firewall (AYT)—The user of the VPN Client system has established firewall policy settings for a personalized firewall that runs on the user’s system. That firewall can be a third-party firewall that works with the Cisco VPN Client and VPN concentrator. The VPN Client uses the Are You There (AYT) enforcement mechanism to periodically poll the firewall. If the firewall doesn’t respond to the periodic “Are you there?” messages, the VPN Client drops the connection to the VPN concentrator. A system administrator can initially configure and install the firewall for these users, but each user is allowed to configure his or her own policies beyond the initial settings. This option is available for use with the Network ICE BlackIce Defender, Zone Labs ZoneAlarm, and Zone Labs ZoneAlarm Pro firewall products.
—Policy Pushed (CPP)—When a corporation’s security policy mandates that all VPN Clients use the same firewall policy, the system administrator can configure the VPN concentrator to push a centralized, standardized firewall policy to each VPN Client, which then passes the policy on to the local firewall for enforcement. The administrator creates a set of traffic management rules on the VPN concentrator, associates the rules with a filter, and designates the filter as the firewall policy from the drop-down window for this attribute. This type of firewall policy management is called push policy or Central Protection Policy (CPP). This option is available for use with the Cisco Integrated Client Firewall, Zone Labs ZoneAlarm, and Zone Labs ZoneAlarm Pro firewall products.
—Policy from Server—You can use the Zone Labs Integrity Server (IS), a standalone firewall server, to manage firewall policy management and enforcement through the VPN Client. A centralized firewall policy is maintained on the IS. The IS then pushes this policy to each monitored VPN Client host and then monitors the use of the policy on those hosts. The Zone Labs IS also communicates with the VPN concentrator to manage connections and share session, user, and status information. This option is only available for the Zone Labs Integrity Server firewall product.
Modify Groups— HW Client Tab
Cisco VPN 3002 Hardware Clients provide additional authentication capabilities for peer and user authentication. The VPN 3002 Hardware Client communicates with the VPN concentrator to establish the tunnel and the user systems connect to the hardware client via Ethernet connections. The user systems do not require the VPN Client.
VPN Concentrator Configuration 165
Figure 4-24 Configuration | User Management | Groups | Modify > Client FW
When you configure the VPN 3002 Hardware Client for the IPSec tunneling protocol, you enter the IPSec group name and password that you configured on the VPN concentrator onto the Configuration | System | Tunneling Protocols | IPSec screen of the VPN 3002 Hardware Client. You must also enter a single username and password on that same screen, which are used to establish user authentication for all users connected to the VPN 3002 Hardware Client. Both the group name and username must be valid to establish the IPSec tunnel. Once the VPN 3002 Hardware Client and the VPN concentrator have established the VPN tunnel, any users connected to the hardware client can use the secure tunnel.
To provide additional security, you can enable interactive authentication for the establishment of the IPSec tunnel and for interactive user authentication. The HW Client tab, shown in Figure 4-25, permits you to enable the following authentication features:
•Require Interactive Hardware Client Authentication—When this field is checked, the username and password that were configured on the VPN 3002 Hardware Client are ignored. The first user connected to the VPN 3002 Hardware Client that wants to begin using secure IPSec communications is prompted to enter a valid username and password. The method of authentication was selected earlier on the group’s IPSec tab. Once the initial user establishes the IPSec tunnel, no other users are prompted for the tunnel authentication username and password.
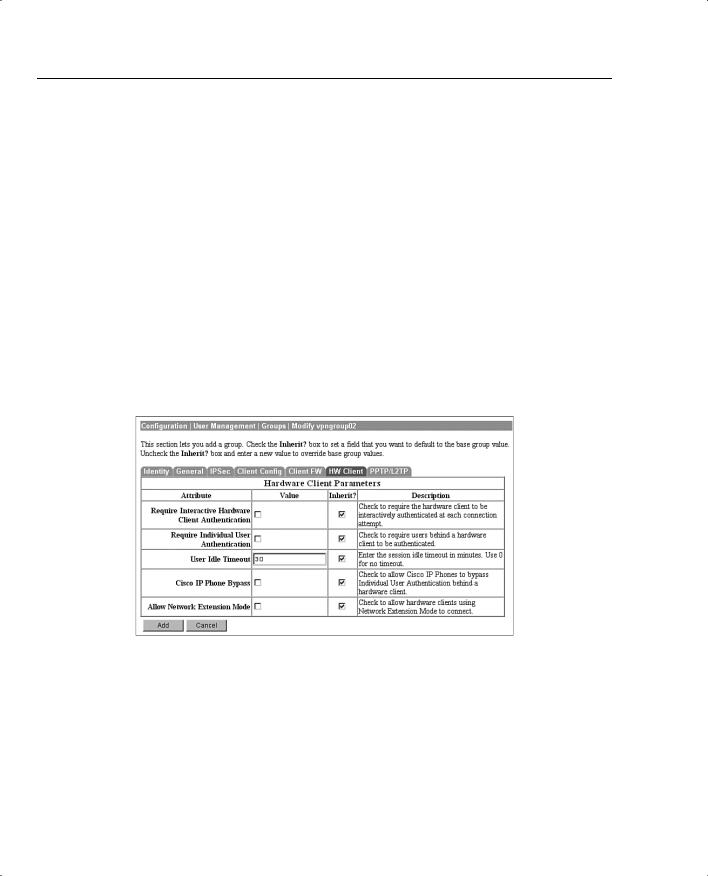
166Chapter 4: Configuring Cisco VPN 3000 for Remote Access Using Preshared Keys
•Require Individual User Authentication—You can also require all other users connected to the VPN 3002 Hardware Client to authenticate before using the IPSec tunnel by checking this attribute box. Each user is prompted for a username and password and is authenticated using whatever method the IPSec group requires.
•User Idle Timeout—The default idle timeout for a user’s connection is 30 minutes. The smallest idle timeout period you can use is 1 minute. You can enter 0 to tell the concentrator to never drop an idle connection. When a user’s connection has been idle for the period of time specified by the idle timeout period, the concentrator drops the connection.
•Cisco IP Phone Bypass—Checking this field tells the VPN concentrator not to negotiate individual user authentication for IP phones.
•Allow Network Extension Mode—You can configure the VPN 3000 Concentrator to support Network Extension mode with VPN 3002 Hardware Clients in site-to-site
networks by checking this field. The VPN 3002 Hardware Client must also be configured to support network extension mode, or the two devices can never connect to one another. The default connection mode is Port Address Translation (PAT).
Figure 4-25 Configuration | User Management | Groups | Modify > HW Client
Modify Groups— PPTP/L2TP Tab
If you selected PPTP, L2TP, or L2TP over IPSec as an allowable tunneling protocol to be used for VPN connections, you might need to make adjustments to the attributes displayed on the PPTP/L2TP Tab, shown in Figure 4-26. Client and VPN concentrator settings must match during VPN tunnel negotiations, or the tunnel is not established. The following attributes are shown on this screen:
•Use Client Address—You can allow clients to supply their own address for the client end of the VPN tunnel. This is not a good idea from a security perspective, so be careful about

VPN Concentrator Configuration 167
enabling this capability. The default mode for this attribute is disabled, forcing the VPN concentrator to supply the address through one of the various means available to the concentrator.
•PPTP Authentication Protocols—During tunnel negotiation, prospective peers generally authenticate one another through some mechanism. By checking none of the available options, you can permit the tunnel to be negotiated with no authentication, but you should only use that for test purposes. The available authentication protocols are as follows:
—PAP—The Password Authentication Protocol (PAP) passes the username and password in clear text and is therefore not secure. Although this is the default setting, it is not a recommended choice for a secure environment. PAP does not provide data encryption.
—CHAP—The Challenge-Handshake Authentication Protocol (CHAP) is also permitted by default, but is also not particularly secure. In response to a challenge from the server, the client encrypts the challenge plus password and returns that to the server along with the clear text username. CHAP does not provide data encryption.
—MSCHAPv1—The Microsoft Challenge-Handshake Authentication Protocol version 1 (MSCHAPv1) is more secure than CHAP because the server only stores and compares encrypted passwords. MSCHAPv1 can encrypt data using the Microsoft Point-to-Point Encryption (MPPE) Protocol.
—MSCHAPv2—The Microsoft Challenge-Handshake Authentication Protocol version 2 (MSCHAPv2) is a step up from MSCHAPv1 because it requires mutual client-server authentication. MPPE can also be used here for data encryption using keys that are unique for each session. MSCHAPv2 also uses different keys for the send and receive functions.
—EAP Proxy—The Extensible Authentication Protocol (EAP) Proxy lets the VPN concentrator offload the authentication process to an external RADIUS server, providing additional authentication services such as EAP/MD5, Smartcards and certificates (EAP/TLS), and RSA SecurID (EAP/SDI). EAP Proxy does not support encryption.
•PPTP Encryption—Select the type of PPTP encryption that you want to use from these options:
—Required—If you select this option, clients must use MPPE encryption. This means that you can only select MSCHAPv1 and MSCHAPv2 as the allowable authentication protocols when using this option. You must also select either 40-bit and/or 128-bit encryption in this category.
—Require Stateless—Under this encryption scheme, the encryption key is changed with each packet transferred.