

OHM 1.19
.1.pdfUsing this Manual
This help manual applies to open source ModPlug Tracker (MPT) build 1 . 1 9 . 1 .
The ModPlugTracker Offline Help Manual (OHM) is designed for both the beginner and the veteran tracker alike. Many end-users prefer to just jump right to an application and start exploring without a manual at their fingertips. But others like to have a help manual in case they get stuck or don't want to waste time trying to find a function or a feature. This manual is for the latter group.
The OHM is organized in an outlined way so that you can explore MPT while going along with the manual, until you reach the Reference sections, which is provided for more experienced MPT users who need more detailed information. There are plenty of images so you can see the subject at hand is if you were there in the ModPlug application. The text is also bookmarked and linked with text that looks like this if you want to jump to another section in the OHM for more information. None of the links take you to an Internet site.
Terms
Track: One entire song file. Interchangeable with the term module, but “track” connotes the musical content, while module implies a complete file in a more data-oriented perspective.
Page: A window found under a tab.
Channel: One vertical set of event data in a tracking file. This is the equivalent of a sequencer’s “track”. Column: One vertical row of information in a channel. ModPlug has 4 columns in a channel.
Field: One column in one row. For some fields, this may include a prefix and a value.
Event: One action executed in a channel, including the note and its assigned instrument (if any), the Note Effect, and the Channel Effect. In MPT, only one event per channel can be played at a time. Chords for an instrument must be divided as several events spread over several channels.
Note Effect: Data entered in the third column of a channel. Most of these are note-driven — hence the term.
Channel Effect: Data entered in the fourth column of a channel. Most of these are Effect commands which affect only the channel — hence the term.
Understanding hexadecimal
ModPlug Tracker employs in a few places, as with most trackers, two-digit hexadecimal numbers as data, and it's important to understand how this is translated to and from decimal. It's not hard to learn, but it may take some time before it becomes second-nature to you.
In decimal numeration, the system based on tens that has always been taught, a two-digit number shows two things: how many tens (the first digit) and how many ones (the second digit). For example, the decimal number 34 tells you there are three tens and four ones.
In hexadecimal (or “hex” for short), a two-digit number tells you how many sixteens by the first digit, and how many ones by the second. So the hex number $34 means there are 3 sixteens and 4 ones. (A $ sign is one way of reminding you the number is hexadecimal; another way is to use 0x, as in 0x34.)
Translating a hex number is easy: multiply the first digit by sixteen and add the second digit; the same thing is done intuitively with decimal — multiply the first digit by ten and add the second. So the hex number $34 is 52 in decimal (16 x 3, plus 4). If you know the decimal and you want to translate to hex, simply divide your decimal value by 16 for the first digit and whatever's left over is the second digit. So, 52 divided by 16 is 3, with 4 remaining — $34.
However, in hex notation there are only enough digits to represent 0 thru 9, which are borrowed from decimal; what about numbers 10 – 15? For those, letters A – F are used, where A = 10, B = 11, and so on. So two-digit numbers counting from 9 to 17 goes like this: $09, 0A, 0B, 0C, 0D, 0E, 0F, 10, and 11.
Translating to decimal with hex letters needs some getting used to, but certain numbers will become automatic with
use, such as these:
$40 = 64: The highest value of many global settings within ModPlug.
$7F = 127: The highest applicable value for Channel FX (except for the SF0 macro) and other parameters.
$FF = 255: The highest possible value for any one-byte setting (a two-digit hex number represents a single byte)
Page 1

1. What is ModPlug Tracker?
To put it simply, ModPlug Tracker has always been and will always be an application that makes it easy to compose music. Using mostly a text-based event editing system, plus several expanded features including MIDI input and VSTs, this free software has enough user-friendliness and flexibility to please all composers from the EDM tracker to the experimentalist to the classical composer.
ModPlug Tracker (MPT) is first and foremost tracking software (self-contained, NOT a plugin), but many features have been added to give it a few sequencing capabilities. It can play software plugins that adhere to Cubase’s Virtual Synthesis Technology, called VSTs for short. It’s also possible to not only set up external MIDI devices for both input and output, but also chain together many sets of output routes that lead to the Master Audio.
MPT features
It’s totally FREE!
The workspace is intuitive and efficient, with a simple Windows-oriented interface, plenty of tooltips on most interactive items, and separate specific sections of work into tabs.
It allows for a rich set of options and preferences, including:
1.Ability to customize the GUI color (but no skins yet), including loading and saving color schemes.
2.Full mixing capabilities, including a global equalizer and other effects, up to 127 channels for pattern data (each with their own volume, pan, and plugin settings, as well as customizable channel names), and separate volume controls for sample playback, VST instruments, and global output.
3.Customizable event detail (ticks per row), audio playback detail (sample and bit rates), polyphony, and latency buffer.
4.Ability to automatically save the current file at intervals — and to a location — of your choosing.
5.Ability to customize most actions with keyboard shortcuts, including navigation, input, and opening dialog boxes.
It has a side panel with expandable directory view to locate relevant files quickly.
It can open or import an excellent range of readable track formats, including backward compatibility with files saved under previous versions of ModPlug Tracker.
It can export to .wav or .mp3 audio formats, as well as render individual patterns or channels.
It can use General MIDI instruments installed with Windows, or loaded from other sources.
There is a decent MIDI implementation through channel effects, including input and playback with external MIDI devices.
It can make full use of VST technology, with tentative accommodation for VST 2.4
It can process audio through many different sound drivers, including ASIO, which is now MPT’s default sound processing package.
It can apply alternate tunings (including scales and temperaments) to sample playback.
There is now a complete offline help manual for beginners and veterans alike!
There is ongoing development and improvements.
It’s part of a thriving community with its own website and forums.
Limitations
1.Limited control for editing of sample data.
2.Inability to directly load banks for VSTi’s.
3.Alternate temperaments cannot be applied to VSTi’s.
4.Can only use a text-based editing system; no piano-roll or musical score editing.
History
ModPlug was originally developed in 1997 by Olivier Lapicque as a plugin for Internet browsers to listen to tracking files (such as .mod and .it files). From this plugin he developed the ModPlug Player and the ModPlug Tracker. ModPlug Player can play a very wide variety of tracking files, and uses many different audio effects, such as graphic equalization, reverb, and Surround Sound. Although it is still available, the Player is not open-source nor is it being developed.
ModPlug Tracker became completely open-source in 2004, allowing the actual application to be developed and the code altered for the correction of long-standing bugs and the implementation of new features, such as the use of VSTs
Page 2

and alternate tunings. It has been rated as one of the top five free music trackers, and has a vibrant community at lpchip.com/modplug.
In this manual we will refer to this open-source version simply as ModPlug Tracker, or MPT for short, even as the application refers to itself as OpenMPT (to differentiate itself from the original program).
2. System Setup
System requirements
System requirements are few. All you need to run and use ModPlug Tracker is:
A Windows-compatible, at least a 32-bit computer, the newer the better
A working sound card, the newer the better
Windows 98 or later.
Expandability
Other options to make MPT a great user-friendly application:
MIDI-compatible external device, with the correct plug into your computer. See the Reference on MIDI for setting up a MIDI device for use in MPT.
External speakers or headphones, including Surround Sound or Quad-Stereo systems for soundcards that can allow those send configurations.
Software plugins, called VSTi’s, that are compatible with your processor speed and Windows OS.
Installation
Download the latest build of ModPlug Tracker that will work on your computer. (For developers who wish to work with the source code, download from sourceforge.net.) The application and its supplemental files are maintained in a .zip archive as well as an installer.
Unzip the archive to the folder of your choice; usually this would be “Program Files” but you are free to choose your own accessible folder. If you are using the installer software for ModPlug, you will asked where you wish to create the MPT folder. If you are updating a previous version, the installer will replace the old files and folders with any new ones as well as update the registry if necessary.
NOTE: As with all open-source software, updates may not be as stable as their previous versions, or features that you have become accustomed to may have been reworked in the new version. Altho the Installer will keep the old user files (by giving the files a new extension), it’s recommended you backup your previous version of MPT until you are satisfied with the upgrade.
When you open MPT for the first time, the General Options dialog will appear automatically to allow you to set up how you want MPT to run. There are many ways to customize MPT, but the main thing you want to start out with is setting options for the Soundcard. Click on the Sound Card tab, and consult the Reference section on Soundcard Options for determining how best to set up for your computer system. However, for most Windows systems, you should be able to use the default settings and jump right in.
Portability
If you’d like to use ModPlug on a Flashdrive or other removable media (maybe because you cannot run the application from the computer you’ll be working on), there is an option to keep MPT self-contained so that it does not leave a footprint on the computer’s system; this is called “portability.” Normally, using MPT’s installer affects the system registry, creates a new folder in the Settings directory, and uses the hard disk to keep autosaves and other external files. Portable Mode bypasses all of these. Here’s how to achieve complete portability for MPT:
If possible, use the ModPlug Installer software to create a new ModPlug setup on your removable. There is an option for installing a portable version of ModPlug.
If you need to do this manually, however, you’ll need an existing installation from a non-portable drive. Copy all of the files in the original MPT folder to a new folder on the portable drive.
If you don’t need to use previous configurations and settings that were already created, simply create a new text file in the portable MPT folder, open it in a text editor, and enter the following two lines:
Page 3

[Paths]
UseAppDataDirectory=0
Now save the file as mptrack.ini, and close it. Skip to .
If, on the other hand, you DO want to import your previous configurations (like keyboard shortcuts, tunings, and other preferences), you’ll need to navigate to the following folder (depending on your OS):
C:\My Computer\[My Hard Disk]\Documents and Settings\[User]\Application Data\OpenMPT or
C:\My Computer\[My Hard Disk]\Documents and Settings\[User]\Application Data\%APPDATA%\OpenMPT.
Open this folder and copy all of these files to the root directory of the portable folder). This includes mptrack.ini, Keybindings.mkb, plugin.cache, mptrack.ini in a text editor (such as NotePad) and find the line which says
after it:
UseAppDataDirectory=0
mptrack.exe (i.e., into the same and the tunings folder. Open [Paths]. Insert the following line
This will cause MPT to look in the same folder as itself for the necessary files/folders.
Close the file.
Be sure to adjust the paths in the General and the AutoSave pages of the Options dialog.
Now ModPlug is completely portable! If you’ll be working away from your main computer, be sure to copy all of your samples, instrument files, and plugins you need onto your portable drive (although they don’t have to be in the same folder as the application). If you wish to edit previously assembled tracks, those need to be copied as well. Consider using a Briefcase folder to make sure duplicate files on two different drives are kept updated.
IMPORTANT NOTES: If you load any tracks which uses plugins, or links to samples (like those in ITP tracks), on your non-portable drive when it is not connected to the computer where you composed the track, these will not load properly.
Tracks that use plugins will load, but you will be reminded that MPT can’t find the plugin where it expects it. Before opening such a track, you will need to re-establish the location of its plug-ins within the Plugin Manager, THEN open the track and everything should work properly. If you open the track first before re-establishing the plugins, DO NOT SAVE THE TRACK or you will lose all of the plugin settings. Close the track and reset the plugin locations first.
Tracks that use links to samples and instruments (ModPlug’s ITP format) will load the instrument slots but without access to the samples, they will not sound. The only way to edit such an ITP file is to first save the instruments to the portable drive and edit the track from the NON-portable drive, linking to the new instrument files that were saved on the portable drive.
It’s also a good idea that if you use plugins for tracks that need to be not only portable but sharable, that you
keep a separate copy of the plugin in the same folder as the track, and load that into MPT’s Plugin Manager dialog. (See the last section of the File Formats chapter concerning portable tracks for more info.)
Page 4

3. Basics of tracking
What is tracking?
To clear up initial confusion, a track in this context is a file of event data, usually denoting a single musical production. A track is often interchanged with the term song, but a song implies a musical progression in a complete form, which a track does not have to be. Assembling a track is of course called tracking.
Tracking in its simplest form is the control of timed data, called events. Much like sequencing, groups of events are assembled into patterns, which can then be arranged in an order list. Unlike sequencing, track events play samples that are part of the file. Tracking in its purest form does not call sounds from external sources, only from those within the file. ModPlug Tracker, however, allows for the use of external sounds sources as well as file-saved samples.
Difference between tracking and sequencing
Sequencing is the playback of event data from ONLY sound sources that are external to the song file. Most sequencing software is MIDI-ready, and often uses libraries to store data on how to configure the sound parameters within the synthesizer. Like tracking, sequencing events are grouped into patterns, but unlike tracking, each channel (called a “track” if it wasn’t confusing enough!) is assigned one instrument, unless a MIDI Program Change event is called within the track. Also, while sequencing software uses a more graphic interface which displays editable bars along a time line, tracking interfaces are more textual in nature, showing events in an alphanumeric list (although many sequencers have this event list to show details of note data). The best sequencers even display events in musical notation!
One of the differences between tracking and sequencing is how concurrent channels are played together. Generally in sequencing each channel has a pattern, and since each channel usually has its own instrument, a pattern played in one channel will sound different when the same pattern is played in another channel. Not so with tracking — patterns hold data for all channels at once; you cannot apply patterns to separate channels. (ModPlug uses the latter technology.)
Sequencing is almost entirely MIDI-driven, while tracking relies on simply altering internal sound data, called samples. Few trackers can edit very many aspects of the sample waveform, but they can manipulate the playback of them with Channel Effects. Sequencers by and large have very little manipulation of sample playback, instead relying on altering sound parameters within the sound source, but this control is minimal (which is why sounds must be set up before running them thru a sequencer). In almost all trackers and sequencers, true sample alteration is practically nonexistent; editing of samples must be done with third-party applications.
The advantage of sequencing over tracking is that a sequence file is a fraction in size of an equivalent track file. But the trade-off is that sequence files are not portable, as they can only play if connected to the external synthesizer from which the instruments originate AND it is run from its application. Tracking files, however, only need the correct application or plugin that can read the file format of the track.
To determine if an application is a tracker, just remember, it is NOT a tracker if it does not allow playback of internally stored sample data.
Page 5
4. Basics of ModPlug Tracker
Overview of the tracking interface
ModPlug Tracker was originally a tracking application, but through open development has gained some sequencer capabilities — the ability to play from external sound generators, including external MIDI synthesizers and “virtual synthesizers” called VSTi’s. Furthermore, MPT makes excellent use of the Windows environment, especially in Windows XP, using sliders and buttons for visual-based input, and allowing in many places for different types of parameter setting. The editor interface is mostly still textual in nature, but can be customized for better readability and efficacy.
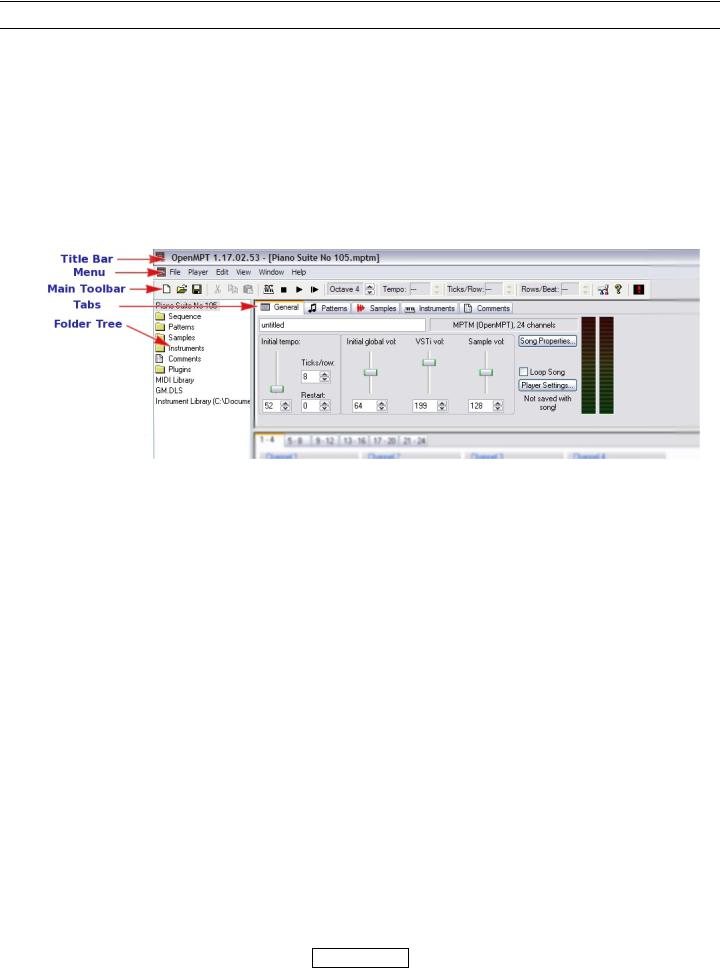
Shown below is the top part of the opening page. ModPlug Tracker’s window is resizable and movable, and you can expand it to full-screen viewing. If a file is open, it has its own within MPT’s window, and can be minimized, restored, maximized to MPT’s window, or closed without quitting ModPlug. Several files with their own windows can be open simultaneously, but only one can be active, receiving the input focus.
The Title Bar
The window title bar shows the ModPlug version number and the file that is currently active. If there is an asterisk (*) next to the track title, the track has been altered and changes will need to be saved to disk.
The Main Menu
ModPlug Tracker’s menu is accessible from any part of the program, altho some of its features may not be. Like most Windows applications, the menu is openable by keystrokes; just press the option key, then the letter that is underlined to choose the menu or a menu item. Here is the section detailing the menu items.
The Main Toolbar
Below the menu is the Main toolbar, which is visible and accessible from anywhere in the application. You can even pull the toolbar out of its slot and place it anywhere on the screen, by left-clicking on an empty space within the toolbar, holding the mouse down, and dragging it. You can also click-and-drag one of the borders to reshape the toolbar. Since each of the items in the toolbar can be assigned a keystroke, it doesn't have to be visible. You can hide (or show) the Main toolbar by right-clicking on any open spot in MPT’s window, and selecting “Main” from the contextual menu.
The Tabs
The interface is divided into five sections, placed within window tabs, which can be accessed from anywhere within the application. These tabs are labeled General, Patterns, Samples, Instruments, and Comments. (There is a Reference chapter devoted to details of these tabs here.)
The Folder Tree
On the left is the Folder Tree, which shows a list of all volumes on your system, and can be opened to show individual folders. This way you can easily locate samples, instruments, and other files to help you in assembling your tracks. To hide this panel, either click on the pane divider between the panel and the tabs, and slide it all the way to the left, or right-click on any open spot of MPT’s window, and select “Tree” from the contextual menu that appears.
Page 6
5. General setup
When you open ModPlug Tracker for the first time, the Options page is immediately visible, but you can dismiss this if you want to just dive right in. You can also open this dialog box any time by clicking on the Setup icon in the Main toolbar or opening the View menu in the Main menubar and selecting “Setup”.
Most of the preferences that are set in the Options page are stored in the file mptrack.ini and can be edited in a simple text editor. Generally, however, you want to make these changes within MPT so you can tell what you’re doing. Besides the .ini file, there are the .mkb files (which save the keyboard shortcuts), the .tun and .tc files (which store individual and collections of tunings respectively), and the plugin.cache file (which saves the locations and flags for the plug-ins that are being used for MPT). These files are kept in the folder
C:/[Hard Disk]/Documents and Settings/[User]/Application Data/OpenMPT
where [Hard Disk] is the name of the computer, and [User] is the name of the user who can use the computer. (some OSes also have an %APPDATA% folder in Application Data.) However, when using ModPlug in portable mode (such as on a removable device), all of these external files are kept in the root directory of the ModPlug Tracker application.
Below is a description of some of the changes that can be made in the Options page.
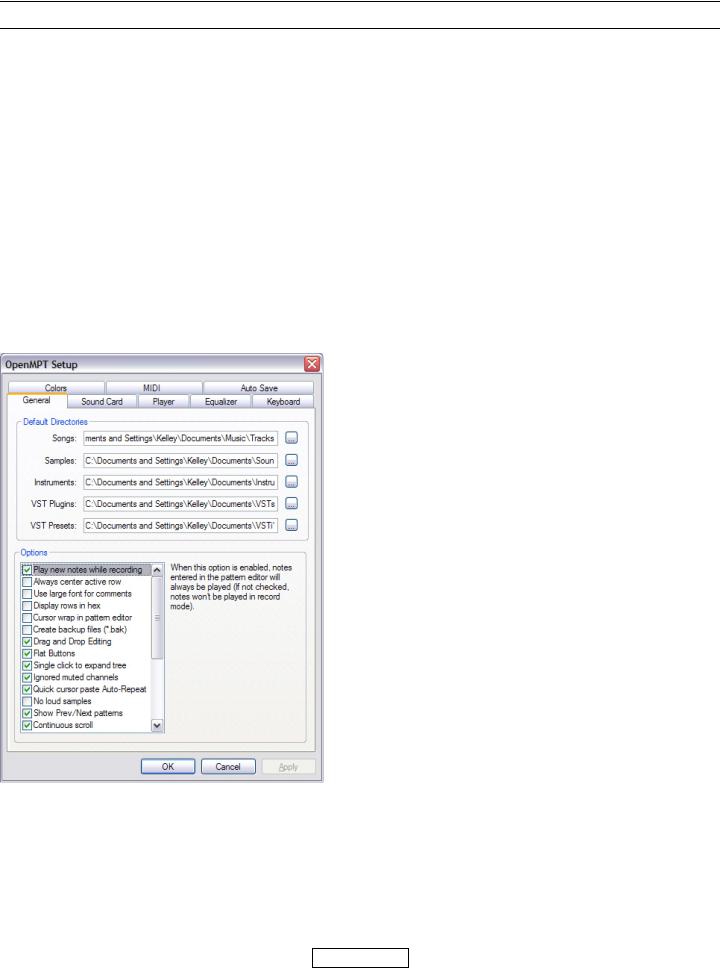
Miscellaneous options
The first tab of the Options page holds miscellaneous settings
— namely the paths to various relevant folders, and flags that make using MPT easier depending on what you’re accustomed to.
Most of the settings you can leave at their default setting if you’re new to tracking, but you can get details on these settings in the Reference section on the Options page. If you’d like MPT to revert to default folders when loading or saving songs, samples, instruments, plug-ins, or plugin presets, you can enter the path to them in the appropriate fields, or press the Browse button on the right to locate the folder directly.
Audio setup
There are 3 Options pages designed for setting up the audio input and output for MPT, under the Soundcard, Player, and Equalizer tabs. Here are the basics for applying these settings. More detailed information can found in the Reference Section for each tab.
Page 7
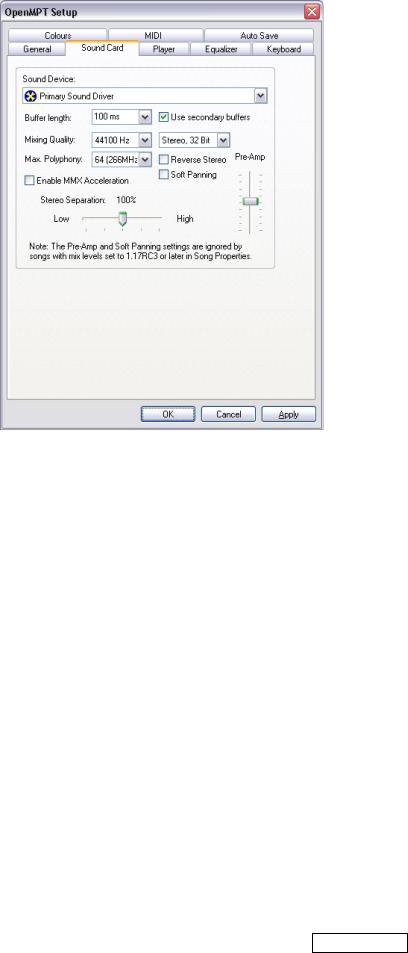
Soundcard Page
In this page you can select MPT’s output device thru your computer. Generally this would be your Primary Sound Driver, but if you have more than one you can select it by clicking on the Sound Device field. If you have an ASIO driver ModPlug will choose this by default.
The Buffer Length field is the amount of Latency you want to employ while using MPT. Basically the Latency setting describes the timing difference between the input or visual display and the audio output. For slower systems you should set the Buffer Length higher. If you have a really good system and you’re using few or no plugins, you can set this to a very low setting (plugins, however, increase processing load, so you would probably would want to set it in the midrange buffer length if you’re using any). For users who have chosen ASIO as their primary sound driver, you can set the Buffer Length to its lowest. For a more detailed description of this setting, see the Reference for the Soundcard page.
The Sample Rate (Mixing Quality) and Bit Depth can also be set, and normally you would leave this at the default setting, UNLESS you have a very slow system that will not be able to handle heavy amounts of audio processing (in which case you want to decrease the Sample Rate), OR if you are doing high-end
“professional” tracking and your system can handle the processing load (in which case you want to increase the Sample Rate). By decreasing either of these amounts, you may lose audial quality during playback, but you gain processing power.The Polyphony is the allowable number of notes that MPT will process at once. High-end computers (especially the newest models) can generally handle 32 or more, while older, low-end computers should have this set at 16 or less.
SUMMARY: If you find that your track “stutters” during playback, you may be trying to process more audio than your computer can handle. To troubleshoot, try doing the following in this order.
Increase Buffer Length to 200 ms.
Reduce the polyphony setting as much as you can. For a solo piano piece, you can probably reduce this to 8 with no tonal loss.
Reduce the Mixing Quality one step at a time to a minimum of 22050 Hz. Anything less than this can create a vast difference between what you hear and what will be recorded when you export the file to audio.
If you still encounter stuttering in playback, you’ll have reduce the number of plugins your using. If you have a VSTi that plays only a few notes or less, consider rendering the notes and importing these notes as samples (more info on rendering is found here). MPT can handle sample playback MUCH more easily than VSTi processing. Also, many VSTs have very high CPU usage and can soak up a large percentage of your processing power.
Page 8
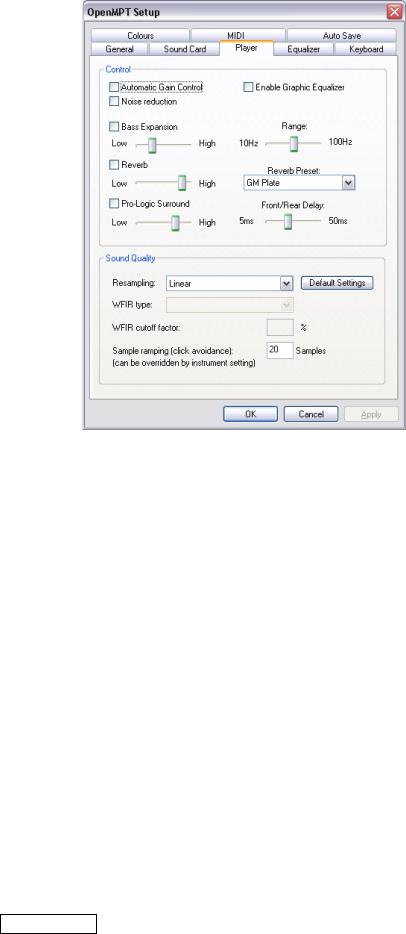
ModPlug Player page
This page has settings that depend on how you want your Windows machine to process audio, and is largely dependent on your machine’s capabilities and limitations. Keep in mind these settings are NOT saved with modules, but ARE applied to ALL tracks during playback and when exporting tracks to WAV or MP3 format.
In the upper part of the page, the Controls section, you can apply various playback functions to the master audio output. Most are self-explanatory, but in order for any of them to be applied, you must enable the appropriate checkboxes. For more details about this page, see the Reference section on the Player Options.
The Automatic Gain Control applies a limiter/ compressor to the Master Audio, increasing soft sounds while dampening loud volumes. You can also enable the Graphic Equalizer (the settings of which you can alter in the Equalizer page).
Check the ProLogic Surround box to have ModPlug use Surround Sound by dividing the signal between the output components. You must have an audio driver capable of Surround Sound for this to be effective. You can set the level of the Surround Sound mix as well as the delay to apply to the Front and Rear components.
The lower part of the page, the Sound Quality section, allows
you to set how ModPlug interpolates all samples it plays. If you’re using high quality samples, this section can be ignored. However, if you wish to do some downsampling to reduce the file size of the track, you may need to keep reading. The Reference section concerning Audio has more detailed explanations, but for the beginner it probably only helps to know what experimentation has taught us concerning resampling.
Testers have found that resampling with the Linear setting is the most primitive in mathematics but the harshest in sound quality. Cubic was found to be slightly better. With Polyphase, there is a definite improvement with only about 10% more processing power. Attenuating each sample’s cutoff is said to improve the overall “warmth” of the output. XMMS/Hamming has about the same results but with less CPU usage than even Linear. XMMS/Hann resampling sounds as if the midrange frequencies are “backgrounded” a little, while XMMS/Blackmann backgrounds the bass frequencies slightly.
Although determining the best resampling method is subjective, testers have picked XMMS/Hamming the best overall in sample interpolation quality. Before exporting tracks that use low-grade samples to audio, however, it’s best to do your own experimentation with the different algorithms.
MIDI Setup
ModPlug’s on-board MIDI implementation is limited, but thru free third-party plugins, it’s possible to expand MPT’s MIDI capabilities. If you’re using an external keyboard controller to input notes, make sure the controller is read by Windows (follow these instructions), then in the first field of this page you can specify the MIDI controller for input.
For details on these options see the Reference section on MIDI Options.
Page 9
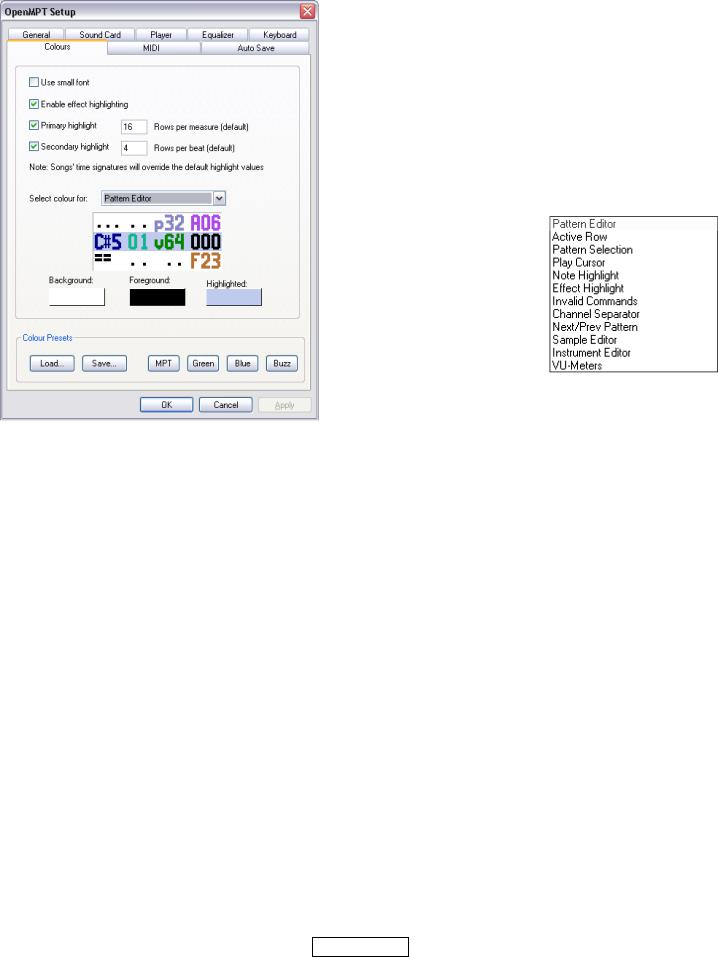
Display setup
While MPT doesn’t use skins or themes in its display scheme, you can set the colorization of some of the more important GUI elements from within the Colors page.
You can apply any of the four preset color schemes at the bottom if you’re used to using particular colors when tracking. Each of these are borrowed from other tracker applications so they may seem familiar. On the other hand you can devise your own color scheme, whether to help with the inspiration process or for better readability. You can also load a scheme someone else created or save your own.
There are 4 categories whose colors can be modified, which you can access by clicking on the Category Selection menu, shown here. The first 9 are for colors within the Pattern Editor.
As you select a different component to set colors for, various color boxes will appear below the
Preview box at the bottom. Click on any of these to call up a standard Windows color selection dialog, where you can choose your color. As you change a color the Preview box allows you to
see what it will look like in its context (except for the VU-Meters).
There are also some basic settings for the Pattern Editor display here.
Use Small Font: Check this to use a smaller, slightly less readable font size in exchange for displaying more rows and channels in the Pattern Editor.
Enable Effect Highlighting: Check this to use the colorization scheme you’ve selected for the text in the Pattern Editor. If this is not checked, the text is not colorized.
Primary/Secondary Highlight: Check one or both of these boxes to use MPT’s “time signature” to determine how the rows are highlighted. (The time signature is set in the Song Properties dialog.) The Primary Highlight is the same color as the “Highlighted” box for the Pattern Editor component, and is equivalent to the Rows per Measure of MPT’s time signature. The Secondary Highlight is a lighter version of the Primary Highlight, and equates to the Rows-per-Beat highlight of the time signature.
Multiview
While you can’t move the tabs to their own position, you can get a more complete look at your track with Multiview, as shown in the graphic below.
In the next graphic, we’re looking at the same track under two different tabs at the same time.
Page 10