

Professional Visual Studio 2005 (2006) [eng]
.pdfChapter 31
Now you’re ready to drag the Customer node onto the form design surface. This will automatically add controls for each of the columns you have specified. It will also add a BindingSource, a BindingNavigator, the AdventureWorksDataSet, and a CustomerTableAdapter to the form — Figure 31-1 shows the basic layout of the form, as well as the nonvisual controls.
Figure 31-1
At this point you can build and run this application and navigate through the records using the navigation control, and you can also take the components apart to understand how they interact. Start with the
AdventureWorksDataSet and the CustomerTableAdapter, as they carry out the background grunt work of retrieving information and persisting changes to the database. The AdventureWorksDataSet that is added to this form is actually an instance of the AdventureWorksDataSet class that was created by the Data Source Configuration Wizard. This instance will be used to store information for all the tables on this form. To populate the DataSet, call the Fill method. If you open the code file for the form, you will see that the Fill command has been added to the form’s Load event handler. There is no requirement for this to occur while the form is loading — for example, if parameters need to be passed to the SELECT command, then you might need to input values before clicking a button to populate the DataSet.
Private Sub Form1_Load(ByVal sender As System.Object, _
ByVal e As System.EventArgs) Handles MyBase.Load
Me.CustomerTableAdapter.Fill(Me.AdventureWorksDataSet.Customer)
End Sub
As you add information to this form, you’ll also add TableAdapters to work with different tables within the AdventureWorksDataSet.
396

Data Binding and Object Data Sources
BindingSource
The next item of interest is the CustomerBindingSource that was automatically added to the nonvisual part of the form designer. This control is used to wire up each of the controls on the design surface with the relevant data item. In fact, this control is just a wrapper for the CurrencyManager. However, using a BindingSource considerably reduces the number of event handlers and custom code that you have to write. Unlike the AdventureWorksDataSet and the CustomerTableAdapter — which are instances of the strongly typed classes with the same names — the CustomerBindingSource is just an instance of the regular BindingSource class that ships with the .NET Framework.
Take a look at the properties of the CustomerBindingSource so you can see what it does. Figure 31-2 shows the Properties window for the CustomerBindingSource. The two items of particular interest are the DataSource and DataMember properties. The drop-down list for the DataSource property is expanded to illustrate the list of available Data Sources. The instance of the AdventureWorksDataSet that was added to the form is listed under Form1 List Instances. Selecting the AdventureWorksDataSet type under the Project Data Sources node creates another instance on the form instead of reusing the existing DataSet. In the DataMember field, you need to specify the table to use for data binding. Later, you’ll see how the DataMember field can be used to specify a foreign key relationship so you can show linked data.
Figure 31-2
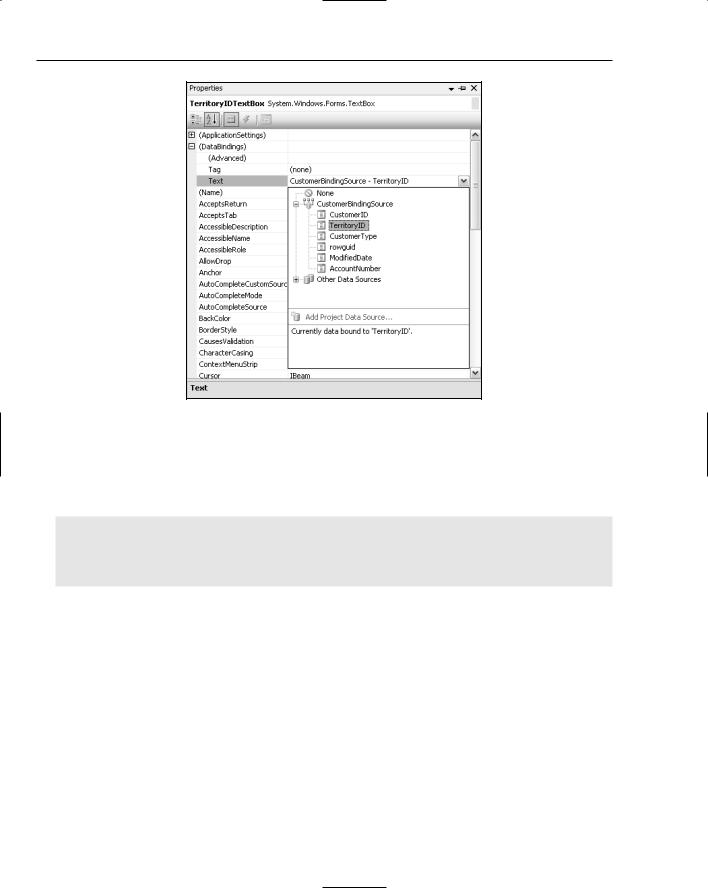
So far you have specified that the CustomerBindingSource will bind data in the Customer table of the AdventureWorksDataSet. What remains is to bind the individual controls on the form to the BindingSource and the appropriate column in the Customer table. To do this you need to specify a DataBinding for each control. Figure 31-3 shows the Properties grid for the TerritoryID textbox, with the DataBindings node expanded to show the binding for the Text property.
397
Chapter 31
Figure 31-3
Again, enable the drop-down list so you can see that the Text property is being bound to the TerritoryID field of the CustomerBindingSource. Because the CustomerBindingSource is bound to the Customer table, this is actually the TerritoryID column in that table. If you look at the designer file for the form, you can see that this binding is set up using a new Binding, as shown in the following snippet:
Me.TerritoryIDTextBox.DataBindings.Add( _
New System.Windows.Forms.Binding(“Text”, _ Me.CustomerBindingSource, _ “TerritoryID”, True) _
)
A Binding is used to ensure that two-way binding is set up between the Text field of the TerritoryID textbox and the TerritoryID field of the CustomerBindingSource. The controls for AccountNumber, CustomerType, and ModifiedDate all have similar bindings between their Text properties and the appropriate fields on the CustomerBindingSource.
BindingNavigator
The last control to cover is the CustomerBindingNavigator component, which is an instance of the BindingNavigator class. Although this control appears in the nonvisual area of the design surface, it has a visual representation in the form of the navigation toolstrip that is initially docked to the top of the form. As with regular toolstrips, this control can be docked to any edge of the form. In fact, in many ways the BindingNavigator behaves the same way as a toolstrip in that buttons and other controls can be added to the Items list. When the BindingNavigator is initially added to the form, a series of buttons are added for standard data functionality, such as moving to the first or last item, moving to the next or previous item, and adding, removing, and saving items.
398
Data Binding and Object Data Sources
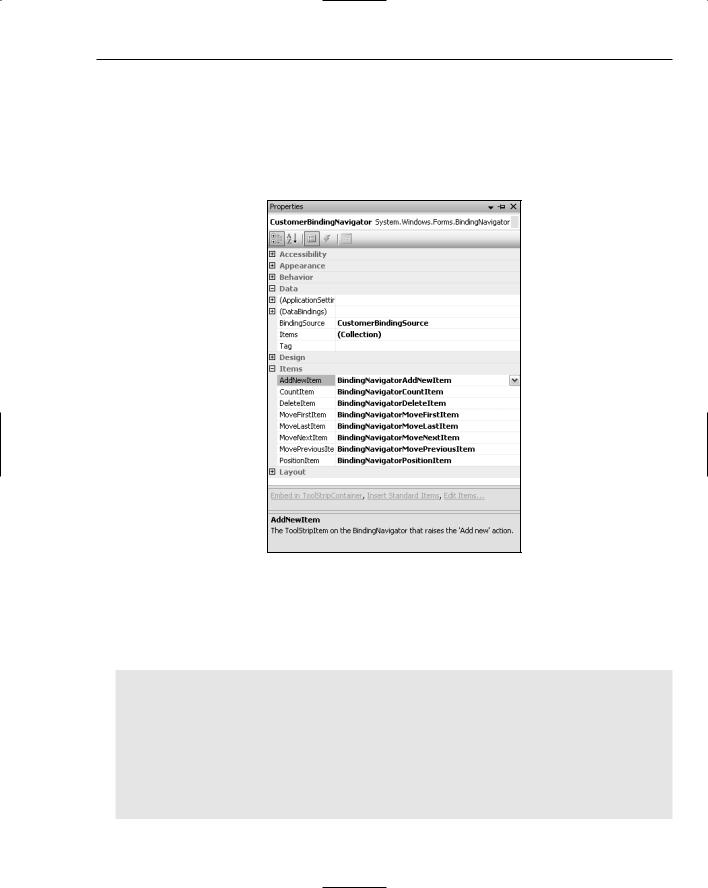
What is neat about the BindingNavigator is that it not only creates these standard controls, but also wires them up for you. Figure 31-4 shows the Properties window for the BindingNavigator, with the Data and Items sections expanded. In the Data section you can see that the associated BindingSource is the CustomerBindingSource, which will be used to perform all the actions implied by the various button clicks. The Items section plays an important role, as each property defines an action, such as AddNewItem. The value of the property defines the ToolStripItem to which it will be assigned — in this case, the BindingNavigatorAddNewItem button.
Figure 31-4
Behind the scenes, when this application is run and this button is assigned to the AddNewItem property, the OnAddNew method is wired up to the Click event of the button. This is shown in the following snippet, extracted using Reflector from the BindingNavigator class. The AddNewItem property calls the WireUpButton method, passing in a delegate to the OnAddNew method:
Public Property AddNewItem As ToolStripItem Get
If ((Not Me.addNewItem Is Nothing) AndAlso Me.addNewItem.IsDisposed) Then Me.addNewItem = Nothing
End If
Return Me.addNewItem End Get
Set(ByVal value As ToolStripItem) Me.WireUpButton(Me.addNewItem, value, _
New EventHandler(AddressOf Me.OnAddNew))
End Set
399

Chapter 31
End Property
Private Sub OnAddNew(ByVal sender As Object, ByVal e As EventArgs) If (Me.Validate AndAlso (Not Me.bindingSource Is Nothing)) Then
Me.bindingSource.AddNew
Me.RefreshItemsInternal
End If End Sub
Private Sub WireUpButton(ByRef oldButton As ToolStripItem, _ ByVal newButton As ToolStripItem, _ ByVal clickHandler As EventHandler)
If (Not oldButton Is newButton) Then
If (Not oldButton Is Nothing) Then
RemoveHandler oldButton.Click, clickHandler
End If
If (Not newButton Is Nothing) Then
AddHandler newButton.Click, clickHandler
End If
oldButton = newButton Me.RefreshItemsInternal
End If End Sub
The OnAddNew method performs a couple of important actions. First, it forces validation of the active field, which is examined later in this chapter. Second, and the most important aspect of the OnAddNew method, it calls the AddNew method on the BindingSource. The other properties on the Binding Navigator also map to corresponding methods on the BindingSource, and it is important to remember that the BindingSource, rather than the BindingNavigator, does the work when it comes to working with the Data Source.
Data Source Selections
Now that you have seen how the BindingSource works, it’s time to improve the user interface. At the moment, the TerritoryID is being displayed as a text box, but this is in fact a foreign key to the Sales Territory table. This means that if a user enters random text, then an error will be thrown when you try to commit the changes. Because the list of territories is defined in the database, it would make sense to present a drop-down list that enables users to select the territory, rather than specify the ID. To add the drop-down, replace the TextBox control with a ComboBox control, and bind the list of items in the dropdown to the SalesTerritory table in the database.
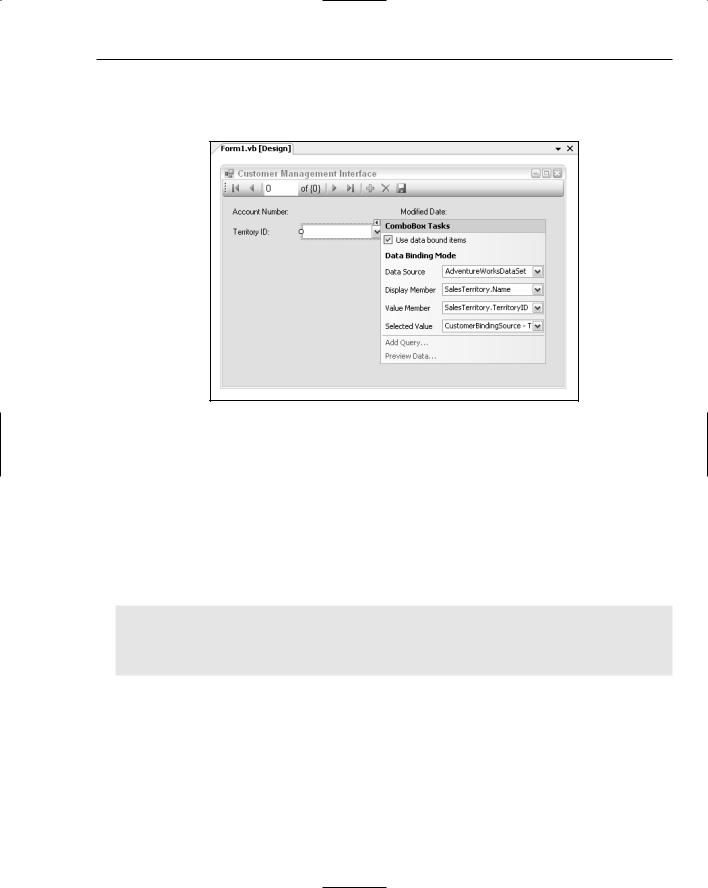
Start by removing the TerritoryID TextBox. Next, add a ComboBox control from the toolbar. With the new ComboBox selected, note that a smart tag is attached to the control. Expanding this tag and checking the “Use data bound items” checkbox will open the Data Binding Mode options, as shown in Figure 31-5. Take this opportunity to rearrange the form slightly so the controls line up.
You need to define four things to get the data binding to work properly. The first is the Data Source. In this case, select the existing AdventureWorksDataSet that was previously added to the form. Within this Data Source, set the Display Member, the field that is to be displayed, to be equal to the Name column of the SalesTerritory table. The Value Member, which is the field used to select which item to display, is set to the TerritoryID column. These three properties configure the contents of the drop-down
400
Data Binding and Object Data Sources
list. The last property you need to set determines which item will be selected and what property to update when the selected item changes in the drop-down list. This is the Selected Value property; in this case, set it equal to the TerritoryID field on the existing CustomerBindingSource object.
Figure 31-5
In the earlier discussion about the DataSet and the TableAdapter, recall that to populate the Customer table in the AdventureWorksDataSet, you need to call the Fill method on the CustomerTableAdapter. Although you have wired up the TerritoryID drop-down list, if you run what you currently have, there would be no items in this list, as you haven’t populated the DataSet with any values for the SalesTerritory table. To retrieve these items from the database, add a TableAdapter to the form and call the Fill method when the form loads. When you added the AdventureWorksDataSet to the data source list, it not only created a set of strongly typed tables, it also created a set of table adapters. These are automatically added to the Toolbox under the Components tab. In this case, drag the SalesTerritoryTableAdapter onto the form and add a call to the Fill method to the Load event handler for the form. You should end up with the following:
Private Sub Form1_Load(ByVal sender As System.Object, _
ByVal e As System.EventArgs) Handles MyBase.Load Me.SalesTerritoryTableAdapter.Fill(Me.AdventureWorksDataSet.SalesTerritory) Me.CustomerTableAdapter.Fill(Me.AdventureWorksDataSet.Customer)
End Sub
Now when you run the application, instead of having a text box with a numeric value, you have a convenient drop-down list from which to select the Territory.
BindingSource Chains
At the moment, you have a form that displays some basic information about a customer, such as Account Number, Sales Territory ID, and Customer Type. This information by itself is not very interesting, as it really doesn’t tell you who the customer is or how to contact them. Before adding more information to
401

Chapter 31
this form, you need to limit the customer list. There are actually two types of customers in the database, Individuals and Stores, as indicated by the Customer Type field. For this example, you are only interested in Individuals, as Stores have a different set of information stored in the database. The first task is to open the AdventureWorksDataSet in the design window, click on the CustomerTableAdapter, select the SelectCommand property, and change the query to read as follows:
SELECT |
CustomerID, CustomerType, TerritoryID, rowguid, |
|
ModifiedDate, AccountNumber |
FROM |
Sales.Customer |
WHERE |
(CustomerType = ‘I’) |
Now that you’re dealing only with individual customers, you can remove the Customer Type information from the form.
To present more information about the customers, you need to add information from the Individual and Contact tables. The only column of interest in the Individual table is Demographics. From the Data Sources window, expand the Customer node, followed by the Individual node. Set the Demographics node to Textbox using the drop-down and then drag it onto the form. This will also add an Individual BindingSource and an IndividualTableAdapter to the form.
When you run the application in this state, the demographics information for each Customer is displayed. What is going on here to automatically link the Customer and Individual tables? The trick is in the new BindingSource. The DataSource property of the IndividualBindingSource is the CustomerBindingSource. In the DataMember field, you can see that the IndividualBindingSource is binding to the FK_Individual_Customer_CustomerID relationship, which of course is the relationship between the Customer table and the Individual table. This relationship will return the collection of rows in the Individual table that relate to the current Customer. In this case, there will only ever be a single Individual record, but, for example, if you look at the relationship between an Order and the OrderDetails table, there might be a number of entries in the OrderDetails table for any given Order.
As you probably have noticed, the Individual table is actually a many-to-many joining table for the Customer and Contact tables. On the Customer side, this is done because a Customer might be either an Individual or a Store; and similarly on the Contact side, not all Contacts are individual customers. The Data Sources window doesn’t handle this many-to-many relationship very well, as it can only display parent-child (one-to-many) relationships in the tree hierarchy. Under the Contact node there is a link to the Individual table, but this won’t help because dragging this onto the form will not link the BindingSources correctly. Unfortunately, there is no out-of-the-box solution to this problem within Visual Studio 2005. However, the following paragraphs introduce a simple component that you can use to give you designer support for many-to-many table relationships.
Begin by completing the layout of the form. For each of the fields under the Contact node, you need to specify whether you want them to be displayed or not. Then set the Contact node to Details, and drag the node onto the form. This will again add a ContactBindingSource and a ContactTableAdapter to the form.
To establish the binding between the IndividualBindingSource and the ContactBindingSource, you need to trap the ListChanged and BindingComplete events on the IndividualBindingSource. Then, using the current record of the IndividualBindingSource, apply a filter to the Contact BindingSource so only related records are displayed. Instead of manually writing this code every time you have to work with a many-to-many relationship, it’s wise to create a component to do the work for
402

Data Binding and Object Data Sources
you, as well as give you design-time support. The following code is divided into three regions. The opening section declares the fields, the constructor, and the Dispose method. This is followed by the Designer Support region, which declares the properties and helper methods that will be invoked to give you design-time support for this component. Lastly, the remaining code traps the two events and places the filter on the appropriate BindingSource:
Imports System.ComponentModel
Imports System.Drawing.Design
Public Class ManyToMany
Inherits Component
Private WithEvents m_LinkingBindingSource As BindingSource
Private m_Relationship As String
Private m_TargetBindingSource As BindingSource
Public Sub New(ByVal container As IContainer) MyBase.New()
container.Add(Me) End Sub
Protected Overrides Sub Dispose(ByVal disposing As Boolean)
If disposing Then
Me.TargetBindingSource = Nothing
Me.Relationship = Nothing
End If
MyBase.Dispose(disposing)
End Sub
#Region “Designer Support”
Public Property LinkingBindingSource() As BindingSource Get
Return m_LinkingBindingSource End Get
Set(ByVal value As BindingSource)
If Not m_LinkingBindingSource Is value Then m_LinkingBindingSource = value
End If End Set
End Property
<RefreshProperties(RefreshProperties.Repaint), _ Editor(“System.Windows.Forms.Design.DataMemberListEditor, System.Design,
Version=2.0.0.0, Culture=neutral, PublicKeyToken=b03f5f7f11d50a3a”, _ GetType(UITypeEditor)), DefaultValue(“”)> _
Public Property Relationship() As String Get
Return Me.m_Relationship End Get
Set(ByVal value As String)
If (value Is Nothing) Then value = String.Empty
End If
403

Chapter 31
If Me.m_Relationship Is Nothing OrElse _
Not Me.m_Relationship.Equals(value) Then
Me.m_Relationship = value End If
End Set End Property
<AttributeProvider(GetType(IListSource)), _ RefreshProperties(RefreshProperties.Repaint), _ DefaultValue(CType(Nothing, String))> _
Public Property TargetBindingSource() As BindingSource Get
Return Me.m_TargetBindingSource End Get
Set(ByVal value As BindingSource)
If (Me.m_TargetBindingSource IsNot value) Then Me.m_TargetBindingSource = value Me.ClearInvalidDataMember()
End If End Set
End Property
<Browsable(False)> _
Public ReadOnly Property DataSource() As BindingSource Get
Return Me.TargetBindingSource End Get
End Property
Private Sub ClearInvalidDataMember()
If Not Me.IsDataMemberValid Then
Me.Relationship = “”
End If
End Sub
Private Function IsDataMemberValid() As Boolean If String.IsNullOrEmpty(Me.Relationship) Then
Return True End If
Dim collection1 As PropertyDescriptorCollection = _ ListBindingHelper.GetListItemProperties(Me.TargetBindingSource)
Dim descriptor1 As PropertyDescriptor = collection1.Item(Me.Relationship) If (Not descriptor1 Is Nothing) Then
Return True End If
Return False End Function
#End Region
#Region “Filtering”
Private Sub BindingComplete(ByVal sender As System.Object, _
ByVal e As System.Windows.Forms.BindingCompleteEventArgs) _ Handles m_LinkingBindingSource.BindingComplete
BindNow()
404

Data Binding and Object Data Sources
End Sub
Private Sub ListChanged(ByVal sender As System.Object, _
ByVal e As System.ComponentModel.ListChangedEventArgs) _ Handles m_LinkingBindingSource.ListChanged
BindNow() End Sub
Private Sub BindNow()
If Me.DesignMode Then Return
If Me.TargetBindingSource Is Nothing OrElse _ Me.TargetBindingSource.List.Count <= 0 Then Return
Dim childColumn As String = CType(Me.TargetBindingSource.List, DataView).Table.ChildRelations(Me.Relationship).ChildColumns(0).ColumnName
Dim parentColumn As String = CType(Me.TargetBindingSource.List, DataView).Table.ChildRelations(Me.Relationship).ParentColumns(0).ColumnName
Dim filterString As String = “”
For Each row As DataRowView In LinkingBindingSource.List
If Not filterString = “” Then filterString &= “ OR “ filterString &= childColumn & “= ‘“ & row(parentColumn) & “‘“
Next
Me.m_TargetBindingSource.Filter = filterString Me.m_TargetBindingSource.EndEdit()
End Sub #End Region
End Class
Adding this component to your solution will add it to the Toolbox, from which it can be dragged onto the nonvisual area on the designer surface. In Figure 31-6, you can see that you can now set the LinkingBindingSource property to be the BindingSource for the linking table — in this case, the IndividualBindingSource. You also have designer support for selecting the TargetBindingSource— the ContactBindingSource — and the Relationship, which in this case is FK_Individual_Contact_ ContactId. The events on the LinkingBindingSource are automatically wired up using the Handles keyword, and when triggered they invoke the BindNow method, which sets the filter on the Target BindingSource.
When you run this application, you can easily navigate between customer records. In addition, not only is the data from the Customer table displayed; you can also see the information from both the Individual table and the Contact table, as shown in Figure 31-7. Notice that the text box for the Email Promotion column has been replaced with a checkbox. This can be done the same way that you replaced the TerritoryID text box: by dragging the checkbox from the Toolbox and then using the DataBindings node in the Properties window to assign the EmailPromotion field to the checked state of the checkbox.
405