

3D Game Programming All In One (2004)
.pdf598Chapter 21 ■ Creating the Game Mission
datablock ParticleEmitterData(CampfireSmokeEmitter)
{
ejectionPeriodMS = 20; periodVarianceMS = 5;
ejectionVelocity = |
0.25; |
||
velocityVariance = |
0.20; |
||
thetaMin |
= |
0.0; |
|
thetaMax |
= |
90.0; |
|
particles = CampfireSmoke;
};
datablock ParticleEmitterNodeData(CampfireSmokeEmitterNode)
{
timeMultiple = 1;
};
Save your work and then launch Koob. Locate the campfire and face it in camera fly mode (press F8). Open the World Editor (press F11) and then enter the World Editor Creator (press F4). Browse the Tree view until you locate Mission Objects, environment, particleEmitter. Click it to place another particle emitter.
You will get the Building Object: ParticleEmitterNode dialog box. Using the illustration as a guide, choose CampfireSmokeEmitterNode from the datablock list, and then choose CampfireSmokeEmitter from the Particle data list (see Figure 21.2).
After the smoke appears, move it with the cursor until it's positioned directly over the campfire. Press F11 to get out of the editor, grab some s'mores, and get cookin'!
As you can see, ParticleEmitterNodes are useful for creating nodes that are stationary but animated. Place them in your world by adding a datablock and emitter references in your mission file, either through the Torque World Creator or by directly editing the mission file.
Table 21.11 describes the significant properties of the ParticleEmitterNode datablock. This describes the actual node object that is inserted in a mission file for a freestanding particle emitter.
Figure 21.2 Adding smoke.
Team LRN

Building the World |
599 |
|
Table 21.11 |
ParticleEmitterNode Properties |
|
|
Property |
Description |
|
|
velocity |
Acts as a master speed control modifying the settings for the |
|
|
|
ParticleEmitterNodeData, ParticleData, and ParticleEmitterData datablocks. |
|
|
datablock |
The name of the ParticleEmitterNodeData defined elsewhere that will be used. |
|
|
emitter |
The name of the ParticleEmitterData defined elsewhere that will be used. |
|
|
|
|
|
Now, if you look at Figure 21.3, you'll see the relationship between the various datablocks involved in particles. The items in rectangles need to be defined somehow—you've seen how to do this. The one gotcha in the diagram is that the items in the dashed rectangles only need to be defined when placing freestanding particles in the game world. When you attach particles to objects like the player or vehicles, only the datablocks shown in the solid rectangles (ParticleData, and ParticleEmitterData) need to be defined.
Table 21.12 describes the significant properties of the ParticleEmitterNodeData datablock.
|
Table 21.12 |
ParticleEmitterNodeData Property |
|
|
Property |
Description |
|
|
timeMultiple |
Ranges from 0.01 to 100.0, specifying how often the particles are emitted |
|
|
|
from the node. Smaller values are for shorter time intervals between |
|
|
|
emissions, which means there is a higher emission frequency. |
|
|
|
|
|
There is only one parameter in this datablock: Multiple. You can create any number of these datablocks with different settings and names.
Table 21.13 describes the significant properties of the ParticleEmitterData datablock.
Figure 21.3 |
Particle system elements. |
Team LRN

600 Chapter 21 ■ Creating the Game Mission
Table 21.13 ParticleEmitterData Properties
Property |
Description |
ejectionPeriodMS |
Controls how often a particle is emitted in milliseconds (ms). A value |
|
of 1000 equals 1 particle per second (1 ms minimum). |
periodVarianceMS |
Introduces randomness to the ejection period. The variance must be |
|
less than ejectionPeriodMS and less than the lifetimeMS setting |
|
in the ParticleData section. |
ejectionVelocity |
Controls how fast the particle image is moved along the emission |
|
vector. Must be equal to or greater than 0, up to 3 meters per |
|
second maximum. |
velocityVariance |
Introduces randomness to the ejectionVelocity. The variance must |
|
be less than ejectionVelocity. |
ejectionOffset |
Modifies the start position of the particle ejection to occur at an |
|
offset along the ejection vector. |
thetaMax, thetaMin |
Sets the range (in degrees) for rotation around the X-axis of the |
|
ParticleNode object. thetaMin must be less than thetaMax, and |
|
both must be in the range of 0.0 to 180 degrees. The particle |
|
generator will randomly pick a value between those limits. Think of |
|
these properties together as "how high" the emitter's "aim" is. |
phiReferenceVel, phiVariance |
Sets the rotation angle around the Z-axis. Both arguments must be |
|
in the range of 0.0 to 180 degrees with phiVariance less than |
|
phiReferenceVel. Think of these properties together as the |
|
"direction" the emitter is pointing. |
overrideAdvances |
Defaults to false. When set to true, this will disable updating the |
|
particle as soon as it is created. This can be used to clean up |
|
particles generated by fast-moving objects. |
orientParticles |
Defaults to false. When set to false, the particle image is presented |
|
as a billboard that always faces the camera. When set to true, the |
|
particle image is oriented with respect to the ejection vector. |
orientOnVelocity |
Defaults to false. When set to true, the particle is displayed oriented |
|
with respect to the ejection vector. At the start the particle faces the |
|
screen, because velocity at the very beginning is 0. |
particles |
Contains the name of the ParticleData datablock to use. Multiple |
|
ParticleData datablocks can be specified in the string, separated |
|
by tab characters. The particle engine will cycle through the list |
|
repeatedly. |
lifetimeMS |
Defines how long this emitter will generate particles. It cannot be a |
|
negative value. A setting of 0 specifies no time limit. If not specified, |
|
then the default is 0. |
lifetimeVarianceMS |
Introduces randomness to the lifetime of the emitter. This value must |
|
be less than (and not equal to nor greater than) lifetimeMS. |
useEmitterSizes |
Does nothing if this datablock belongs to a ParticleEmitterNode. |
|
Otherwise, when set to true, use emitter-specified sizes instead of |
|
datablock sizes. |
useEmitterColors |
Does the same as useEmitterSizes, but for colors. |
Team LRN

Building the World |
601 |
Table 21.14 describes the significant properties of the ParticleData datablock.
Table 21.14 ParticleData Properties
Property |
Description |
textureName |
Specifies path and file name of a PNG or JPG image. Particle textures use |
|
black for the image areas that will be treated as the alpha (transparency) |
|
channel. PNG images will also use black for the transparent areas, but will |
|
also alternatively use the real alpha channel for transparent image regions |
|
if one is included. If a real alpha channel is specified in a PNG image, then |
|
black will not be used for transparency. Images must be sized in powers of |
|
2, to a maximum of 512 by 512 pixels. |
useInvAlpha |
Switches from using black to using white for transparent regions. |
inheritedVelFactor |
Specifies how much of a parent object's velocity should be imparted in |
|
particles emitted. |
constantAcceleration |
Specifies acceleration rate for each particle along the ejection vector. |
dragCoefficient |
Specifies deceleration rate for each particle along the ejection vector. |
windCoefficient |
Specifies how much the game world's wind velocity vector should be |
|
imposed on particles emitted. |
gravityCoefficient |
Specifies acceleration rate for each particle vertically. Positive values |
|
indicate acceleration toward the ground. |
lifetimeMS |
Controls how long the particle image is displayed as it follows its ejection |
|
vector. Short lifetimes have a pronounced strobe effect. Default is 1000 (1 |
|
second) with a minimum value of 100. |
lifetimeVarianceMS |
Introduces randomness to the lifetime of the particle. This value must be |
|
less than (and not equal to nor greater than) lifetimeMS. |
spinSpeed |
Dictates how fast images will be randomly rotated around the vertical axis, |
|
if particles aren't set to be billboarded using the orientParticles or |
|
orientOnVelocity properties of the ParticleEmitterData. |
spinRandomMax |
Specifies the maximum allowable angle that a particle image can be |
|
randomly rotated. Allowable range is 10000.0 to +10000.0. |
|
spinRandomMax must be greater than spinRandomMin. |
spinRandomMin |
Specifies the minimum allowable angle that a particle image can be |
|
randomly rotated. Allowable range is 10000.0 to +10000.0. |
|
spinRandomMin must be less than spinRandomMax. |
animateTexture |
Allows use of animated particle image textures, when set to true. |
framesPerSec |
Specifies the animation frame rate. |
animTexName |
Specifies a DML file that contains a list of texture image files. Each file is a |
|
single frame in the animation. |
colors[n] |
Specifies the color interpolation values for three sequences of particle |
|
emissions. |
sizes[n] |
Specifies the scale interpolation values for three sequences of particle |
|
emissions. |
times[n] |
Specifies the time stamp values that pin the moments for the three particle |
|
emission sequences. |
Team LRN

602Chapter 21 ■ Creating the Game Mission
Waterfall
As promised, we will build a waterfall. Add the following particle system datablocks to your particles.cs file:
datablock ParticleData(WFallAParticle)
{
textureName = "~/data/particles/splash"; dragCoefficient = 0.0; gravityCoefficient = 0.5; windCoefficient = 1.0; inheritedVelFactor = 2.00;
lifetimeMS = 15000; lifetimeVarianceMS = 2500; useInvAlpha = false; spinRandomMin = -30.0; spinRandomMax = 30.0; colors[0] = "0.6 0.6 0.6 0.1"; colors[1] = "0.6 0.6 0.6 0.1"; colors[2] = "0.6 0.6 0.6 0.0"; sizes[0] = 5;
sizes[1] = 10; sizes[2] = 15; times[0] = 0.0; times[1] = 0.5; times[2] = 1.0; };
datablock ParticleEmitterData(WFallAEmitter)
{
ejectionPeriodMS = 10; periodVarianceMS = 5; ejectionVelocity = 0.55; velocityVariance = 0.30; thetaMin = 0.0; thetaMax = 90.0;
particles = WFallAParticle; };
datablock ParticleEmitterNodeData(WFall1EmitterNode)
{
timeMultiple = 1; };
//------------------------------
datablock ParticleData(WFallBParticle)
Team LRN

Building the World |
603 |
{
textureName = "~/data/particles/splash"; dragCoefficient = 0.0;
gravityCoefficient = -0.1; // rises slowly inheritedVelFactor = 2.00;
lifetimeMS = 3000; lifetimeVarianceMS = 500; useInvAlpha = false; spinRandomMin = -30.0; spinRandomMax = 30.0; colors[0] = "0.4 0.4 0.7 0.1"; colors[1] = "0.5 0.6 0.8 0.1"; colors[2] = "0.6 0.6 0.9 0.0"; sizes[0] = 10;
sizes[1] = 15; sizes[2] = 20; times[0] = 0.0; times[1] = 0.5; times[2] = 1.0; };
datablock ParticleData(WFallCParticle)
{
textureName = "~/data/particles/splash"; dragCoefficient = 0.0;
gravityCoefficient = -0.1; // rises slowly inheritedVelFactor = 2.00;
lifetimeMS = 3000; lifetimeVarianceMS = 300; useInvAlpha = false; spinRandomMin = -30.0; spinRandomMax = 30.0; colors[0] = "0.4 0.4 0.5 0.1"; colors[1] = "0.5 0.5 0.6 0.1"; colors[2] = "0.0 0.0 0.7 0.0"; sizes[0] = 5;
sizes[1] = 5; sizes[2] = 5; times[0] = 0.0; times[1] = 0.5; times[2] = 1.0; };
datablock ParticleEmitterData(WFallBParticleEmitter)
Team LRN
604 Chapter 21 ■ Creating the Game Mission
{
ejectionPeriodMS = 15; periodVarianceMS = 5; ejectionVelocity = 0.25; velocityVariance = 0.10; thetaMin = 0.0; thetaMax = 90.0;
particles = "WFallBParticle" TAB "WFallCParticle"; };
datablock ParticleEmitterNodeData(WFall2ParticleEmitterNode)
{
timeMultiple = 1; };
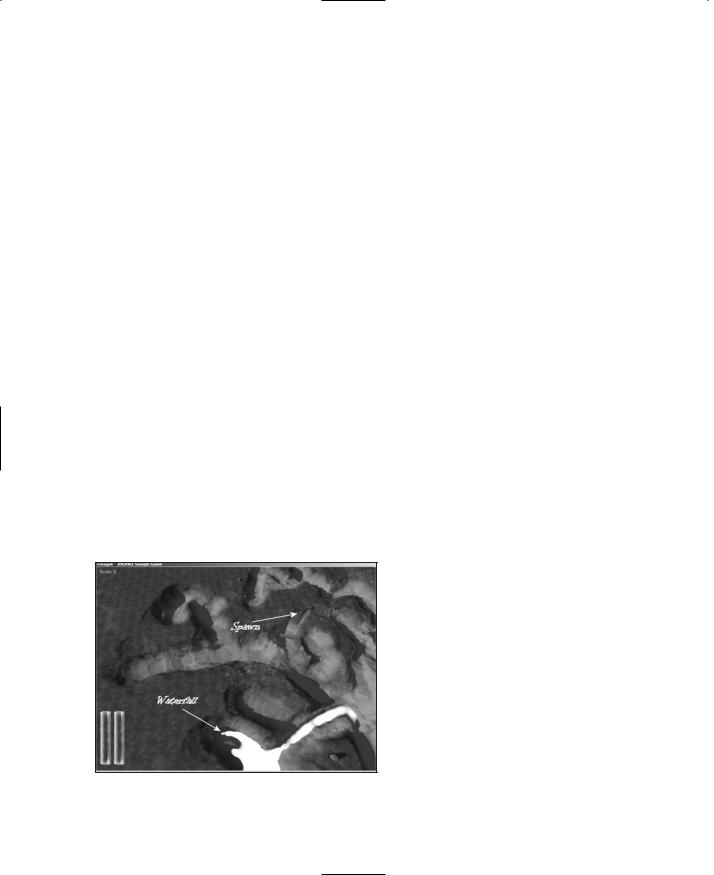
Save your work, and launch your game. The area where you want to make your waterfall is shown in Figure 21.4; the annotations show where I think is the best place for a waterfall. Anywhere along the water will do, though.
To get there, use F8 to get into camera fly mode, fly straight up for a second (do this by looking straight down at the ground and hitting the Down Arrow key to go backward and up). Then turn 180 degrees away from the direction you were facing when you spawned, and fly over to the area shown in the figure.
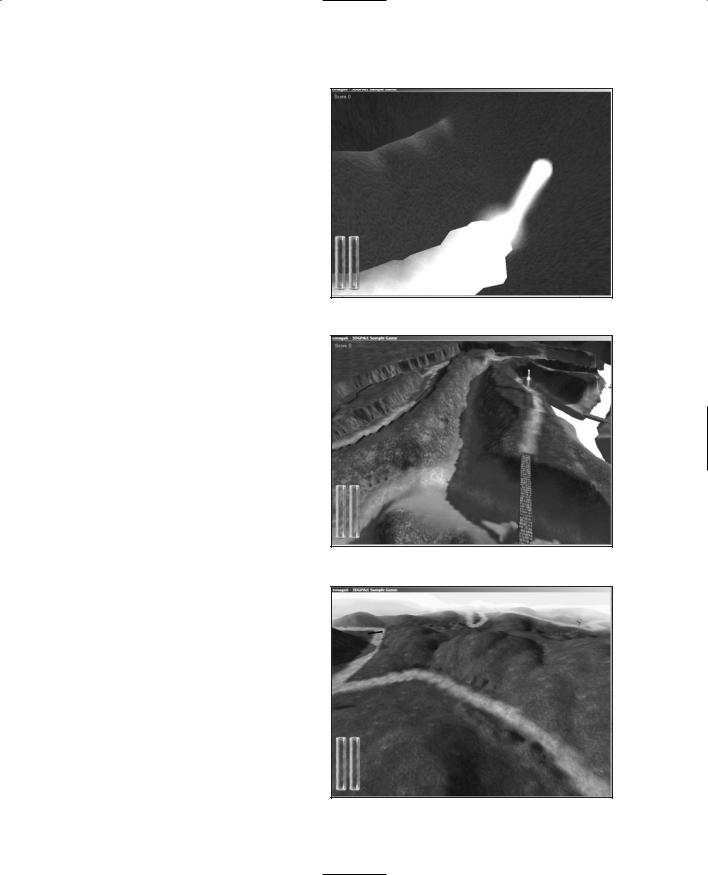
Once there, use the same methods used when you added the campfire smoke in the earlier section. For the top of the waterfall, use WFall1ParticleEmitterNode with the WFallAEmitter. Then for the splashing effect at the water surface, use WFall2ParticleEmitterNode with the WFallBEmitter. You should get something that looks like Figure 21.5.
You can refine your waterfall by using three nodes for the top—one each for the left, right, and center of the falling water—and perhaps two at the bottom. You'll notice when you look at some waterfalls that the center stream of water has a different character than the outer fringes—hence the use of three particle emitters. Also, when the water hits the pool at the bottom, there are typically two observable phenomena: splashing and spraying of
Figure 21.4 Locating the falls. fine mist. So two emitters at the bottom would go a long way as well.
Team LRN
The Terrain
I've prebuilt two terrains—trackA.ter and trackB.ter—for use in Koob. Of course, you are free to make your own. Each of these terrains has a different, in fact a somewhat opposite, appearance.
trackA.ter is a bit claustrophobic in places, with much of the action happening in and around canyons and riverbeds, as you can see in Figure 21.6.
trackB.ter, in Figure 21.7, is more wide open, driving around a series of foothills and mountains.
In both cases, as I laid out the track, I wanted to make sure that there was no way to grossly cheat and find a shortcut that would allow someone who knew of the shortcut to obtain a huge advantage. In fact, I designed trackB.ter to have two built-in shortcuts that may or may not be quicker than staying on the track. See if you can find them!
Also, the specification that says that checkpoints must be used will help minimize shortcut use as cheating.
trackA is quite similar to the test terrain we've been using with Emaga6 and earlier revisions of Koob.
trackB is entirely new. If you want to check them out, then copy the files trackA.mis, trackA.ter, trackB.mis, and trackB.ter from C:\3DGPAi1\ RESOURCES\CH21\ and deposit them in the C:\koob\control\data\maps\ directory.
Next, you will need to edit the file
Building the World |
605 |
Figure 21.5 The falls.
Figure 21.6 trackA.ter.
Figure 21.7 trackB.ter.
Team LRN

606Chapter 21 ■ Creating the Game Mission
C:\koob\control\client\client.cs and find this line:
createServer("SinglePlayer", "control/data/maps/koobA.mis");
Then enter the file name of whichever mission file (and thus terrain) you want to look at. Now I know this seems to be an awkward way to select missions. We will be addressing this issue in the next chapters.
Items and Structures
Go ahead and set up Koob to use trackB. Once that's done, copy all of the files located in C:\3DGPAi1\RESOURCES\CH21\STRUCTURES and put them in C:\koob\control\ data\maps\. If you get a dialog box asking if you want to overwrite existing files, your answer is yes.
Now launch the game and go into camera fly mode after you've spawned. You should be in the middle of a big parking lot.
Enter the World Editor Creator (press F11 followed by F4) and browse the Tree view until you find Interiors, Control, Data, Structures. Then look for the startfinish item and the checkpoint item, placing one of each in the game world, using Figure 21.8 as a guide.
To rotate an object, select it and then hold down the Alt key and hover the cursor over one of the gizmo axes (X, Y, or Z) of the item. When the axis label appears, click and hold. Then drag your cursor left or right, up or down, to cause the item to rotate around the chosen axis.
If you need to go back and adjust an object already placed, press F4 to enter the World Editor Inspector to select and adjust the items. Switch back to the World Editor Creator to resume placing items.
To move an item, select it, hover the cursor over one of the axis gizmos, and click and drag in the direction you want to move.
To scale an object along an axis, select the axis as before and then hold down both the Alt and Ctrl keys while dragging the cursor. The checkpoint object will have to be scaled a bit horizontally and vertically to fit it inside the startfinish object as depicted earlier
in Figure 21.8.
Figure 21.8 The start/finish line.
Team LRN

You can use a number of other structures to define the track, like barriers (see Figure 21.9) and direction signs (see Figure 21.10).
You should place checkpoints at the locations indicated in Figure 21.11. There will be a total of five checkpoints: one at the start/finish line and four more around the track.
Place barriers strategically to prevent access to certain areas, and use the direction signs to assist players in understanding which direction the track will be heading.
You should also place a Tommy gun and crossbow accompanied by an ammo box for each somewhere in the vicinity of the start/finish line.
Place a Health Kit somewhere near the start/finish line as well. Also place a HealthPatch object near each checkpoint. You can use a block structure from the Interiors list to place these items on to improve visibility. Make sure to sink the block low enough into the ground that the player can jump up on it.
Also from the Interiors list, locate the hovels, and place a few around the track, near it but not too close. Make sure there is a way for a player to get to the hovels, and perhaps provide enough space to hide a vehicle behind them.
Select some trees and rocks from the Static Shapes list under Static Shapes, Control, Data, Models, Items. Place them around your map at visually appealing as well as strategic
Building the World |
607 |
Figure 21.9 Barrier.
Figure 21.10 Direction sign.
Figure 21.11 Checkpoint locations.
Team LRN