

ASP.NET 2.0 Everyday Apps for Dummies
.pdfChapter 12: Ten New Features of ASP.NET 2.0 427
error would occur. This type of problem happens much less frequently in Visual Studio 2005 than it used to in previous versions — and that’s because the code-behind file doesn’t include any generated code.
ASP.NET 2.0 also provides a code-beside model, in which the C# or VB code is embedded within the .aspx file rather than stored as a partial class in a separate file. To use the code-beside model, you simply uncheck the Place Code in Separate File option in the dialog box that appears when you create a new page. As a general rule, I prefer code-behind to code-beside because code-behind provides better separation of the application’s presentation and logic code. However, some programmers prefer code-beside because of its
simplicity, especially for smaller projects. All of the examples in this book use code-behind.
App_ Folders
In addition to the difference in the way code-behind works, ASP.NET 2.0 also introduces a set of special application folders you can use in your applications.
These folders have reserved names, so you shouldn’t create your own application folders using these names. Here’s a list of the application folders you can use:
App_Data: Contains any Access databases used by the application. Other types of databases can be stored here, too, but SQL server databases are typically stored in a separate folder that’s not part of the application’s folder structure.
App_Code: Contains class files used by the application. If you create utility or helper classes, database-access classes, or classes that define business objects, this is where you should place them.
App_GlobalResources: Contains resources you place in this folder to be accessed by any page in the application.
App_LocalResources: Contains resources that are available only to pages in the same folder as the App_LocalResources folder.
App_WebReferences: Contains references to Web services.
App_Browsers: Contains browser-definition files. ASP.NET uses these files to identify the capabilities of individual browsers.
Note that some of these folders are created automatically by Visual Studio when they’re needed and others can be added by right-clicking the Web site in Solution Explorer and choosing the Add ASP.NET Folder command.

428 Part VI: The Part of Tens
Master Pages
One of the most common requirements for any Web application is to create a unified look for all the pages that make up the application. In ASP.NET 1.x, the only easy way to do that was to specify a user control to create every element common to all the application’s Web pages. For example, you might create one user control apiece for the banner that appears at the top of each page and a navigation menu that appears on the left side of each page. Then you’d have to make sure that each page included these user controls, as well as layout elements (such as tables or CSS positioning elements) to provide a consistent layout for the page. (Hassles, anyone?)
ASP.NET 2.0 introduces a major new feature called Master Pages — an easy way to provide a consistent layout for all the pages in a Web site. A Master Page is a page that provides a layout within which the content from one or more Content pages is displayed. When a user requests a Content page, the elements from the Master Page specified by the Content page are added to the elements from the Content page to create the final page that’s rendered to the browser. Figure 12-1 shows how this works.
Master page |
Content page |
Final page
Figure 12-1:
How Master
Pages work.
Chapter 12: Ten New Features of ASP.NET 2.0 429
The Master Page itself includes the content displayed on each page that uses the master. In addition, it contains one or more content placeholder controls (contentplaceholder) that specify where to display content from the Content page. For example, the Master Page shown in Figure 12-1 includes a banner and a sidebar displayed for each Content page that uses this master — plus a content placeholder that displays information from the Content page.
Creating a Master Page
To create a Master Page in Visual Studio 2005, follow these steps:
1.Choose the Web Site Add New Item command.
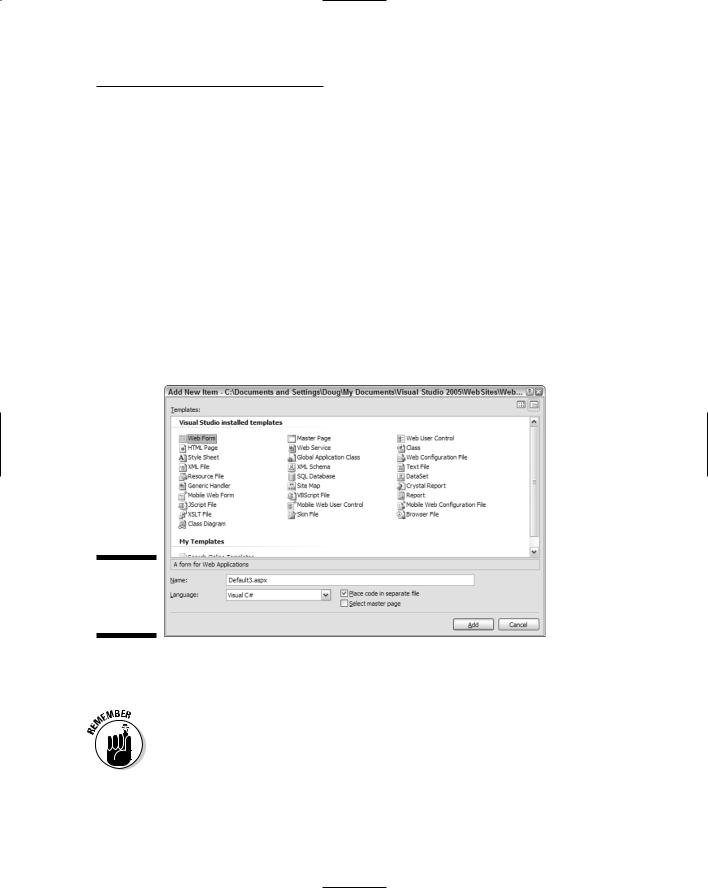
This brings up the Add New Item dialog box (shown in Figure 12-2), which lists the various templates available for adding new items to a project.
Figure 12-2:
The Add
New Item dialog box.
2.Select Master Page from the list of templates.
3.Enter the name you want to use for the new Master Page.
4. Select the programming language you want to use.
Make sure the Place Code in Separate File option is selected.
5.Click OK.
The Master Page is created.
Listing 12-1 shows the .aspx code that’s generated for a new Master Page.

430 Part VI: The Part of Tens
Listing 12-1: The default code for a Master Page
<%@ Master Language=”C#” AutoEventWireup=”true” |
1 |
CodeFile=”MasterPage.master.cs” Inherits=”MasterPage”
%>
<!DOCTYPE html PUBLIC “-//W3C//DTD XHTML 1.1//EN” “http://www.w3.org/TR/xhtml11/DTD/xhtml11.dtd”>
<html xmlns=”http://www.w3.org/1999/xhtml” > <head runat=”server”>
<title>Untitled Page</title> </head>
<body>
<form id=”form1” runat=”server”> <div>
<asp:contentplaceholder id=”ContentPlaceHolder1” 2 runat=”server”>
</asp:contentplaceholder>
</div>
</form>
</body>
</html>
Just two key points in this listing:
1 Instead of a Page directive, Master Pages begin with a Master directive. This directive indicates that the page is a Master Page and specifies the language used (in this case, C#), whether automatic event wiring is used, the name of the code-behind file, and the name of the class defined by the code-behind file.
2 The <ContentPlaceHolder> element (<asp:ContentPlace Holder>)is used to mark the location on the page where the content from the content file should appear. In the default Master Page, the <ContentPlaceHolder> simply fills the entire page; in
an actual Master Page, you add elements outside the <ContentPlaceHolder>.
Completing a Master Page
Okay, the default Master Page shown in Listing 12-1 isn’t very useful as is; it doesn’t provide any elements that appear automatically on each page. You can fix this sad state of affairs by adding (well, yeah) elements that appear on each page: Simply edit the Master Page in Design or Source view. For example, Listing 12-2 shows the code for the Master Page that’s illustrated in Figure 12-1.

Chapter 12: Ten New Features of ASP.NET 2.0 431
Listing 12-2: A Master Page with a banner image
<%@ Master Language=”C#” %>
<!DOCTYPE html PUBLIC “-//W3C//DTD XHTML 1.1//EN” “http://www.w3.org/TR/xhtml11/DTD/xhtml11.dtd”>
<html xmlns=”http://www.w3.org/1999/xhtml” > <head runat=”server”>
<title>The Acme Pirate Shop</title> </head>
<body>
<form id=”form1” runat=”server”> <div>
<img src=”Images/Banner.jpg” /> <asp:contentplaceholder id=”ContentPlaceHolder1”
runat=”server”>
</asp:contentplaceholder>
</div>
</form>
</body>
</html>
As you can see, the only difference between this code and the code in Listing 12-1 is that I added an .img tag immediately before the <ContentPlace Holder> element. This image tag displays the banner that appears at the top of each page that uses this Master Page.
Any content you add between the start and end tags of the <ContentPlace Holder> element will be treated as default content — stuff that’s rendered only when the Master Page is used by a Content page that doesn’t specifically provide a <Content> element for the <ContentPlaceHolder>.
Creating a Content page
Listing 12-3 shows the code for an empty Content page. Of course, for this page to be useful, you must add (what a concept) some actual content.
Listing 12-3: The default code for a Content page
<%@ Page Language=”C#” |
1 |
MasterPageFile=”~/MasterPage.master” |
|
AutoEventWireup=”true” CodeFile=”Default2.aspx.cs” |
|
Inherits=”Default2” Title=”Untitled Page” %> |
|
<asp:Content ID=”Content1” |
2 |
ContentPlaceHolderID=”ContentPlaceHolder1” |
|
Runat=”Server”> |
|
</asp:Content> |
|


Chapter 12: Ten New Features of ASP.NET 2.0 433
handle the application’s data access. As a result, this application avoids using the declarative data-access features of ASP.NET 2.0.
The following sections describe the new data access controls you’ll use most:
SqlDataSource, GridView, FormView, and DetailsView.
The SqlDataSource control
The new SqlDataSource connects to a SQL database and binds controls such as DataList, GridView, and DetailsView to SQL data retrieved from SQL databases such as Microsoft’s own SQL Server and Access. This control isn’t rendered on the page, so it isn’t visible to the user when the application runs. However, it is visible in the Web Designer in Visual Studio, so you can work with it in Design view.
The following paragraphs describe some of the more important features of the SqlDataSource control:
It uses the ADO.NET data provider classes to connect to relational databases. As a result, you can use it to access several different types of databases, including Microsoft SQL Server, Access, and Oracle.
The connection string can be automatically retrieved from the application’s web.config file, so you don’t have to code the connection string on the page.
Each SqlDataSource control has a Select command associated with it via the SelectCommand property. The data source executes this command whenever it needs to retrieve data from the database. You can also manually execute this Select command by calling the data source’s Select method.
The SqlDataSource control can also have an Insert, Update, and Delete command associated with it via InsertCommand, Update Command, and DeleteCommand properties. When you bind a SqlDataSource control to a data control such as GridView or FormView, the data control executes these commands when the user inserts, updates, or deletes data. In addition, you can manually execute these commands by calling the data source’s Insert, Update, or Delete methods.
The SqlDataSource has three collections of parameters that provide values for the Select, Insert, Update, and Delete commands. These parameter collections are accessed via the SelectParameters,
InsertParameters, UpdateParameters, and DeleteParameters collections. The parameters can be bound to a property of another control (for example, the Text property of a text box or the SelectedValue property of a drop-down list), a query string, a value retrieved from session state, a cookie, or a form field.

434 Part VI: The Part of Tens
You can configure a SqlDataSource so the SELECT statement returns an ADO.NET dataset or a data reader. The data reader is more efficient if you simply want to display read-only data on a page. If you want to update the data — or if you want to filter, sort, or page the data — you should use a dataset. (The default mode is dataset.)
The SqlDataSource control can be configured to automatically cache data. As a result, you no longer have to write code to cache data.
The following example shows a basic SqlDataSource control from the
Product Catalog application presented in Chapter 5:
<asp:SqlDataSource ID=”SqlDataSource2” runat=”server”
ConnectionString=
“<%$ ConnectionStrings:ConnectionString %>” SelectCommand=”SELECT catid, name, [desc]
FROM Categories ORDER BY name”> </asp:SqlDataSource>
This data source simply retrieves the catid, name, and desc columns from the Categories table in the database, sorting the rows by name.
Here’s a more complicated SqlDataSource control, from the Maintenance application presented in Chapter 7:
<asp:SqlDataSource ID=”SqlDataSource1” runat=”server” ConflictDetection=”CompareAllValues” ConnectionString=
“<%$ ConnectionStrings:MaintConnectionString %>” SelectCommand=”SELECT [catid],
[name], [desc]
FROM [Categories] ORDER BY [catid]” InsertCommand=”INSERT INTO [Categories]
([catid], [name], [desc]) VALUES (@catid, @name, @desc)”
UpdateCommand=”UPDATE [Categories]
SET [name] = @name, [desc] = @desc WHERE [catid] = @original_catid
AND [name] = @original_name AND [desc] = @original_desc” DeleteCommand=”DELETE FROM [Categories] WHERE [catid] = @original_catid
AND [name] = @original_name AND [desc] = @original_desc” >
<InsertParameters> <asp:Parameter Name=”catid”
Type=”String” /> <asp:Parameter Name=”name” Type=”String” />

Chapter 12: Ten New Features of ASP.NET 2.0 435
<asp:Parameter Name=”desc” Type=”String” />
</InsertParameters>
<UpdateParameters> <asp:Parameter Name=”name”
Type=”String” /> <asp:Parameter Name=”desc” Type=”String” />
<asp:Parameter Name=”original_catid” Type=”String” />
<asp:Parameter Name=”original_name” Type=”String” />
<asp:Parameter Name=”original_desc” Type=”String” />
</UpdateParameters>
<DeleteParameters>
<asp:Parameter Name=”original_catid” Type=”String” />
<asp:Parameter Name=”original_name” Type=”String” />
<asp:Parameter Name=”original_desc” Type=”String” />
</DeleteParameters>
</asp:SqlDataSource>
This SqlDataSource specifies all four command types (Select, Insert, Update, and Delete) as well as parameters for the INSERT, UPDATE, and DELETE statements.
In some cases, you may want to access data from a SqlDataSource in code. For example, the Shopping Cart application presented in Chapter 6 needs to retrieve data from the current record so it can use the data to update the ShoppingCart item in session state. To do this, it calls the data source’s Select method, which returns an object defined by the DataView class. It then uses the DataView object to get the DataRowView object for the first row returned by the SELECT statement. Then it can access the individual fields for the row. Here’s the code (in C#):
DataView dv = (DataView)SqlDataSource1.Select( DataSourceSelectArguments.Empty);
DataRowView dr = dv[0];
string ID = (String)dr[“ProductID”]; string Name = (string)dr[“Name”];
decimal Price;
if (dr[“SalePrice”] is DBNull) Price = (decimal)dr[“Price”];
else
Price = (decimal)dr[“SalePrice”];
