

gpss_manual
.pdfThe Function Keys Page
Figure 2—16. The Function Keys Page of the Settings Notebook
Enter GPSS Statements into the fields on this page to load them into Function Keys.
When a Simulation Object is selected, i.e. has the input focus, all you have to do to send the loaded GPSS Statement is to press the Function Key. Using an INCLUDE Statement permits you to send a Statement list of any complexity, including PLUS Procedure and Experiment definitions.
The Expressions Page
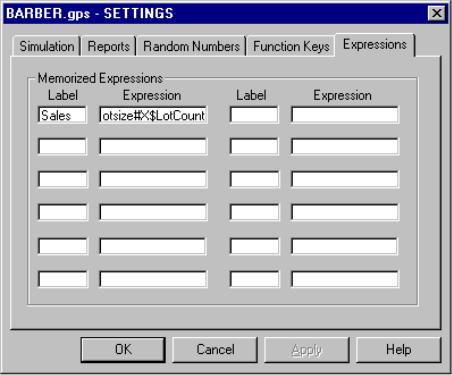
Figure 2—17. The Expressions Page of the Settings Notebook
When you open an Expressions Window or a Plot Window on a Simulation Object, you must specify the expression to be watched as well as a name to be used as a label. This page allows you to save complex expressions with the Simulation Object. Then, when you open a Window using the expression, you can select it from a list instead of having to retype it.
Both the Expression Window and the Plot Window give you a chance to Memorize Expressions. You can do this by
SELECT Edit / Expressions Window
and
SELECT Edit / Plot Window
And then selecting the expression and
CLICK ON Memorize
Alternately, you can type the label and expression into this page of the Settings Notebook. The effect is the same. You will now be able to bring back the labeled expression simply by selecting it.
2.3. Controlling a Session
Normal installation of GPSS World places a line in your system's Start / Programs
Menu that you click on to start the program. Alternately, you can create a shortcut to GPSS World and place it on the Desktop, or anywhere you like. Simply drag the GPSS World icon from the Start / Programs menu.
When you run GPSS World the first time it registers the file types and extensions of GPSS World with the Windows operating system. This allows Windows to associate GPSS World with any of its Object files. Thereafter you can double click on any of the file icons to start a GPSS World Session.
2.3.1. Using the Main Window
Once you have started a Session you can control it using your mouse and the keyboard. You can choose menu items by clicking with your mouse, by using menu mnemonic keys, and by using accelerators keys. Many interactions require you to type information using the keyboard, and the set of Functions Keys on your keyboard can be loaded with any Commands you choose. As described in the previous section, you Edit the Settings of an object in order to load Commands into the Function Keys.
Before you begin, you should familiarize yourself with the Main Menu. A quick overview is presented above, in Section 2.2.2. Many of the Main Menu items are disabled and appear gray until they can be used. As you open and create GPSS World Objects, the valid menu commands will become enabled as appropriate.
Using The Main Menu
Although all the GPSS World Objects have small menus on their own windows, most actions start in the Main Menu. All menus are used in a similar fashion. Some menus sequences result in the creation of a Dialog Window containing several controls such as buttons and entry fields. Entry fields normally require you to use the keyboard to type in additional information.
To initiate the menu actions, you have three choices. First, you can simply use the
mouse to click on the succession of menu items. Second you can press the a key
to activate the menu, and then press the underlined (i.e. the mnemonic) letter in each menu item, in sequence. Third, if the lowest level menu item has an accelerator key listed to the right of the item name in the menu, you can simply press that combination of keys to begin the action.
The Accelerator Keys
Accelerator keys are key combinations that immediately enter a menu command into GPSS World. Usually, they are listed just to the right of the menu item they effect. They are enabled only when their associated menu item is. To activate an accelerator key, hold down all keys in the combination except the last, then press the last key, then release all keys.
GPSS World Hot Keys
Hot keys are quick ways to send GPSS World Commands to a Simulation Object. They are:
b+a+S - Create Simulation
b+a+R - Retranslate
b+a+L - Repeat Last Command
b+a+C - CONTINUE
b+a+H - HALT
b+a+1 - STEP 1
Text View Navigation Keys
Navigation Keys let you jump to specic locations in a Text View. They are:
b+a+B - Next Bookmark
b+a+G - Go To Line
b+a+N - Next Error
b+a+P - Previous Error
b+a+F - Find / Replace
Text Editing Accelerators
Editing is faster using Text Edit Accelerators instead of menu selection. These keys are:
b+Z - Insert Line
b+D - Delete Line
b+I - Undo
b+C - Copy to Clipboard b+X - Cut to Clipboard b+V - Paste from Clipboard
also,
b+h - Copy to Clipboard j+c - Cut to Clipboard j+h - Paste from Clipboard
General Accelerators
There are several other general purpose keys. They are:
b+O - File Open
b+S - File Save
b+P - File Print
a+q - Next Pane
j+q - Previous Pane
Online Help
The l key opens the GPSS World Help System any time it is pressed. You can then explore the contents and index of the "Windows Help" form of the GPSS World Reference Manual.
In addition, if a menu item or control is selected, l will open context sensitive help on that topic. Or, if the cursor is embedded in a GPSS World keyword, such as a Command Name, in a Text View, if you press the l key, you will open the Reference manual's page on that topic.
Using Text Views
The Text View of all GPSS World Objects have text editing capabilities. You can enter text into a Text View by opening a file, by typing, or by pasting from the clipboard. Text can be modified in a variety of ways.
There are two place marking indicators that you can use when a Text View has the input focus. In a Text View, the mouse pointer is the I-beam icon that travels as you move the mouse. The cursor, or insertion point, is the flashing vertical line in the text window that marks the text insertion point. Text you type is placed at the insertion point indicated by the cursor.
The editing operations available are:
Move the cursor to the position of the mouse pointer by clicking mouse button 1.
Move the cursor by arrow keys in the keypad.
Move the cursor and scroll using the { and } keys.
Move the cursor to the beginning and end of a text line by pressing g and d , respectively.
Scroll using the scroll bars of the Text
Window.
Break a text line with e or f .
Delete selected text with c .
Undo last edit with Edit / Undo .
Delete line with cursor with Edit /
Delete Line
Insert new line after cursored line with
Edit / Insert Line .
Selection operations include
Select word by double click on button 1.
Swipe select by click and hold button 1, move mouse, release button 1.
Extended select by j + click mouse button 1 to select from cursor to mouse pointer.
Clipboard operations include
∙Cut selected text by Edit / Cut. Delete text and
place copy in clipboard. You may also use the key combination b + X.
∙Copy selected text by Edit / Copy. Copy text to
clipboard. You may also use the key combination b +
C.
∙ Paste to cursor by Edit / Paste . Insert a copy of text from clipboard. You may also use the key combination b + V.
Other operations using keyboard accelerators are described above. You can change the font of text in a Text View. First select the text, then CHOOSE Edit / Font
This will open the Font Dialog, where you can specify typeface, size, and character stype for the selected text. GPSS World uses Courier as the default font. It has the advantage of being a monospaced font with uniform character widths. This has the advantage of easy column alignment in GPSS Statements.
2.3.2. Building Models
The physical process of model development starts with the creation of a Model Object which contain the Model Statements written by you. Model Statements are defined in Chapters 6, 7, and 8 of this manual. Often it's easiest to begin building a simulation by modifying an existing model. The Samples folder is rich source of small GPSS World Model Objects.
Model Statements can exist in additional Text Objects as well, permitting you to share code across projects. Athough there's only one Model Object in a simulation, there can be many Text Objects. These are connected to the Model Object with INCLUDE Statements, which take the name of the Text Object file as an argument.
Model development begins by opening a Text View of the Model Object. A complete set of text editing operations are available for modifying and adding Model Statements.
A model must be Translated in order to Create a Simulation Object. The Translation is started via the Command / Create Simulation item in the main
menu of the Model Window. The Translator determines if there are syntax errors in the model. If so, a circular queue of error messages is created so that the errors can be found and corrected easily. If no errors are found, the resulting simulation automatically sent to the Simulation Object, replacing any that already existed. When the Simulation Object receives a simulation, it immediately performs all embedded Commands in the order encountered by the Translator.
INCLUDE Commands
You can use an INCLUDE Command anywhere a sequence of Model Statements can be used. Normally, they are used in Model Objects to incorporate statements from one or more Text Objects. INCLUDE Statements can be nested to a depth of 5, but they cannot be used inside a PLUS Procedure.
The syntax of the INCLUDE Command is:
INCLUDE "FileSpec"
Where you replace the italicized word FileSpec with your file specification and enclose it in double quotes. The default directory is that of the Model Object.
INCLUDE Commands have other uses, as well. You can type an INCLUDE Command as a Custom Interactive Command. This cause a whole file of Model Statements to be Translated and sent to the simulation.
An INCLUDE Command can be loaded into a function key, just like any other GPSS Command. In this manner a single keystroke can initiate a complex Command File or PLUS Procedure redefinition.
Before you use a file in an INCLUDE Command, you should Translate it by itself to remove syntax errors. To do so, copy its Model Statements to the clipboard, open a new temporary Model Object, paste into it from the clipboard, and Translate it using Command / Create Simulation. This allows you to correct any Syntax
Errors before combining the Text Object into a more complicated model.
Translating Models
GPSS World features a new high performance Model Translator that is hundreds of times faster than its predecessor. The largest models are Translated in no more than a few seconds. Any errors that are detected are placed in a circular queue so that they may be corrected using the full screen editor.
Simulations are Translated models. When you Translate a model by selecting Command / Create Simulation, the GPSS World Translator checks for
syntax errors, creates a simulation, and sends it to a newly created Simulation Object. If successful, Translation activates all the Interactive Commands and Simulation
Windows, so that the state of the newly created simulation can be monitored and controlled. After that, you can send any Model Statement to the existing simulation for processing.
When the Translator detects one or more errors in the model, it creates a circular list of error messages that can be accessed from the Model Object. You can traverse the error list quickly using the Search / Next Error or Search /
Previous Error menu commands. Both have keyboard mnemonics and
accelerators. Each stop in the list places the error message in the Status Line of the Main Window and places the insertion point in the Model Text View just before the syntactical element that caused the error. It's then a simple matter to correct each error and move to the next.
If an error the cursor is placed just after the character under the scan when the error was detected, and the error message is displayed in the Status Line. You use the text editor to correct each error, and then Translate the corrected model.
If an error occurs in an INCLUDEd Text Object, and you cannot find it easily, you can paste those statements into a new temporary Model Object and Translate it by itself.
Blocks are placed in the simulation in the same order as they were encountered by the Translator. Block Statements sent interactively to an existing simulation cause a temporary Block to be created and immediately destroyed after the Active Transaction attempts to enter it. This mode is called Manual Simulation.
Commands are accumulated in an ordered list which is sent to the Simulation Object with the simulation. The list is scanned for Immediate Commands (SHOW, HALT, and CONDUCT), and the remainder are placed on the simulation’s Command Queue and executed one after the other. Command lists sent interactively to an existing simulation are treated the same way.
Dynamic simulation windows (not Snapshots) are automatically refreshed when you Translate a model to ensure that the view is current. If an entity can no longer be found, say, in a Table Window, the Window will be closed automatically.
Controlling Simulations
GPSS Commands are used to control the running of simulations. They are discussed in detail in Chapter 6. They may be embedded in a model or they may be sent as Interactive Statements.
Any Model Statement may be sent to an existing simulation. Such statements are called Interactive Statements. You can control and view running simulations very closely with the operations that are available. To do so, use the Command menu in the Main Window. If the Command you need is not listed, select Command /
Custom and type it into the entry field, and select OK. This action Translates the
Command and sends it to the simulation. The Command menu is disabled until there is a simulation to receive interactions.
You may use GPSS Block Statements and PLUS Procedure definitions as Interactive Commands. Blocks cause the Active Transaction to enter a temporary Block, and Procedure Statements register a user created PLUS Procedure, replacing any of that name that may already exist.
Interactions are logged in the Journal View of the Simulation Object.
Running
Normally, a START Command is used to begin a simulation. It could be entered interactively or could be part of the Model Object. The START Statement specifies the Termination Count, which is an important state variable of the simulation. The Termination Count must be decremented to zero for the simulation to end. Any TERMINATE Statement in the simulation can decrement this count.
When the Simulation Object executes a START Command, Transactions will begin to circulate in the simulation. Normally, the simulation will end by itself and will produce a Standard Report when either the termination count reaches zero. If an error stop occurs, no report is written. Reporting options can be changes in the Settings of the Simulation Object. These are described above in Section 2.2.3.
Multiple simulations can be run unattended by using RESET, CLEAR, and START in a sequence of Commands. These are commonly used in PLUS Experiments, which can control and analyze extensive sets of simulation runs. PLUS Experiments are discussed in this manual in Section 8.2.4 , and in Lesson 19 of
The GPSS World Tutorial Manual.
Stopping a Simulation
You may stop a running simulation in several ways.
∙ First, you can interrupt a simulation by sending a HALT Command. HALT can be asserted by the b+a+H Hot Key, a Function Key, an
Interactive Command from the Command menu, or as part of a Command File.
∙Second, you can enter one or more stop conditions with the STOP Command, before you START or CONTINUE the simulation. When the simulation stops, previous stop conditions are not removed. If you CONTINUE a simulation after a stop condition was found, the original condition which caused the simulation to stop is ignored to allow the stopped Transaction to proceed. STOP conditions can be controlled by "Point and Shoot" operations in the Debug Toolbar using only the mouse. This is discussed below, and in Chapter 5.
∙Third, you can resume the simulation with a STEP Command. After the specified number of Block entries, the simulation will stop automatically.
∙Fourth, when an error condition is detected, an Error Stop occurs. The simulation is halted and messages are sent to identify the reason.
∙ Fifth, you can simply wait for the simulation to complete. This occurs when the termination count falls to or below 0.
In each of these cases, when the simulation stops the state of the simulation is reported to the Journal View of the Simulation Object.
Interactive Statements
Any Model Statement can be sent to an existing simulation. These are called Interactive Statements. They can be Commands, PLUS Procedure definitions, and even Block Statements.
Every simulation has a Command Queue associated with it. The Simulation Object performs each Command on the queue one after the other, until it is HALTed or until it runs out of things to do. Even Commands in the Model, other than HALT and SHOW, are placed on the Command queue before they are performed.
Interactive Commands are either Immediate or Queued. Immediate Commands, such as HALT and SHOW, are performed as soon as they are received by the Simulation Object. All other Commands are queued. They are placed at the end of a list of Commands which have not yet been completed.
The HALT Command is a special case. Not only is it an immediate Command, but it also deletes any remaining Queued Commands still on the Command queue. After a HALT Command is performed, the Simulation Object has nothing more to do on behalf of that simulation, for the moment.
Commands are not the only statements that can be used interactively. When a PLUS Procedure Statement is sent interactively, it causes the procedure to be registered within the simulation. Thereafter, the procedure can be invoked from any PLUS Expression. If a Procedure with the same name already exists within the simulation, it is redefined.
A PLUS Experiment is a special kind of Procedure. PLUS Experiments are can be sent interactively, as well. If any like-named PLUS Procedure (or Experiment) is currently registered with the Simulation Object, it is replaced. Then the Experiment can be invoked using a CONDUCT Command, which is discussed in Chapter 6.
Interactive Block Statements are called Manual Simulation Statements. When received by the Simulation Object, they cause a temporary Block to be created, and the Active Transaction to attempt to enter it. Then the Block is destroyed. In this manner, GPSS Blocks can be used as though they were commands, providing for a fine level of control over the simulation. Data Stream file I/O is supported interactively, as well. Data Streams are discussed in Section 4.16.
GENERATE Blocks are the only ones which cannot be used in Manual Simulation Mode. Instead, SPLIT Block Statements can be used to create Transactions interactively.
The are several ways to send a Model Statement to the simulation. You can use the Dialog in the Command submenu of the Main Window, you can use a "Hot Key", and you can associate a GPSS Statement with a Function Key in the Model Settings Notebook.
To send a Command to the Simulation Object
CHOOSE Command / Custom, type the Command list, and
SELECT OK
This will Translate the Command list and send it to the simulation for execution.
It is often convenient to put a list of frequently used Commands in a small text file. You can then use an INCLUDE Command to send the whole sequence to the Simulation Object. Even easier, you can load a function key with an INCLUDE Command, and have the whole Command List performed by a single keystroke.
Redefining Entities
There are fifteen different entity types that you can create. The entity types are Transactions, Blocks, Facilities, GPSS Functions, Logicswitches, Matrices, Queues, Storages, Savevalues, Tables, Userchains, Variables, Numeric Groups, Transaction Groups, and Random Number Generators. The better you understand these entities and their properties, the more powerful your simulations will be. Chapter 4 is devoted to entities.
With the exception of Transactions, entities are never deleted from the simulation. However, some entity types can be redefined interactively. You can use STORAGE, TABLE, QTABLE, MATRIX, or VARIABLE Commands using the same label to do so. Similarly, PLUS Procedures may be redefined interactively.
A location label, or simply location, is a name used to label a Block Statement. This field is not required in a Block Statement. Unlike other entity types, Blocks may not be redefined in GPSS World. A similar flexibility can be achieved by using an EXECUTE Block and redefining its Operand A.
Viewing
A wide variety of windows are available for viewing simulations. Multiple windows of the same type may be opened on any simulation. All windows can be printed or saved for later use.
Simulation windows are divided into two categories: Snapshots and Dynamic Windows. Snapshots are available only in the Commercial Version of GPSS World.
All Simulation Snapshots and Windows are opened using the Window submenu in the Main Window. Use Window / Simulation Snapshot for a Snapshot and Window / Simulation Window for a Dynamic Window. The menus are
disabled until there is a simulation to see.
Snapshots are not updated online. They take a single picture that represents a view of the simulation at a single instant.
You can take Snapshots of the following items:
·Any Transaction in the simulation.
·The Current Events Chain.
·The Future Events Chain.
·Numeric Groups.
·Userchains.
·Transaction Groups.
Dynamic Windows are updated as the simulation changes. They are refreshed when you Translate a model or cause a RESET event. You can open an online view of
·The Block Structure of the model.
·An arbitrary Expression list.
·The Facility Entities.
·The Logicswitch Entities.
·Any cross-section of a Matrix Entity.
·A Plot of multiple arbitrary Expressions.
·The Queue Entities.
·The Savevalue Entities.
·The Storage Entities.