

Practical Database Programming With Java
.pdf5.3 Exploring NetBeans IDE 6.8 189
Figure 5.30. The completed Project Properties window.
Figure 5.31. The running result shown in the Output window.
•Enter some integers as input arguments to the Arguments field, and each integer should be separated with a comma, such as 12,34,56, and click on the OK button.
Your finished Project Properties window should match one that is shown in
Figure 5.30.
Now that we have created the application and provided runtime arguments for the application, we can test and run the application in two ways: run the application inside the NetBeans IDE 6.8, or run the application outside the NetBeans IDE 6.8.
To run the application inside the NetBeans IDE 6.8:
Choose the Run > Run Main Project menu item (or F6 key).
In the Output window shown in Figure 5.31, you should see both the input arguments (12, 34 and 56) and the output result from the program (The sum =102).
To run this application outside of the NetBeans IDE 6.8, you need first to build and deploy the application into a JAR file and then run the JAR file from the command line.
5.3.2.3.6 Build and Deploy the Application The main build command in the NetBeans IDE is the Clean and Build Main Project command. The Clean and Build Main Project command deletes previously compiled classes and other build artifacts, and then rebuilds the entire project from scratch.

190 Chapter 5 Introduction to NetBeans IDE
 Notes: There is also a Build Main Project command, which does not delete old building artifacts, but this command is disabled by default.
Perform the following operations to build the application:
1. |
Click on the Run > Clean and Build Main Project button (Shift-F11). |
2. |
Output from the Ant build script appears in the Output window. If the Output window |
|
does not appear, you can open it manually by choosing Window > Output > Output. |
3.When you clean and build your project, the following things occur:
A.Output folders that have been generated by previous build actions are deleted (“cleaned”). In most cases, these are the build and dist folders.
B.The build and dist folders are added to your project folder, or hereafter referred to as the PROJECT_HOME folder.
C.All of the sources are compiled into .class files, which are placed into the
PROJECT_HOME/build folder.
D.A JAR file SumApp.jarcontaining your project is created inside the PROJECT_HOME/ dist folder.
E. If you have specified any libraries for the project (SumLib.jar in this case), a lib folder is created in the dist folder. The libraries are copied into dist/lib folder.
F.The manifest file in the JAR is updated to include entries that designate the main class and any libraries that are on the project’s classpath.
 Note: You can view the contents of the manifest in the IDE’s Files window. After you have built your project, switch to the Files window and navigate to dist/SumApp.jar. Expand the node for the JAR file, expand the META-INF folder, and double click MANIFEST.MF to display the manifest in the Source Editor.
Manifest-Version: 1.0
Ant-Version: Apache Ant 1.7.1
Created-By: 14.3-b01 (Sun Microsystems Inc.)
Main-Class: sumapp.Main
Class-Path: lib/SumLib.jar
X-COMMENT: Main-Class will be added automatically by build
After building and deploying the application, now we can run this application outside the NetBeans IDE. To do that, perform the following operations:
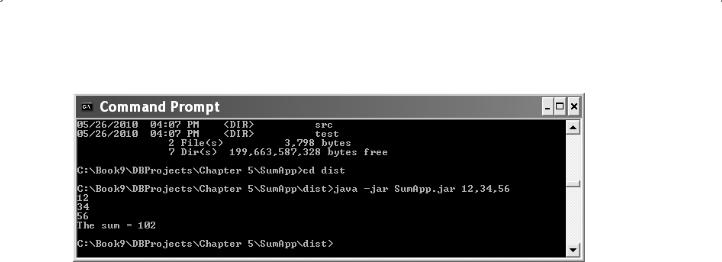
1.On your system, open up a command prompt or terminal window.
2.In the command prompt, change directories to the SumApp/dist directory.
5.3 Exploring NetBeans IDE 6.8 191
Figure 5.32. The running result shown in the Command window.
3.At the command line, type the following statement: java -jar SumApp.jar 12,34,56
The application then executes and returns the outputs as shown in Figure 5.32.
5.3.2.3.7 Distribute the Application to Other Users Now that you have verified that the application works outside of the IDE, you are ready to distribute the application and allow other users to use it.
To distribute the application, perform the following operations:
1.On your system, create a zip file that contains the application JAR file (SumApp.jar) and the accompanying lib folder that contains SumLib.jar.
2.Send the file to the people who will use the application. Instruct them to unpack the zip file, making sure that the SumApp.jar file and the lib folder are in the same folder.
3.Instruct the users to follow the steps listed in the last section above to run this application outside the NetBeans IDE 6.8.
Two complete Java projects, Java Class Library project SumLib and Java Application project SumApp, can be found from the folder DBProjects\Chapter 5 that is located at the site ftp://ftp.wiley.isbn/JavaDB. You can download these two projects and test them by calling the Java class library SumLib from the Java application project
SumApp.
Next, let’s develop and build a Java project with existing sources.
5.3.2.4 Build a Java Project with Existing Sources
To build a Java project with existing sources is mainly used for development of a new Java project, but some existing sources, either GUIs or source codes that had been built in early Java or current Java JDK, must be involved in this new Java project to save developing efforts or the time. For Java projects developed outside of NetBeans, you can use an “Existing Sources” template in the New Project wizard to make a NetBeans project. In the wizard, you identify the location of the sources and specify a location for the NetBeans project metadata. You then use the Project Properties dialog box to configure the project.

192 Chapter 5 Introduction to NetBeans IDE
Perform the following operations to set up a NetBeans project for an existing Java application:
1. |
Choose File |
> |
New |
Project (Ctrl-Shift-N). |
2. |
Choose Java |
> |
Java |
Project with Existing Sources, then click on the |
|
Next button. |
|
|
|
3. In the Name and Location page of the wizard, follow these steps:
A.Type a project name.
B.(Optional) Change the location of the project folder.
C.(Optional) Change the name of the build script used by the IDE. This might be desirable if there is already a build script called build.xml that is used to build the sources.
D.(Optional) Select the Use Dedicated Folder for Storing Libraries checkbox, and specify the location for the libraries folder.
E.Select the Set as Main Project checkbox. When you select this option, keyboard shortcuts for commands such as Clean and Build Main Project (Shift-F11) apply to this project.
4.Click on the Next to advance to the Existing Sources page of the wizard.
5.In the Source Packages Folder pane and click Add Folder. Then navigate to your sources and select the source roots.
6.When you add a folder containing source code, you must add the folder that contains the highest folder in your package tree. For example, in the com.mycompany.myapp.ui package, you add the folder that contains the com folder.
7.(Optional) In the Test Package Folders pane, click Add Folder to select the folder containing the JUnit package folders.
8.(Optional) In the Includes & Excludes page of the wizard, enter file name patterns for any files that should be included or excluded from the project. By default, all files in your source roots are included.
9.Click on the Finish button to complete this process.
The newly created project is displayed in both the Projects window and the Files window.
Because of the simplicity of this kind of Java projects, no example project is involved in this chapter.
5.3.2.5 Build a Java Free-Form Project
There are also project templates available for Java free-form projects. In so-called freeform projects, the NetBeans IDE uses targets in an existing Ant script to build, run, clean, test, and debug your application. If the Ant script does not contain targets for some of these functions, the functions are unavailable for the project. To implement these functions, you write targets either in your Ant script or in a secondary Ant script.
In general, it is better to use standard “With Existing Sources” project templates for importing projects. For Eclipse projects, it is best to use the Import Project feature, which creates and configures a standard project for you. Standard projects are easier to maintain in the long term. However, the free-form project templates can be useful if you have an existing Ant-based project with a complex or idiosyncratic configuration that cannot be

5.3 Exploring NetBeans IDE 6.8 193
replicated within a standard project. For example, if you are importing a project with multiple source roots, each of which has a different classpath, and you cannot split the source roots into different projects, it might be necessary to use a free-form project template.
Because the scope of this book is about database programming with Java, for more detailed information to set up free-form projects, refer to Advanced Free-Form Project Configuration.
5.3.3 Build a JavaFX Application Project
JavaFX is a Java platform for creating and delivering rich Internet applications that can run across a wide variety of connected devices. By using the JavaFX, developers can design and build applications for desktop, browser, and mobile phones.
5.3.3.1 Overview of JavaFX
JavaFX builds on Java technology. To build JavaFX applications, developers use a statically typed, declarative language called JavaFX Script; Java code can be integrated into JavaFX programs and compiled to Java bytecodes, so JavaFX applications run on any desktop and browser that runs the Java Runtime Environment (JRE) and on top of mobile phones running Java ME.
JavaFX is the best software for creating feature-rich applications that deliver secure and expressive cross-platform user experiences. With the JavaFX SDK, developers and designers now have the essential set of technologies, tools, and resources to easily create and deploy their content across browsers, desktops, mobile devices, TVs, and other connected devices.
Regularly, a JavaFX contains the following components:
1.JavaFX Composer—Preview
The JavaFX Composer is a visual layout tool for JavaFX applications, like the NetBeans GUI Builder is for Java SE applications. The JavaFX Composer is a plug-in for NetBeans IDE 6.8. It provides:
•Visual editor for a form-like UI using components in JavaFX 1.2.1 SDK
•Dynamic design editing based on states
•Data access to Web Services, databases, and local storages
•Support for JavaFX binding
•Simple animation editor
•Multiscreen-size editing
2.JavaFX Script Editor
The JavaFX Script Editor brings you improved semantic and syntactic highlighting, source navigation, faster code completion, code folding, javadoc pop-ups, refactoring, and error
detection and hints, such as fixing import statements and packages.You can Go to Types, Find Usages, and navigate through code with hypertext links. The Palette allows you to drag and drop JavaFX structures for transformations, effects, animation, and more to your project. You can also let the code snippet generator surround selected lines or implement abstract methods, then use the Preview button to display the output of your visual code live.

194Chapter 5 Introduction to NetBeans IDE
3.Full JavaFX Mobile Support
The JavaFX SDK 1.2.x supports JavaFX Mobile and comes with a JavaFX Mobile Emulator. JavaFX Mobile applications run directly on the Java Micro Edition platform: Benefit from Java ME’s ubiquity, security, and advanced APIs, including support for media, GPS, cameras, file system, networking, and Bluetooth.
4.JavaFX Debugging and Profiling
The improved Debugger uses the common debugger infrastructure so you benefit from better extensibility and performance. Use the integrated Profiler for standard CPU or memory profiling, or simple monitoring to optimize your JavaFX application’s speed and memory usage. The options have been preset to default values by experts, but you can customize settings for a specific application.
All of these components are included in the JavaFX SDK.
In addition to these components, you also need JavaFX Compiler and JavaFX Runtime to compile your source codes to the bytecodes and run them in your machine using the Java Virtual Machine (JVM or Java Interpreter). However, because we are using NetBeans IDE as our JavaFX development environment, these two components have been installed automatically by NetBeans IDE when we use plug-in to add JavaFX components into this IDE at the beginning time.
5.3.3.2 JavaFX SDK
The JavaFX Software Development Kits (SDK) includes the following components (also included when you download NetBeans IDE for JavaFX):
•JavaFX Desktop Runtime
•JavaFX Mobile & TV Emulators (for Windows & Mac OS X)
•JavaFX APIs
•JavaFX Compiler
•JavaFX API documentation
•Samples
When you add JavaFX components into the NetBeans IDE by using plug-in, those components will be organized by the functionality to the different bundles based on different applications. Figure 5.33 shows an example bundle for applications developed in NetBeans IDE.
The developer bundle contains the following tools:
•NetBeans IDE for JavaFX
The JavaFX technology is integrated with the NetBeans IDE, a mature and powerful development environment that makes it easy to build, preview, and debug JavaFX applications. The NetBeans IDE for JavaFX is easy to learn, and it comes bundled with the JavaFX SDK and lots of sample applications. The NetBeans editor features a drag-and-drop palette to quickly add JavaFX statements, including transformations, effects, and animation. The new JavaFX Composer adds a visual editor for form-like user interfaces, along with support for animation, multiple screen sizes, and more.
•JavaFX Plug-In for NetBeans
If you are already using the NetBeans IDE, you can add the JavaFX plug-in to include support for developing JavaFX applications.
5.3 Exploring NetBeans IDE 6.8 195
Developer Bundle
NetBeans IDE
for JavaFX
JavaFX |
|
Plugin |
JavaFX |
for |
SDK |
NetBeans |
|
Figure 5.33. An example bundle for applications built in NetBeans IDE.
To develop and build a JavaFX application, you need to use the JavaFX Script programming language. Let’s have a closer look at this kind of language.
5.3.3.3 JavaFX Script Language
JavaFX Script is a scripting language designed by Sun Microsystems, forming part of the JavaFX family of technologies on the Java Platform. JavaFX targets the Rich Internet Application domain (competing with Adobe Flex and Microsoft Silverlight), specializing in rapid development of visually rich applications for the desktop and mobile markets. JavaFX Script works with integrated development environments, such as NetBeans and Eclipse. JavaFX is released under the GNU General Public License, via the Sun sponsored OpenJFX project.
JavaFX Script used to be called F3 for Form Follows Function. Its name was changed to JavaFX Script, and it became open sourced at JavaOne in 2007.
JavaFX Script language has the following important properties:
•Statically typed—when type checking is performed during compile time as opposed to run time.
•Declarative programming—a programming paradigm that expresses the logic of a computation without describing its control flow.
Like other OOP languages, JavaFX Script can be used to develop various targeting applications. The syntax used to create and apply variables, functions, and objects are similar to most other OOP languages. In the following sections, we will use an example to illustrate how easy it is to use JavaFX Script language to build a JavaFX application in NetBeans IDE 6.8.
5.3.3.4 Build a JavaFX Script Application
Inthissection,wewilldevelopaJavaFXScriptapplicationprojectJavaFXScriptCounter. The function of this project is simple and easy; it is used to perform simple counting between 0 and 9, and the output is the count result displayed in a single LED.
196 Chapter 5 Introduction to NetBeans IDE
Figure 5.34. The finished Name and Location page.
Let’s |
first create a new JavaFX Script application |
project under NetBeans |
IDE 6.8. |
|
|
5.3.3.4.1 |
Create a JavaFX Script Application Project |
Launch the NetBeans IDE |
and choose File|New Project. When the new project wizard appears, choose JavaFX as the category and press the Next button to continue.
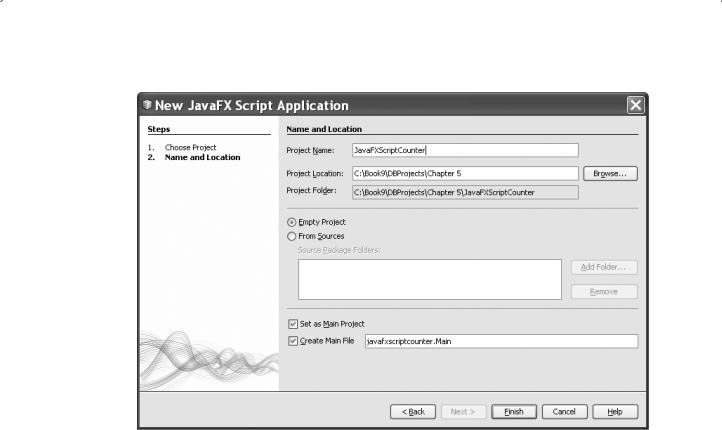
On the Name and Location page, type JavaFXScriptCounter for the Project Name, specify your desired location for the project’s files in the Project Location text field, and leave all the other default settings unchanged, as shown in Figure 5.34.
Click on the Finish button to complete this new project creation process.
The JavaFXScriptCounter project opens in both the Projects window and the Files window, and the Main.fx file opens in the source editor, as shown in Figure 5.35.
Notice that all JavaFX Script codes, including the codes created by the system or codes developed by the developer, are included within the Main.fx file by default. These codes include all operations to successfully perform a JavaFX Script application with declaring variables, creating functions and objects, and invoking functions. Several import statements and object literals such as Stage and Scene have been prewritten in this Main. fx file. These Object literals represent key concepts within the JavaFX application, and are described in Table 5.4.
It can be found from Figure 5.35 that four import statements are coded at the beginning of this script file to indicate the locations of associated packages that contain the related classes and components to be used in this project. Then the Stage and Scene

5.3 Exploring NetBeans IDE 6.8 197
Figure 5.35. The opened Main.fx file.
Table 5.4. Object literals created by default JavaFX Script projects
Object Literals |
Functions |
|
|
Stage |
The top-level container window required to display any visible JavaFX |
|
objects. The default instance variables title, width, and height define |
|
the text that appears on the window’s top border and its height and |
|
width. The scene variable defines an instance of the Scene object |
|
literal which sets the area in which you can place the JavaFX objects. |
Scene |
Similar to a drawing surface for the graphical content of your |
|
application. The scene instance variable has a content variable that is |
|
used to hold JavaFX graphical elements and defines the graphical |
|
content of your application. The instance variables, width, and height, |
|
define the width and height of the content area. |
Text |
Defines the graphical element that displays text in the scene. |
Font |
Defines the font used to display the text in the scene. |
|
|
objects are created and initialized with some default values, such as the title, width, height, and content of the Scene object. Also, the text font and starting values for both horizontal and vertical axes, x and y, are also set up for the Scene object.
Refer to Table 5.4 to get a more detailed description about these four components and their functionalities.
In addition to those components, JavaFX Script utilized different variables, functions, and objects. Table 5.5 lists syntax used to declare and create most popular variables, objects, and functions using JavaFX Script language.

198 Chapter 5 Introduction to NetBeans IDE
Table 5.5. Syntax used to declare and create JavaFX script variables and objects
Syntax |
Functions |
|
|
var variable_name; |
var keyword is used to declare a new script variable without |
var num1, num2; |
assigning any initial value, which means that this variable’s value |
|
can be assigned later. |
def variable_name = value; |
def keyword is used to define a new variable with an initial value. |
def num1 = 10; |
The difference between the var and the def is that the variable’s |
|
value cannot be changed if it is declared with the def keyword. |
class_name{ |
To create a new object based on an existing class, use this syntax. |
instance variable: value; |
The point is that the definition of the class must have been |
instance method: name; |
created and located at a package, and the package has been |
} |
imported into the project file. |
function f_name() { |
Declare a new script function. |
function body… |
You can pass arguments to any script function. The syntax used |
} |
to pass arguments to a function is: (arg_name: arg_type). For |
function add() { |
example, function add(num1:integer, num2:double) {…} |
var result = num1+num2; } |
|
f_name(); |
To invoke a JavaFX script function. Just call that function with its |
add(); |
name. |
|
|
Figure 5.36. The stored 10-digit image files.
5.3.3.4.2 Add Graphical Images into the JavaFX Script Project Since we need to use 0 9 images to display the counting number for the single LED, we need to download those images and save them in our project. The popular way to do that is to use a resources folder under our project folder to store any image or other resource files. To save time and space, we can download those 10-digit image files and directly store them in our current project folder.
Download the 0.png 9.png image files from the folder Images that is located at the Wiley ftp site (refer to Figure 1.2 in Chapter 1), and save them in our project folder javafxscriptcounter in which our Main.fx file is located, as shown in Figure 5.36.