

0470045272
.pdf11_045275 ch05.qxp 11/28/06 8:25 PM Page 91
Chapter 5 Setting Up a Wireless Studio 91
5.3 Stand-mounted softbox
Stand-mounted softboxes come in a multitude of shapes and sizes ranging from squares to rectangles to ovals to octagons. Most photographers use standard square or rectangular softboxes. However, some photographers prefer to use oval or octagonal ones for the way that they mimic umbrellas and give a more pleasing round shape to the catchlights in the eyes. This is mostly a matter or personal preference. I, for one, usually use a medium sized rectangular softbox.
As with umbrellas, the size of the softbox you need to use is dependent on the subject you are photographing. Softboxes can be taken apart and folded up pretty conveniently — most of them come with storage bag that can be used to transport them.
Softbox alternatives
If you are working on a budget, or just aren’t sure you are ready to invest in a softbox, a more economical approach is to use a diffusion panel. A diffusion panel is basically a frame made out of PVC pipe with a reflective nylon stretched over it. It functions much in the same way as a soft box, but you have more control over the quality of the light. Because the PVC frame can be disassembled easily and packed away into a small bag for storage or for transport to and from location, it makes it great for the portable studio.
Diffusion panels are usually about six feet tall and have a base which allows it stand up without the need of a light stand. The diffusion panel is placed in front of the subject. Your Speedlight is then mounted on a light stand using the AS-19 adaptor that is supplied with it. You can move the Speedlight closer to the diffusion panel for more directional light or further away for a softer and more even light. For a full length portrait, you should place two Speedlights behind the panel, one near the top and one closer to the bottom.
A diffusion panel can also be used as a reflector when used in conjunction with another light source. Diffusion panels can be purchased at most major camera stores at a fraction of the price of a good softbox.
Tip |
If you’re feeling |
crafty, a |
diffu- |
|
sion panel can be made from |
||
|
items easily found in your local |
||
|
hardware and |
fabric |
store. |
|
Numerous sites are on the |
||
|
Internet that offer advice on |
||
|
how to construct one. |
|
|

11_045275 ch05.qxp 11/28/06 8:25 PM Page 92
92 Part II Creating Great Photos with the Creative Lighting System
5.4 A diffusion panel
Backgrounds and
Background Stands
When you want to isolate the subject, making it the sole focus of the image, use a background. Backgrounds can also be used to compliment the color of an object or to accent a certain feature of the person whose portrait you are taking.
Backgrounds come in almost as many colors and materials as you can imagine. The following sections discuss some of the different types and applications.
Seamless paper backdrops
The most common type of backgrounds are made of paper. Seamless paper backdrops are inexpensive and come in every color imaginable. Standard rolls of background paper range in size from 3-feet to 12-feet wide, and can be as long as 36 feet. The great thing about using paper as a background is that if it gets dirty or torn you can cut it off and pull more down from the roll.
Starting out, getting a roll of neutral grey paper is best. You can use this color for just about any subject without worrying about the color of your subject clashing with the background. White paper is good for photographing high-key subjects, while a black background is good for photographing lowkey subjects.
11_045275 ch05.qxp 11/28/06 8:25 PM Page 93
Chapter 5 Setting Up a Wireless Studio 93
5.5 A seamless paper background
For more information on high key and low key, see Chapter 3.
In order to keep your portable studio manageable, sometimes it might be necessary to cut down your seamless paper backdrop. For example, when I have to travel with my portable portrait studio, I usually take a 53 inch wide by 36 foot roll of seamless and cut it down to 48 inches wide with a hacksaw in order to make it fit into the case that holds my backdrops and stands.
Tip |
When shopping for a backdrop, |
|
consider www.photography |
|
props.com and www.back |
|
dropsource.com, both on the |
|
Web. |
Tip |
When |
using white, grey, or |
|
black |
seamless backgrounds, |
|
you can use gels on a |
|
|
Speedlight aimed at the back- |
|
|
drop to add color. A gel is a |
|
|
piece of colored film that you |
|
|
place over the light source in |
|
|
order to change the color. Nikon |
|
|
sells a colored gel kit, the SJ-1, |
|
|
which includes yellow, red, blue, |
|
|
and amber gel filters as well as |
|
|
filters |
for balancing tungsten |
|
and fluorescent with flash from |
|
|
the Speedlight. Many different |
|
|
companies sell these gels at |
|
|
reasonable prices. |
|
Muslin backdrops
Muslin is an inexpensive lightweight cotton material. When used for backdrops, it is usually dyed different colors with a mottled pattern to give the background a look of texture. You can purchase muslin at most well-stocked photography stores or online. If you have very specific needs, there are companies that dye muslin fabric to a custom color of your choice.
Muslin is very convenient to use. It’s very lightweight, it folds up easily into a small bundle, and it is pretty durable. You can drape it over your background stand or you can easily tack it to a wall. For a portable studio, this flexibility is very advantageous because the muslin doesn’t take up too much valuable space when traveling.
11_045275 ch05.qxp 11/28/06 8:25 PM Page 94
94 Part II Creating Great Photos with the Creative Lighting System
5.6 A muslin backdrop shown in a studio setting
Muslin is very versatile, and although it’s much more suited to portraits, it can be used successfully for product shots as well.
Canvas backdrops
Canvas backdrops are very heavy duty. They are usually painted a mottled color that is lighter in the center and darkens around the edges, which helps the subject stand out from the background. These types of
backdrops are almost exclusively used for portraits.
When considering a canvas backdrop, in addition to the weight factor, you should consider the cost as well — they are expensive. Although you can get them in lighterweight smaller sizes, I wouldn’t generally recommend using canvas backdrops for a portable studio as they are unwieldy and not very versatile.

11_045275 ch05.qxp 11/28/06 8:25 PM Page 95
Chapter 5 Setting Up a Wireless Studio 95
Background stands
Background stands, amazingly enough, hold up your backgrounds. Most background stand kits have three pieces: two stands and a cross-bar. The cross-bar slides into a roll of paper or other backdrop and is held up by the stands. The cross-bar has two holes, one at either end, which slide over a support pin on the top of the stand. The crossbar is usually adjustable from 3 to 121⁄2 feet, to accommodate the various widths of backdrops. The stands are adjustable in height up to 101⁄2 feet. Most kits also come with either a carrying case or a bag for maximum portability.
There a varying degrees of quality in background stands. The more sturdy the stand, the more expensive it is. For a portable studio, a decent medium-weight background stand kit suffices.
Space Requirements
Portable studios, by their very nature, don’t require a lot of space to set up. As always, the more space you have, the more comfortable you are.
If your portable studio is going to be set up mostly in one place, such as a spare room in your house, then you’re going to want to take measurements of the width of the space to make determinations, such as how wide your backdrop can be. Another consideration is what type of photography you plan to do. If you’re going to be photographing full length portraits, for example, the length of the room needs to be longer than if you’re planning on photographing mainly head and shoulders portraits.
5.7 A background stand kit with seamless paper backgrounds
Setting up indoors
The first thing you want to do when setting up indoors is to find a space wide enough to accommodate your background and stands. Remember that although your backdrop may only be six feet wide, the stands extend two or three feet beyond that. Next, you want to be sure that you have enough room in front of the background to be able to move back and forth to enable you to compose your picture properly.
Depending on the type of indoor photography you are planning, your considerations differ, as the next sections explain.
Portraits
When photographing portraits, you want to use lenses with a longer focal length so you don’t get the distortion that wide angle lenses often have. Unfortunately, with longer lenses comes the need for more space.

11_045275 ch05.qxp 11/28/06 8:25 PM Page 96
96 Part II Creating Great Photos with the Creative Lighting System
If you use a long focal length lens to photograph a head and shoulders portrait, you don’t want to find your back up against the wall when you only have the head in the frame. For example, if you use an 85mm lens with a D200, you need at least 12 feet between the camera and the subject, two or three feet behind the camera for you, and anywhere from three to six feet between the model and the background to be sure the model isn’t casting shadows on the backdrop.
Be sure the area is wide enough to accommodate both the models and the lights comfortably. You want to have enough width to be able to move the lights further away from the model if needed.
When setting up to photograph portraits, you need to first decide how you want your lighting to look. There are five main types of portrait lighting.
These five types are
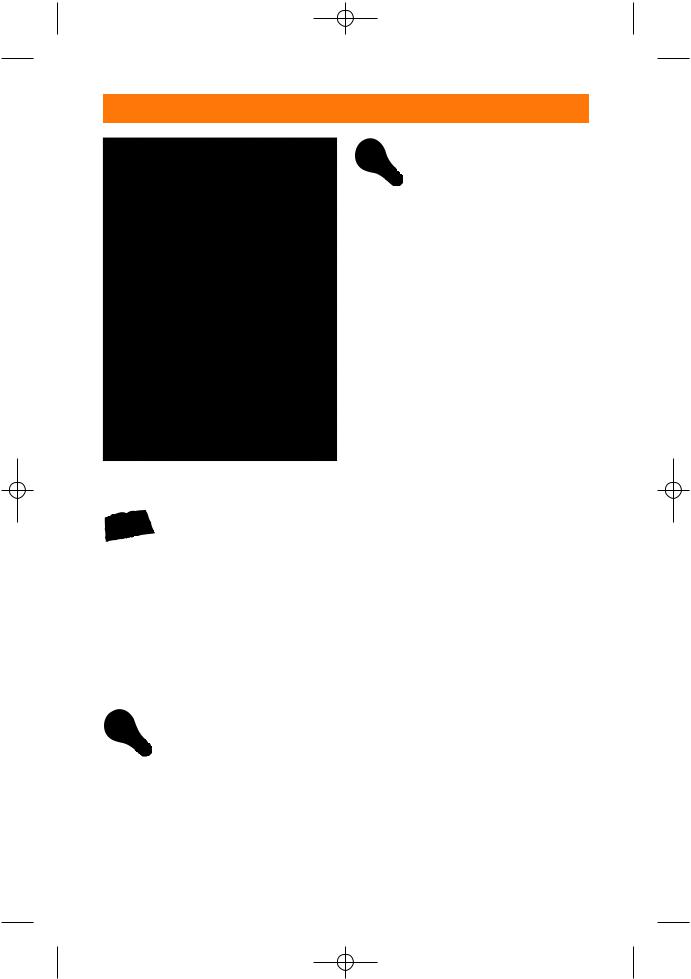
Shadowless. This lighting is when your main light and your fill light are at equal ratios. Generally, you set up a Speedlight at 45 degrees on both sides of your model. This type of light can be very flattering although it can lack moodiness and drama.
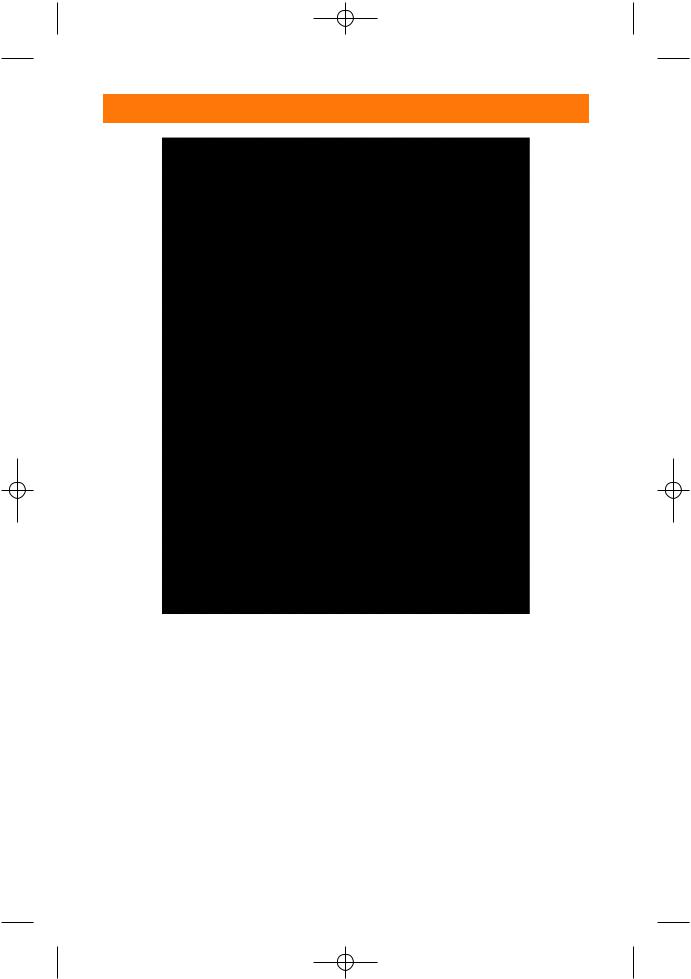
Butterfly. Also called Hollywood glamour, this type of lighting is mostly used in glamour photography. It gets its butterfly name from the shape of the shadow that the nose casts on the upper lip. You achieve this type of lighting by positioning the main light directly above and in front of your model.
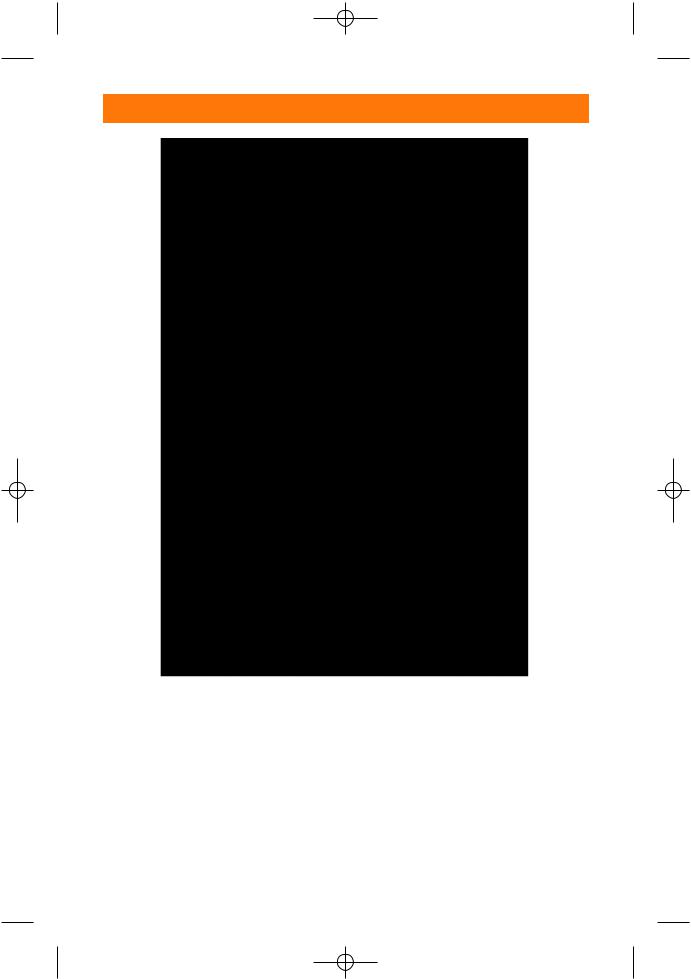
Loop. Also called Paramount, this is the most commonly used lighting technique for portraits. It was used so extensively by Paramount Studios in Hollywood’s golden age, that this lighting pattern became synonymous with the studio’s name. This lighting pattern is achieved by placing the main light at a 15-degree angle to the face making sure to keep the light high enough so that the shadow cast by the nose is at a downward angle and not horizontal.
Rembrandt. This dramatic lighting pattern was used extensively by the famous artist Rembrandt van Rijn. The lighting is a moody dramatic pattern that benefits from using less fill light. The Rembrandt style is achieved by placing the light at a 45-degree angle aimed a little bit down at the subject. Again I emphasize using little or no fill light. This style is by far my favorite type of lighting.
Split. This is another dramatic pattern that benefits from little or no fill. You can do this by simply placing the main light at a 90-degree angle to the model.
11_045275 ch05.qxp 11/28/06 8:25 PM Page 97
Chapter 5 Setting Up a Wireless Studio 97
5.8 A portrait using shadowless light

11_045275 ch05.qxp 11/28/06 8:25 PM Page 98
98 Part II Creating Great Photos with the Creative Lighting System
5.9 A portrait using butterfly lighting

11_045275 ch05.qxp 11/28/06 8:25 PM Page 99
Chapter 5 Setting Up a Wireless Studio 99
5.10 A portrait using loop lighting

11_045275 ch05.qxp 11/28/06 8:25 PM Page 100
100 Part II Creating Great Photos with the Creative Lighting System
5.11 A portrait using Rembrandt lighting