

TheHackersManual2015RevisedEdition
.pdfHardware hacks
The AMD APU Athlon 5350 is cheap and cheerful and more than powerful enough for a humble NAS box.
memory is strongly recommended) and Btrfs can cause CPU spikes. Ext4 has a couple of RAID-specific options stride and stripe-width and it’s important to get these right so that
RAID chunks and filesystem blocks are |
24TB of finest |
|
|
Western Digital Red |
|
|
|
aligned. Stride is the number of filesystem |
|
|
|
storage. Capacious. |
|
|
|
blocks spanned by each chunk, so calculation |
|
|
|
|
|
|
|
is chunksize/blocksize. Ext4 uses 4k blocks |
|
|
|
by default (though you can use smaller ones |
smb.conf, there’s a few things you might want |
public = yes |
|
via the -b option if you want), so each of our |
to enable and disable. First, uncomment and |
read only = yes |
|
256k chunks span 64 blocks. Stripe width is |
edit the hosts allow line so that Samba |
;writable = yes |
|
this figure multiplied by the number of data |
access is restricted to the local network (eg |
Alternatively, to allow write access only for |
|
disks. In our four-disk array, each chunk is |
192.168. or 192.168.0.) and loopback |
users in the raidusers group: |
|
spanned across two disks and the other two |
interface only. Towards the end of the file you’ll |
# chown lxfraid:raidusers |
|
are devoted to the chunk’s parity, thus our |
find the Share Definitions section. Add the |
# chmod 775 /mnt/raid/public |
|
stripe width is 128 blocks. If we were using |
following block to make a share for our array: |
and then add the following inside the |
|
RAID5, then only one disk would be a parity |
[raid] |
[public] definition: |
|
disk, but we’re not so we formatted the array |
comment = LXF RAID |
writelist = @raidusers |
|
with the following: |
path = /mnt/raid |
Now we can start the Samba services and |
|
# mkfs.ext4 -v -L wdarray -m 0.5 -E |
public = no |
test our server: |
|
stride=64,stripe-width=128 /dev/md0 |
valid users = lxfraid |
# systemctl start {smbd,nmbd} |
|
The -m option sets the percentage of the |
writable = yes |
You should be able to access the Samba |
|
partition to reserve for the super-user. This |
|
|
shares from anywhere |
defaults to 5%, which is a little high for |
“Much of the complexity is |
on your network. |
|
large volumes. |
The nmbd service will |
||
Samba: shall we dance? |
obviated by the mdadm |
let you look up your |
|
Samba shares using |
|||
We’ll want to add at least one user called |
abstraction layer.” |
|
the \\hostname |
lxfraid, and change the permissions on /mnt/ |
|
(Windows) or smb:// |
|
|
|
||
raid to allow them to access our data silo: |
|
|
hostname (Mac/ |
# groupadd raidusers |
Later you can add more and put them in |
Linux) URI’s. But this can be temperamental |
|
# useradd -m -G raidusers -s /bin/bash lxfraid |
the raidusers group and set up permissions. |
and you may have better luck using your IP |
|
# chown root:raidusers /mnt/raid |
If you want to set up a public area that doesn’t |
address here. Nautilus and Dolphin will let you |
|
# chmod 775 /mnt/raid |
require authentication, first make a directory: |
browse workgroups from the Network section. |
|
Now we can start installing all the |
# mkdir /mnt/raid/public |
Machines wanting to see SMB shares will |
|
packages required. |
By default guest accesses are mapped to |
need at least the smbclient package installed |
|
# pacman -S samba |
the unprivileged user nobody, so if write |
in order to browse and mount network shares. |
|
As well as having a system account, |
access is needed you’ll need to chmod 777 |
If you can’t access your shares then good luck |
|
Samba users will need to have an entry in the |
this directory, and uncomment the last line in |
troubleshooting – the testparm command is |
|
smbpasswd file. This is achieved with: |
the following share definition.:[public] |
a good place to start, it will check your smb. |
|
# smbpasswd -a lxfraid |
comment = Guest area |
conf for anomalies. You can then set these |
|
Now edit and read the file /etc/samba/ |
path = /mnt/raid/public |
services to start automatically by replacing |
|
NAS a Build | hacks Hardware
The Hacker’s Manual 2015 | 101

Hardware hacks | Build a NAS
Hardware hacks
start with enable.
If you want to automatically mount your server from another machine on your network then you can add an /etc/fstab entry akin to the following:
//192.168.133.225/raid /mnt/raid cifs username=lxfraid, password=password 0 0
Storing passwords in this way is obviously not secure so only use this on machines where no one is going to pry. Also if for any reason the Samba service is not running, like the box is turned off, then startup on a machine with an fstab entry like this will be slowed down.
with ssh-keygen and add it to the /root/.
authorized_keys file. You could also disable root logins altogether by setting the above option to no, but then you’d have to do any admin tasks locally, ie plugging a keyboard and monitor into your NAS box.
An alternative is to follow our OwnCloud guide [see page 162] and add the Samba share using external storage.
Opening up to the world
Sometimes it is desirable to make your NAS accessible via the internet. This isn’t something you should do lightly, and nor is it something you should do using Samba. One way is to forward port 22 on your router to your NAS, and connect via SFTP. Make sure you’ve locked down the SSH server, in particular the line
PermitRootLogin without-password
is a good idea. This will restrict root access to public key only, so you’ll need to generate one
Since your external IP address is likely to change you’ll want to set up a dynamic DNS using a service such as DuckDNS, dyndns or no-ip. These services enable you to run a script or client program on your machine which will update the DNS mapping for your IP address. By setting up a cron job to run this periodically your machine will always be accessible by a constant domain name. Signing up to any of these services is straightforward, but DuckDNS enables you to
AM1 motherboards are limited when it comes to choice and features, but they’re all pretty small.
update things by a simple script, which befitting of the Arch KISS philosophy. Follow the instructions in the box (see the bottom of the page) to get it set up.
For the most part, your RAID will take care of itself. But keep an eye on /proc/mdstat – an entry like [UUUU] implies that everything is working fine, if a drive fails then you will instead get an F in this list. You can also get lots of information from:
# mdadm --detail /dev/md0
Those who prefer to go for a more handson approach will enjoy regularly ‘scrubbing’ their array. (There’s nothing wrong with that
after all.) This will check for any inconsistencies between the data and parity blocks, and will go on to try to repair them automatically.
To initiate a scrub:
# echo check > /sys/block/md0/md/sync_ action
This will take a while, the mdstat file will track its progress, but if you want to cancel it at any time then you’ll need to run:
# echo idle > /sys/block/md0/md/sync_action
There’s so much more you could do with your NAS, but we’ve run out of space this time to write more. Why not write to us and tell of your NAS-related adventures? Θ
DuckDNS setup
You can sign up to the DuckDNS service at |
Enter the following, replacing the domains |
automagically, you’ll need to install a cron |
www.duckdns.org using Twitter, Facebook, |
and token appropriately. |
daemon, let’s use the simple cronie |
Reddit or Google+. If you are an off-grid sort, |
echo url=”https://www.duckdns.org/ |
# pacman -S cronie |
then you’ll need to decide which is the lesser of |
update?domains=your_domain&token=your_ |
The next command (reverting to the |
these four evils and create a special account. |
token&ip=” | curl -k -o ~/duckdns/duck.log -K - |
lxfraid user) will open an empty crontab (using |
Change to the lxfraid user and create our |
Then make it executable and give it a test run: |
the nano editor so as not to induce any |
DuckDNS updater script: |
$ chmod 700 duck.sh |
inevitable vi-rage): |
# su lxfraid |
$ ./duck.sh |
$ EDITOR=nano crontab -e |
$ mkdir ~/duckdns |
You should get some output from curl, and |
Add the following line to run duck.sh every |
$ cd duckdns |
hopefully the duck.log file should now contain |
five minutes: |
$ nano duck.sh |
the encouraging text OK. To run this |
*/5 * * * * ~/duckdns/duck.sh >/dev/null 2>&1 |
102 | The Hacker’s Manual 2015

Try the new issue of MacFormat free* in the award-winning app! bit.ly/macformatipad
Packed with practical tutorials and independent advice – discover why MacFormat has been the UK’s best-selling Apple magazine for seven years!
* New app subscribers only

Hardware hacks | Robotics
Hardware hacks
Raspberry Pi
Break out your Raspberry Pi and start a new robot civilization that is three laws safe.
obots have been a staple Rof science fiction since
the 1950s, with towering silver
bodies bringing doom to the human race on countless occasions. But in reality robots have been working with us in our factories,
under the sea and in space. Wherever there is a job too dangerous for human beings a robot can be found.
But robots are no longer just an expensive tool for factories and the rich. Thanks largely
to low cost development platforms, such as the Raspberry Pi, we can bring robots into our daily lives and more importantly into our
schools. Building robots is a fun and rewarding experience and covers many different skills in
one project, such as building, programming and electronics.
To program the robot we use Python, which has been widely adopted as the main language for teaching children to code in the UK. The
Raspberry Pi Foundation has worked hard to ensure that Python is the leading language for Pi-based projects. Building the robot requires
104 | The Hacker’s Manual 2015
Hardware hacks
us to either select a kit of parts from many of the online retailers, which is what we have done in this feature. Or we could create our own solution from a plethora of components on the market.
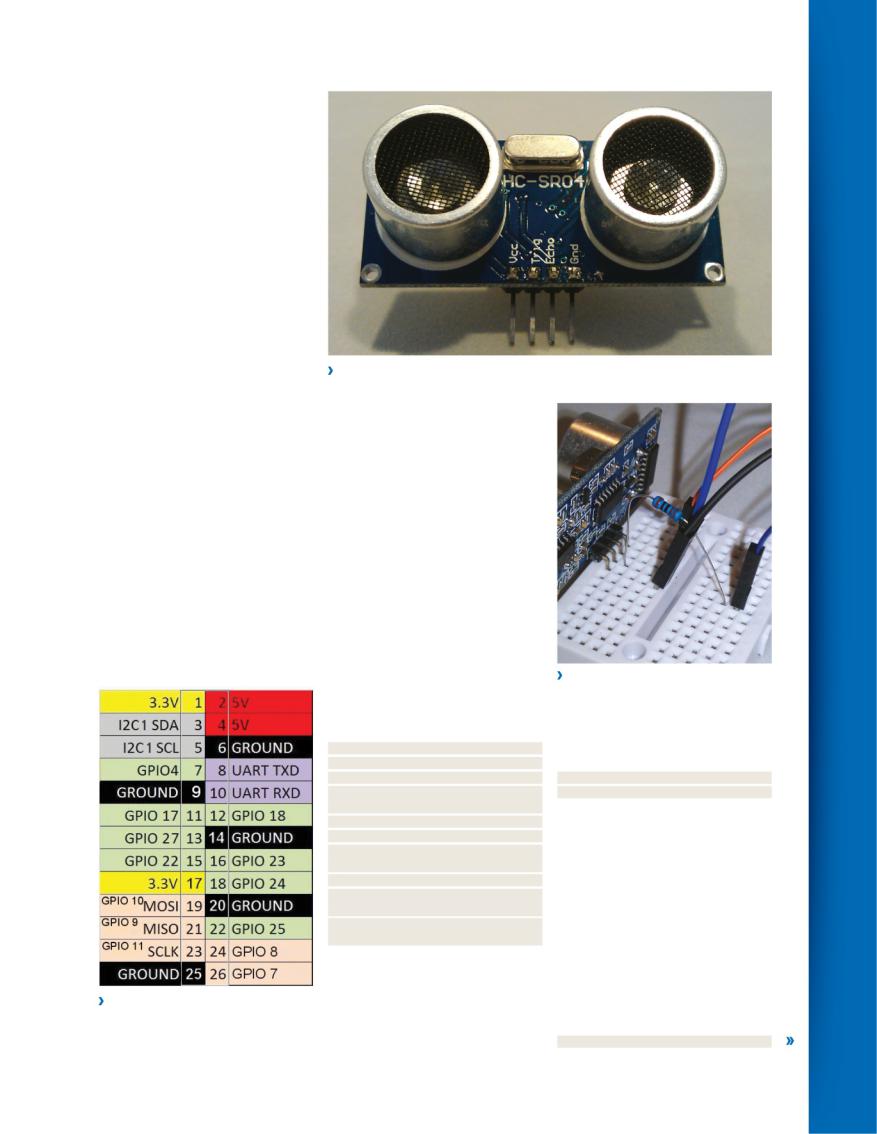
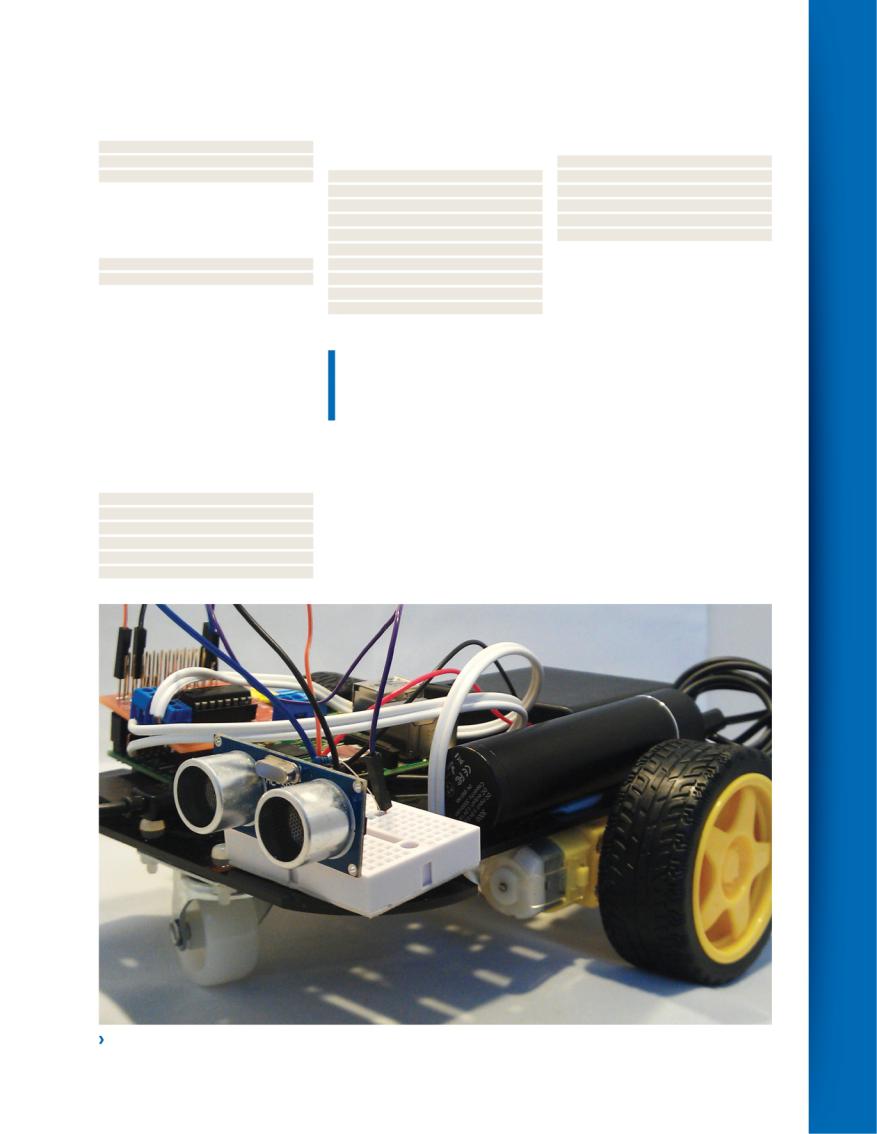
The electronics of the robot are the various connections made to the robot hardware via the Raspberry Pi GPIO (General Purpose Input/Output) pins. Which in this case interact with a motor control board and an ultrasonic sensor. When plugged into the Raspberry Pi these components become extensions of our Pi and enable us to dive into the world of physical computing.
Children, and adults alike, need exciting projects to help keep their focus, and this is where robots, Python and Raspberry Pi meet. Using the Raspberry Pi and a few cost effective components we can build a simple robot that will attempt to find its way out of a maze using only around 80
lines of Python code. By the end of this feature you will have your first robot ready to explore the world.
The Ryanteck motor control board is a fantastically simple board to use, but first it requires soldering together. You can purchase a pre-soldered board for only a few pounds more, and this is recommended if you are new to soldering. Ryanteck sells the motor control board as part of a robot kit, and this is the most cost effective method to gather all of the parts needed.
The board is relatively straightforward to assemble and Ryan has a great series of instructions at http://ryanteck.uk/rtk-000- 001-assembly which are easy to follow. The included chassis is also easy to work with and Ryan has a series of instructions via his
The GPIO pin layout has two layouts: a logical layout called ‘Board’, and the
‘Broadcom BCM’ layout. For reference we used the BCM GPIO reference.
The ultrasonic sensors used with our robot are similar to parking sensors in modern cars.
website that you should follow but feel free to adapt to meet your needs. A top tip is when attaching components such as the battery box and USB power, use Blu-tack (or any other type of temporary adhesive) to secure them in place.
Python code
To control the hardware which makes up the physical side of our project we need software in the form of Python code that will provide a sequence of steps for our robot to follow. A simple robot would be programmed so that it would be able to move forwards,
backwards, turn left and turn right, with these commands placed into a sequence that the robot would follow.
To trigger the sequence we are using an ultrasonic sensor which gives our robot vision. Using pseudocode, which is a tool to write down how a program will behave in an easy to understand manner, let's examine the sequence.
Import any modules that we require Create any variables
Set up Raspberry Pi GPIO
Create function to handle the ultrasonic sensor
Create functions to handle motor control Create an infinite loop
Call the ultrasonic function to measure the distance from an object
Create a conditional statement
If distance from robot to object is greater than 10cm, go forward
Else If the distance from the robot to object is less than 10cm, turn right
So let’s start with our run through of the code, and first of all we look at modules.
Modules are external libraries of Python code that can be easily imported into your project. For example we use the RPi.GPIO module to enable our project to use the GPIO pins of our Raspberry Pi. To import a module,
Resistors look small but play a big part in protecting your Pi from too much power.
for example the time module, we can simply use the import command. In our code we have two imports: one is for time, the other is for the GPIO functionality.
import RPi.GPIO as GPIO import time
You'll notice that the time module has been imported differently from the RPi.GPIO module. Using the ‘as’ method we can rename a module to make it easier to work with, in this case shortening RPi.GPIO to GPIO. This will prove handy throughout our code later in the project.
Next, we see three variables, one of which is a special type of variable – a global variable called distance. Global variables are special types of variables that can be used both inside and outside of functions (which we will cover later in this project). Our
other two variables are echo and trigger, and they store the GPIO pin numbers used for our ultrasonic sensor.
global distance
Robotics | hacks Hardware
The Hacker’s Manual 2015 | 105

Hardware hacks | Robotics
Hardware hacks
trigger = 11 echo = 8
Now let's turn to setting up the GPIO pins. All Raspberry Pi models have two GPIO pin mapping layouts: a logical pin numbering system called BOARD and another called BCM. BCM is an abbreviation of Broadcom, which is the company behind the system on a chip (SoaC) that the Raspberry Pi uses. BCM layout is not a logical layout; rather it breaks out the relevant paths from the SoaC to the GPIO enabling us to use them.
In this project we will use the BCM layout as directed by the Ryanteck documentation.
GPIO.setmode(GPIO.BCM)
Whether you use BOARD or BCM you can still use the GPIO in your projects, but first you must set up what each pin in our project will do. For example:
GPIO.setup(17, GPIO.OUT)
This instructs our project that pin 17 is to be set up as an output, by which we mean that current will flow from the pin to the Ryanteck motor control board.
Rather than use hard-coded numbers, we can also use variables to store the pin number, and we do this in our project with the echo and trigger variables.
GPIO.setup(echo, GPIO.IN) GPIO.setup(trigger, GPIO.OUT) GPIO.setup(17, GPIO.OUT) GPIO.setup(18, GPIO.OUT) GPIO.setup(22, GPIO.OUT) GPIO.setup(23, GPIO.OUT)
Crime and pin-ishment
The Ryanteck board uses four pins on the GPIO to communicate with the motors on the underside of our chassis. These pins are 17, 18, 22 and 23. Typically 17 and 18 will be linked to the left motor, and 22 and 23 will be for the right. The left motor is connected to M1 on the
board and the right to M2.
With the setup complete now we create a series of functions that will contain all of the code necessary to perform certain tasks.
The first function to address is our ultrasonic range finder.
Ultrasonic sensors work by firing an ultrasonic pulse of sound towards an object and then waiting to receive the pulse back. The time taken is then used to calculate the distance between the sensor and object. In our code we first define the name of the function and note that it requires an argument, which in this case is sensor, a variable that will be used to identify the sensor, enabling multiple sensors to be used in future projects. We also reference the ‘global distance’ variable that we earlier created.
def ultra(sensor):
Unlike other boards the Ryanteck board requires no specialist Python modules, which makes it the ideal choice for mid-range projects.
Motors come in various shapes and sizes, from a slow 298:1 geared motor to the large and speedy DC motors used in our project.
global distance
Now we create the start of a conditional statement, in this case if...else. We start with "if the sensor argument equals zero wait for 0.3 seconds", allowing the ultrasonic sensor time to ‘settle’. We then instruct the trigger pin to turn on and send a current to the ultrasonic sensor for 0.00001 of a second, just enough time for a quick pulse. We then turn off the trigger pin, stopping the pulse.
if sensor == 0: time.sleep(0.3) GPIO.output(trigger, True) time.sleep(0.00001) GPIO.output(trigger, False)
When a pulse is sent, the sensor waits for an echo pulse to be received, and while there is no pulse received the code uses the following logic: while there is no pulse, set the variable signaloff to the current time using the function time.time(). But when an echo is received, the variable signalon will store the time that the pulse was received.
while GPIO.input(echo) == 0: signaloff = time.time() while GPIO.input(echo) == 1: signalon = time.time()
Now we need to do a little GCSE maths to work out how far away an object is. We first create a variable called timepassed, and in there we store the answer to the sum signalon minus signaloff. Once we have this answer we then create another variable called distance, which is our global variable, and this stores the answer to the sum timepassed multiplied by 17000. Why 17000, you ask? 17000 is half of the speed of sound (cm/s), as we only need to know how long it takes to receive an echo from an object we halve
106 | The Hacker’s Manual 2015
|
|
Hardware hacks |
||
34000 to 17000 to give us this figure. Lastly |
The above function can be replicated to |
then the robot will use the forward function to |
||
we return the distance, which prints the |
handle turning the robot. It requires a little |
move forward, but if the distance is less than |
||
distance variable in the shell output. |
tweak to enable the robot to turn on the spot |
10cm then the robot will attempt to turn right |
||
timepassed = signalon - signaloff |
in a similar fashion to a tank. Here is the code |
in hope of escape. |
|
|
distance = timepassed * 17000 |
to turn left. |
while True: |
|
|
return distance |
def left(): |
ultra(0) |
|
|
Finally we close the if statement and |
GPIO.output(17,0) |
if distance > 10: |
||
move on to the else part of the condition. |
GPIO.output(18,1) |
|
forward() |
|
Else is used if the first condition is false. We |
GPIO.output(22,0) |
elif distance < 10: |
||
simply print ‘Error’ on the screen and repeat |
GPIO.output(23,1) |
|
right() |
|
the process. |
time.sleep(1) |
So now we have a robot ready to find its |
||
else: |
GPIO.output(17,0) |
way out of a maze, but how far can we take |
||
print "Error." |
GPIO.output(18,0) |
this project? The answer, to nick a cheesy line |
||
Our other functions handle the control of |
GPIO.output(22,0) |
from Rocky Balboa, is “if you’re willing to go |
||
the motors attached to the control board. |
GPIO.output(23,0) |
through all the battling you got to go through |
||
Pull together |
Getting the correct combination of motors |
to get where you want to get, who’s got the |
||
|
|
right to stop you?” |
||
To go forward we need to instruct both |
“We can add sound sensors |
From this simple |
||
motors to work together and in the same |
platform we can add |
|||
direction, and for our wiring setup we used |
that enable our robot to react |
further sensors such |
||
pins 17 and 23 for our motors. To turn them |
as line sensors which |
|||
on we use the number 1, which refers to both |
to sound and run away.” |
enable our robot to |
||
True and High in programming logic. We then |
follow a line on the |
|||
|
|
|||
wait for one second, which is enough time for |
|
|
floor, used heavily in |
|
the robot to move a few centimetres. Then we |
to turn on and off can be a little tricky, as each |
the manufacturing industry. We can add |
||
turn off pins 17 and 23 using 0, which signifies |
motor can work in two directions. Tinkering is |
sound sensors that enable our robot to react |
||
False and Low. |
required for the best results. |
to sound and run away. We can stream video |
||
def forward(): |
Our last section of code is rather simple |
live from our robot to the internet and add |
||
GPIO.output(17,1) |
but effective. It starts off with an infinite loop |
remote controls via a simple web page. |
||
GPIO.output(23,1) |
and then calls the function that we created |
Robotics is a great platform to learn with |
||
time.sleep(1) |
earlier to measure the distance from the robot |
as the sky is the limit – literally: you could |
||
GPIO.output(17,0) |
to an obstacle. If the distance between the |
build a Pi-powered drone aircraft. Enjoy your |
||
GPIO.output(23,0) |
robot and the object is greater than 10cm |
new robot – you could even call it li’l Arnie. Θ |
||
Robotics | hacks Hardware
Our robot has two wheels that provide motion and a further front trolley wheel to stabilise the robot.
The Hacker’s Manual 2015 | 107

Hardware hacks | Pi3D
Hardware hacks
Pi3D
Discover that 3D graphics with Python and Pi3D on the Pi can be as easy as pie to play with.
espite its itsy-bitsy form factor Dand notwithstanding its fairly
low CPU power, the Pi is blessed with some
workman-like graphics hardware. Specifically, the Broadcom VideoCore IV is a dual-core affair, supporting OpenGL ES 2.0 and hardware decoding of 1080p
30fps h.264 video. All well and good, but what is OpenGL ES and how can we use it to make pretty graphics? Good questions, dear reader, and it so happens that this article is devoted to their answers.
OpenGL has bindings available for many languages, but using these directly is not for
the feint of heart – programming in OpenGL is not really anything like programming in Python. Fortunately for the pythonistas, there
are a few options to avail yourself of all the 3D goodness without having to conformally map your brain around so many alien concepts.
For example, there is Intel’s Clutter using Cogl as a backend [see Linux Format 133]. This is still a popular way to do things, surfaces are abstracted to Stages, and things that move
108 | The Hacker’s Manual 2015

Hardware hacks
|
|
and shadows to create a 3D effect, unlike uv_ |
|
|
|
flat, which just renders the texture with no |
|
|
|
colour transformation. The uv_reflect shader |
|
|
|
reflects one image in another one. We shall |
|
|
|
use it to reflect the bump map image in the |
|
|
|
moons’ surfaces, in the smaller moon, we also |
|
|
|
reflect the stars. |
|
|
|
The demos come with a whole variety of |
|
|
|
imagery in the textures subdirectory. |
|
|
|
The PNG files here have transparency |
|
|
|
information, which is useful as we will be |
|
|
|
interested in what’s going on behind them. |
|
|
|
This is a 3D tutorial, afterall. For example, we |
|
|
|
will shortly overlay the mostly transparent file |
|
|
|
earth_clouds.png on top of our earth, to give |
|
|
|
it a vaguely ethereal atmosphere. All sunshine |
|
|
|
makes for a desert, a wise man once said. |
|
|
|
The True argument in the first line specifies |
|
|
|
that partial transparency is respected for our |
|
Buckfast Abbey: Remember, ‘Tonic’ does not imply health-giving or medicinal properties. |
clouds. First, we load all the textures: |
||
cloudimg = pi3d.Texture(“textures/earth_ |
|||
|
|
||
blossomed. You can read the official release |
DISPLAY = pi3d.Display.create(x=50, y=50) |
clouds.png”,True) |
|
here: www.raspberrypi.org/pi3d. But by now |
DISPLAY.set_background(0,0,0,1) # |
earthimg = pi3d.Texture(“textures/world_ |
|
you’re probably itching to get started, so |
r,g,b,alpha |
map.jpg”) |
|
follow the instructions (see Installing Pi3D On |
Shady business |
moonimg = pi3d.Texture(“textures/moon. |
|
Raspbian, below) and you’ll be all set. |
jpg”) |
||
Pi3D is best learned by example, so lets |
Part of the magic of OpenGL (and OpenGL ES) |
starsimg = pi3d.Texture(“textures/stars2.jpg”) |
|
start with the Earth.py file in the demos |
are shaders. Shaders are programs written in, |
watimg = pi3d.Texture(“textures/water.jpg”) |
|
directory. This will teach us all about spheres, |
surprise, a shader language, in our case GLSL, |
moonbmp = pi3d.Texture(“textures/moon_ |
|
textures, keyboard input and a little bit of |
and handle the reflections, shadows and other |
nm.jpg”) |
|
celestial geometry. |
interactions between light and surfaces, |
Textures aren’t really of any worth without |
|
Since the world is, or ought to be, |
volumes and points. GLSL follows a C-like |
some sort of surface onto which they can be |
|
transitioning to Python 3 [see Features, Linux |
syntax, and is designed to take advantage of |
mapped. We’re going to draw the Earth and |
|
Format 195] we begin with some forward |
the huge number of shader units on modern |
the moon, which we will represent with |
|
compatibility courtesy of the __future__ |
graphics hardware. As such, the general idea |
spheres. We’ll define two spheres for the |
|
module. Then we import some trig functions, |
is to have many small shader programs |
Earth: one showing the surface details, and |
|
since you can’t get far without sin and cos, |
running in parallel to collectively produce |
one (with a slightly larger radius) for rendering |
|
and the pi3d module itself. The fun begins |
complicated and pleasing results. |
the atmosphere and other shader effects. |
|
with the set up of the all-important DISPLAY |
Pi3D wisely keeps the gruesome details |
We will also have two moons, giving a |
|
object. Since most objects rely on the |
of its shader implementation locked up behind |
hierarchal system of rotations in which a |
|
existence of such an object, most Pi3D |
the scenes. But that doesn’t stop us from |
smaller moon orbits a larger one which in turn |
|
projects will feature this line quite early on. |
getting some nice effects for our Earth, |
orbits the Earth. We also specify a plane on |
|
The object maintains timing information |
moon and stars: |
which to draw the background starfield. |
|
which is useful for animations. You can pass |
shader = pi3d.Shader(“uv_light”) |
Besides specifying the requisite radii and |
|
screen dimensions to the create() function, |
shinesh = pi3d.Shader(“uv_reflect”) |
centres, the Sphere construct also takes two |
|
we use a small 50x50 window which we set up |
flatsh = pi3d.Shader(“uv_flat”) |
extra parameters, slices and sides which |
|
with a black, opaque background: |
The uv_light shader uses light directions |
decree the number of latitude and segments |
|
Installing Pi3D on Raspbian
Pi3D has a few dependencies, including some |
Pip repositories, so you’ll want to install Pip, and |
Using 128MB will suffice, and should still |
headers which you’ll find in the Raspbian |
use it to grab ‘em: |
enable you to run a few desktop applications. |
repositories. So first update and upgrade, then |
$ sudo apt-get install pip |
The Pi3D demos can be cloned from GitHub: |
install the required packages: |
$ sudo pip install Pillow |
$ cd ~ |
$ sudo apt-get update |
$ sudo pip install pi3d |
$ git clone git://github.com/pi3d/pi3d_demos |
$ sudo apt-get upgrade |
By default, the 512MB Pi models, B and B+, |
This will create a directory ~/pi3d_demos, |
$ sudo apt-get install python-dev python- |
allocate 64MB to the GPU. While many of the |
from which you can, for example, explore |
setuptools libjpeg-dev zlib1g-dev libpng12-dev |
Pi3D demos will work fine with these rations, |
Buckfast Abbey: |
libfreetype6-dev |
some require a little more. You can change the |
$ cd ~/pi3d_demos |
Pi3D and the Pillow Python library on which it |
GPU memory allocation, among other system |
$ python BuckfastAbbey.py |
depends aren’t in the Raspbian repositories at |
settings, with the raspi-config utility. |
Unfortunately, the Abbey shop, stocking the |
the present time, but fear not: they exist in the |
$ sudo raspi-config |
famously fortified tonic wine is missing. |
Pi3D | hacks Hardware
The Hacker’s Manual 2015 | 109

Hardware hacks | Pi3D
Hardware hacks
by which the sphere is approximated. It’s true, even in this day and age we haven’t evolved beyond pixels and straight lines, so we can’t draw an actual sphere. We can, however, get a nice easy way to work with simple keyboard input, which we will use later for the sole purpose of ending the program:
mysphere = pi3d.Sphere(radius=2, slices=24, sides=24, name=”earth”, z=5.8)
mysphere2 = pi3d.Sphere(radius=2.05, slices=24, sides=24, name=”clouds”, z=5.8) mymoon = pi3d.Sphere(radius=0.4, slices=16, sides=16, name=”moon”)
mymoon2 = pi3d.Sphere(radius=0.15, slices=16, sides=16, name=”moon2”) myplane = pi3d.Plane(w=50, h=50, name=”stars”, z=30)
mykeys = pi3d.Keyboard() |
We need clouds to make rain, and we need alpha channels to let the light through. |
|
If you don’t specify x, y or z co-ordinates |
|
|
for your sphere, it is placed at the origin. |
which makes for a nice effect and is vaguely |
the moons takes a couple of numbers after |
Celestial ballet |
more accurate since the clouds aren’t stuck to |
the textures, which specify the number of tiles |
the Earth. And seeing as everything else is |
to use and the strength of the reflection |
|
We describe the orbit of the moon around the |
spinning, we also rotate the background |
respectively. The clouds have to be drawn last |
earth and that of the secondary moon around |
starfield, since this is only two-dimensional, |
since otherwise the transparency blending will |
the moon with the parameters rot1 and rot2 |
the only sane axis to rotate about is the z-axis. |
not work: You’re not allowed to subsequently |
respectively. These will be incremented as the |
We redraw the moon and moon2 spheres |
add objects further away and obscured by the |
main loop (which we’re getting to) progresses. |
by changing their position properties, using |
semi-transparent one when blend = True is |
The radius of each orbit is given by m1Rad |
high school trigonometry to come up with |
specified, so it’s safest to add such textures |
and m2Rad. Initialising these to 90 and 0 |
new co-ordinates. The DISPLAY object we set |
last of all. |
degrees respectively means that (from our |
up conveniently gives us a main event loop, so |
mysphere.draw(shader, [earthimg]) |
point of view) the big moon is in front of the |
we use this to govern our celestial ballet: |
mymoon.draw(shinesh, [moonimg, |
Earth and the little moon is horizontally |
while DISPLAY.loop_running(): |
moonbmp], 6.0, 0.0) |
adjacent to the big moon. |
myplane.rotateIncZ(0.01) |
mymoon2.draw(shinesh, [watimg, |
rot1=90.0 |
mysphere.rotateIncY(-0.1) |
moonbmp, starsimg], 3.0, 0.8) |
rot2=0.0 |
mysphere2.rotateIncY(-0.14) |
myplane.draw(flatsh,[starsimg]) |
m1Rad = 4 |
mymoon.position(mysphere.x() + |
mysphere2.draw(shader, [cloudimg]) |
m2Rad = 0.6 |
m1Rad*sin(rot1), mysphere.y(), mysphere.z() - |
Now we increment the rotation parameters |
As well as rotating around other bodies, |
m1Rad*cos(rot1)) |
– the smaller moon orbits the larger one |
we also rotate the Earth and the two moons |
mymoon.rotateIncY(-0.1) |
about four times as fast as the larger moon |
about their own y axis. The y axis is the one |
mymoon2.position(mymoon.x() - |
orbits the sun: |
that corresponds to the vertical direction on |
m2Rad*sin(rot2), mymoon.y(), mymoon.z() + |
rot1 += 0.005 |
your screen, just like in Minecraft, so rotating |
m2Rad*cos(rot2)) |
rot2 += 0.021 |
about this axis is like skewering the Earth pole |
mymoon2.rotateIncZ(-0.61) |
Since we went to the trouble of setting up |
to pole and then spinning it, only less |
Now we use the shaders to add the |
a Keyboard object earlier, it would be a shame |
destructive. We rotate the clouds sphere at a |
textures and some neat effects to our |
not to use it. We’ll catch two keyboard events |
rate slightly faster than that of the Earth, |
heavenly bodies. The reflect shader used on |
– pressing Esc (key index 27) will end the |
What is OpenGL
You’ve no doubt heard of OpenGL, the unified API for talking to graphics hardware. The language originated back in 1992 at Silicon Graphics, who decided that open sourcing a standard would be a good way to weaken its competition. It worked well, but then Microsoft’s Direct3D came along. But no matter, OpenGL will not be obliterated and one of the reasons for this is OpenGL ES. This is the subset of OpenGL used on mobile devices, embedded systems and some games consoles. Unlike familiar desktop graphics cards, these machines often
lack oodles of registers and on-chip floating point support, so things must be reworked accordingly. But the principle remains the same: to have a uniform method for efficiently offloading textures, light and perspective calculations to the graphics hardware.
Like OpenGL, OpenGL ES is developed royalty and licence-free by the Khronos Group,
a consortium of industry giants and academic institutions. Besides OpenGL, Khronos also coordinates development of OpenCL, WebGL, EGL and a few other video-themed standards.
Back in August, the Khronos group welcomed its newest member: Microsoft. However, it would be paranoid to assert that this is a Redmondian attempt to take down OpenGL from the inside.
The fact of the matter is that its in everyone’s interests to have an open standard for mobile graphics, and it’s in everyone’s interests for these standards to have input and support from all the major players. The old MS strategy of embrace, extend, extinguish will not work here, since it is entirely incongruous with the views of other contributors, such as AMD and Nvidia.
110 | The Hacker’s Manual 2015