

- •brief contents
- •about this book
- •The Windows Forms namespace
- •Part 1: Hello Windows Forms
- •Part 2: Basic Windows Forms
- •Part 3: Advanced Windows Forms
- •Who should read this book?
- •Conventions
- •Action
- •Result
- •Source code downloads
- •Author online
- •acknowledgments
- •about .NET
- •Casting the .NET
- •Windows Forms overview
- •about the cover illustration
- •Hello Windows Forms
- •1.1 Programming in C#
- •1.1.1 Namespaces and classes
- •1.1.2 Constructors and methods
- •1.1.3 C# types
- •1.1.4 The entry point
- •1.1.5 The Application class
- •1.1.6 Program execution
- •1.2 Adding controls
- •1.2.1 Shortcuts and fully qualified names
- •1.2.2 Fields and properties
- •1.2.3 The Controls property
- •1.3 Loading files
- •1.3.1 Events
- •1.3.2 The OpenFileDialog class
- •1.3.3 Bitmap images
- •1.4 Resizing forms
- •1.4.1 Desktop layout properties
- •1.4.2 The Anchor property
- •1.4.3 The Dock property
- •1.5 Recap
- •2.1 Programming with Visual Studio .NET
- •2.1.1 Creating a project
- •Action
- •Result
- •2.1.2 Executing a program
- •Action
- •Result
- •2.1.3 Viewing the source code
- •View the code generated by Visual Studio .NET
- •Action
- •Result
- •2.2 Adding controls
- •2.2.1 The AssemblyInfo file
- •Action
- •Results
- •2.2.2 Renaming a form
- •Action
- •Result
- •2.2.3 The Toolbox window
- •Action
- •Result
- •2.3 Loading files
- •2.3.1 Event handlers in Visual Studio .NET
- •Action
- •Result
- •2.3.2 Exception handling
- •Action
- •Result
- •Action
- •Results and Comments
- •2.4 Resizing forms
- •2.4.1 Assign the Anchor property
- •Action
- •Result
- •2.4.2 Assign the MinimumSize property
- •Action
- •Result
- •2.5 Recap
- •Basic Windows Forms
- •Menus
- •Action
- •Result
- •Action
- •Result
- •Action
- •Result
- •Action
- •Result
- •3.3 Click events
- •Action
- •Result
- •Action
- •Result
- •Action
- •Result
- •Action
- •Result
- •Action
- •Result
- •Action
- •Result
- •3.5 Context menus
- •Action
- •Result
- •Action
- •Result
- •3.6 Recap
- •Status bars
- •4.1 The Control class
- •4.2 The StatusBar class
- •Action
- •Result
- •Action
- •Result
- •4.3.1 Adding panels to a status bar
- •Action
- •Result
- •Action
- •Result
- •Action
- •Result
- •Action
- •Result
- •4.5 Recap
- •Reusable libraries
- •5.1 C# classes and interfaces
- •5.2 Class libraries
- •Action
- •Result
- •Action
- •Result
- •Action
- •Result
- •Action
- •Result
- •Action
- •Result
- •Action
- •Result
- •Action
- •Result
- •Action
- •Result
- •Action
- •Result
- •5.3 Interfaces revisited
- •Action
- •Result
- •Action
- •Result
- •Action
- •Result
- •5.4 Robustness issues
- •Action
- •Result
- •Action
- •Result
- •Action
- •Result
- •Action
- •Result
- •Action
- •Result
- •Action
- •Result
- •Common file dialogs
- •Action
- •Results
- •Action
- •Result
- •Action
- •Result
- •Action
- •Result
- •Action
- •Result
- •6.3 Paint events
- •Action
- •Result
- •Action
- •Result
- •6.4 Context menus revisited
- •Action
- •Result
- •Action
- •Result
- •6.5 Files and paths
- •Action
- •Result
- •Action
- •Result
- •Action
- •Result
- •6.6 Save file dialogs
- •Action
- •Result
- •Action
- •Result
- •Action
- •Result
- •Action
- •Result
- •Action
- •Result
- •6.7 Open file dialogs
- •Action
- •Result
- •Action
- •Result
- •6.8 Recap
- •Drawing and scrolling
- •7.1 Form class hierarchy
- •Action
- •Result
- •Action
- •Result
- •Action
- •Result
- •Action
- •Result
- •Action
- •Result
- •Action
- •Result
- •Action
- •Result
- •Action
- •Result
- •Action
- •Result
- •Action
- •Result
- •Action
- •Result
- •Action
- •Result
- •7.4 Panels
- •Action
- •Result
- •Action
- •Result
- •Action
- •Result
- •Action
- •Result
- •Action
- •Result
- •Dialog boxes
- •8.1 Message boxes
- •Action
- •Result
- •Action
- •Result
- •8.1.4 Creating A YesNoCancel dialog
- •Action
- •Result
- •Action
- •Result
- •8.2 The Form.Close method
- •8.2.1 The relationship between Close and Dispose
- •Action
- •Result
- •8.3 Modal dialog boxes
- •Action
- •Result
- •Action
- •Result
- •8.3.2 Preserving caption values
- •Action
- •Result
- •Action
- •Result
- •Action
- •Result
- •Action
- •Result
- •Action
- •Result
- •Action
- •Result
- •Action
- •Result
- •Action
- •Result
- •Action
- •Result
- •Action
- •Result
- •Action
- •Result
- •Action
- •Result
- •Action
- •Result
- •Action
- •Result
- •Action
- •Result
- •Action
- •Result
- •Action
- •Result
- •Basic controls
- •Action
- •Result
- •Action
- •Result
- •Action
- •Result
- •9.1.2 Creating a derived form
- •Action
- •Result
- •9.2 Labels and text boxes
- •Action
- •Result
- •Action
- •Result
- •Action
- •Result
- •Action
- •Result
- •Action
- •Result
- •Action
- •Result
- •Action
- •Result
- •Action
- •Result
- •Action
- •Result
- •Action
- •Result
- •Action
- •Result
- •Action
- •Result
- •Action
- •Result
- •Action
- •Result
- •Action
- •Result
- •Action
- •Result
- •Action
- •Result
- •Action
- •Result
- •9.3.6 Adding AlbumEditDlg to our main form
- •Action
- •Result
- •Action
- •Result
- •9.4 Recap
- •List controls
- •10.1 List boxes
- •Action
- •Result
- •Action
- •Result
- •Action
- •Result
- •Action
- •Result
- •10.2 Multiselection list boxes
- •10.2.1 Enabling multiple selection
- •Action
- •Result
- •Action
- •Result
- •Action
- •Result
- •Action
- •Result
- •10.3 Combo boxes
- •Action
- •Result
- •Action
- •Result
- •10.4 Combo box edits
- •Action
- •Result
- •Action
- •Result
- •Action
- •Result
- •10.5 Owner-drawn lists
- •Action
- •Result
- •Action
- •Result
- •Action
- •Result
- •Action
- •Result
- •More controls
- •Action
- •Result
- •Action
- •Result
- •11.2 Tab pages
- •Action
- •Result
- •Action
- •Result
- •11.3.1 Dates and times
- •Action
- •Result
- •Action
- •Result
- •Action
- •Result
- •Action
- •Result
- •Action
- •Result
- •Action
- •Result
- •11.5 Recap
- •A .NET assortment
- •12.1 Keyboard events
- •Action
- •Result
- •Action
- •Result
- •12.2 Mouse events
- •Action
- •Result
- •Action
- •Result
- •Action
- •Result
- •12.3 Image buttons
- •Action
- •Result
- •Action
- •Result
- •Action
- •Result
- •Action
- •Result
- •Action
- •Result
- •Action
- •Result
- •Action
- •Result
- •Action
- •Result
- •Action
- •Result
- •12.4 Icons
- •Action
- •Result
- •Action
- •Result
- •Action
- •Result
- •12.5 Recap
- •Toolbars and tips
- •13.1 Toolbars
- •Action
- •Result
- •Action
- •Result
- •Action
- •Result
- •Action
- •Result
- •Action
- •Result
- •Action
- •Result
- •Action
- •Result
- •Action
- •Result
- •Action
- •Result
- •13.4.2 Creating tool tips
- •Action
- •Result
- •Action
- •Result
- •Advanced Windows Forms
- •List views
- •14.2 The ListView class
- •Action
- •Result
- •Action
- •Result
- •Action
- •Result
- •Action
- •Result
- •14.2.3 Populating a ListView
- •Action
- •Result
- •Action
- •14.3 ListView columns
- •Action
- •Result
- •Action
- •Result
- •Action
- •Result
- •Action
- •Result
- •Action
- •Result
- •Action
- •Result
- •Action
- •Result
- •Action
- •Result
- •Action
- •Result
- •Action
- •Result
- •Action
- •Result
- •Action
- •Result
- •Action
- •Result
- •Action
- •Result
- •Action
- •Result
- •Action
- •Result
- •Action
- •Result
- •Action
- •Result
- •Action
- •Result
- •14.6 Recap
- •Tree views
- •Action
- •Result
- •Action
- •Result
- •Action
- •Result
- •15.3 Dynamic tree nodes
- •Action
- •Result
- •Action
- •Result
- •Action
- •Result
- •Action
- •Result
- •Action
- •Result
- •15.4 Node selection
- •Action
- •Result
- •Action
- •Result
- •Action
- •Result
- •Action
- •Result
- •Action
- •Result
- •15.5 Fun with tree views
- •Action
- •Result
- •Action
- •Result
- •Action
- •Result
- •Multiple document interfaces
- •Action
- •Result
- •Action
- •Result
- •Action
- •Result
- •16.3 Merged menus
- •Action
- •Result
- •Action
- •Result
- •Action
- •Result
- •Action
- •Result
- •16.4 MDI children
- •Action
- •Result
- •Action
- •Result
- •Action
- •Result
- •Action
- •Result
- •Action
- •Result
- •Action
- •Result
- •Action
- •Result
- •Action
- •Result
- •Action
- •Result
- •Action
- •Result
- •16.5 MDI child window management
- •Action
- •Result
- •Action
- •Result
- •16.6 Recap
- •Data binding
- •17.1 Data grids
- •Action
- •Result
- •Action
- •Result
- •17.2 Data grid customization
- •Action
- •Result
- •Action
- •Result
- •Action
- •Result
- •Action
- •Result
- •Action
- •Result
- •Action
- •Result
- •Action
- •Result
- •Action
- •Result
- •Action
- •Result
- •Action
- •Result
- •Action
- •Result
- •Odds and ends .NET
- •Action
- •Result
- •Action
- •Result
- •Action
- •Result
- •Action
- •Result
- •18.2 Timers
- •Action
- •Result
- •Action
- •Result
- •18.3 Drag and drop
- •Action
- •Result
- •Action
- •Result
- •18.4 ActiveX controls
- •Action
- •Result
- •Action
- •Result
- •Action
- •Result
- •Action
- •Result
- •Action
- •Result
- •18.5 Recap
- •C# primer
- •A.1 C# programs
- •A.1.1 Assemblies
- •A.1.2 Namespaces
- •A.2 Types
- •A.2.1 Classes
- •A.2.2 Structures
- •A.2.3 Interfaces
- •A.2.4 Enumerations
- •A.2.5 Delegates
- •A.3 Language elements
- •A.3.1 Built-in types
- •A.3.2 Operators
- •A.3.3 Keywords
- •A.4 Special features
- •A.4.1 Exceptions
- •A.4.2 Arrays
- •A.4.3 Main
- •A.4.4 Boxing
- •A.4.5 Documentation
- •.NET namespaces
- •B.1 System.Collections
- •B.2 System.ComponentModel
- •B.3 System.Data
- •B.4 System.Drawing
- •B.5 System.Globalization
- •B.6 System.IO
- •B.7 System.Net
- •B.8 System.Reflection
- •B.9 System.Resources
- •B.10 System.Security
- •B.11 System.Threading
- •B.12 System.Web
- •B.13 System.Windows.Forms
- •B.14 System.XML
- •Visual index
- •C.1 Objects
- •C.2 Marshal by reference objects
- •C.3 Components
- •C.4 Common dialogs
- •C.7 Event data
- •C.8 Enumerations
- •For more information
- •bibliography
- •Symbols
- •Index

|
|
|
|
|
|
ADD CONTROLS TO THE CAPTIONDLG FORM |
|||
|
|
|
|
|
|
|
|
|
|
|
|
|
Action |
|
|
|
Result |
||
|
|
|
|
|
|
|
|
|
|
3 |
|
Before adding any controls, lock |
|
||||||
|
|
the toolbox open. |
|
|
|
|
|||
|
|
How-to |
|
|
|
|
|||
|
|
Open the Toolbox window and click |
|
||||||
|
|
the push-pin graphic at the top |
|
||||||
|
|
right of this window. |
|
|
|
|
|||
|
|
|
|
|
|
|
|
|
Note: The order of controls in your toolbox may dif- |
|
|
|
|
|
|
|
|
|
fer from those shown here. You can sort this list |
|
|
|
|
|
|
|
|
|
alphabetically by right-clicking on the Windows |
|
|
|
|
|
|
|
|
|
Forms title and selecting the Sort Items Alphabeti- |
|
|
|
|
|
|
|
|
|
cally option. |
|
|
|
|
|
|
|
|
|
|
4 |
|
Add an OK button to the base of |
|
||||||
|
|
the form. |
|
|
|
|
|||
|
|
How-to |
|
|
|
|
|||
|
|
Drag a Button control from the |
|
||||||
|
|
toolbox onto the form, and assign |
|
||||||
|
|
its properties as indicated. |
|
||||||
|
|
|
Settings |
|
|
|
|
||
|
|
|
|
|
|
|
|
|
|
|
|
|
Property |
|
|
Value |
|
||
|
|
|
(Name) |
|
|
btnOK |
|
||
|
|
|
DialogResult |
|
|
OK |
|
||
|
|
|
Text |
|
|
&OK |
|
||
|
|
Note: We discuss the meaning of |
|
||||||
|
|
the DialogResult property later |
|
||||||
|
|
in the chapter. |
|
|
|
|
|||
|
|
|
|
|
|
|
|
|
|
5 |
|
Add a Cancel button to the form, |
|
||||||
|
|
and position the two buttons as |
|
||||||
|
|
shown in the graphic. |
|
|
|
|
|||
|
|
|
Settings |
|
|
|
|
||
|
|
|
|
|
|
|
|||
|
|
|
Property |
|
Value |
|
|||
|
|
|
(Name) |
|
btnCancel |
|
|||
|
|
|
DialogResult |
|
Cancel |
|
|||
|
|
|
Text |
|
&Cancel |
|
|||
|
|
|
|
|
|
|
|
|
Note: There is a bit of black magic involved in posi- |
|
|
|
|
|
|
|
|
|
tioning controls. The Format menu in Visual Studio |
|
|
|
|
|
|
|
|
|
.NET provides commands for positioning and align- |
|
|
|
|
|
|
|
|
|
ing controls. These appear on the Layout toolbar, |
|
|
|
|
|
|
|
|
|
and you can experiment with these while creating |
|
|
|
|
|
|
|
|
|
this form. |
|
|
|
|
|
|
|
|
|
|
MODAL DIALOG BOXES |
243 |
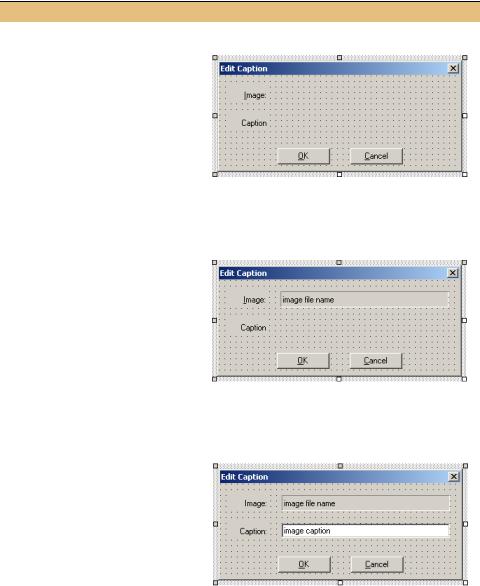
ADD CONTROLS TO THE CAPTIONDLG FORM (continued)
|
|
|
|
|
Action |
|
|
|
Result |
|
|
|
|
|
|
|
|
|
|
|
|
6 |
Create the Image and Caption |
|
||||||||
|
labels on the form. |
|
|
|
|
|||||
|
How-to |
|
|
|
|
|
|
|||
|
Drag two Label controls onto the |
|
||||||||
|
form, and resize and position them |
|
||||||||
|
as in the graphic. |
|
|
|
|
|||||
|
|
|
|
|
Settings |
|
|
|
|
|
|
|
|
|
|
|
|
|
|
|
|
|
|
|
Label |
|
Property |
Value |
|
|||
|
|
|
Image |
|
Text |
Image: |
|
|||
|
|
|
|
|
TextAlign |
MiddleRight |
Note: For the Visual C++ programmers among us, |
|||
|
|
|
Caption |
|
Text |
Caption: |
||||
|
|
|
|
the Label class is similar to the CStatic class |
||||||
|
|
|
|
|
TextAlign |
MiddleRight |
found in the MFC library. |
|||
|
|
|
|
|
|
|
|
|
|
|
7 |
Create a lblImage label on the |
|
||||||||
|
form. |
|
|
|
|
|
|
|||
|
|
Note: We could also use a read- |
|
|||||||
|
|
only TextBox control here. Labels |
|
|||||||
|
|
and text boxes are discussed in |
|
|||||||
|
|
detail in chapter 9. |
|
|
|
|
||||
|
|
|
|
|
Settings |
|
|
|
|
|
|
|
|
|
|
|
|
|
|
||
|
|
|
Property |
|
Value |
|
||||
|
|
|
(Name) |
|
lblImage |
|
||||
|
|
|
BorderStyle |
|
Fixed3D |
|
||||
|
|
|
Text |
|
image file name |
|
||||
|
|
|
TextAlign |
|
MiddleLeft |
|
||||
|
|
|
|
|
|
|
|
|
|
|
8 |
Create a text box to hold the image |
|
||||||||
|
caption. |
|
|
|
|
|
|
|||
|
How-to |
|
|
|
|
|
|
|||
|
Drag a TextBox control onto the |
|
||||||||
|
form. |
|
|
|
|
|
|
|||
|
|
|
|
|
Settings |
|
|
|
|
|
|
|
|
|
|
|
|
||||
|
|
|
Property |
|
Value |
|
||||
|
|
|
(Name) |
|
txtCaption |
|
||||
|
|
|
Text |
|
image caption |
|
||||
|
|
|
|
|
|
|
|
|
|
Note: Again for Visual C++ programmers, the |
|
|
|
|
|
|
|
|
|
|
TextBox class is similar to the CEdit class found |
|
|
|
|
|
|
|
|
|
|
in the MFC library. |
|
|
|
|
|
|
|
|
|
|
|
244 |
CHAPTER 8 DIALOG BOXES |
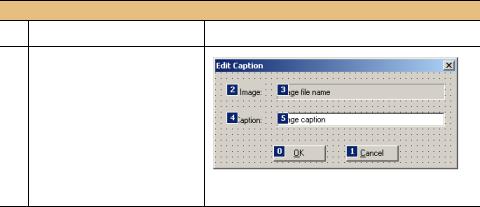
ADD CONTROLS TO THE CAPTIONDLG FORM (continued)
Action |
Result |
9Set the tab order for the controls on the form.
How-to
a.Click the top-level View menu.
b.Select the Tab Order item.
c.Click the controls in the desired order, starting with number 0, as shown in the graphic.
d.Press the Esc key to save the new tab order.
Well, that took a while. Placing controls on a form is not a difficult task, but it can take some time. This is another reason sketching out your interface up front is a good idea before you spend too much time in the designer window.
As you might expect, the code generated in the CaptionDlg.cs source file is quite similar to what we have seen for our MainForm class in previous chapters. As a quick recap, here is a summary of the code you will find in this file.
• The CaptionDlg class is derived from the Form class.
public class CaptionDlg : System.Windows.Forms.Form
{
•Each control is created as a private member of the class. The organization used by Visual Studio can be a bit confusing, so I have used the power of cut and paste to rearrange these code excerpts to be a bit more logical. If you recall, the
components member is required by Visual Studio to manage certain controls on the form.
private System.Windows.Forms.Button btnOK; private System.Windows.Forms.Button btnCancel; private System.Windows.Forms.Label label1; private System.Windows.Forms.Label label2; private System.Windows.Forms.Label lblImage; private System.Windows.Forms.TextBox txtCaption;
///<summary>
///Required designer variable.
///</summary>
private System.ComponentModel.Container components = null;
•The controls are initialized in the InitializeComponent method, which is called from the CaptionDlg constructor.
#region Windows Form Designer generated code
/// <summary>
MODAL DIALOG BOXES |
245 |
///Required method for Designer support - do not modify
///the contents of this method with the code editor.
///</summary>
private void InitializeComponent()
{
•Inside the InitializeComponent method, the controls are first created using the new keyword.
this.btnOK = new System.Windows.Forms.Button (); this.btnCancel = new System.Windows.Forms.Button (); this.label1 = new System.Windows.Forms.Label (); this.label2 = new System.Windows.Forms.Label (); this.lblImage = new System.Windows.Forms.Label (); this.txtCaption = new System.Windows.Forms.TextBox ();
•Next the nondefault properties are set for each control. This section is quite long, so the following code is only an excerpt of this portion of the file:
this.SuspendLayout();
//
//btnOK
this.btnOK.DialogResult = System.Windows.Forms.DialogResult.OK; this.btnOK.Location = new System.Drawing.Point(82, 88);
this.btnOK.Name = "btnOK"; this.btnOK.TabIndex = 0;
this.btnOK.Text = "&OK";
//btnCancel
//
this.btnCancel.DialogResult
= System.Windows.Forms.DialogResult.Cancel; this.btnCancel.Location = new System.Drawing.Point(187, 88); this.btnCancel.Name = "btnCancel";
this.btnCancel.TabIndex = 1; this.btnCancel.Text = "&Cancel";
//
// label1
//
this.label1.Location = new System.Drawing.Point(32, 8); this.label1.Name = "label1";
this.label1.Size = new System.Drawing.Size(48, 23); this.label1.TabIndex = 2;
. . .
•Finally, the Form itself is initialized, and the controls are added to the form using the Form.Controls property.
//
// CaptionDlg
//
246 |
CHAPTER 8 DIALOG BOXES |