

Microsoft Visual C++ .NET Professional Projects - Premier Press
.pdf90 |
|
Part I |
|
|
INTRODUCING VC++.NET |
|
|
|||
|
|
|
|
|||||||
|
|
|
|
|
|
|
|
|
|
|
|
|
|
{ |
|
|
|
|
|
|
|
|
|
|
|
|
|
CDialog::DoDataExchange(pDX); |
||||
|
|
|
|
|
|
DDX_Text(pDX, IDC_LOG, log); |
||||
|
|
|
|
|
|
DDX_Text(pDX, IDC_PASS, pass); |
||||
|
|
|
} |
|
|
|
|
|
|
|
|
|
|
BEGIN_MESSAGE_MAP(DialogClass, CDialog) |
|
|
|||||
|
|
|
|
|
|
ON_BN_CLICKED(IDOK, OnBnClickedOk) |
||||
|
|
|
|
|
|
ON_BN_CLICKED(IDCANCEL, OnBnClickedCancel) |
||||
|
|
|
END_MESSAGE_MAP() |
|
|
|
|
Y |
||
|
|
|
|
|
|
|
|
|
|
|
|
|
|
// DialogClass message handlers |
|
|
L |
||||
|
|
|
|
|
|
|
|
|
||
|
|
|
void DialogClass::OnBnClickedOk() |
F |
||||||
|
|
|
{ |
|
|
|
M |
|
||
|
|
|
|
// Call the DDX mechanism |
|
|||||
|
|
|
|
|
|
UpdateData(ARU ); |
|
|
||
|
|
|
|
|
|
MessageBox(“Login name “ + log+” is accepted.”); |
||||
|
|
|
|
|
|
E |
|
|
|
|
|
|
|
|
// Close the dialog box |
|
|
|
|
||
|
|
|
|
|
|
T |
|
|
|
|
EndDialog(TRUE);
}
void DialogClass::OnBnClickedCancel()
{
MessageBox(“Closing the dialog box.”);
EndDialog(TRUE);
}
You have successfully implemented the required functionality of the dialog class. If you recollect, you had designed a menu option to invoke the dialog box. Hence, the last part of the implementation is to add a message handler for the menu option and code it to invoke the appropriate member function of the CDialog class to create and display the dialog box.
The following are the steps to add the message handler for the menu option:
1.Switch to the Resource View and select the menu IDR_DialogAppTYPE.
2.Right-click on the option Login and select AddEventHandler. Add the event handler to the view class.
Team-Fly®

MENUS, DIALOG BOXES, AND WINDOW CONTROLS |
Chapter 4 |
|
91 |
|
|||
|
|
|
|
3.Add the following code to the OnDialog function, which is added to the DialogAppView.cpp file:
void CDialogAppView::OnDialog() |
|
{ |
|
DialogClass dlg; |
// Creating |
an object of your application’s dialog class |
|
dlg.DoModal(); |
// To create |
a modal dialog box |
|
} |
|
4.Include the header file of the dialog box class, DialogClass, in the DialogAppView.cpp file so that the view class can recognize your dialog box class. To do so, add the following:
#include “CFirstDialog.h”
Figure 4-8 displays the output of the application.
FIGURE 4-8 The sample application
5.Type “My first dialog application” in the application window.
6.Select the option Logon to display the dialog box that you have created, as shown in Figure 4-9.

92 |
|
Part I |
INTRODUCING VC++.NET |
|
|||
|
|
|
|
FIGURE 4-9 The sample application with the modal dialog box
7.Type your name in the LoginId box and type “password” in the Password box.
8.Click anywhere in the application window. The application window does not respond to your action, which implies that you are working with a modal dialog box.
9.Click on the OK button. A message box with your login ID is displayed.
10.Click on the OK button to close the dialog box. Now, you can continue working in the application window.
You have seen how a modal dialog box works. Now you are going to design a modeless login dialog box and see the difference.
Creating a Modeless Dialog Box
When you create a modeless dialog box, it runs in a nonexclusive mode. This implies that even when the dialog box is displayed, you can continue working with the application window that contains the dialog box. Thus, while working with a modeless dialog box, you have the flexibility to switch between the dialog box and the application window. Besides, you can also work with any other active applications.
MENUS, DIALOG BOXES, AND WINDOW CONTROLS |
Chapter 4 |
|
93 |
|
|||
|
|
|
|
The steps to create a modeless dialog box are similar to those for creating a modal dialog box. You first create the resource and then create a dialog box class to handle the dialog box.
To create dialog box resource, perform the following steps:
1.Create an MDI application by using the MFC Application Wizard and use CEditView as the base class for your view class. The sample application is named Modeless.
2.Using the Add Resource dialog box, add a new dialog resource to your application.
3.Right-click on the dialog resource and select Properties to display the Properties dialog box. Set the Visible property to True.
 CAUTION
For a modeless dialog box, you need to set its Visible property to True; otherwise, it will not be visible even if it has been loaded on the screen.
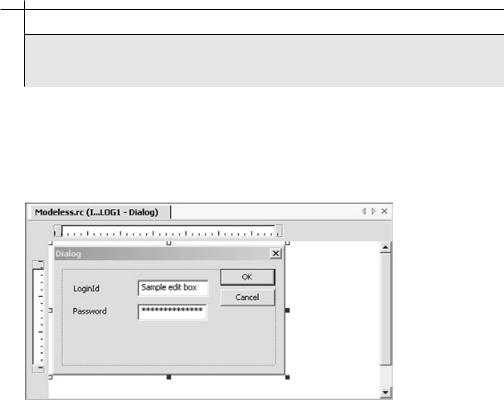
4.Add controls to the dialog resource, as shown in Figure 4-10. Apply the same settings as those of the modal dialog box that you created.
FIGURE 4-10 The dialog resource
94 |
|
Part I |
INTRODUCING VC++.NET |
|
|||
|
|
|
|
As you did for the modal dialog box, you need to create a menu option that will invoke the dialog box. Edit the IDR_ModelessTYPE menu to add an option
named ModelessLogin.
Similar to a modal class, you need to derive a class for a modeless dialog box from the CDialog class. However, to create a modeless dialog box, you need to use the Create function instead of the DoModal function. To create a class and add the functionalities for the dialog box, you need to perform the following steps:
1.Using the MFC Class Wizard, create a class named ModelessDialog based on the CDialog class.
2.Click on the Finish button to close the wizard. The wizard adds two files to your project, ModelessDialog.h and ModelessDialog.cpp, which contain the class declaration and definition, respectively.
3.After creating the class, using the Add Variable Wizard, add member variables corresponding to controls in the dialog resource. In the sample application, the member variables used are log and pass.
4.Add message handlers for the OK and Cancel buttons using the Event Handler Wizard.
5.Add the following code to the OnBnClickedOK function:
void OnBnClickedOk
{
//Call the DDX mechanism UpdateData(TRUE);
MessageBox(“Login name “ + log+” is accepted.”);
//Close the dialog box
DestroyWindow();
Flg=0;
}
The message handler, OnBnClickedOK, calls the DDX mechanism and displays a message box with the login information. The DestroyWindow function of the CWnd class destroys the active modeless dialog box. You don’t use the EndDialog function for a modeless dialog box because this function makes the dialog box invisible and will not destroy it. After closing the dialog box, you need to set the Flg value to 0.
6.Add another message handler for the Cancel button and edit the message handler as follows:
MENUS, DIALOG BOXES, AND WINDOW CONTROLS |
Chapter 4 |
|
95 |
|
|||
|
|
|
|
void OnBnClickedCancel()
{
MessageBox(“Closing the dialog box.”); // Close the dialog box
DestroyWindow();
Flg=0;
}
7.The OnBnClickedCancel message handler displays a message box and closes the dialog box.
Apart from the aforementioned steps, you need to perform one important step to create a modeless dialog box. You need to declare a global variable to check the status of the modeless dialog box. An obvious question that arises is, why? Well, while working with a modeless dialog box, you could instantiate it multiple times. To avoid multiple instances, you can use a global variable to check the status of the dialog box to ensure that you don’t open multiple copies of an already active dialog box. You could decide to create a variable and set it to 1 if the dialog box is created, and set the variable to 0 when the dialog box is destroyed. As a result, if the variable is set to 0, you create a new instance; otherwise, you only activate the existing instance.
Add the following global variable in the ModelessView.h file, because you will be using the variable only in the view class:
static BOOL Flg=0;
Also, you need to add the code to create a modeless dialog box to the constructor
of the ModelessDialog class:
// In the CModeless.cpp file ModelessDialog::ModelessDialog(CWnd* pParent /*=NULL*/)
: CDialog(ModelessDialog::IDD, pParent)
{
Create(IDD_MODELESSDIALOG);
}
In the constructor of the ModelessDialog class, you call the Create function and pass the resource ID of the dialog resource to the function.
Finally, using the Event Handler Wizard, add the message handler for the menu option that will invoke the dialog box. Edit the OnLogon function as follows:
96 |
|
Part I |
INTRODUCING VC++.NET |
|
|||
|
|
|
|
void CModelessView::OnLogon()
{
ModelessDialog *Dlg; if(Flag==0)
{
Dlg=new ModelessDialog;
Flag=1;
}
else
{
Dlg->SetFocus();
}
}
In the OnDialog function, you need to create an object of the ModelessDialog type and check the status of the global Flag variable. If the value is 0, it indicates that the dialog box is not yet created, and hence you create an object of the ModelessDialog type. Otherwise, you activate the dialog box that is already displayed in the application window by using the SetFocus function of the CWnd class.
To use the ModelessDialog class in the view class, you need to include the following code in the beginning of the ModelessView.cpp file:
#include “ModelessDialog.h”
1.Execute your application. Type “Task:”.
2.From the menu, select Logon to display the logon dialog box.
3.Type your name in the LoginId box and type “password” in the Password box.
4.Click anywhere within the application window. The application window is still available for you to work with.
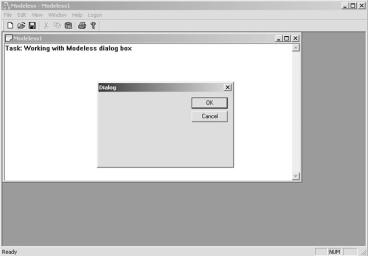
5.Type “Working with Modeless dialog box” as shown in Figure 4-11.
6.Click on the OK button. The message box indicating your login is displayed.
7.Click on the OK button to close the dialog box.
MENUS, DIALOG BOXES, AND WINDOW CONTROLS |
Chapter 4 |
|
97 |
|
|||
|
|
|
|
FIGURE 4-11 The application with the modeless dialog box
Summary
You’ve covered the basic concepts required to work with two main user-interface components, menus and dialog boxes. Based on the requirement of the application that you are designing, you can choose to use either or both of these components. Also, while using the dialog boxes, you need to judiciously decide on the type of dialog box required: application modal, system modal, or modeless.
This page intentionally left blank

Chapter 5
The
Document/View
Architecture