

Microsoft Visual C++ .NET Professional Projects - Premier Press
.pdf190 Project 1 DATABASE PROGRAMMING USING VC++.NET
|
|
Y |
|
L |
|
|
F |
|
FIGURE 8-15 The Create New Data Source to SQL Server dialog box |
||
|
M |
|
A |
|
|
8. Click on the Next button. On the next screen, select the type of authen- |
||
tication that youEwant the SQL server to perform. (I have used NT |
||
authentication.) |
|
|
T |
|
|
9. Click on the Next button. On the next screen, change the default database from master to Banking, as shown in Figure 8-16.
FIGURE 8-16 The default database
Team-Fly®
IMPLEMENTING DATA ACCESS TECHNOLOGIES |
Chapter 8 |
191 |
|
|
|
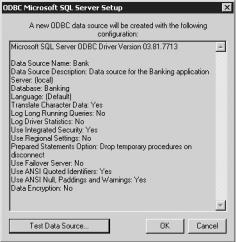
10.Click on the Next button and then the Finish button. The ODBC Microsoft SQL Server Setup dialog box appears with the settings specified by you. Figure 8-17 displays this dialog box.
FIGURE 8-17 The ODBC Microsoft SQL Server Setup dialog box
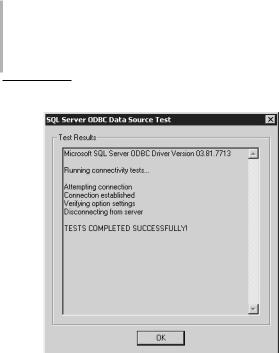
11.Click on the Test Data Source button to check the validity of the connection settings. The SQL Server ODBC Data Source Test dialog box appears, shown in Figure 8-18, indicating the success or failure status of the connection.
12.Click on the OK button three times to close all open dialog boxes and complete the ODBC setup. Close the Control Panel.
Next, you will have to create the front-end MFC-based application in Visual C++.NET.
Creating the SaveMyMoney Application
As listed earlier, you have to create an MFC-based application with ODBC support, and then design the various screens and classes required for providing the required functionality. Here’s what you will do:
1. Create an MFC-based application using the MFC Application template.
192 Project 1 DATABASE PROGRAMMING USING VC++.NET
FIGURE 8-18 The SQL Server ODBC Data Source Test dialog box
2.Design the application’s main form and edit the menu.
3.Add classes to handle the login, deposit/withdrawal, and transfer operations, and design the appropriate forms.
4.Add the appropriate code required to integrate all classes and to implement the required functionality.
5.Build and execute the project.
I will guide you through these steps in the subsequent sections.
Creating an MFC-based Application
As per the design specifications, you need to create an MFC-based SDI application. Additionally, you need to avail back-end support through the ODBC data source that you configured earlier. You can achieve all of this by using the MFC Application template. The steps to perform are as follows:
1.In the Microsoft Development Environment [design] window, choose File, New Project. (Alternatively, if the Start page is active, you can click on the New Project button.)
2.In the New Project dialog box, choose Visual C++ Project as the project type, choose MFC Application as the template, and then, in the Name

IMPLEMENTING DATA ACCESS TECHNOLOGIES |
Chapter 8 |
193 |
|
|
|
text box, type BankOperation as the name of your project. Figure 8-19 depicts these settings.
FIGURE 8-19 The New Project dialog box
3.Click on the OK button to invoke the MFC Application Wizard.
4.Click on Application Type to view the settings specifying your application type.
5.Under Application Type, select Single document to create an SDI application. Accept all other default values on this page.
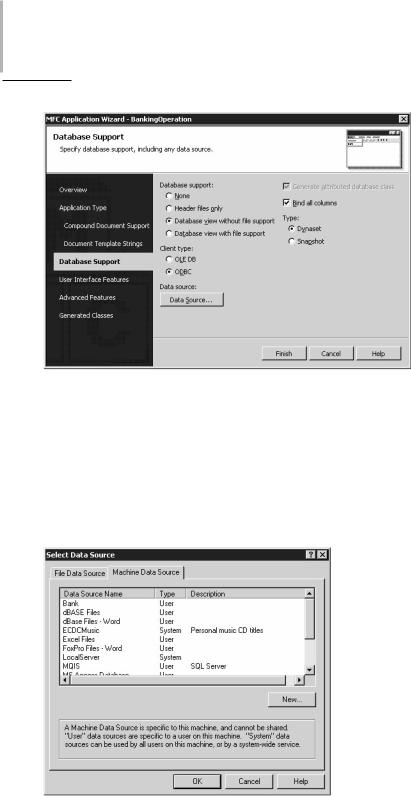
6.Click on Database Support to view the options for setting the database connectivity for your application.
7.Under Database Support, select Database view without file support, and under Client type, select ODBC. Figure 8-20 illustrates the specified settings.
NOTE
Remember that the Database view with file support option is available only for an MDI application.
194 Project 1 DATABASE PROGRAMMING USING VC++.NET
FIGURE 8-20 The Database Support page
8.On the Database Support page, under Data source, click on the Data Source button. The Select Data Source dialog box appears. Click the Machine Data Source tab, and from the list of data sources, select Bank, as shown in Figure 8-21.
FIGURE 8-21 The Machine Data Source tab of the Select Data Source dialog box
IMPLEMENTING DATA ACCESS TECHNOLOGIES |
Chapter 8 |
195 |
|
|
|
9.Click on OK. If a SQL Server login box appears, log in using the appropriate login ID and password.
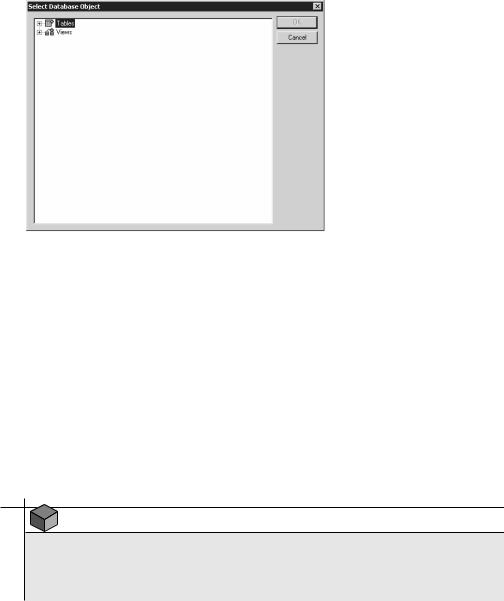
10.Click on OK. The Select Database Object dialog box appears, shown in Figure 8-22.
FIGURE 8-22 The Select Database Object dialog box
11.Expand Tables, as shown in Figure 8-23. The four tables in the Banking database appear.
12.Select the table Account_Detail. You will be creating the main application based on the Account_Detail table. Later, you can add the required classes to handle the other three tables.
13.Click on Finish to create the project named BankingOperation. By default, a solution by the same name is created and this project is added to the solution. The Solution Explorer, shown in Figure 8-24, displays all files created by the wizard in this project.
NOTE
Notice that when you select Database Support, the wizard automatically adds classes based on the CRecordSet and CRecordView classes. Recall that these are the MFC ODBC classes that provide the database connectivity.

196 Project 1 DATABASE PROGRAMMING USING VC++.NET
FIGURE 8-23 The tables in the Banking database
FIGURE 8-24 The Solution Explorer displaying the BankingOperation project
Designing the Main Form
When the user executes the application, the very first screen that appears is the Login screen. (You’ll design the Login screen next.) Once the user enters his or her username and password and clicks on Submit, the main form is displayed (if
IMPLEMENTING DATA ACCESS TECHNOLOGIES |
Chapter 8 |
197 |
|
|
|
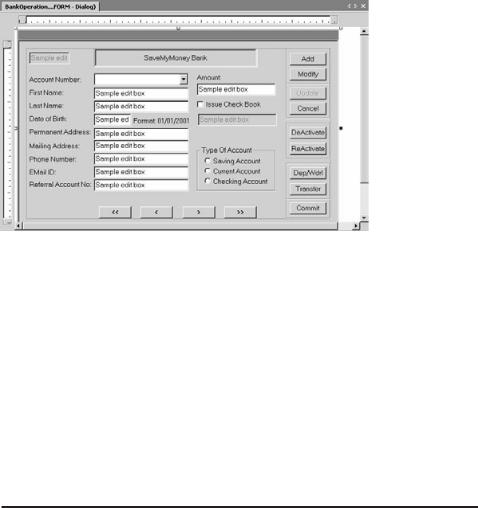
the provided logon details are valid). This form, as shown in Figure 8-25, is based on the Account_Detail table. You’ll now design this form.
FIGURE 8-25 The design of the application’s main form
To design the form, switch to the Resource View. From the Dialog resources, select IDD_BANKOPERATION_FORM. This is the default form provided by the wizard for designing the main view of your application. Refer to Figure 8-25 and design the main form.
When you design the form, you need to set the various properties for the controls so that you create a replica of the form shown in Figure 8-25.
Table 8-1 lists the properties to be set for the main form, IDD_BANKOPERATION_FORM:
Table 8-1 Properties to be Set for the Main Form
Property |
Category |
Value |
Caption |
Appearance |
Banking |
Font(Size) |
Font |
MS Sans Serif(10) |
Use System Font |
Font |
False |
|
|
|
This will set the font size of the controls on the form to MS Sans Serif(10).

198 Project 1 DATABASE PROGRAMMING USING VC++.NET
For all Static Text controls (labels), place them and type the name given in Figure 8-26. The value that you type here is assigned to the Caption property of the respective control. The IDs for these labels are the default IDs, and therefore you need not edit them.
Besides editing some of the controls, you need to edit the default ID assigned to the controls. Table 8-2 lists the controls for which you need to edit the default ID. The controls that are not listed in this table will have the default ID.
Table 8-2 IDs of Controls of the Main Form
Control |
Type |
ID Property Value |
Control next to the control |
Edit Box |
IDC_CURRDT |
displaying the form’s caption |
|
|
Account Number |
Combo Box |
IDC_ACCNO |
First Name |
Edit Box |
IDC_FNAME |
Last Name |
Edit Box |
IDC_LNAME |
Date of Birth |
Edit Box |
IDC_DOB |
Permanent Address |
Edit Box |
IDC_PADD |
Mailing Address |
Edit Box |
IDC_MADD |
Phone Number |
Edit Box |
IDC_PHONE |
Email ID |
Edit Box |
IDC_EMAIL |
Referral Account No |
Edit Box |
IDC_REFACCNO |
Amount |
Edit Box |
IDC_AMOUNT |
Control below the check box |
Edit Box |
IDC_VALID |
Add |
Command Button |
IDC_ADD |
Modify |
Command Button |
IDC_MOD |
Update |
Command Button |
IDC_UPD |
Cancel |
Command Button |
IDC_CANCEL1 |
DeActivate |
Command Button |
IDC_DELETE |
ReActivate |
Command Button |
IDC_REACTIVATE |
Dep/Wdrl |
Command Button |
IDC_DEPOSIT |

IMPLEMENTING DATA ACCESS TECHNOLOGIES |
Chapter 8 |
199 |
|||
|
|
|
|
|
|
|
|
|
|
|
|
Control |
Type |
ID Property Value |
|||
|
|
|
|
|
|
Transfer |
Command Button |
IDC_TRANSFER |
|
|
|
Commit |
Command Button |
IDC_COMMIT |
|
|
|
|
|
|
|
|
|
You will next design the Login form.
Designing the Login Form
Recall that when you created the application, you selected the Account_Detail table as the base. As a result, the wizard created a CRecordView-based class and provided a dialog resource. Now, to add the functionality for logging on, you need to add another class. Following are the steps that you need to perform to create a class:
1.Choose Project, Add Class to open the Add Class dialog box. (Alternatively, you can right-click the project in the Solution Explorer and choose Add Class.)
2.From the Templates list, select MFC Class.
3.Click on Open to invoke the MFC Class Wizard.
4.In the Class name box, enter LoginDlg and choose CDialog as the base class, as shown in Figure 8-26.
FIGURE 8-26 The MFC Class Wizard