

FM 21-150 COMBATIVES 1992
.pdfFM 21-150
2-3. BASIC OR ONE-STATION UNIT TRAINING
Combative training in the basic or one-station unit training program is based on 10 hours of available training time, divided into five periods of 2 hours each. The following is a suggested POI for introductory-level combative training.
a.Period 1 - 2 Hours.
(1)Introduction to combatives—safety.
(2)Combat demonstration performed by instructors or trainers to gain attention and to motivate soldiers.
(3)Vital points and vulnerable points.
(4)Warm-ups.
(5)Stretches.
(6)Stances.
(7)Elbows and knees.
(8)Short punches and strikes.
(9)Kicks.
(10)Drills. Twenty-five repetitions for each strike—that is, elbows, knees, punches, and kicks-using vital and vulnerable points.
(11)Combinations of strikes.
b.Period 2 - 2 Hours.
(1)Warm-ups and stretches.
(2)Review of strikes.
(3)Falls.
(4)Throws.
(5)Proficiency development of falls and throws through repetition.
c.Period 3 - 2 Hours.
(1)Warm-ups and stretches.
(2)Review of falls.
(3)Grappling.
(4)Chokes.
d.Period 4 - 2 Hours.
(1)Warm-ups and stretches.
(2)Defense and counters against weapons.
Angles of attack and defenses of each angle.
Knife defense.
Knife attacks.
Three-foot stick defense.
Three-foot stick attacks.
Drills. Twenty-five repetitions of defenses against each angle of attack, knife attacks, and 3-foot stick attacks.
2-4

FM 21-150
e.Period 5 - 2 Hours.
(1)Warm-ups and stretches.
(2)Overall review.
2-4. UNIT SUSTAINMENT TRAINING PROGRAM
Unit combative training is best done at company and platoon level. It is difficult for commanders to find time to conduct hand-to-hand combat training in typical training schedules. Combative training can be conducted during the times allotted for unit physical readiness training. Most units have at least one day a week when organized athletics are conducted for PT; this is a good time to train in hand-to-hand combat.
a. When the unit begins combative training, it starts with the basic training/OSUT program. After each soldier in the unit has attained the same basic skill level, the training can then progress to more advanced techniques and drills. If conducted once a week, this program takes 10 weeks to complete. A typical progression might be as follows:
Defense and counters against weapons: 3 hours
Field-expedient weapons: 3 hours.
Sentry removal, silent kills, and quick kills: 2 hours.
Advanced knife drills: 3 hours.
b. Once the unit has basic proficiency of the topics in Chapters 3 through 7, the commanders can easily plan future combative training. Unit trainers will know where emphasis should be placed in the unit’s hand-to-hand training, and they can also create more advanced training exercises and drills based on soldier skill levels.
Section III
TRAINING AREAS
An advantage of combative training is that it can be conducted almost anywhere with little preparation of the training area. (See Appendix A.)
2-5. TRAINING FORMATIONS
Physical training formations may be used for combative training. (See FM 21-20.) If the extended rectangular formation is used, the first and third ranks should face the second and fourth ranks so that each soldier has a partner directly across from him.
a. When practicing throws or disarming techniques, soldiers need twice the normal interval between ranks. Instructors also try to pair soldiers according to height and weight.
2-5

FM 21-150
b. A large, grassy outdoor area free of obstructions is suitable for training. Each pair of soldiers should have an 8-foot square training space. Indoor areas, such as gymnasiums, are also appropriate; however, sharp or hard weapons are not used on gymnasium floors or on mats.
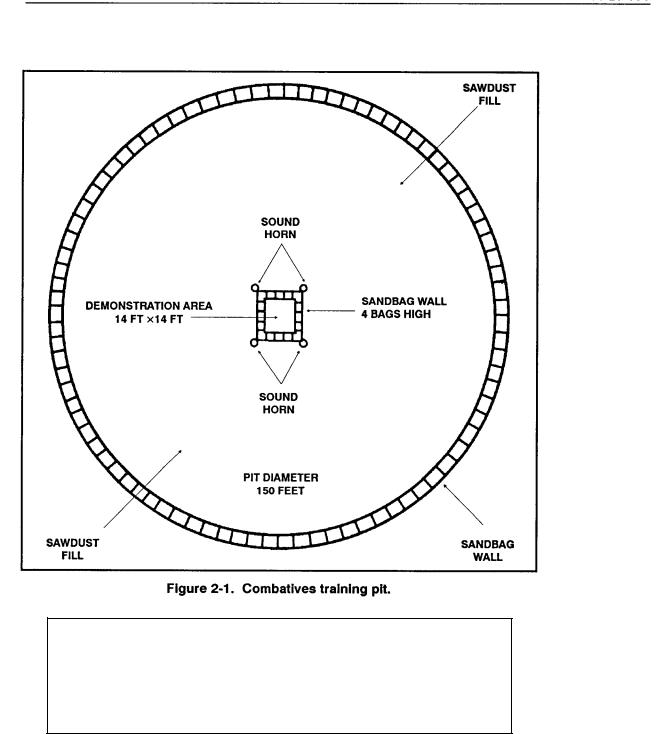
2-6. PIT CONSTRUCTION
The most common area for teaching hand-to-hand combat is a sawdust pit. Figure 2-1, shows a training area for 200 soldiers with a sawdust pit surrounding an instructor and demonstrator platform.
a. To construct the pit, dig out and level an area 50 meters wide and build a retaining wall at least 24 inches high. The wall can be cinder blocks, sandbags, or dirt if other materials are not available. To prevent injuries from a cinder block retaining wall, cover the wall and the top of the wall with sandbags. Place a layer of plastic sheeting on the ground to prevent the growth of grass and weeds, and place a sand base up to 12 inches deep on top of the plastic. Then, place a layer of sawdust at least 6 inches deep on top of the sand.
b. Build a 14-foot square demonstration area (Figure 2-1) in the center of the pit with the same type of retaining wall described in paragraph a. This area is large enough for two demonstrators and the primary instructor.
2-7. BAYONET ASSAULT COURSE
The bayonet assault course provides the commander a unique training opportunity. It allows his soldiers to employ rifle-bayonet fighting skills under simulated combat conditions. The course can be built and negotiated so that demands placed on the soldiers’ abilities and on their endurance approach those experienced under combat conditions. Realistic sights and sounds of battle—fire, smoke, confusion, and pyrotechnics--can also be created to enhance realism. (See Appendix B.) The training objectives of the bayonet assault course include:
Improving rifle-bayonet fighting skills.
Improving physical fitness and soldier aggressiveness.
Improving speed, strength, coordination, and accuracy.
Providing realistic rifle-bayonet fighting under near combat conditions.
Challenging the soldiers’ determination and stamina, which are needed in combat.
Providing an opportunity for team and squad leaders to develop their leadership and control measures.
2-6
FM 21-150
CAUTION
SOLDIERS MUST CARRY AND USE THE PROTECTIVE
MASK WHILE PARTICIPATING IN TRAINING THAT
INCLUDES THE USE OF SMOKE.
a. Safety. The safety of the soldiers should be a constant concern of the instructor and his assistants. The best safety aids are constant control and supervision. In addition, instructors should brief soldiers at the beginning of each class on the requirements for safety during rifle-bayonet training. Instructors use the following safety measures:
2-7

FM 21-150
(1) Bayonets must be fixed and unfixed only on command.
(2) Rifles should be grounded near the targets when the soldiers are ordered to move to the instructor’s platform for explanations or demonstrations.
(3)A level surface that does not become slippery when wet should be provided for the training court.
(4)Left-handed soldiers should be positioned so that they are opposite another left-handed soldier when working against the targets. This type of arrangement prevents possible injury when executing a series of movements.
(5)When using the M16 rifle against a target, the force of contact during the thrust movement may drive the hand, gripping the small of the stock, into the forward assist assembly (on the right-hand side of the weapon near the stock). To prevent injury to the hand, the soldier must maintain a firm grip on the small of the stock; gloves should be worn as part of the training uniform when weather dictates.
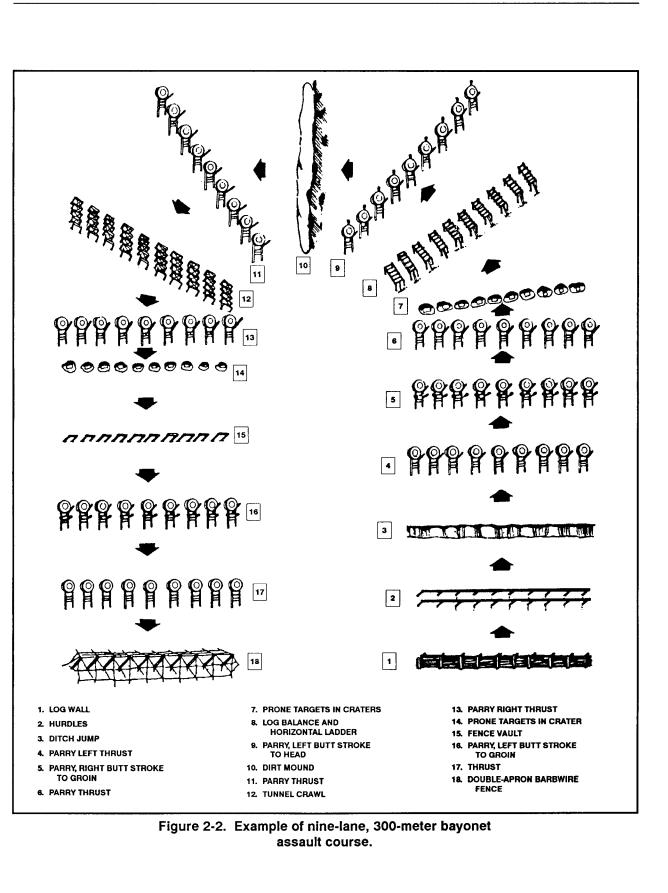
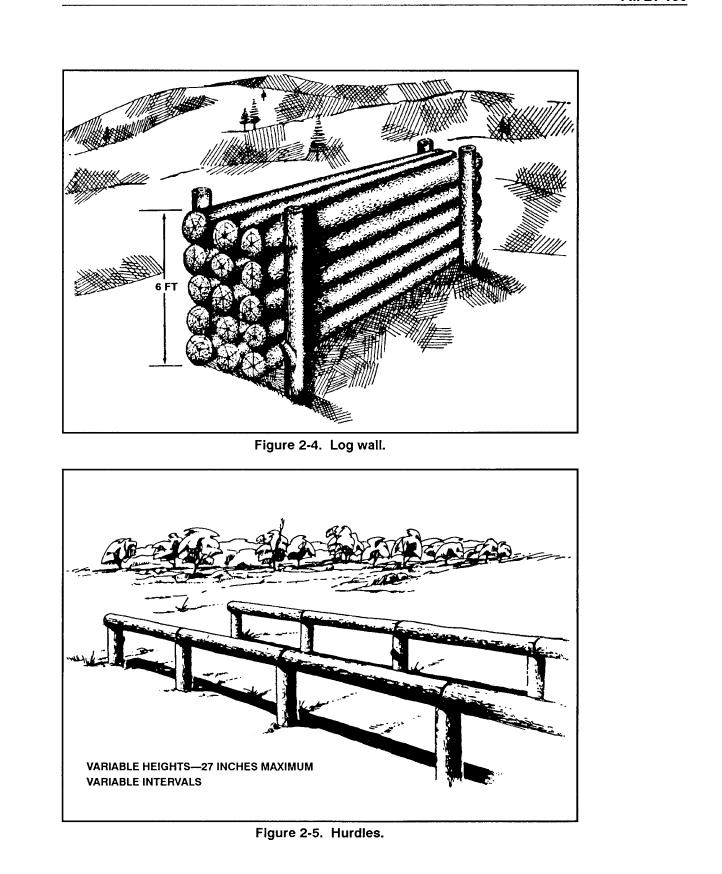
b.Layout. The 300-meter-long course consists of a series of targets to attack and obstacles to negotiate. Lay it out over natural terrain, preferably rough and wooded areas. Include natural obstacles, such as streams, ravines, ridges, and thick vegetation. Build artificial obstacles, such as entanglements, fences, log walls, hurdles, and horizontal ladders (Figure 2-2).
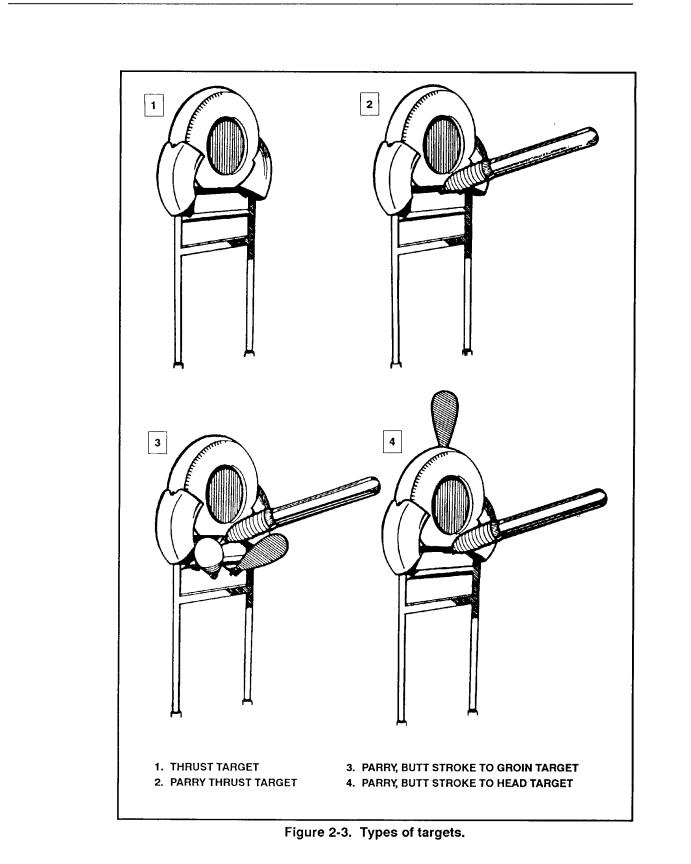
c.Targets. Use a variety of targets to provide experience in different attacks. The local TSC can build the targets. Those composed of old tires are appropriate as well as the ivan-type targets used by range control—that is, the E-type silhouette, three-dimensional personnel target (large), FSN 6920-01-164-9625 or the F-type silhouette, three-dimensional personnel target (small), FSN 6920-OO-T33-8777. Targets should be durable but should not damage weapons. Place a sign near each target to indicate the type of
attack to be used.
d. Usage. An example of how to conduct the bayonet assault course is as
follows:
(1)Task. Negotiate the bayonet assault course.
(2)Conditions. Given nine lanes on a 300-meter bayonet assault course over irregular terrain with four types of targets: thrust; parry thrust target; parry, butt stroke to the groin target; and parry, butt stroke to head target
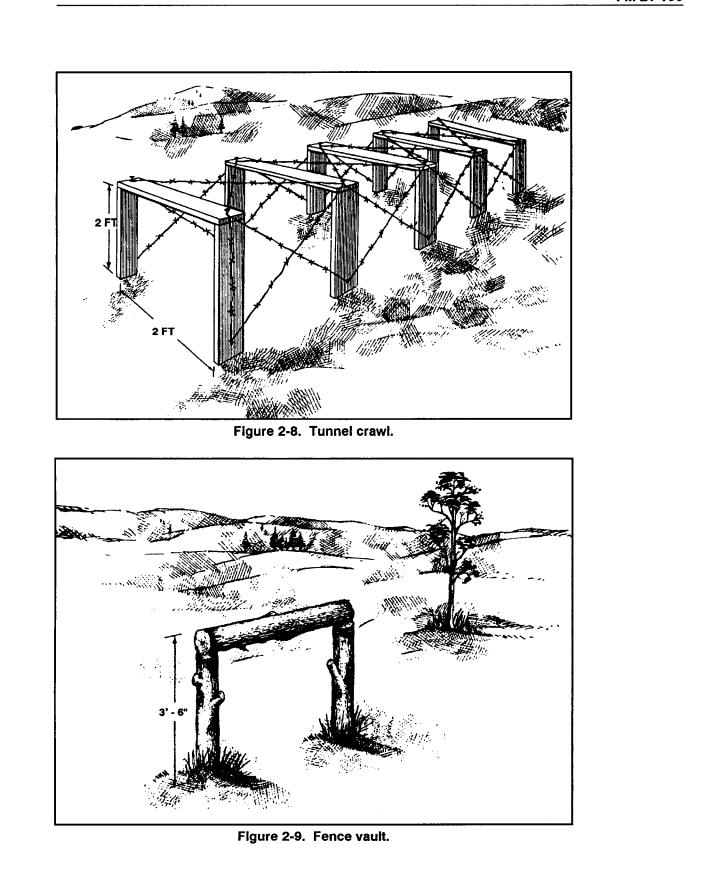
(Figure 2-3, page 2-10). The targets are marked with a sign to indicate the required attack. Given seven types of obstacles as shown in Figures 2-4 through 2-10, pages 2-11 through 2-14. Given a soldier in battle dress uniform with load-carrying equipment and a rifle with a fixed bayonet.
2-8
FM 21-150
2-9
FM 21-150
2-10
FM 21-150
2-11

FM 21-150
2-12
FM 21-150
2-13