

Beginning Visual C++ 2005 (2006) [eng]
.pdfUpdating Data Sources
Adding Rows to a Table
Extend the example to implement the capability to add a new order to the Northwind database. This provides insight into some of the practical problems and complexities you will face in this kind of operation.
An order itself is not a simple record in a table in the Northwind database. Two tables are involved in defining a new order. The basic order data is in the Orders table, where information about the customer is stored. For each order, there is one or more records in the Order Details table and one for each product in the order, the link to the record in the Orders table being the Order ID. The relationship between these tables is illustrated in Figure 20-11.
O |
Cus |
Em |
|
Or |
|
|
|||
t |
p |
|
d |
|
|
|
|||
rder |
l |
|
e |
|
ome |
o |
r |
||
|
ye |
|||
|
|
Da |
||
ID |
r |
|
e |
|
|
t |
|||
|
|
I |
||
|
ID |
|
e |
|
|
|
|
D |
|
998 EDXY
Orders Table
... etc.
 5 columns in total
The products corresponding to an order in the Orders table are recorded in one or more records of the Order Details Table.
|
|
P |
Un |
|
Q |
D |
||||
O |
|
|||||||||
|
|
ro |
i |
|
u |
|
i |
|||
|
|
d |
|
|
s |
|||||
|
|
t |
|
a |
|
c |
||||
rder |
|
|
|
|||||||
|
|
u |
P |
n |
|
o |
||||
|
|
ct |
ri |
|
t |
|
u |
|||
|
ID |
|
|
|
it |
|
|
n |
||
|
|
c |
|
|
||||||
|
|
|
ID |
|
|
y |
|
|
t |
|
|
|
|
e |
|
|
|||||
|
|
|
|
|
|
|
|
|
|
|
|
|
|
|
|
|
|
|
|
|
|
|
|
998 |
|
43 |
|
2.50 |
|
50 |
0.1 |
|
|
|
|
|
|
||||||
|
|
|
|
|
|
|
|
|
|
|
|
|
998 |
|
11 |
|
9.95 |
|
25 |
0 |
|
|
|
|
|
|
|
|
|
|
|
|
|
|
998 |
|
71 |
15.00 |
|
30 |
0.15 |
||
|
|
|
|
|||||||
|
|
|
|
|
|
|
|
|
|
|
|
|
|
|
|
|
|
|
|
|
|
|
|
|
|
|
|
|
|
|
|
|
Order Details Table
Figure 20-11
999

Chapter 20
But there’s more than these two tables involved in the process for adding a new order. When creating a new order you have to provide a way for the user to select a customer from the Customers table. The Orders table includes a field identifying the employee, which needs to be one of the employees recorded in the Employees table. After the information required for a new record in the Orders table has been established, one or more products obviously will need to be selected from those defined in the Products table. With all these tables involved, it’s going to be a somewhat messy business. You can simplify it slightly by making the Employee ID field 1 by default. This avoids the need to deal with the Employees table in the example. You need to establish the overall logic first.
The Order Entry Process
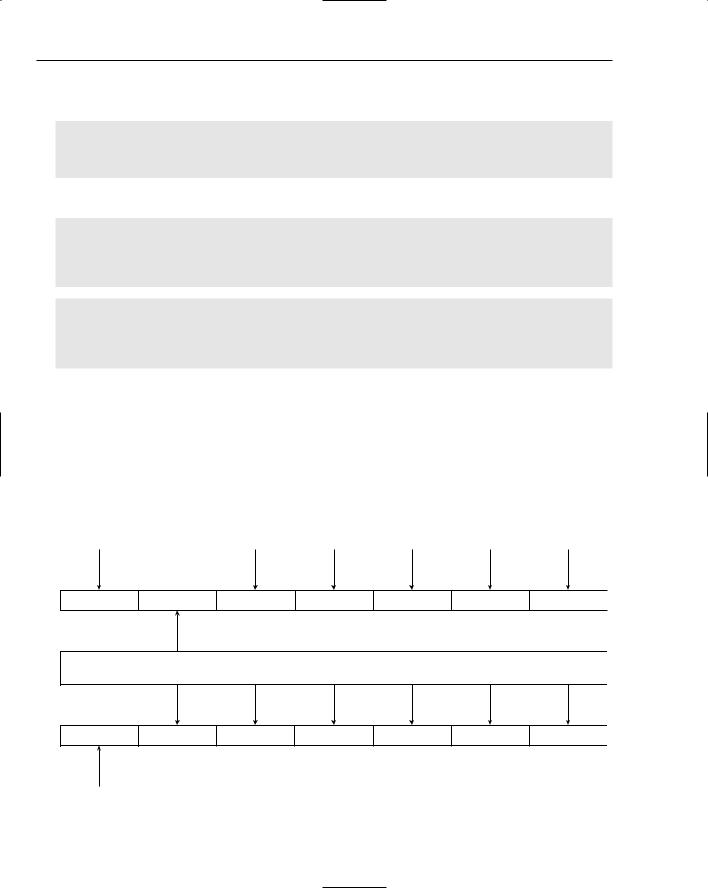
You will be using two dialog forms in addition to the dialog form you already have that provides for viewing and editing the details of existing orders. One deals with the selection of the customer for the order, and setting the required delivery date, and the other takes care of entering the details of the products and quantities for the order. The dialog box to select the customer is associated with the Customers table in the database, and the dialog box for selecting products is associated with the Products table. Buttons on the dialog box enable the transition from one dialog box to another. The basic logic is shown in Figure 20-12.
Starts new order with customer  selection dialog
Starts product selection dialog for order
Aborts new order and returns to order detail dialog
Ends new order processing and returns to
order details dialog. If no product was selected, no
order is created. Creates new order and details for first product. Subsequent
selections add order details record.
Figure 20-12
1000
Updating Data Sources
You will hold off creating a new record in the Orders table until you have the first Product Details record entered. That way you will avoid ending up with an order that doesn’t order anything. Put together the dialog resources you need and then implement the code to support the operations.
Creating the Resources
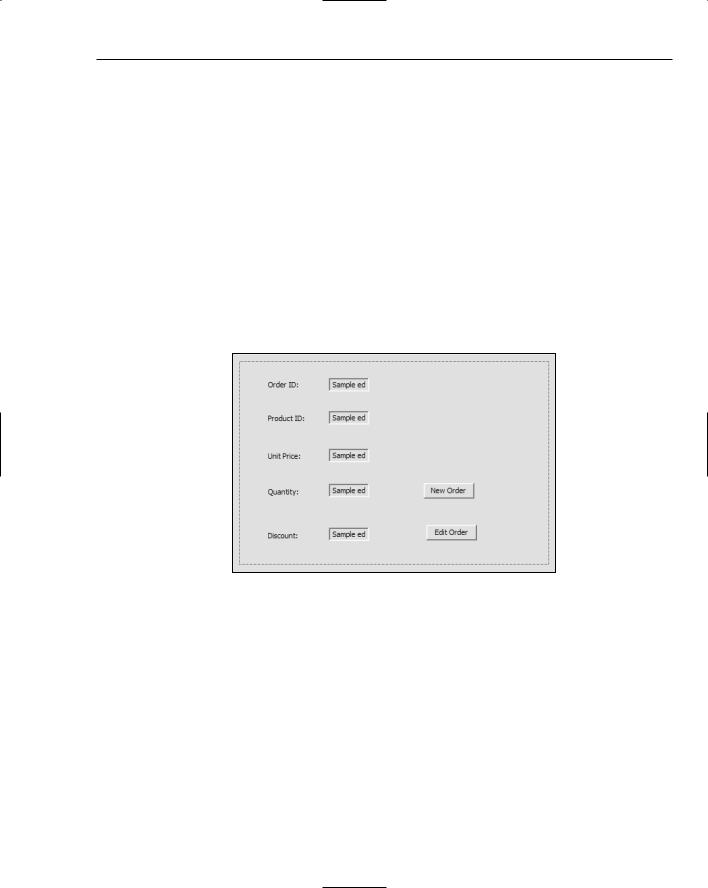
You need an additional button on the dialog box that you have at present to initiate the process of creating a new order, so add a button with the label New Order, and with the ID IDC_NEWORDER. After you have done this, you can place the new button coincident with the Cancel button if you want because only one is visible at any given time, the New Order button being visible by default. On the other hand you could keep them distinct if you would prefer to avoid working with resources where one can mask another.
If you want the New Order button to appear on top when it is in the same position as the Cancel button, you need to make sure it follows the Cancel button in the tab order. Figure 20-13 shows the revised IDD_SIMPLEUPDATE_FORM dialog form with the New Order button overlaying and therefore masking the Cancel button.
Figure 20-13
You can add a handler for the New Order button to COrderDetailsView by right-clicking the button and selecting Add Event Handler from the pop-up. You could shorten the default handler name to OnNewOrder() if you choose. You may need to move the button before clicking it to get the handler for the right button. You will add the code for this handler later. Of course, you could have used the Cancel button here by changing its label and altering the effect of its handler depending on the state of the m_Mode member of COrderDetailsView, but with this approach you’ll get to see how you can work with two buttons here.
You can create the new dialog forms you need by right-clicking the Dialog folder in Resource View and selecting Insert Dialog from the pop-up. Assign the IDs as IDD_CUSTOMER_FORM and IDD_PRODUCT_FORM, respectively. They both need to have Child selected for the Style property and None selected in the Border property. You could also make all three dialog forms about the same size and a little larger than the original form.
1001

Chapter 20
Creating the Recordsets
Two recordset classes corresponding to the Customers and Products tables in the database are required. You add each of these in the same way; right-click on DBSimpleUpdate in Class View and select Add > Class from the pop-up and then choose MFC ODBC Consumer as the template. You can make the class names CCustomerSet and CProductSet set corresponding to the Customers and Products tables respectively and select the recordset type to be Snapshot in both instances. Change fields of type CStringW to type CString and don’t forget to delete or comment out the #error directive that precedes the definition of the GetDefaultConnect() function in each class.
Creating the Recordset Views
You can now create record view classes that connect to the new dialogs, so add .h files and .cpp files to the project that hold the code for the new CCustomerView and CProductView classes that you’ll define. The CCustomerView class encapsulates a view of the CCustomerSet recordset and uses the IDD_CUSTOMER form dialog resource. The initial class definition is therefore:
// CustomerView.h : header file
#pragma once
class CCustomerSet;
class CCustomerView : public CRecordView
{
public:
CCustomerView();
virtual ~CCustomerView();
public:
enum { IDD = IDD_CUSTOMER_FORM };// Form Data CCustomerSet* m_pSet;
// Operations public:
CCustomerSet* GetRecordset();
#ifdef _DEBUG
virtual void AssertValid() const;
virtual void Dump(CDumpContext& dc) const; #endif
};
You can initialize the m_pSet member that stores the pointer to the recordset object in the constructor in the CustomerView.cpp file:
#include “stdafx.h”
#include “DBSimpleUpdate.h” // Main header file for the application #include “CustomerView.h”
// Constructor
1002

Updating Data Sources
CCustomerView::CCustomerView()
: CRecordView(CCustomerView::IDD), m_pSet(NULL)
{
}
The constructor also establishes IDD_CUSTOMER_FORM as the dialog box for this view by passing its ID to the base class constructor. You need the #include directive for DBSimpleUpdate.h preceding the #include for CustomerView.h, as without it the symbol IDD_CUSTOMER_FORM would not be recognized during compilation. DBSimpleUpdate.h has an #include directive for Resource.h that contains the definitions for the IDs for the resources you have created.
Now add the definitions of the functions that are to be generated in debug mode to CustomerView.cpp:
// CCustomerView diagnostics
#ifdef _DEBUG
void CCustomerView::AssertValid() const
{
CRecordView::AssertValid();
}
void CCustomerView::Dump(CDumpContext& dc) const
{
CRecordView::Dump(dc);
}
#endif //_DEBUG
You probably won’t need these, but it’s good to have them defined(just in case something goes wrong.
You can now add overrides for the DoDataExchange(), OnGetRecordset(), and OnInitialUpdate() functions that are inherited from the base class. The example shows you how to customize these to work with the recordset in the way that you want. Right-click the CCustomerView class name in Class View and select Properties from the pop-up. Click the overrides toolbar button (wait for the tooltips for the buttons to display if you can’t remember which button it is) and for each override select the function name in the left column and select the <Add> option in the cell to the right to add the function.
You can complete the implementation of the OnGetRecordset() function override right away:
CRecordset* CCustomerView::OnGetRecordset()
{
if(m_pSet == NULL) |
// If we don’t have the recordset address |
{ |
|
m_pSet = new CCustomerSet(NULL); |
// create a new one |
m_pSet->Open(); |
// and open it |
} |
|
return m_pSet; |
// Return the recordset address |
} |
|
If m_pSet is NULL you create a recordset and open it before returning its address. If m_pSet is not NULL there is already a recordset created so you return the address that it contains. You must add an #include directive for CCustomerSet.h to the .cpp file because you refer to the CCustomerSet class name here.
1003

Chapter 20
You can now implement the GetRecordset() function to use this function:
CCustomerSet* CCustomerView::GetRecordset()
{
return static_cast<CCustomerSet*>(OnGetRecordset());
}
The explicit cast is necessary here because the cast is down the class hierarchy from the base class to the derived class. You will be able to complete the detail of the other two overrides later.
Because you are creating the CCustomerSet object on the heap, you need to take care to delete it in the CCustomerView class destructor:
CCustomerView::~CCustomerView()
{
if (m_pSet) delete m_pSet;
}
The OnInitialUpdate() function override in the CCustomerView class should be implemented as you have seen previously:
void CCustomerView::OnInitialUpdate()
{
BeginWaitCursor();
GetRecordset();
CRecordView::OnInitialUpdate(); if (m_pSet->IsOpen())
{
CString strTitle = m_pSet->m_pDatabase->GetDatabaseName(); CString strTable = m_pSet->GetTableName(); if(!strTable.IsEmpty())
strTitle += _T(“:”) + strTable; GetDocument()->SetTitle(strTitle);
}
EndWaitCursor();
}
The definition of the CProductView class is much the same as the CCustomerView class, the primary difference being the dialog form associated with it:
// ProductView.h : header file #pragma once
class CProductSet;
class CProductView : public CRecordView
{
public:
CProductView(); virtual ~CProductView();
public:
1004

Updating Data Sources
enum { IDD = |
IDD_PRODUCT_FORM }; |
// Form Data |
CProductSet* |
m_pSet; |
|
//Operations public:
CProductSet* GetRecordset();
//Implementation
protected: #ifdef _DEBUG
virtual void AssertValid() const;
virtual void Dump(CDumpContext& dc) const; #endif
};
Now you can add overrides for the OnGetRecordset(), DoDataExchange(), and OnInitialUpdate() functions using the method you used for the previous class and add the following directives to the beginning of the ProductView.cpp file:
#include “stdafx.h” #include “DBSimpleUpdate.h”
#include “ProductView.h” #include “ProductSet.h”
The constructor should initialize the m_pSet member and the destructor should delete the object pointed to by the m_pSet object because you’ll create it on the heap. The constructor and destructor definitions are:
CProductView::CProductView()
:CRecordView(CProductView::IDD), m_pSet(NULL)
{
}
CProductView::~CProductView()
{
if (m_pSet) delete m_pSet;
}
The implementation of the OnGetRecordset() function is:
CRecordset* CProductView::OnGetRecordset()
{
if(m_pSet == NULL) |
// If there is no recordset |
{ |
|
m_pSet = new CProductSet(NULL); |
// create one |
m_pSet->Open(); |
// then open it |
} |
|
return m_pSet; |
// Return the address of the recordset |
} |
|
1005
Chapter 20
The implementation of the GetRecordset() function in the CProductView class is also essentially the same as for the CCustomerView class:
CProductSet* CProductView::GetRecordset()
{
return static_cast<CProductSet*>(OnGetRecordset());
}
You can also add definitions for the diagnostic functions to be used in debug mode:
#ifdef _DEBUG
void CProductView::AssertValid() const
{
CRecordView::AssertValid();
}
void CProductView::Dump(CDumpContext& dc) const
{
CRecordView::Dump(dc);
}
#endif //_DEBUG
You’ll return to the functions still to be implemented in CProductView a bit later in this chapter (in the meantime you are now ready to populate the dialog boxes with the controls you need.
Adding Controls to the Dialog Resources
Although you have only tied the IDD_CUSTOMER_FORM dialog box into the Customers table, within the process you will need to provide all the information necessary to create a new record in the Orders table. The source of the data for each field of a new Orders record is shown in Figure 20-14.
Generated as |
Arbitrarily |
Current |
Input from |
Set as |
Arbitrarily |
max(OrderID)+1 |
9 |
Date |
Dialog |
<NULL> |
3 |
OrderID |
CustomerID |
EmployeeID |
OrderDate |
RequiredDate |
ShippedDate |
ShipVia |
Customers Table
Freight |
ShipName |
ShipAddress |
ShipCity |
ShipRegion |
ShipPostalCode ShipCountry |
Arbitrarily
9.95
Figure 20-14
1006
Updating Data Sources
Half of the fields are drawn from the record in the Customers table that the user selects. Because you are creating a new order, you will need to synthesize a new unique order ID. To do this you can find the largest ID currently in use in the Orders table and then just add 1 to that value.
To select the customer, the user scrolls through the recordset until the required customer is displayed. You can then retrieve the data you need to construct the new Orders record from the recordset. You can display the current date in the dialog box as the order date, and you can provide a control for selecting the required ship date. The other fields you’ll just assign arbitrary values to, so that you don’t overcomplicate the example.
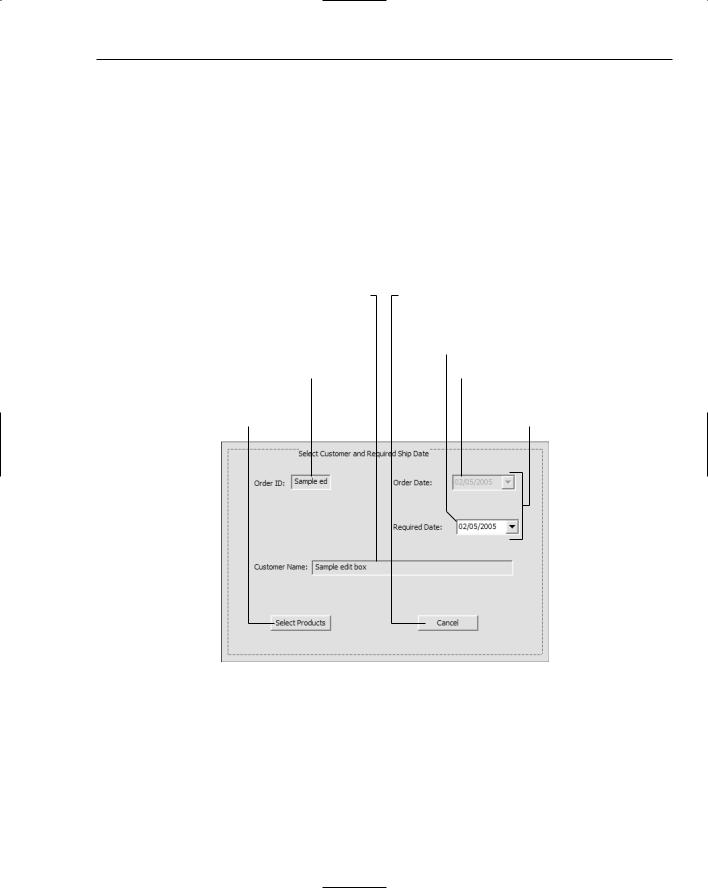
Of course, you don’t need to display all the information from the Customers table in the dialog box — just the name is sufficient to identify the customer for selection purposes. You still need the data in the recordset though. You can place controls on the IDD_CUSTOMER_FORM dialog as shown in Figure 20-15.
IDC_COMPANYNAME
Connects to
Customers table
Unique ID created from
Orders as max(OrderID)+1
IDC_NEWORDERID
IDC_SELECTPRODUCTS
Goes to dialog to select products for order
IDC_CANCELORDER
Aborts new order creation
IDC_REQUIREDDATE
Current date IDC_ORDERDATE
These are Date/
Time Picker controls
Figure 20-15
You can see from the diagram how the controls are to be used, and the IDs that you need to assign to assign to them. The date time picker controls allow a date or time to be entered or selected. Whether it selects a date or a time depends on the value you choose for the Format property. The controls here use Short Date format. The date is chosen by clicking the down arrow and choosing a date from the calendar that pops up. You can try it out to see how it works. Note that the control showing the order date is not accessible by the user because the date value is just today’s date. You set this state for the control by setting the Disabled property value to True. Note also that the edit controls for the order ID and
1007

Chapter 20
customer name each have their Read Only property set to True to prevent modification of the values displayed.
You can add variables to the CCustomerView class to store values from the date time picker controls. Right-click the order date edit control and select Add Variable from the pop-up. Figure 20-16 shows the dialog box.
Figure 20-16
You need to select the category as Value and the type as CTime because you want a variable that stores the value from the control rather than one that provides access to the control itself. You can give the member the name m_OrderDate. The Add Member Variable wizard automatically adds initialization for the variable to the class constructor and add a DDX_ function call to the DoDataExchange() function to effect data exchange between the variable and the control. You can add a variable with the name m_RequiredDate in a similar way for the other date/time picker control.
Although this view is associated with a recordset corresponding to the Customers table, in fact only the edit control showing the customer name needs to be connected to the CCustomerSet recordset as you are only displaying this field on the dialog box. You can add a DDX_ function call for this to the
DoDataExchange() function in the CCustomerView class:
void CCustomerView::DoDataExchange(CDataExchange* pDX)
{
CRecordView::DoDataExchange(pDX); DDX_DateTimeCtrl(pDX, IDC_ORDERDATE, m_OrderDate);
DDX_DateTimeCtrl(pDX, IDC_REQUIREDDATE, m_RequiredDate); DDX_FieldText(pDX, IDC_COMPANYNAME, m_pSet->m_CompanyName, m_pSet);
}
1008