

CSharp Bible (2002) [eng]-1
.pdfit is as clean as possible. The verification process ensures that your code is accessing memory properly and that it is using the correct variable types when calling methods that expect a specific type. These checks ensure that your code doesn't execute any instructions that could make the code crash. The MSIL instruction set was designed to make this verification process relatively straightforward. CPU-specific instruction sets are optimized for quick execution of the code, but they produce code that can be hard to read and, therefore, hard to verify. Having a C# compiler that directly outputs CPU-specific code can make code verification difficult or even impossible. Allowing the .NET Framework JIT compiler to verify your code ensures that your code accesses memory in a bug-free way and that variable types are properly used.
Metadata
The compilation process also outputs metadata, which is an important piece of the .NET codesharing story. Whether you use C# to build an end-user application or you use C# to build a class library to be used by someone else's application, you're going to want to make use of some already-compiled .NET code. That code may be supplied by Microsoft as a part of the
.NET Framework, or it may be supplied by a user over the Internet. The key to using this external code is letting the C# compiler know what classes and variables are in the other code base so that it can match up the source code you write with the code found in the precompiled code base that you're working with.
Think of metadata as a "table of contents" for your compiled code. The C# compiler places metadata in the compiled code along with the generated MSIL. This metadata accurately describes all the classes you wrote and how they are structured. All of the classes' methods and variable information is fully described in the metadata, ready to be read by other applications. Visual Basic .NET, for example, may read the metadata for a .NET library to provide the IntelliSense capability of listing all of the methods available for a particular class.
If you've ever worked with COM (Component Object Model), you may be familiar with type libraries. Type libraries aimed to provide similar "table of contents" functionality for COM objects. However, type libraries suffered from some limitations, not the least of which was the fact that not all of the data relevant to the object was put into the type library. Metadata in
.NET does not have this shortcoming. All of the information needed to describe a class in code is placed into the metadata. You can think of metadata as having all of the benefits of COM type libraries without the limitations.
Assemblies
Sometimes, you will use C# to build an end-user application. These applications are packaged as executable files with an extension of .EXE. Windows has always worked with .EXE files as application programs, and C# fully supports building .EXE files.
However, there may be times when you don't want to build an entire application. Instead, you may want to build a code library that can be used by others. You may also want to build some utility classes in C#, for example, and then hand the code off to a Visual Basic .NET developer, who will use your classes in a Visual Basic .NET application. In cases like this, you won't be building an application. Instead, you'll be building an assembly.
An assembly is a package of code and metadata. When you deploy a set of classes in an assembly, you are deploying the classes as a unit; and those classes share the same level of
version control, security information, and activation requirements. Think of an assembly as a "logical DLL." If you're familiar with Microsoft Transaction Server or COM+, you can think of an assembly as the .NET equivalent of a package.
There are two types of assemblies: private assemblies and global assemblies. When you build your assembly, you don't need to specify whether you want to build a private or a global assembly. The difference is apparent when you deploy your assembly. With a private assembly, you make your code available to a single application. Your assembly is packaged as a DLL, and is installed into the same directory as the application using it. With a deployment of a private assembly, the only application that can use your code is the executable that lives in the same directory as your assembly.
If you want to share your code among many applications, you might want to consider deploying your code as a global assembly. Global assemblies can be used by any .NET application on the system, regardless of the directory in which it is installed. Microsoft ships assemblies as a part of the .NET Framework, and each of the Microsoft assemblies is installed as a global assembly. The .NET Framework contains a list of global assemblies in a facility called the global assembly cache, and the .NET Microsoft Framework SDK includes utilities to both install and remove assemblies from the global assembly cache.
Summary
In this chapter, you learned the basics of the .NET Framework. After tracing the evolution from C to C++ to C#, you examined the high points of the C# feature list. You also investigated the output of the C# compiler, MSIL code, and metadata, and reviewed the use of assemblies as the building blocks of compiled .NET code.
Chapter 2: Writing Your First C# Program
In This Chapter
This chapter walks you through the development of a simple C# application. You also learn about how simple C# applications are structured and how to invoke the C# compiler to turn your source code into code that can be executed by the .NET Framework. Finally, you learn how to document your code using source code comments and how you can automatically turn your comments into an XML document.
Choosing an Editor
You have many options when it comes to writing code for the .NET Framework in C#. The most logical choice is to use Visual Studio .NET. By using Visual Studio, you get the benefit of IntelliSense, syntax highlighting, and many other productivity-enhancing tools.
Many third-party editors try to envelop the productivity tools that are contained within Visual Studio. Several of these tools can be downloaded as shareware, and others are freeware. The examples provided in this chapter simply use Windows Notepad. By using Notepad, not only do you learn that any text editor can be used to write C# applications, but you also learn the basics necessary to compile applications. Also by using Notepad, you learn that you don't

need to rely on wizards to generate code for you. You can simply concentrate on the language itself, without having to learn the ins and outs of an IDE. Keep in mind though that for larger applications, you may prefer to use an editor that displays line numbers, which can help when you are tracking down faulty code.
Writing Hello World!
The code shown in Listing 2-1 is a complete C# application. It runs from within a console window and prints the message Hello World! to the screen. The sections that follow walk through this code one line at a time.
Listing 2-1: Writing to the Console
class HelloWorld
{
public static void Main()
{
System.Console.WriteLine("Hello World!");
}
}
Building a class
The first line in our C# program defines a class. A class is a container for all the code that is contained within the application. Unlike in C/C++, all your code must be contained within a class, with few exceptions. The exceptions to this rule are the using statement, structure declarations, and a namespace declaration. Any attempt to write code that is not contained within a class results in a compiler error.
The first line in your Hello World application starts with the class keyword and then the word HelloWorld. HelloWorld is the name of the class that the code is creating. All classes must be assigned a unique name so you can reference them later.
Immediately following the class declaration, you must have an opening brace. The opening brace is used to open your class's body of code. All the code that you write in your class must be placed after this opening brace. In addition to an opening brace, there must also be a closing brace, as seen in the last line of the HelloWorld application. Ensure that all of your programming is placed between these two braces.
Beginning with the Main() method
Every application in C# must have a method called Main(). A method is a set of instructions that perform an action. This method can return information to the section of code that called it but under certain circumstances it doesn't necessarily have to.
Note The terms method and function are generally used interchangeably, but there is a distinction. A method is a function contained within a class. A function is generally a group of instructions not contained within a class and generally in a language, such as C or C++. Because you cannot add code outside of a class in C#, you should never have a
function.
The public keyword in your declaration of the Main() method also contains the word public, which informs the compiler that your Main() method should be publicly accessible. Not only is the Main() method available from within your application by other methods, but also externally from other applications. By declaring your Main() method as public, you are creating an entry point for Windows to start the application when a user wants to run it.
When a user double-clicks the HelloWorld application icon, Windows searches the executable for an entry point by that name. If it finds no entry, the application is unable to run.
The word Static in the method declaration means that the compiler should allow only one copy of the method to exist in memory at any given time. Because the Main() method is the entry point into your application, it would be catastrophic to allow the entry point to be loaded more than once; this would generate more than one copy of the application in memory and undoubtedly some severe errors.
Just before the word Main, you see the word Void. Void is what your main function returns when it has completed running. Void means that your application returns no value after it has completed. This sample application isn't very advanced, so no return value is needed; under normal circumstances, however, the Main() function would typically return an integer value by replacing the word void with int. Valid return values are any simple data type defined within the .NET Framework.
Much like a class declaration, any methods you define must also contain an opening and closing brace within which all code for the method is placed. You can see the opening and closing brace for the Main() method on lines 4 and 6 in Listing 2-1.
Writing to the console
Line 5 of Listing 2-1 contains a call to the WriteLine method. This method is contained within the .NET Framework and writes a string to the console. If run from within a console window, the text would be shown on the screen. If you run this command from within the Visual Studio environment, any output it produces shows up in the output window.
You already learned that all functions in C# must be defined inside of a class. The functions found in the .NET Framework are no exception. The WriteLine() function is found in a class called Console. The Console keyword, used just before the WriteLine() function call, tells the compiler that the WriteLine() function can be found in a class called Console. The Console class is one of the many classes in the .NET Framework, and the WriteLine() function is a member of the Console class. A period separates the name of the class from the name of the function being called.
The name System appears immediately before the Console class name. Classes in the .NET Framework are organized into groups called namespaces. Namespaces are covered in more detail within Chapter 12. For now, you can think of a namespace as a collection of classes. The Console class is found in a .NET Framework namespace called System, and you must write this namespace name into your code. The C# compiler needs to find the code for WriteLine() so that your application runs properly, and you must give the compiler enough information about namespaces and classes before it can find the code for WriteLine().

The text inside the WriteLine() parentheses is a string. A string in C# is a collection of characters enclosed in double quotes and kept together as a unit. Putting the string inside the parentheses tells the compiler that you intend to pass the string as a parameter to the WriteLine() function. The WriteLine() function writes a string to the console, and the parameter to the function tells WriteLine() which string should be written out.
There's a lot of information on line 5, which you can read as follows: "C# compiler, I want to call the WriteLine() with a string parameter of 'Hello World!' The WriteLine() function can be found in a class called Console, and the Console class can be found in a namespace called System."
Line 5 ends with a semicolon. All C# statements must end with a semicolon. The semicolon separates one statement from another in C#.
Compiling and Running the Program
Now that you've reviewed the code in Listing 2-1, it's time to make it run. Type the code from Listing 2-1 into your favorite text editor and save it as a file called Listing2-1.cs. The cs extension is the extension for all files that contain C# code.
Note Before compiling the C# example, you must ensure that the C# compiler is within your Path. The csc.exe application is typically in the c:\windows\ Microsoft.NET\ Framework\v1.0.xxxx (replace V1.0.Xxxx with the version of your .NET Framework) folder, which you can verify by searching for it within Windows. To add entries to your path, search your Windows Help file for the keyword Path.
Now open up a command-prompt window and navigate to the folder in which you saved your HelloWorld.cs file. Once there, you can type the following command:
csc HelloWorld.cs
The csc command invokes the .NET Framework's C# compiler. Running this command produces an executable called HelloWorld.exe, which you can run just as you would any Windows application. Running this executable writes text to the console window as shown in Figure 2-1.
Figure 2-1: The command-prompt window shows the Hello World application in action.
Congratulations! You have just written your first C# application.
Understanding keywords and identifiers
The C# application in Listing 2-1 contains many words, separated by spaces. It uses two types of names: keywords and identifiers. This section describes the differences between these two types of names.
Keywords are words that have special meaning in the C# language. These words have been set aside in C# and are referred to as reserved words. The words class, static, and void are the reserved words in Listing 2-1. Each keyword has been defined by the C# language as having a special meaning. The following list contains all of the keywords defined by C#.
|
|
|
|
|
|
|
abstract |
|
continue |
|
finally |
|
is |
|
|
|
|
|
|
|
as |
|
decimal |
|
fixed |
|
lock |
|
|
|
|
|
|
|
base |
|
default |
|
float |
|
long |
|
|
|
|
|
|
|
bool |
|
delegate |
|
for |
|
namespace |
|
|
|
|
|
|
|
break |
|
do |
|
foreach |
|
new |
|
|
|
|
|
|
|
byte |
|
double |
|
goto |
|
null |
|
|
|
|
|
|
|
case |
|
else |
|
if |
|
object |
|
|
|
|
|
|
|
catch |
|
enum |
|
implicit |
|
operator |
|
|
|
|
|
|
|
char |
|
event |
|
in |
|
out |
|
|
|
|
|
|
|
checked |
|
explicit |
|
int |
|
override |
|
|
|
|
|
|
|
class |
|
extern |
|
interface |
|
params |
|
|
|
|
|
|
|
const |
|
false |
|
internal |
|
private |
|
|
|
|
|
|
|
protected |
|
short |
|
this |
|
unchecked |
|
|
|
|
|
|
|
public |
|
sizeof |
|
throw |
|
unsafe |
|
|
|
|
|
|
|
readonly |
|
stackalloc |
|
true |
|
ushort |
|
|
|
|
|
|
|
ref |
|
static |
|
try |
|
using |
|
|
|
|
|
|
|
return |
|
string |
|
typeof |
|
virtual |
|
|
|
|
|
|
|
sbyte |
|
struct |
|
uint |
|
void |
|
|
|
|
|
|
|
sealed |
|
switch |
|
ulong |
|
while |
|
|
|
|
|
|
|
Identifiers are names that you use in your applications. C# does not reserve identifier names. Identifiers are words that name items in your C# code. Your class needed a name, and you used the name HelloWorld for your class. This makes the name HelloWorld an identifier. Your method also needed a name, and you used the name Main for your function. This makes the name Main an identifier.
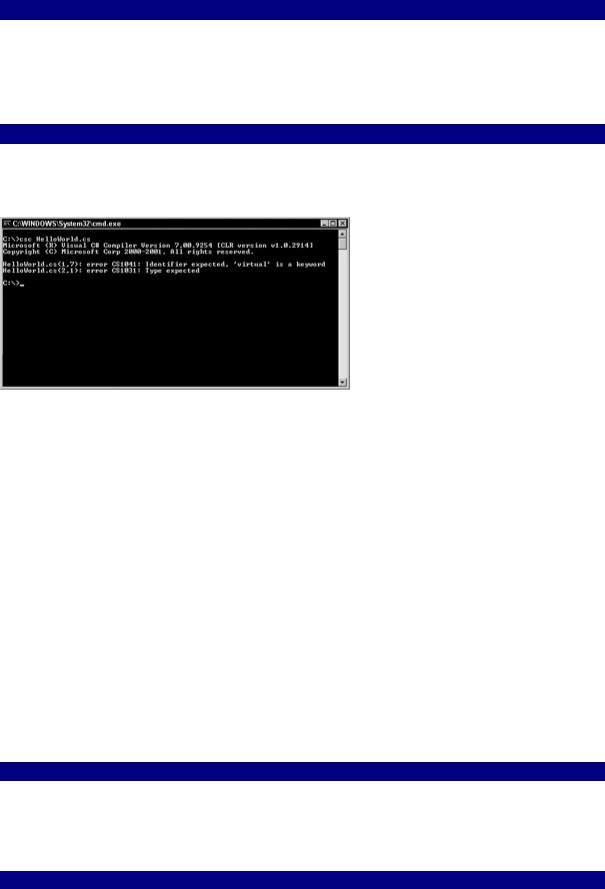
The C# compiler does not ordinarily allow you to use any of the reserved keywords as an identifier name. You'll get an error if, for example, you try to name a class static. If you really need to use a keyword name as an identifier, however, you can precede the identifier with the @ symbol. This overrides the compiler error and enables you to use a keyword as an identifier. Listing 2-2 shows how this is done. It is a modification to the code in Listing 2-1 and defines the word virtual as the name of the class.
Listing 2-2: Using the virtual Keyword as a Class Identifier
class @virtual
{
static void Main()
{
System.Console.WriteLine("Hello World!");
}
}
Without the leading @ symbol, you get an error from the compiler, as shown in Figure 2-2.
Figure 2-2: Forgetting @ generates compiler errors.
Using whitespace
The text of C# applications can include spaces, tabs, and carriage returns. These characters are called whitespace characters. Whitespace characters, which can be placed anywhere except in the middle of a keyword or identifier, help improve the readability of your code.
The C# compiler ignores the placement of whitespace when compiling a program. This means that you can place any whitespace character anywhere that the compiler accepts a whitespace character. The compiler remains indifferent to your use of carriage returns, tabs, and spaces, and you are free to use any combination of whitespace characters in your code.
The listings in this book reflect personal styles of whitespace layout: carriage returns are placed before and after opening and closing braces, and code is indented from the braces. However, this layout is not required by the C# application. Listing 2-3 shows an alternative layout of the code, using different whitespace characters. Feel free to experiment with the style that works best for you.
Listing 2-3: An Alternative Whitespace Layout
Class HelloWorld
{
static void Main() {System.Console.WriteLine("Hello World!");}
}

If you compile and run Listing 2-3, you see that it behaves just as the code in Listing 2-1 does: it outputs the string Hello World! The new whitespace layout style has no effect on the compiler's ability to compile the code; nor does it have any effect on the behavior of the code executing at runtime.
Starting Programs with the Main() Function
The application shown in Listing 2-1 defines a class with a function called Main(). The Main() function is an important part of C# applications, as the Main() function is where execution of your program begins.
Every C# application that you write must have one class with a function called Main(). The Main() function is referred to as your application's entry point, and the execution of your C# applications begin with the code in Main(). If your code contains more than one class, only one class can have a function called Main(). If you forget to define a Main() function, you will receive several errors from the compiler, as shown in Figure 2-3.
Figure 2-3: The absence of a Main() function generates compiler errors.
The Main() function defined in Listing 2-1 returns nothing (hence the void keyword), and takes no arguments (hence the empty parentheses). The C# compiler does, in fact, accept any of four possible constructs for the Main() function:
•public static void Main()
•public static void Main(string[] Arguments)
•public static int Main()
•public static int Main(string [] Arguments)
The first form, public static void Main(), is the form that used in Listing 2-1.
The second form, public static void Main(string[] Arguments), does not return a value to the caller. It does, however, take in an array of strings. Each string in the array corresponds to a command-line argument supplied when the program executes. For example, suppose that you modify the code in Listing 2-1 so that the Main() method accepts a string array as its argument. Moreover, suppose that you run that code and supply some command-line arguments:
Listing2-1.exe Param1 Param2 Param3
In this case, the string array passed into the Main() function holds the following contents:
Arguments[0]: Param1
Arguments[1]: Param2
Arguments[2]: Param3
The third form, public static int Main(), returns an integer value to the caller. The integer return value is specified by the int keyword found in the declaration. Integer return values from Main() are used as program termination codes. For example, you may want to design your applications to return one value (0, perhaps) if its operation were successful, and another value (1, perhaps) if its operation were not successful. If you launch your .NET application from within an environment that can read this program termination code, you have enough information to determine whether your program ran successfully.
The last form of the Main() function, public static int Main(string [] Arguments), specifies a function that supplies command-line arguments in a string array and allows the function to return a program termination code.
Keep a few things in mind when working with the Main() function:
•The void return forms of the Main() function always have a program termination code of 0.
•The static keyword is required in all forms of the Main() function.
When a C# application runs, the user always supplies command-line arguments. However, if the C# application is written with one of the forms of the Main() function that does not take any arguments, the application is unable to read the arguments. It is legal for a user to specify arguments to a C# application that was not written to support them (although that would not be very useful).
Commenting Your Code
Commenting your code lets you add notes to your C# source files. These notes can help you document the design and flow of your application. Comments can appear anywhere in your C# source code where whitespace is legal.
Using one-line comments
One-line comments begin with two slashes and remain in effect for the rest of the line:
{ // this is an opening brace System.Console.WriteLine("C#"); // call WriteLine() } // this is a closing brace
Using regular comments
Regular comments begin with a slash followed by an asterisk and remain in effect until an asterisk followed by a slash is found. Regular comments can span multiple lines:
/*
This is a regular comment in C#. It contains multiple lines of text, Separated by NewLine characters.

*/
The C# compiler does not let you embed one regular comment within another:
/*
outer comment /*
inner comment */
more outer comment text */
You can't embed one regular comment in another because the compiler finds the first */ characters and assumes that it has reached the end of the multiline comment. It then assumes that the text following the */ characters is C# source code and tries to interpret it as such.
You can, however, embed a single-line comment within a regular comment:
/*
outer comment
// inner comment more outer comment text */
Generating XML documentation from comments
An interesting feature of the C# compiler is that it can read specially formatted comments and generate XML documentation from the comments. You can then display this XML on the Web to provide an extra level of documentation to developers who need to understand the structure of your applications.
To use this feature, you must do two things:
•Use three slashes for comments. The C# compiler does not generate any XML documentation for any comments that do not begin with three slashes. Nor does the C# compiler generate any XML documentation for regular, multiline, comments.
•Use the /doc option of the C# compiler to specify the name of the file that should contain the generated XML documentation.
Listing 2-4 shows the Hello World! application with XML documentation comments. Listing 2-4: The Hello World! Application with XML Comments
///The HelloWorld class is the one and only class in the
///"HelloWorld" class. The class implements the application's
///Main() function. The class does not contain any other
///functions.
class HelloWorld
{
///This is the Main() function for the Listing2_4 class.
///It does not return a value and does not take any
///arguments. It prints the text "Hello from C#!" to the
///console and then exits.