

Beginning Apache Struts - From Novice To Professional (2006)
.pdf18 |
C H A P T E R 3 ■ U N D E R S T A N D I N G S C O P E S |
Session and request scopes are the two most important scopes in Struts. To see if you really understand these ideas, try the following lab.
Lab 3: Scopes Quiz
Consider the following two JSP pages (Listings 3-1 and 3-2) and assume they’ve been loaded onto a servlet container. Your job is to predict the output on the screen as two users, Audrey and Brenda, interact with the system.
Listing 3-1. First.jsp
<jsp:useBean id="myVariable"
scope="application" class="java.lang.StringBuffer" />
<%
myVariable.append("1");
%>
<jsp:forward page="Second.jsp" />
Listing 3-2. Second.jsp
<jsp:useBean id="myVariable"
scope="application" class="java.lang.StringBuffer" />
<%
myVariable.append("2");
%>
<%= myVariable.toString() %>
The <jsp:useBean> tag simply defines a new JSP variable, with the given scope. <jsp:forward> redirects the user to a given page. Try to answer the following questions:
•Audrey is the first person to view First.jsp. What will she see?
•Brenda next views First.jsp from a different machine. What does she see?
•If Audrey again views First.jsp after Brenda, what will she see?
•What if Brenda now loads Second.jsp directly?
Compare your answers to the ones in Appendix D.
When you’re sure you understand how application scope works, consider what happens if we change the scope attribute in both First.jsp and Second.jsp to session, then request, then page. In each instance, check your answers before proceeding with the next scope.

C H A P T E R 3 ■ U N D E R S T A N D I N G S C O P E S |
19 |
I hope this little Gedankenexperiment gives you a clear understanding of how the various scopes work. To sweep away any lingering doubts you might have, try doing it in real life:
1.Copy the lab3.war file found in the Source Code section of the Apress website, located at http://www.apress.com, into the Tomcat \webapps\ directory.
2.Start Tomcat, if it isn’t already running.
3.With your favorite web browser, navigate to http://localhost:8080/lab3/.
You should see a main page with links to four versions of First.jsp, one for each scope (see Figure 3-1). Play around with the application until you’re absolutely sure you understand the difference between the various scopes.
Figure 3-1. The Scopes web application start page
One last question: If we created a variable with a scriptlet on our JSP page like so:
<% int x = 7; %>
what scope would it implicitly have?

20 |
C H A P T E R 3 ■ U N D E R S T A N D I N G S C O P E S |
IN CASE YOU WERE WONDERING...
You might have noticed that we used a StringBuffer for myVariable, and you might be wondering if we could have used a String instead. We can’t.
The reason is that you cannot reassign a variable declared with <jsp:useBean>. A String is immutable, and so each time you try to change a String with a statement like myVariable += "1", you’re attempting to reassign the variable.
However, calling a function on a variable is OK since we’re not reassigning anything. So, myVariable. append("1") is acceptable, since we’re just calling a function on the object referred to by the variable. The variable refers to the same object instance as it did before—no reassignment done.
Session and Request Scope Internals
In the previous chapter, we came across two servlet classes, HttpServletRequest and HttpSession, which as I explained represent the lifetimes of objects on your webapp. If this comment seemed a little cryptic at that time, I’d like to clear the air now.
Both classes have setAttribute() and getAttribute() functions (see Appendix B for details) to store and retrieve objects on them, very much like a HashMap’s put() and get() functions. Objects stored on HttpServletRequest have request scope while objects stored on HttpSession have session scope.
When you create a variable on your JSP page, as in Listing 3-1, you’re implicitly calling setAttribute() on the appropriate object (an instance of either HttpServletRequest or HttpSession) depending on the scope you used.
Similarly, when you used myVariable in the scriptlets embedded in First.jsp and Second.jsp, the servlet container retrieves the variable by calling getAttribute("myVariable") on the appropriate object.
So, if you somehow manage to get an instance of either HttpServletRequest or HttpSession, you could stuff them with objects that could in principle be retrieved from your JSP pages. In fact, all you need is an instance of HttpServletRequest, since you could get the associated HttpSession instance by calling getSession() on HttpServletRequest.
The “somehow” will become obvious in later chapters. For now, note that this is one way you could pass data between the Java classes and JSPs that make up your webapp.
C H A P T E R 3 ■ U N D E R S T A N D I N G S C O P E S |
21 |
Summary
•Scopes describe the lifetime and visibility of a variable.
•Session and request scopes are the most often used scopes.
•Session-scoped variables exist for the duration of a user’s session with the system.
•Request-scoped variables exist only for a single-page request, including redirects.
•Session-scoped variables are stored in an instance of HttpSession.
•Request-scoped variables are stored in an instance of HttpServletRequest.
•HttpServletRequest and HttpSession can be used to pass data between Java classes and JSPs.

C H A P T E R 4
■ ■ ■
Custom Tags
Custom tags are JSP tags you create that allow you to define new functionality for your JSPs. For example, suppose we have a custom tag called <temp:F> that converts degrees Celsius to degrees Fahrenheit. We could use it in our JSPs:
Water boils at 100 Celsius, which is <temp:F>100</temp:F> Fahrenheit.
which displays as
Water boils at 100 Celsius, which is 212 Fahrenheit.
While this is a simple example meant to illustrate what custom tags are, in reality, custom tags are useful for a number of reasons:
•They promote code reuse because they cut down duplication of code on your JSPs.
•They make your JSPs more maintainable, because you can avoid using scriptlets.
•Their usage simplifies the work of web designers, because they obviate the need for scriptlets, which are more difficult to write and use.
•They are a key tool used to promote a separation of concerns (see Chapter 1). Most, if not all, web application frameworks, including Struts and JavaServer Faces, utilize custom tags for this reason.
Because Struts uses custom tags extensively, it is to your advantage to understand how to create and use custom tags.
Custom Tag Basics
Tags have a prefix defined on the JSP page (in the preceding example, the prefix is temp) and a tag name (in the example, F), which is fixed in the tag’s TLD (Tag Library Descriptor) file.
Before they can be used on a JSP, a tag has to be declared at the start of the page. For example, a declaration for the <temp:F> tag might be as follows:
23

24 |
C H A P T E R 4 ■ C U S T O M T A G S |
<%@ taglib uri="/tags/temperature" prefix="temp" %>
We’ll deconstruct this declaration in the following section. For now, simply note that the prefix is defined in the JSP.
■Note A tag’s prefix is used to prevent tag name clashes. For example, if you had to use two different tags (from different tag libraries) with the same name, you could give them different prefixes, to distinguish between them. So, prefixes are flexible and you define them on an individual JSP. Tag names, on the other hand, can’t be changed and are defined in the tag’s TLD file.
Tags may also have attributes, for example:
<msg:echo message="Hi" />
Lastly, several tags may be collected together, into a TLD file. That’s why it’s called a Tag Library Descriptor file. We next take a look at the lifecycle of a typical tag.
How Custom Tags Are Processed
Suppose we have a JSP with a custom tag on it. How does it get converted to text we can see on screen? Well, when the servlet container parses the JSP for the first time, it encounters the custom tag, for example:
<bean:write property="companyName"/>
The servlet container expects, and looks for, a corresponding taglib declaration on the JSP page. For example:
<%@ taglib uri="/tags/struts-bean" prefix="bean" %>
There may be several such taglib declarations on the JSP page. The servlet container knows which to use by matching the prefix on the tag with the prefix attribute in the taglib declaration, as shown in Listing 4-1.
Listing 4-1. A Sample JSP with a Taglib Declaration and a Custom Tag
<%@ taglib uri="/tags/struts-bean" prefix="bean" %> <bean:write property="companyName"/>
The taglib declaration simply associates a prefix with a URI (Uniform Resource Identifier), which is a logical path to the tag’s TLD file. The uri attribute is a logical and not a real path because it points to a specific entry in web.xml, the standard servlet configuration file, and not some location on your hard drive.
C H A P T E R 4 ■ C U S T O M T A G S |
25 |
The web.xml file must contain the actual location of the tag library indicated by the uri attribute. In this case, the relevant information in web.xml is given in a <taglib> tag (see Listing 4-2).
Listing 4-2. A Taglib Section in web.xml
<taglib> <taglib-uri>/tags/struts-bean</taglib-uri>
<taglib-location>/WEB-INF/struts-bean.tld</taglib-location> </taglib>
The main points to notice from Listing 4-2 are
•The taglib-uri body must match the uri attribute of the taglib declaration given in the JSP file.
•The taglib-location body must contain the relative path to the TLD file. In the previous example, the TLD file is struts-bean.tld.
The physical location of the TLD file is always relative to the root folder of the webapp’s WAR file (or relative to your web application’s subdirectory in the servlet container’s webapps directory). So, in Listing 4-2, we see that the TLD file resides in the WEB-INF folder and is called struts-bean.tld.
Finally, the TLD file is just an XML document containing metadata describing the tags in the library. This metadata is
•A tag’s name (which in Listing 4-1 would be write).
•A tag’s optional and required attributes and (property from Listing 4-1).
•The Java handler class that processes the tag’s attributes and body to produce the output. These Java classes are usually bundled in a JAR file that you place in your webapp’s WEB-INF\lib directory.
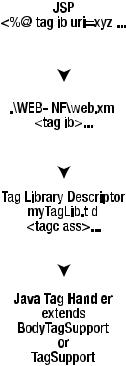
We’ll go through the nitty-gritty details of the TLD file in the lab session. Figure 4-1 summarizes the processing flow of a custom tag.
In the final step, the servlet container calls certain functions on the Java tag handler, which is responsible for producing the custom tag’s output.
As you can see, the processing flow of even the simplest custom tag is a little involved. I suggest rereading this section a couple of times until you are reasonably confident of the details before proceeding.
26 |
C H A P T E R 4 ■ C U S T O M T A G S |
|||||||
|
|
|
|
|
|
|
|
|
|
|
|
|
|
|
|
|
|
|
|
|
|
|
|
|
|
|
|
|
|
|
|
|
|
|
|
|
|
|
|
|
|
|
|
|
|
|
|
|
|
|
|
|
|
|
|
|
|
|
|
|
|
|
|
|
|
|
|
|
|
|
|
|
|
|
|
|
|
|
|
|
|
|
|
|
|
|
|
|
|
|
|
|
|
|
|
|
|
|
|
|
|
|
|
|
|
|
|
|
|
|
|
|
|
|
|
|
|
|
|
|
|
|
|
|
|
|
|
|
|
|
|
|
|
|
|
|
|
|
|
|
|
|
|
|
|
|
|
|
|
|
|
|
|
|
|
|
|
|
|
|
|
|
|
|
|
|
|
|
|
|
|
|
|
|
|
|
|
|
|
|
|
|
|
|
|
|
|
|
|
|
|
|
|
|
|
|
|
|
|
|
|
|
|
|
|
|
Figure 4-1. Summarized processing flow of a custom tag
The Java Handler Classes
The actual work of transforming the custom tag’s body and attributes into HTML code is done by Java handler classes that you must implement.
Your handler classes would subclass one of two base classes, depending on the requirements of your tag.
If your custom tag has no body, then you’d subclass javax.servlet.jsp.tagext. TagSupport. This base handler class represents custom tags having no body, but possibly having attributes.
If your custom class has a body, then you’d have to subclass javax.servlet.jsp. tagext.BodyTagSupport instead. Of course, using BodyTagSupport doesn’t mean your tags must have a body when they are used on JSPs. What it does mean is that you have to implement an extra handler function to process the tag’s body.
To keep things simple, in what follows we will focus on BodyTagSupport.

C H A P T E R 4 ■ C U S T O M T A G S |
27 |
■Note I’ve bent the truth a little here. You can subclass either BodyTagSupport or TagSupport, regardless of whether or not your custom tag has a body. It’s just that BodyTagSupport has extra facilities to allow you to conveniently read your tag’s body. TagSupport does not have this ability. But this convenience comes at a price, since the servlet container has to do extra work and use more memory. This explains why you should subclass TagSupport if your custom tag doesn’t have a body, and use BodyTagSupport only if necessary.
That extra function is doAfterBody(), which is called after the servlet container reads in the tag’s body. This function is where you read the tag’s body, do all necessary processing, and display the output. The tag must return an integer flag called EVAL_PAGE, defined for you on BodyTagSupport. This flag tells the servlet container to go ahead and process the rest of the page.
The other requirement your handler classes must satisfy is that they must have additional getXXX and setXXX functions corresponding to attributes supported by your custom tag.
■Note In other words, in addition to being a subclass of either BodyTagSupport or TagSupport, your handler class needs to be a JavaBean, with properties corresponding to attributes supported by your custom tag.
For example, in Listing 4-1, by looking at the <bean:write> you can infer that the corresponding Java handler class has the functions getProperty() and setProperty(). Listing 4-3 illustrates this.
Listing 4-3. Part of the Java Handler Class for the <bean:write> Tag
import javax.servlet.jsp.tagext.*;
public class BeanWriteTagHandler extends TagSupport{
protected String _property = null;
public String getProperty(){ return _property;
}
public void setProperty(String property){ _property = property;
}