

Beginning REALbasic - From Novice To Professional (2006)
.pdf216 C H A P T E R 8 ■ O B J E C T - O R I E N T E D P R O G R A M M I N G
Declaring a variable in this manner does not instantiate an object. It merely establishes a reference, which you can then use to instantiate the object using the New keyword, as you see in the following.
dteMyAnniversary = New Date
■Tip REALbasic also enables you to declare and instantiate an object in a single statement, as the following shows.
Dim dteMyAnniversary As New Date
Once you instantiate an object, you can access any of the properties and methods belonging to its parent class. For example, in the case of the Date class, you could set its Year property to 1991, as the following shows.
dteMyAnniversary.Year = 1991
You can work with some classes within REALbasic without having to formally instantiate them using the New keyword. For example, the EndOfLine class’s Windows property, which you used in Chapter 7 to control string formatting within data displayed using the MsgBox function, was accessed by simply setting up an expression, as the following shows.
MsgBox "Greetings!" + EndOfLine + EndOfLine + "Welcome to my application."
The MsgBox function used in the previous example provides you with the capability to display a text message in a pop-up window without having to add a new window to your application, and then configure its interface. While certainly convenient, REALbasic provides a more flexible, object-oriented alternative to the MsgBox function in the form of the MessageDialog class.
The MessageDialog class provides you with detailed control over the pop-up window displayed, which you do not get with the MsgBox function. For example, using the MessageDialog class, you can specify what combination of buttons are displayed, what icon is displayed, and which buttons are set up as the default Cancel and Action buttons. You can also specify a highlevel explanatory message, as well as a second, more detailed, message string. In addition,
on Windows and Linux, you can also specify a string to be displayed in the pop-up window’s title bar.
The MessageDialog class is another example of a noncontrol class. To use it, you must instantiate, as the following shows.
Dim popup as New MessageDialog
Dim result as New MessageDialogButton

C H A P T E R 8 ■ O B J E C T - O R I E N T E D P R O G R A M M I N G |
217 |
This first statement declares a variable named popup and uses it to instantiate a MessageDialog object. The second statement declares a variable named result and uses it to instantiate a MessageDialogButton object.
The MessageDialogButton class represents a button in a MessageDialog pop-up window, which has three possible values, as shown in the following list. Use the MessageDialogButton class and an If…ElseIf…Then block or a Select…Case block to determine which of these buttons the user may have clicked.
•ActionButton. A button set up to perform the default action.
•CancelButton. A button set up to perform an action if the user clicks Cancel
•AlternateActionButton. A button set up to perform an alternative action.
Once instantiated, you can configure any of the MessageDialog class’s properties, which you see in the following list:
•ActionButton. A button set up to perform the default action.
•AlternateActionButton. An optional button set up to perform an alternative action.
•CancelButton. An optional button that executes an action if the user clicks Cancel.
•Explanation. A text string representing the primary message to be displayed in the pop-up dialog window. On Macintosh, this text string is displayed in a smaller font below the Message property.
•Icon. A graphic icon displayed in the pop-up dialog window. You can specify an icon type either as an Integer value or by its REALbasic supplied constant value. Table 8-1 lists the supported range of values for this property.
•Message. A text string representing summary text. On Macintosh, this text string is displayed in a larger font just above the Explanation property.
•Title. A text string displayed in the titlebar of Windows and Linux pop-up dialog windows.
Table 8-1. Icons Available for Display by the MessageDialog Class
Value |
Constant |
Icon* |
-1 |
GraphicNone |
No graphic is display |
0 |
GraphicNote |
A Note graphic is displayed |
1 |
GraphicCaution |
A Caution graphic is displayed |
2 |
GraphicStop |
A Stop graphic is displayed |
3 |
GraphicQuestion |
A Question graphic is displayed |
|
|
|
*Note: The appearance of these icons varies between operating systems (OSs), especially on the Macintosh, where the Note, Stop, and Question icons are all displayed as application icons.
218 C H A P T E R 8 ■ O B J E C T - O R I E N T E D P R O G R A M M I N G
The MessageDialog class also provides you with access to two methods, which the following shows:
•ShowModal. Displays the pop-up dialog windows and returns a value representing the button clicked by the user.
•ShowModalWithin. Displays the pop-up dialog as a sheet window (on Macintosh) and returns a value representing the button clicked by the user.
The best way to learn how the MessageDialog class works is to use it. The following example demonstrates how to use the MessageDialog to display a text message, and then determine which button the user clicks.
Dim popup As New MessageDialog 'Instantiate a MessageDialog object
Dim result As MessageDialogButton 'Instantiate a MessageDialogButton object
'Set various properties belonging to the MessageDialog class popup.icon = MessageDialog.GraphicNote 'Display an informational icon
popup.ActionButton.Caption = "Yes" 'Set text shown on the action button popup.CancelButton.Caption = "No" 'Set text shown on the cancel button popup.CancelButton.Visible = True 'Display the cancel button popup.Message = "Application Shutdown" 'Display short message popup.Explanation = "Are you sure that you want to quit?" 'Display message
'Display the popup windows and capture the button clicked by the user result = popup.ShowModal
Select Case result 'Figure out which button the user clicked Case popup.ActionButton
'Insert statements here Case popup.CancelButton
'Insert statements here End select
Comments were embedded in this example to explain line-by-line how things work.
Event-Driven Programming
In object-oriented applications, programs typically execute code in response to actions taken by the user. For example, if the user clicks an Open menu item, an application may display an Open file dialog. If the user clicks a PushButton control labeled Exit, the application might terminate its execution. Applications of this nature are referred to as event-driven applications.
C H A P T E R 8 ■ O B J E C T - O R I E N T E D P R O G R A M M I N G |
219 |
Working with Event Handlers
Event-driven programming provides you with the capability to associate program code with events belonging to specific objects. Code associated with a specific event is stored in an event handler. When an application runs and events occur, REALbasic automatically tracks all activity and determines when events occur. If an event occurs for which you provided program code, the code statements located in that object’s event handler are executed.
REALbasic controls provide the building blocks for developing application interfaces. Each control is designed to respond to a specific collection of actions. For example, the PushButton control responds to a number of different actions, such as click and double-click.
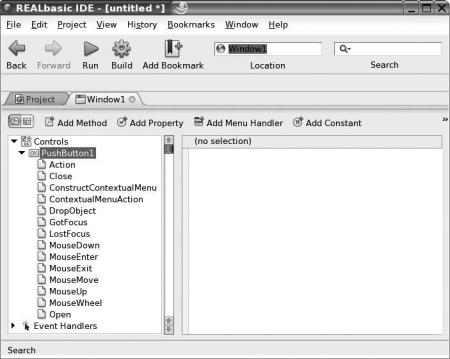
If you are new to object-oriented programming, then you may be surprised at the number of different events your REALbasic applications are capable of responding to. REALbasic provides a large collection for controls. Each control has its own particular set of events it is capable of responding to. As Figure 8-5 shows, you can use the Browser windows, located on the left-hand side of the Code Editor, to explore the range of events supported by controls you add to windows.
Figure 8-5. Browsing the list of events supported by the PushButton control, as seen on Linux

220 C H A P T E R 8 ■ O B J E C T - O R I E N T E D P R O G R A M M I N G
REALbasic organizes controls and their event handlers in a hierarchical fashion in the browser page. To view the event handlers associated with a particular control you added to a window, expand the control’s entry in the Browser pane. A list of controls you added to the windows is displayed. Expand any control to see event handlers it supports.
To enter program code you want executed in response to a particular action, select the event hander associated with the affected control and enter the code statements in the righthand side of the Code Editor.
■Tip Once you add program code to an event handler, REALbasic uses bold text to highlight the event handler and the control in the Code Editor’s browser. This makes it easy to identify which controls and event handlers have code associated with them.
Working with Menu Handlers
While REALbasic automatically provides access to event handlers for any control you add to a REALbasic application, it does not do the same for menu handlers. A menu handler is similar to an event handler, but it only executes in response to selections made by the user to menu items you add to your REALbasic applications.
To add program code to respond to menu events, you must first add a menu handler to your application. This is done by clicking the Add Menu Handler button located on the Code Editor toolbar. You need to add a menu handler for each menu item you add to your application. More information on how to work with menu handlers is available in Chapter 4.
Working with Modules
As you write more and more REALbasic applications, you may come across situations in which you need to add properties, methods, and constants to your application that are not associated with a particular object. In these situations, where do you define these nonobject-related properties, methods, and constants? The answer is modules.
A module is a container for storing nonobject-related resources. Modules are not classes. They do not have a Super Class and you can’t use them as a template for creating subclasses. Modules are not instantiated using the New keyword. Module functionality is limited. Modules can only contain properties, methods, and constants.
To help further explain modules and their usefulness, consider a situation in which you are creating a scientific application. This application might need to perform a number of different calculations based on specific formulas. Access to these methods might be required from various parts of the applications. Yet, the calculations themselves might not be associated

C H A P T E R 8 ■ O B J E C T - O R I E N T E D P R O G R A M M I N G |
221 |
with a particular object. One way to implement this is to develop methods designed to perform the calculations the application needs to perform. For these methods to execute, they might also need access to a collection of scientific data, such as the value of pi. This data could be stored in constants. In addition, you might want to store data produced by these methods using properties. In this scenario, modules provide a means for storing all the properties, methods, and constants required to perform the scientific calculations.
Adding Modules to REALbasic Applications
Modules are added to REALbasic applications from the Project screen. You can add a new module by clicking the Add Module button on the Project Editor toolbar or by clicking ProjectAdd Module, as Figure 8-6 shows. By default, REALbasic names the first module added to application Module1. Using the Properties pane, however, you can rename the module by changing the value assigned to its Name property to something that better describes the module’s purpose.
Figure 8-6. Adding a new module to a REALbasic application, as seen on Linux
222 C H A P T E R 8 ■ O B J E C T - O R I E N T E D P R O G R A M M I N G
Scoping Modules Resources
Each property, method, and constant you add to a module has a scope that defines which parts of the applications are able to access them. Three different levels of scope are supported, as you see in the following.
•Global. Makes the property, method, and constant available to all parts of the application using the name assigned (for example, “dot” notation is not required).
•Public. Makes the property, method, and constant available to all parts of the application using “dot” notation (for example, Module1.ResourceName).
•Protected. Limits access to the property, method, and constant available to code within the module using the name assigned (for example, “dot” notation is not required).
Adding a Property to a Module
You add a property to a module in much the same way that you add a property to a window. The following procedure identifies the steps required to perform this task.
1.Double-click the module in the Project screen where the method is to be added.
2.Click the Add Property button located on the Code Editor toolbar or click Project Add Property.
3.Enter the name of the property into the field provided and specify its data type.
4.Click one of the three buttons to the right of the Declaration field to specify a scope for the property (Global, Public, or Protected).
5.Optionally, document the property by adding a comment in the space provided below the Declaration area.
Adding a Method to a Module
You add methods to modules using the same basic procedure used to add methods to windows, as the following procedure outlines.
1.Double-click the module in the Project screen where the method is to be added.
2.Click the Add Method button located on the Code Editor toolbar or click Project AddMethod. The Method Declaration area is displayed at the top of the code editing area, as Figure 8-7 shows.

C H A P T E R 8 ■ O B J E C T - O R I E N T E D P R O G R A M M I N G |
223 |
Figure 8-7. Adding a new method to a module, as shown on Mac OS X
3.Enter the name of the method in the Method Name field.
4.Enter any required parameters and their data types in the Parameters field.
5.By default, REALbasic defines the method as Subroutine. If necessary, convert the method to a Function by specifying the data type of a value that will be returned by the method.
6.Click one of the three buttons to the right of the Method Name field to specify a scope for the method (Global, Public, or Protected).

224 C H A P T E R 8 ■ O B J E C T - O R I E N T E D P R O G R A M M I N G
Adding a Constant to a Module
You add a constant to a module in much the same way that you add a constant to a window. The following procedure outlines the steps that are involved.
1.Double-click the module in the Project screen where the method is to be added.
2.Click the Add Constant button located on the Code Editor toolbar or click Project Add Constant. The Constant Declaration area is displayed at the top of the code editing area, as you see in Figure 8-8.
Figure 8-8. Declaring a new constant inside a module, as shown on Linux
3.Enter the name of the constant in the Constant Name field.
4.Enter the value to be assigned to the constant in the Default Value field.
5.Specify the data type for the constant by clicking one of the buttons representing the Number, String, Boolean, or Color data types.
6.Click one of the three buttons to the right of the Constant Name field to specify a scope for the property (Global, Publish, or Protected).

C H A P T E R 8 ■ O B J E C T - O R I E N T E D P R O G R A M M I N G |
225 |
Working with Windows
A key part of any desktop application is the development of its GUI, the foundation of which is windows. Windows store controls and provide an organizational tool for managing properties, methods, and constants. An understanding of how to apply OOP to windows, therefore, is essential to any REALbasic programmer.
Up to this point in the book, all the applications you worked with have consisted of a single window. REALbasic automatically opened these windows each time you ran your applications. Often, though, applications are made up of collections of different windows. You can add additional windows to your application from the Project screen by clicking the Add Window button located on the Project toolbar or by clicking Project Add Window. REALbasic responds by adding a new window to your application, as Figure 8-9 shows. You can then change the window’s name or its type by modifying its Name and Frame properties in the Properties pane.
Figure 8-9. Adding a new window to a REALbasic application, as seen on Windows
Any time you develop an application that consists of more than one window, you need to know how to open these windows. One way to do this is by making a reference to a property of the window you want opened. For example, if you develop an application that has a second window, which you renamed SupportWindow, you could display it by adding the following code statement to a menu item or PushButton control located on the application’s primary window.
SupportWindow.Title = "Additional Support"