

Beginning Visual Basic 2005 (2006)
.pdfChapter 19
3.txtCompanyName
4.txtAddress1
5.txtAddress2
6.txtCity
7.txtRegion
8.txtPostalCode
9.txtCountry
10.txtEmail
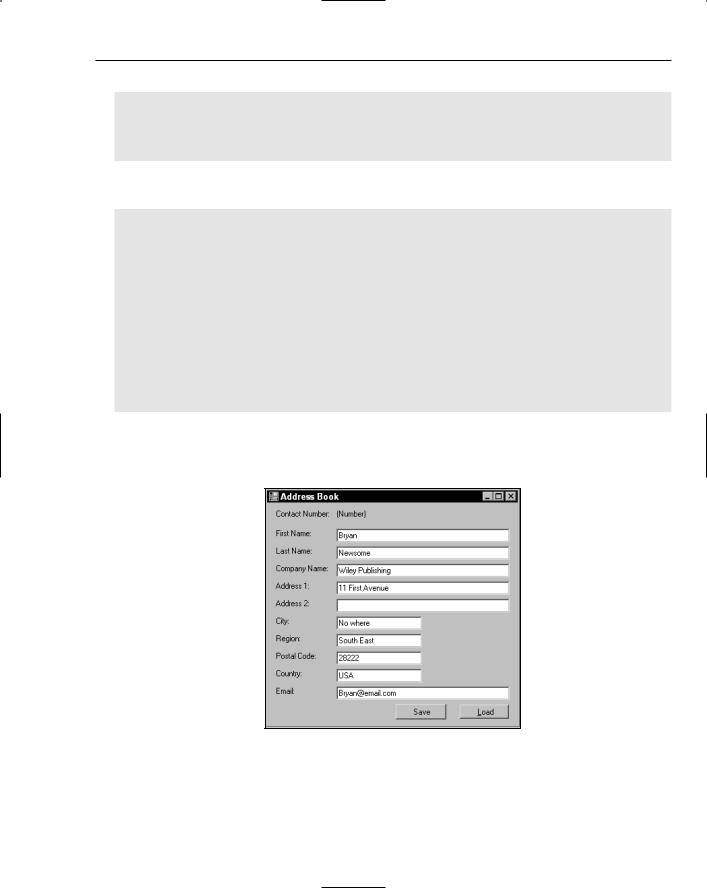
4.Set the text propeties of the labels and button to match Figure 19-1.
5.The button should be named btnSave. Finally, the Label control marked (number) should be called lblAddressNumber.
That’s all you need to do with respect to form design. Let’s move on and write some code to save the data as an XML file.
The SerializableData Class
Your application is going to have two classes: Address and AddressBook. Address will be used to store a single instance of a contact in the address book. AddressBook will store your entire list of addresses and provide ways for you to navigate through the book.
Both of these classes will be inherited from another class called SerializableData. This base class will contain the logic needed for saving the addresses to disk and loading them back again. In XML parlance, the saving process is known as serialization and the loading process is known as deserialization. In this next Try It Out, you’re going to build the SerializableData and Address classes so that you can demonstrate saving a new address record to disk.
Try It Out |
Building SerializableData |
1.The first class you need to build is the base SerializableData class. Using the Solution Explorer, right-click the Address Book project and select Add Class. Call the new class
SerializableData and click Add.
2.Right click on the project in Project Explorer and choose Add Reference. Click the .NET tab and then select System.XML.dll. Next, add these namespace import directives at the top of the class definition:
Imports System.IO
Imports System.Xml.Serialization
Public Class SerializableData
End Class
616

Visual Basic 2005 and XML
3.Next, add these two methods to the class:
‘Save - serialize the object to disk...
Public Sub Save(ByVal filename As String)
‘make a temporary filename...
Dim tempFilename As String tempFilename = filename & “.tmp”
‘does the file exist?
Dim tempFileInfo As New FileInfo(tempFilename)
If tempFileInfo.Exists = True Then tempFileInfo.Delete() ‘ open the file...
Dim stream As New FileStream(tempFilename, FileMode.Create)
‘save the object...
Save(stream)
‘close the file...
stream.Close()
‘remove the existing data file and
‘rename the temp file...
tempFileInfo.CopyTo(filename, True) tempFileInfo.Delete()
End Sub
‘ Save - actually perform the serialization...
Public Sub Save(ByVal stream As Stream)
‘ create a serializer...
Dim serializer As New XmlSerializer(Me.GetType)
‘ save the file...
serializer.Serialize(stream, Me)
End Sub
4.Add a new class called Address. Set the class to derive from SerializableData, like this:
Public Class Address
Inherits SerializableData
End Class
5.Next, add the members to the class that will be used to store the address details:
Public Class Address Inherits SerializableData ‘ members...
Public FirstName As String Public LastName As String Public CompanyName As String Public Address1 As String Public Address2 As String Public City As String Public Region As String Public PostalCode As String Public Country As String Public Email As String
End Class
6.Go back to the Form Designer for Form1 and double-click the Save button to have the Click event handler created. Add this highlighted code to it:
617

Chapter 19
Private Sub btnSave_Click(ByVal sender As System.Object, _
ByVal e As System.EventArgs) Handles btnSave.Click
‘create a new address object...
Dim address As New Address()
‘copy the values from the form into the address...
PopulateAddressFromForm(address)
‘save the address...
Dim filename As String = DataFilename address.Save(filename)
‘ tell the user...
MsgBox(“The address was saved to “ & filename) End Sub
7.Visual Studio will highlight the fact that you haven’t defined the DataFilename property or the PopulateAddressFromForm method by underlining these respective names. To remove these underlines, first add the DataFileName property to the Form1 code:
‘DataFilename - where should we store our data?
Public ReadOnly Property DataFilename() As String
Get
‘get our working folder...
Dim folder As String
folder = Environment.CurrentDirectory
‘return the folder with the name “Addressbook.xml”...
Return folder & “\AddressBook.xml”
End Get
End Property
8.Now you need to add the PopulateAddressFromForm method to your Form1 code:
‘PopulateAddressFromForm - populates Address from the form fields...
Public Sub PopulateAddressFromForm(ByVal address As Address)
‘copy the values...
address.FirstName = txtFirstName.Text address.LastName = txtLastName.Text address.CompanyName = txtCompanyName.Text address.Address1 = txtAddress1.Text
address.Address2 = txtAddress2.Text address.City = txtCity.Text address.Region = txtRegion.Text address.PostalCode = txtPostalCode.Text address.Country = txtCountry.Text address.Email = txtEmail.Text
End Sub
9.Run the project and fill in an address.
10.Click the Save button. You will see a message dialog box that lets you know where the file has been saved.
11.Use Windows Explorer to navigate to the folder that this XML file has been saved into. Doubleclick it, and Internet Explorer should open and list the contents. What you see should be similar to the contents listed here:
618

Visual Basic 2005 and XML
<?xml version=”1.0” encoding=”utf-8”?>
<Address xmlns:xsi=”http://www.w3.org/2001/XMLSchema-instance” xmlns:xsd=”http://www.w3.org/2001/XMLSchema”>
<FirstName>Bryan</FirstName>
<LastName>Newsome</LastName> <CompanyName>Wiley Publishing</CompanyName> <Address1>11 First Avenue</Address1>
<Address2 /> <City>No where</City>
<Region>South East</Region> <PostalCode>28222</PostalCode> <Country>USA</Country> <Email>Bryan@email.com</Email>
</Address>
How It Works
First of all, look at the XML that’s been returned. For this discussion, you can ignore the first line, starting <?xml, because all that’s doing is saying, “Here is an XML version 1.0 document.” You can also ignore the xmlns attributes on the first and second lines, because all they are doing is providing some extra information about the file, which at this level is something that you can let .NET worry about and don’t need to get involved with. With those two parts removed, this is what you get:
<Address>
<FirstName>Bryan</FirstName>
<LastName>Newsome</LastName> <CompanyName>Wiley Publishing</CompanyName> <Address1>11 First Avenue</Address1> <Address2 />
<City>No where</City> <Region>South East</Region> <PostalCode>28222</PostalCode> <Country>USA</Country> <Email>Bryan@email.com</Email>
</Address>
You can see how this is pretty similar to the code described previously in this chapter — you have start tags and end tags, and when taken together these tags form an element. Each element contains data, and it’s pretty obvious to see that, for example, the CompanyName element contains Bryan’s company name.
You’ll notice as well that there are Address start and end tags at the top and at the bottom of the document. All of the other elements are enclosed by these tags, and this means that each of the elements in the middle belongs to the Address element. The Address element is the first element in the document and is therefore known as the top-level element or root element.
It’s worth noting that an XML document can only have one root element; all other elements in the document are child elements of this root.
Look at the <Address2 /> line. By placing the slash at the end of the tag, what you’re saying is that the element is empty. You could have written this as <Address2></Address2>, but this would have used more storage space in the file. The XmlSerializer class itself chooses the naming of the tags, which is discussed later in this chapter.
619

Chapter 19
So now you know what was created; but how did you get there? Follow the path of the application from the clicking of the Save button.
The first thing this method did was create a new Address object and call the PopulateAddressFromForm method. (This method just reads the Text property for every text box on the form and populates the matching property on the Address object.)
Private Sub btnSave_Click(ByVal sender As System.Object, _
ByVal e As System.EventArgs) Handles btnSave.Click
‘create a new address object...
Dim address As New Address()
‘copy the values from the form into the address...
PopulateAddressFromForm(address)
Then, you ask the DataFilename property (which you wrote in step 7 of this Try It Out) to give you the name of a file that you can save the data to. You do this by using the Environment.CurrentDirectory property to return the folder that the address book is executing in and then tacking “\AddressBook.xml” to the end of this directory pathway. This is going to be the convention you use when saving and loading files with your application — you won’t bother with giving the user the opportunity to save a specific file. Rather, you’ll just assume that the file you want always has the same name and is always in the same place:
‘ save the address...
Dim filename As String = DataFilename
You then call the Save method on the Address object. This method is inherited from SerializableData, and in a moment you’ll take a look at what this method actually does. After you’ve saved the file, you tell the user where it is:
address.Save(filename) ‘ tell the user...
MsgBox (“The address was saved to “ & filename) End Sub
It’s the two Save methods on SerializableData that are the really interesting part of this project. The first version of the method takes a filename and opens the file. The second version of the method actually saves the data using the System.Xml.Serialization.XmlSerializer class, as you’ll soon see.
When you save the file, you want to be quite careful. You have to save over the top of an existing file, but you also want to make sure that, if the file save fails for any reason, you don’t end up trashing the only good copy of the data the user has. This is a fairly common problem with a fairly common solution: You save the file to a different file, wait until you know that everything has been saved properly, and then replace the existing file with the new one.
To get the name of the new file, you just tack .tmp onto the end. So, if you had the filename given as
C:\MyPrograms\AddressBook\AddressBook.xml, you’d actually try and save to C:\MyPrograms\ AddressBook\AddressBook.xml.tmp. If this file exists, you delete it by calling the Delete method:
‘ Save - serialize the object to disk...
Public Sub Save(ByVal filename As String)
‘ make a temporary filename...
Dim tempFilename As String
620

Visual Basic 2005 and XML
tempFilename = filename & “.tmp” ‘ does the file exist?
Dim tempFileInfo As New FileInfo(tempFilename)
If tempFileInfo.Exists = True Then tempFileInfo.Delete()
Once the existing .tmp file is gone, you can create a new file. This will return a System.IO.FileStream object:
‘ open the file...
Dim stream As New FileStream(tempFilename, FileMode.Create)
You then pass this stream to another overloaded Save method. You’ll go through this method in a moment, but for now all you need to know is that this method will do the actual serialization of the data.
Then, you close the file:
‘ close the file...
stream.Close()
Finally, you replace the existing file with the new file. You have to do this with CopyTo (the True parameter you pass to this method means “overwrite any existing file”) and finally delete the temporary file:
‘remove the existing data file and
‘rename the temp file...
tempFileInfo.CopyTo(filename, True) tempFileInfo.Delete()
End Sub
The other version of Save takes a Stream argument instead of a String and looks like this:
‘ Save - actually perform the serialization...
Public Sub Save(ByVal stream As Stream)
‘ create a serializer...
Dim serializer As New XmlSerializer(Me.GetType)
‘ save the file...
serializer.Serialize(stream, Me)
End Sub
The System.Xml.Serialization.XmlSerializer class is what you use to actually serialize the object to the stream that you specify. In this case, you’re using a stream that points to a file, but later in this chapter you’ll use a different kind of file.
XmlSerializer needs to know ahead of time what type of object it’s saving. You use the GetType method to return a System.Type object that references the class that you actually are saving, which in this case is Address. The reason XmlSerializer needs to know the type is because it works by iterating through all of the properties on the object, looking for ones that are both readable and writable (in other words, ones that are not flagged as read-only or write-only). Every time it finds such a property, XmlSerializer writes the property to the stream, which in this case means that the property subsequently gets written to the AddressBook.xml file.
621

Chapter 19
XmlSerializer bases the name of the element in the XML document on the name of the matching property. For example, the FirstName element in the document matches the FirstName property on Address. In addition, the top-level element of Address matches the name of the Address class; in other words, the root element name matches the class name.
XmlSerializer is a great way of using XML in your programs because you don’t need to mess around creating and manually reading XML documents — it does all the work for you.
Loading the XML File
Now you can load the address back from the XML file on the disk. In this next Try It Out, you’ll be adding the methods necessary to deserialize the XML back into data that you can work with in your application.
Try It Out |
Loading the XML File |
1.Using the Solution Explorer, open the code editor for SerializableData. Add these two methods:
‘Load - deserialize from disk...
Public Shared Function Load(ByVal filename As String, _ ByVal newType As Type) As Object
‘ does the file exist?
Dim fileInfo As New FileInfo(filename) If fileInfo.Exists = False Then
‘ create a blank version of the object and return that...
Return System.Activator.CreateInstance(newType) End If
‘ open the file...
Dim stream As New FileStream(filename, FileMode.Open) ‘ load the object from the stream...
Dim newObject As Object = Load(stream, newType)
‘close the stream...
stream.Close()
‘return the object...
Return newObject
End Function
Public Shared Function Load(ByVal stream As Stream, _
ByVal newType As Type) As Object
‘create a serializer and load the object....
Dim serializer As New XmlSerializer(newType)
Dim newObject As Object = serializer.Deserialize(stream)
‘return the new object...
Return newobject
End Function
2.Go back to the Form Designer for Form1. Add a new button. Set the Text property of the new button to &Load and the Name to btnLoad.
3.Double-click the Load button and add the following highlighted code to the event handler:
Private Sub btnLoad_Click(ByVal sender As System.Object, _
ByVal e As System.EventArgs) Handles btnLoad.Click
622
Visual Basic 2005 and XML
‘load the address using a shared method on SerializableData...
Dim newAddress As Address = _ SerializableData.Load(DataFilename, GetType(Address))
‘update the display...
PopulateFormFromAddress(newAddress)
End Sub
4.You’ll also need to add this method to Form1:
‘PopulateFormFromAddress - populates the form from an
‘address object...
Public Sub PopulateFormFromAddress(ByVal address As Address) ‘ copy the values...
txtFirstName.Text = address.FirstName txtLastName.Text = address.LastName txtCompanyName.Text = address.CompanyName txtAddress1.Text = address.Address1 txtAddress2.Text = address.Address2 txtCity.Text = address.City txtRegion.Text = address.Region txtPostalCode.Text = address.PostalCode txtCountry.Text = address.Country txtEmail.Text = address.Email
End Sub
5.Run the project and click the Load button or press Alt + L. The address should be loaded from the XML file and displayed on the screen. After clicking the Load button, you should see what you typed and saved previously as shown in Figure 19-2.
Figure 19-2
623

Chapter 19
How It Works
Deserialization is the opposite of serialization. It can be used to load the XML data from the file, whereas before you saved the XML data to the file. (Note that here I’m using the word file for simplification. In fact, you can serialize to and deserialize from any kind of stream.)
Whenever you ask XmlSerializer to deserialize an object for you, it will create a new object. You can use this functionality to get XmlSerializer to create a new object for you rather than having to create one yourself. This is a good candidate for an overloaded method on the SerializableData object.
You create an overloaded method called Load, the first version of which takes a filename and also a System.Type object. This Type object represents the type of object you ultimately want to end up with. Specifically, you’ll need to pass in a Type object that tells XmlSerializer where to find a list of properties that exist on your Address object.
Since XmlSerializer doesn’t save .NET class namespaces or assembly information into the XML file, it relies on an explicit statement saying what class the file contains; otherwise things get ambiguous. (Imagine you had a hundred assemblies on your machine, each containing a class called Address. How could XmlSerializer know which one you mean?)
Obviously, when the method is called, the first thing you do is check to see whether the file exists. If it doesn’t, you’ll return a blank version of the object that you asked for.
‘ Load - deserialize from disk...
Public Shared Function Load(ByVal filename As String, _ ByVal newType As Type) As Object
‘ does the file exist?
Dim fileInfo As New FileInfo(filename) If fileInfo.Exists = False Then
‘ create a blank version of the object and return that...
Return System.Activator.CreateInstance(newType) End If
If the file does exist, you open it and pass it to the other version of Load, which you’ll see in a moment. You then close the file and return the new object to the caller:
‘ open the file...
Dim stream As New FileStream(filename, FileMode.Open)
‘ load the object from the stream...
Dim newObject As Object = Load(stream, newType)
‘close the stream...
stream.Close()
‘return the object...
Return newObject
End Function
The other version of Load uses the XmlSerializer again and, as you can see, it’s no more complicated than when you used it last time. Except, of course, that the Deserialize method returns a new object to you:
Public Shared Function Load(ByVal stream As Stream, _ ByVal newType As Type) As Object
‘ create a serializer and load the object....
Dim serializer As New XmlSerializer(newType)
Dim newObject As Object = serializer.Deserialize(stream)
624

Visual Basic 2005 and XML
‘ return the new object...
Return newobject End Function
When it’s deserializing, XmlSerializer goes through each of the properties on the new object that it has created, again looking for ones that are both readable and writable. When it finds one, it takes the value stored against it in the XML document and sets the property. The result: You are given a new object, fully populated with the data from the XML document.
Once you’ve called Load and have gotten a new Address object back, you pass the new object to
PopulateFormFromAddress:
Private Sub btnLoad_Click(ByVal sender As System.Object, _
ByVal e As System.EventArgs) Handles btnLoad.Click
‘load the address using a shared method on SerializableData...
Dim newAddress As Address = _ SerializableData.Load(DataFilename, GetType(Address))
‘update the display...
PopulateFormFromAddress(newAddress)
End Sub
Changing the Data
To prove that nothing funny is going on, in the next Try It Out you’ll change the XML file using Notepad and try clicking the Load button again.
Try It Out |
Changing the Data |
1.Open up Windows Notepad and load the XML file into it. Inside the FirstName element, change the name that you entered to something else. Then save the file and exit Notepad.
2.Go back to the Address Book program. Click the Load button again. The new name that you entered will be loaded.
How It Works
What you’ve done here is proven that XmlSerializer does indeed use the AddressBook.xml file as the source of its data. You changed the data, and when you loaded the Address object again, the FirstName property had indeed been changed to the new name that you entered.
Sending E-mail
For this next Try It Out, you’ll see how you can integrate this application with an e-mail client such as Outlook or Outlook Express using the e-mail data from your addresses. You’ll be using the Process class to start the e-mail client associated with the mailto protocol, as you see in a few moments.
Try It Out |
Sending E-mail from the Client |
1.Go back to the Form1 designer and, using the Toolbox, draw a LinkLabel control underneath the Email label. Set its Text property to Send Email and change its Name property to lnkSendEmail as shown in Figure 19-3.
625