

Beginning Visual Basic 2005 (2006)
.pdfChapter 20
example, you then built a Web Service that allowed the consumer to download a list of pictures from the service. With the service in place, you built a simple client application that connected to the Web Service and called methods on the remote object. This also briefly demonstrated how to utilize the COM interoperability layer on .NET in order to actually put Internet Explorer inside your application.
Finally, you went through the creation of a Server and a Client using .NET Remoting. You created a class library and used it from another machine. .NET Remoting is a powerful way of creating machine communications and more. You could use .NET Remoting for networking support in your next game (did you wonder why it was named PongEngine?) or any other machine-to-machine communication that requires quick interoperation.
To summarize, you should know:
What a Web Service is and how it works
How to create Web methods in a Web Service and test them with the test harness built into a Web Service
How to create a client application that accesses a Web Service
What .NET Remoting is and generally how it works
The different protocols used by Web Services and .NET Remoting
Exercises
Exercise 1
Create a Web Service that returns information about the Web server. Add three methods that return the Web server date, Web server time, and Web server name, respectively. Run the project to test the three methods.
Exercise 2
Create a Remoting server and client that act like the Web Service in Exercise 1. The server will have two methods. One will return the server date, and the other will return the server time. The client should test both methods functionality. Since you are running the application locally, there is no need to create a proxy.
686

21
Deploying Your Application
Deploying an application can be a complicated process, especially when dealing with large, complex applications. A wealth of knowledge is required on nearly every aspect of a development. A large software installation for Windows requires you to have knowledge ranging from Registry settings, MIME types, and configuration files to database creation and manipulation. Companies tend to rely on dedicated deployment software for these large installations, together with key people who understand the processes involved. However, Visual Studio 2005 does provide some basic deployment functionality, which is tremendously helpful for the standard developer and smaller installations.
Under the Visual Studio .2005 banner, you can create many different types of applications, from desktop to Web applications and services. All of these have varying degrees of complexity or peculiarities when it comes to installation time.
Since this is a beginner’s guide, this chapter will not go into depth on specifics regarding the deployment of the different applications; rather, it provides an overview of deployment.
In this chapter, you will:
Learn concepts and terminology
Deploy a ClickOnce Application with Visual Studio 2005
Create a setup program with Visual Studio 2005
Edit the installer user interface
What Is Deployment?
Deployment is the activity of delivering copies of an application to other machines so that the application runs in the new environment. It is the larger, architectural view for what you may know as an installation or a setup. There is a subtle difference between deployment and installation.

Chapter 21
Deployment is the art of distribution. It is concerned with how something is distributed. In other words, deployment is the way in which software is delivered.
The installation or setup is a process, where you load, configure, and install the software. So an installation is what you do to configure the software, and deployment is how you get it where you want it.
With this terminology, a CD is a deployment mechanism, as is the Internet. The two deployment mechanisms may have different installation requirements. As an example, if an installation is on a CD, you may have all the additional dependent software on that CD. This would be fine for a CD, but perhaps not for delivery via the Internet. Another example that may affect the installation option is where you may have written an installation in JavaScript. This may work fine when executed on a machine by the user having the correct Windows User Rights, but would not work through Internet Explorer. These kinds of considerations are important to consider when deciding what your best deployment option is. The type of installations you require could also be different per application.
Now that you have an understanding of the terminology, let me show you how to deploy applications using Visual Studio 2005.
ClickOnce Deployment
ClickOnce deployment is the concept of sending an application or its referenced assemblies to the client in a way that allows self-updating applications. You have three distribution options for a ClickOnce application: file share, Web page, or external media (CD, DVD, and so on). ClickOnce deployment has benefits with limitations. It is a useful deployment option for smallto medium-sized applications.
The benefits of ClickOnce deployment include three major factors. First, using this deployment option allows for self-updating Windows applications. You can post the latest version of the application at the original location, and the next time the user runs the application, it will install the latest version and run it. Next, any user can install most ClickOnce applications with only basic user security. With other technologies, administrator privileges are required. Finally, the installation has little impact on the user’s computer. The application is run from a secure per-user cache and adds entries only to the Start menu and the Add/Remove Programs list. For programs that can run in the Internet or intranet zones that do not need to access the Global Assembly Cache (GAC), this is a terrific deployment solution for distribution via the Web or a file share. If you distribute the ClickOnce application through external media, the application will be run with full trust.
In the following Try It Out, you learn how to deploy a ClickOnce application from the Web.
Try It Out |
Deploying a ClickOnce Application from the Web |
1.Create a new Windows Application named ClickOnce.
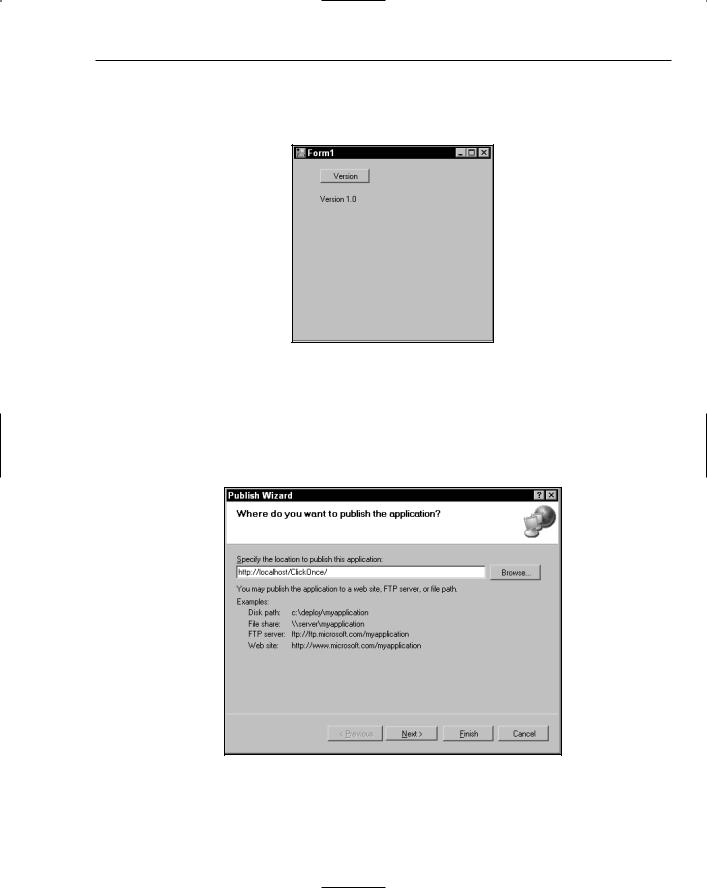
2.On Form1, add a button and label. Change the button’s Name property to btnVersion and Text to Version. Change the label Name to lblVersion and set Text to “”.
3.Add the following highlighted code to the Click event for btnVersion:
Private Sub btnVersion_Click(ByVal sender As System.Object, ByVal e As _ System.EventArgs) Handles btnVersion.Click
lblVersion.Text = “Version 1.0” End Sub
688
Deploying Your Application
4.Test the form. When the user clicks the button, the label should display “Version 1.0.” Your form should look like Figure 21-1. Next, build the project. To build the project, click the Build menu and choose Build ClickOnce in the submenu.
Figure 21-1
5.Now, publish the assembly to the Web. If you do not have IIS installed, you can publish the file to a local or network drive. Just remember how you chose to publish the assembly.
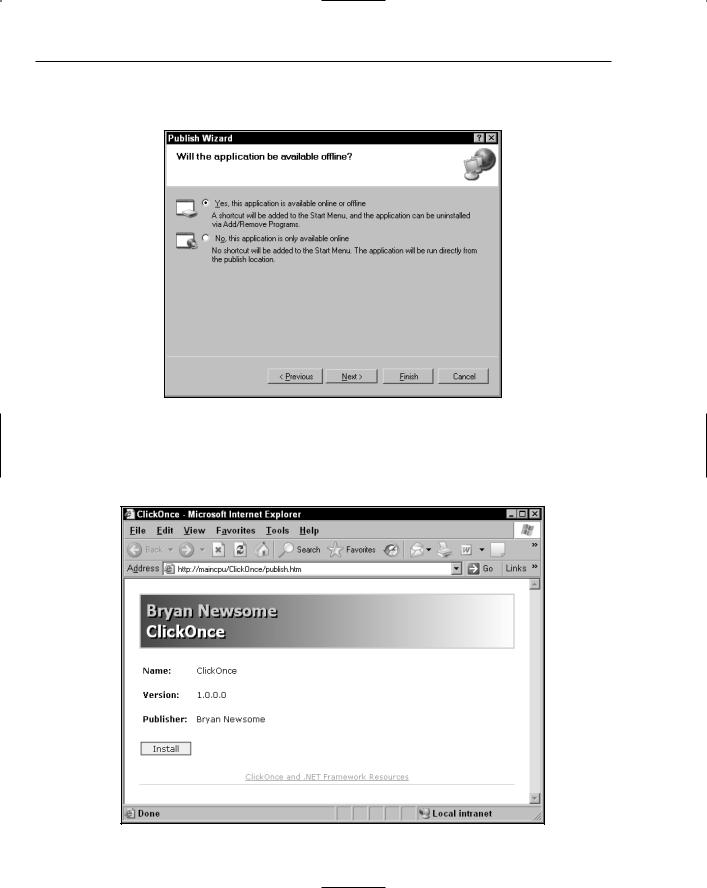
6.Right click the ClickOnce project in the Solution Explorer and choose Publish from the context menu. The Publish Wizard will open. (See Figure 21-2.) Choose a location to publish the file. In this example, we choose the default location for IIS.
Figure 21-2
689
Chapter 21
7.Click Next to go to step 2 of the wizard. Here you can choose whether to install a shortcut on the Start menu and add a listing in Add/Remove Programs. Select Yes as shown in Figure 21-3.
Figure 21-3
8.Now, you will see the summary of your choices. Click Finish to complete the wizard. This wizard will complete and open the default Web page users will use to install the application. Click the link to install the application. (See Figure 21-4.)
Figure 21-4
690

Deploying Your Application
9.When you run the install from the Web, you may see a security warning (see Figure 21-5). If you see this, just click Install to continue. The form you created will open. Click the Version button and you will see Version 1.0. You can close the form.
Figure 21-5
10.Check the Program Files directory, and you will see firsthand that no files were added. A new shortcut has been added to the Start menu.
Now, you will update the application and see the self-updating capabilities in action.
11.Go back to the ClickOnce Windows application in Visual Studio and change the button Click event to update the label to Version 1.1. Your Click event handler should look like this:
Private Sub btnVersion_Click(ByVal sender As System.Object, ByVal e As _ System.EventArgs) Handles btnVersion.Click
lblVersion.Text = “Version 1.1” End Sub
12.Test and build the application.
13.Right-click the project in Solution Explorer and choose Properties from the context menu. This time you will not use the wizard to publish the assembly. Click the Publish tab on the left side of the main window.
14.Take a look at the options. You can see all the choices you made using the wizard. All you have to do is scroll down to the bottom right of the Publish window and click Publish Now.
15.The Install page will be displayed, but do not click Install. Just close the window.
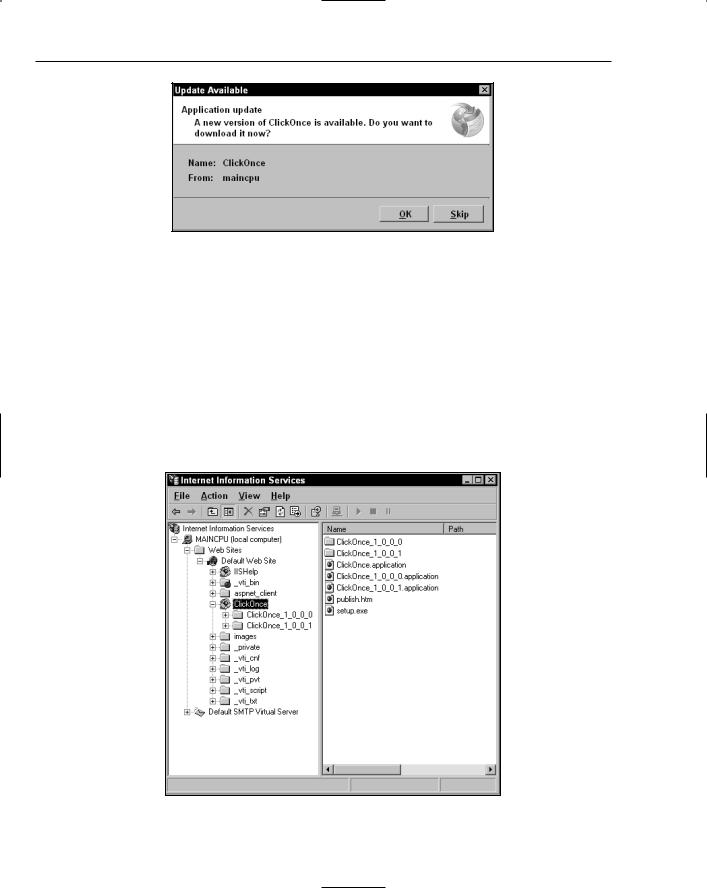
16.Now, run the application using the shortcut on the Start menu. You will be prompted to update the application, and you should click OK (see Figure 21-6). After the form opens, click the Version button, and you will see by the text of the label that the application is updated.
How It Works
That was easy, but what happened? After a few clicks, you deployed a Windows Forms application that was self-updating. Behind the scenes, Visual Studio completed many tasks that make this deployment strategy easy to implement.
691
Chapter 21
Figure 21-6
First, you chose the location to publish the assembly. http://localhost/ClickOnce was created as a virtual directory to host the deployment files for you. If you open the IIS MMC to investigate the virtual directory, you will see what was published. Your console will look like Figure 21-7. Notice that each version of the assembly has its own directory. By default, the .NET Framework would be installed if the user does not have version 2.0 of the Framework. The installer would download it from Microsoft. Feel free to browse around the Web directory. We will discuss the other files later.
The next step of the wizard allows you to specify whether offline access is allowed. A shortcut is added to Add/Remove Program files and the Start menu based on your choice to allow offline access. The application also installed to a secure cache on your computer. If you decide not to allow offline access, the user must return to the publishing location to launch the application on each use. In this case, the user would be required to have access to the Web site to launch the application.
Figure 21-7
692

Deploying Your Application
That’s it. When you click Finish, Visual Studio 2005 goes to work. What happens behind the scenes is not magic. Actually, you could manually complete everything without Visual Studio if you ever needed to do so.
Now, take a look at IIS (Figure 21-7), and I will explain what made this happen. First, a virtual directory was added to IIS. This is where the application was deployed. A subdirectory was then created for the current version’s files. Also, required manifest files were generated and placed under the root and version subdirectory.
Other files were part of the deployment. A Web page (publish.htm) was created for the user interface. Finally, a setup.exe file for deployment was created. Both the setup.exe and publish.htm files were added to the root virtual directory.
To install the application, you navigated to the publish.htm Web page. Each time you launched the installed application, a check was made to see whether a newer version was available. When a new version was available, you were notified and presented with the option to install the update. ClickOnce deployment has an almost unlimited number of deployment options. You just scratched the surface in this exercise.
XCOPY Deployment
XCOPY deployment gets its name from the MS DOS XCOPY command. XCOPY is a copy procedure that copies a directory and all files including subfolders. This is commonly associated with Web applications, but with Visual Studio 2005 it can also apply to a desktop application. Since a standard .NET assembly does not need any form of registration, it fully supports this option. XCOPY does not work with shared assemblies because they require installation (if they are used from the Global Assembly Cache). You learn more about shared assemblies later in this chapter.
Creating a Visual Studio 2005
Setup Application
Visual Studio 2005 supports the Windows Installer. But what is it? The Windows Installer service is a general platform for installing applications in Windows and gets installed with Visual Studio 2005. It provides a lot of functionality, such as uninstall capabilities and transactional installation options (the ability to roll back if something fails) as well as other general features. Many of these features either are built in (so that you do not have to do anything) or are configurable and/or extensible.
The Visual Studio 2005 Windows Installer support has made it easier to create a simple installation. Visual Studio has provided templates in the New Project dialog box for this purpose.
Visual Studio 2005 exposes four main templates for creating Windows installer projects:
Setup Project for desktop or general setup
Web Setup Project for Web applications or Web Services
Merge Module, a package that can only be merged into another setup
Cab Project creates a package that can be used as a type of install
693
Chapter 21
Finally, Visual Studio 2005 also has a Setup Wizard Project, which aids you in creating one of the Windows Installer templates listed here.
Creating a Setup application
When you are creating setup applications, always be aware of the user. All of the applications you will create with Visual Studio 2005 require version 2.0 of the .NET Framework on the installation system. For internal applications, you will know what prerequisites are installed on each computer, but in many cases you will deliver your application to users with no idea of the target system configuration. When you are not sure of the user’s configuration, it is up to you to make all required components available.
Visual Studio 2005 makes the process of including prerequisites easy. Most common requirements can be included (bootstrapping) by just checking a box. By default, the .NET Framework is automatically bootstrapped. Any setup application that is created with the default settings will prompt the end user to install the Version 2.0 of the Framework if it is not installed prior to setup.
In the following Try It Out, you create a setup application.
Try It Out |
Creating a Setup application |
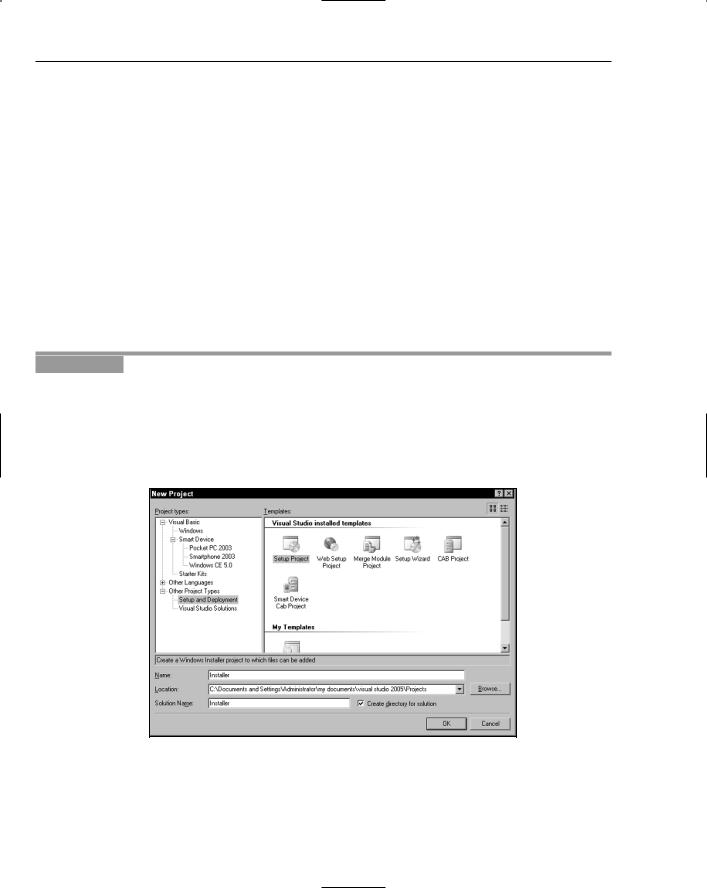
1.Open Visual Studio and create a New Windows Application named Prerequisite. You will not make any changes to the form design or code.
2.Save All and then build the project.
3.Add a setup project to the solution, named Installer as shown in Figure 21-8. To add a new project, choose File Add New Project from the main menu bar.
Figure 21-8
When Visual Studio creates the project, it adds a Designer. There are three main folders in the left pane of the Designer: Application Folder, User’s Desktop, and User’s Program Menu. (See Figure 21-9.)
694

Deploying Your Application
Figure 21-9
4.In the Solution Explorer, right-click the Installer project and choose Properties.
5.Find the Settings button at the right and click it. You will see the Prerequisite form as shown in Figure 21-10. Notice that, by default, the .NET Framework 2.0 is selected.
Figure 21-10
6.Check the box beside Microsoft Data Access Components 2.8 and click OK twice to both dialogs. Notice that by default, the components are set to download from the vendor’s Web site.
695