

Beginning Visual Basic 2005 Express Edition - From Novice To Professional (2006)
.pdf80 |
C H A P T E R 3 ■ W O R K I N G W I T H V A R I A B L E S |
Inside the For Each block, you just write out the value of that new variable. In fact, you could extend this program even further and bring in some of the handy stuff you saw that integers can do to make the output even better. Go ahead and make another couple of changes:
Sub Main()
Dim names()As String = {"Pete", "John", "Dave", "Gary"}
Console.WriteLine( _
"The array contains {0} items", names.Length)
Dim index As Integer = 0
For Each name As String In names
Console.WriteLine("Names({0}) = {1}", index, name) index += 1
Next
Console.ReadLine()
End Sub
This time around, you’re setting up an integer variable to keep track of how many items in the array you’ve looked at. Inside the For Each loop, you use the += operator to add 1 to that variable, and also print out the current index value, along with the current array element. Run the program, and your console window should look a little more informative than it did (see Figure 3-11).
I’ll cover more on loops and the different kinds of loops you can use a little later in this chapter.
Figure 3-11. By adding an integer counter variable, along with some neat use of Console.WriteLine(), you can make your program become more informative.

C H A P T E R 3 ■ W O R K I N G W I T H V A R I A B L E S |
81 |
Making Decisions
I touched on how to get VB to make decisions in the “Writing Conditional Statements” walk-through in the previous chapter. Time to look at the details.
If Statements
I don’t think I’ve ever come across a programming language that didn’t have an If statement.
The format is quite simple, as you saw in the preceding chapter:
If somecondition Then
End If
Notice that If, as with all VB keywords, is typed out with a capital first letter. If you forget to type this yourself, the VB editor will fix it for you. The If statement always evaluates what follows as a Boolean True or False value. For example:
If 1 = 2 Then
// Do something
End If
This code will never work, because 1 does not equal 2. The = symbol means “is equal to” and is just one of a whole bunch of comparison operators that you can use in building your conditions. The full list is shown in Table 3-1.
Table 3-1. The Conditional Operators Available to You in VB
Symbol Meaning
=Is equal to—compares the value on the left to see whether it is equal to the value on the right
<> |
Not equal to—compares the value on the left to ensure that it’s not the same as the one |
|
on the right |
<Less than—checks whether the value on the left is smaller than the one on the right
>Greater than—checks whether the value on the left is bigger than the one on the right
<= |
Is less than or equal to—checks whether the value on the left is less than or equal to the |
|
value on the right |
>= |
Is greater than or equal to—checks whether the value on the left is greater than or |
|
equal to the value on the right |
Not |
Not—returns True if the entire condition is not true |
|
|

82 |
C H A P T E R 3 ■ W O R K I N G W I T H V A R I A B L E S |
The last item in the list (Not) is an interesting one. It negates the whole condition. For example:
If Not (myAge = entryAge)) Then
End If
Normally, you’d expect a True value to get returned, causing the block following the If command to run if myAge and entryAge were both the same. Wrapping them in parentheses and sticking a Not at the front turns it all around. The block following the If condition will run If myAge is Not equal to entryAge.
How about this, though:
If Not ( myAge <> entryAge ) Then
End If
Confusing, isn’t it. This is equivalent to just testing myAge = entryAge, and it demonstrates something quite important: negative conditions are confusing. Try to avoid using negative conditions if you possibly can. It’s hard for us humans to think in terms of negative conditions, and so using Not and <> too many times makes your code quite hard to read—and that can be a big deal when you’re up against a deadline and can’t find that last bug. As a general rule of thumb, use only positive conditions (Not negative ones).
Typically, newcomers to VB spend their first few months writing code that always has a condition following the If statement, but you don’t have to. The If just expects to see a True or False value as the condition, so you can use single Boolean variables, or even function calls, in the condition part. This can make your code really slick and easy to follow. Let’s take a look.
Try It Out: Using Functions As Conditions
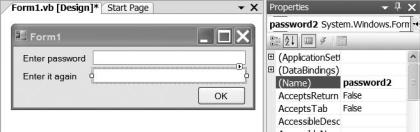
You’re going to revisit our password example from the previous chapter, writing a simple form to check that the user enters the same password twice, just as if they were changing it in some application. Create a Windows application in Visual Basic 2005 Express and drop some controls on the form so that it looks like Figure 3-12.
Figure 3-12. Drop some controls onto your form and set up their text properties so that your
form looks like the one shown here.
C H A P T E R 3 ■ W O R K I N G W I T H V A R I A B L E S |
83 |
Just to make sure your code looks the same as mine, set the Name of the first textbox to password1, and the second to password2 (see Figure 3-13).
Figure 3-13. Set up the name properties of the controls by using the Properties window, as always.
When you’re finished setting up the properties, double-click the OK button on your form to drop into the code editor. What you could do at this point is write a simple If followed by a condition to check that the two words entered are the same. In fact, in an example this trivial that would make a lot of sense, but it wouldn’t really teach you anything.
Instead, add a new function to the code underneath the button’s event handler:
Private Function PasswordsValid( _
ByVal firstPassword As String, ByVal secondPassword As String) _
As Boolean
Return (firstPassword.Equals(secondPassword))
End Function
Notice that this is not a Sub, as we have used in the preceding chapters. A Function is a special kind of Sub that can return a value, in this case a Boolean value. Other than the word “Function,” the other difference with how this function is written are the words As Boolean at the end of the Function definition. It looks in some ways just like a variable declaration. You’re just letting VB know here that the data type this function returns is a True/False, or Boolean, value. Also, as you type this in, you don’t need to type in the words ByVal. VB will automatically put them in for you. I’ll cover what they mean later. The final, very important, piece of information you need to know about this function is that because it returns a True or False value, you can actually call it as part of an If statement, as you’ll see shortly.
Next, I’m sure you already noticed that the function contains just one line of code—a Return statement. The Return statement is returning the result of a condition. You take two strings into the function (firstPassword and secondPassword) and just do a simple comparison of the two to check that they are the same. The result of a condition is always a Boolean True or False value, so it’s fair enough to just return

84 |
C H A P T E R 3 ■ W O R K I N G W I T H V A R I A B L E S |
this. You’ve probably also spotted that you don’t compare the two strings with the = operator, but instead use the Equals() function. When you’re using strings, the = operator will actually call Equals() behind the scenes. However, in terms of strings and objects, = should really just check to the see whether the two objects refer to the same space in memory, not that they contain the same value. To clarify, then, when comparing strings, use the Equals() method rather than =. It saves heartache, as you’ll see when you’ve learned more about objects, trust me.
With your function coded up, it’s dead easy to add some code to the button’s click handler to use it. Type code in so that your click event handler looks like this:
Private Sub Button1_Click(ByVal sender As System.Object, _
ByVal e As System.EventArgs) Handles Button1.Click
If (PasswordsValid(password1.Text, password2.Text)) Then
MessageBox.Show("Congratulations! They match.")
Else
MessageBox.Show("They don't match - try again.")
End If
End Sub
Take a look at the code and see if you can figure out what it does.
Instead of using a condition, the If statement just calls PasswordsValid(), passing in as parameters whatever text the user entered into the two password boxes on the form. Because this function returns True or False, that’s all you need. If the return value is True, a message box gets displayed saying that everything was okay. Otherwise, a message box is shown to indicate that there was a problem.
As you can see here, Else adds a certain something to a basic If statement, letting you set up a code block to run if the If condition is not True.
You can even go one step further if you want and use multiple If statements, like this:
If condition1 Then
ElseIf condition2 Then
ElseIf condition3 Then
Else
End If
Such things are generally frowned upon, though, if you let them get too big—there are better ways to get around having massive If...ElseIf...ElseIf statements, including object orientation and subclassing—so I’m not going to spend any more time on this right now. .

C H A P T E R 3 ■ W O R K I N G W I T H V A R I A B L E S |
85 |
Select Statements
A bunch of If...ElseIf...Else statements quickly gets confusing, so it’s frowned on for all but the simplest of checks. An alternative (as long as you don’t get carried away with it as well), is the Select statement.
Unlike If, Select doesn’t use conditions. You typically use an If clause to check whether one thing satisfies a condition. A Select statement lets you test a whole bunch of conditions at once. It lets you effectively code “if the value is this, do this; otherwise if it’s this, do this; otherwise…” and so on. I’ll just jump straight into an example to show you how it works.
Try It Out: Select Statements
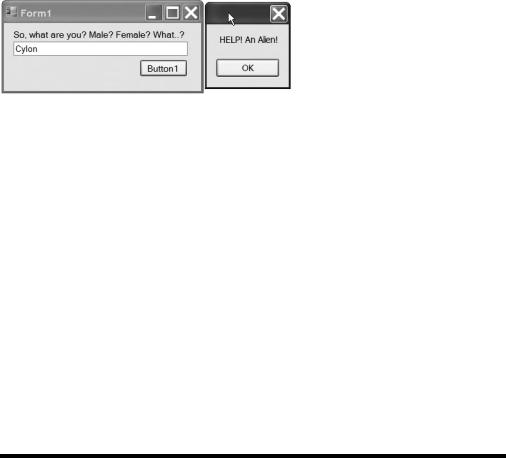
Start up a new Windows project and set up your form like the one in Figure 3-14.
Figure 3-14. Set up your form like this one.
Set up the Name of the text box control to be userType.
Double-click the Button1 button to drop into the code editor. Now write some code with a Select statement to respond appropriately to the type of user keying in data:
Private Sub Button1_Click(ByVal sender As System.Object, _
ByVal e As System.EventArgs) Handles Button1.Click
Select Case userType.Text.ToUpper()
Case "MALE"
MessageBox.Show("So, you're a guy!")
Case "FEMALE"
MessageBox.Show("Hello there, m'lady!")
Case Else
MessageBox.Show("HELP! An Alien!")
End Select
End Sub
Run the program and try keying in Male, Female, or anything else, just to check that it works as it should. You’ll see a window like the one in Figure 3-15.
86 |
C H A P T E R 3 ■ W O R K I N G W I T H V A R I A B L E S |
Figure 3-15. You can use Select statements to easily test for a bunch of different conditions.
Let’s explore just how this works.
Obviously, you want to check what the user entered, and so the Select statement contains a reference to the text that the user entered into the text box inside its brackets—notice, not a condition, but a straight value. Because the user could conceivably type in data in lowercase, uppercase, or a mix of them, you also call the string’s ToUpper() method so that no matter what they enter you can treat it as uppercase.
Inside the Select block, the Case statements list the possible values that you are interested in responding to—in this case, Male, Female, and anything else. That’s really what Case Else does—by adding a Case Else statement to the block, you are telling VB’s Select statement that if it doesn’t find a match, it should do whatever follows Case Else.
Immediately following the Case statements, we just have commands to pop open message boxes. You could conceivably do anything you like here, but the general rule of thumb is that if you have more than two or three lines of code following a Case statement, you really should move that code into a function and call the function from the Case statement instead.
Just as with the If...ElseIf statements, there is also a risk that if you stick huge Select blocks in your code, it will become unmanageable and very hard to read and debug.
Loops
Loops use conditional statements just like our old friend the If statement. The difference between them of course is that whereas If will do something just once if a condition is met, loops will run over and over until the condition is met (For loops), or for as long as a condition is true (While loops).
While Loops
A While loop, as its name indicates, runs a block of code over and over while a condition is true. As soon as the condition fails, the loop stops. That can cause problems for newcomers until they get their heads around it, because While loops may never run at all; if the
C H A P T E R 3 ■ W O R K I N G W I T H V A R I A B L E S |
87 |
condition is False, the first time the While loop is met, the loop will be skipped. Alternatively, a badly coded condition could also mean the loop runs forever.
In terms of formatting, While loops look pretty similar to If statements:
Do While condition
Loop
Just like an If test, While checks the condition to make sure it’s true and then runs the stuff inside the block. This can be useful, but please make sure you do something in the block so that eventually the loop stops; otherwise, your program is likely to send the computer into an endless spin cycle and stop everything else that is running as well.
As always, code helps clarify the situation, so let’s take a look at a While loop in this “Try It Out.”
Try It Out: While Loops
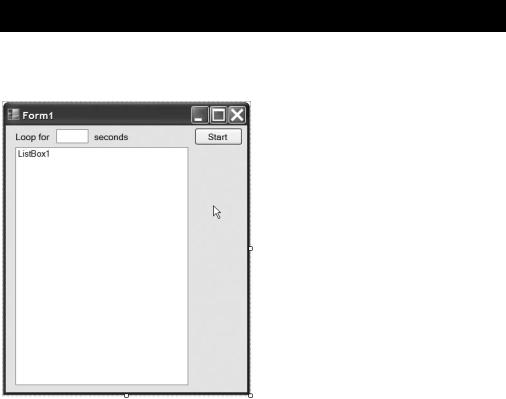
Let’s make a simple Windows form that dumps the current time into a list box, for a length of time. Create a new Windows Forms application and build up a user interface like the one in Figure 3-16.
Figure 3-16. Drop two labels, a text box, a button, and a list box onto your form to make it look like this.
Just let VB Express assign the default names to the controls and you won’t need to change anything for your code to work the same as mine.
88 |
C H A P T E R 3 ■ W O R K I N G W I T H V A R I A B L E S |
Double-click the Start button on the form to pop open the code editor.
Each time the button is clicked, the first thing you need to do is clear out any data that may already be in the list box. Add this line to the subroutine:
ListBox1.Items.Clear()
What the code is going to do ultimately is fire items into the list box for a specific length of time. The easiest way to do that is to add the number of seconds entered in the text box by the user to the current time, to work out the time to stop. That’s the next line of code to add:
Private Sub Button1_Click(ByVal sender As System.Object, _
ByVal e As System.EventArgs) Handles Button1.Click
ListBox1.Items.Clear()
Dim endTime As Date
endTime = DateTime.Now.AddSeconds( _ Integer.Parse(TextBox1.Text))
End Sub
Let’s talk through this a little just to make it clear what’s happening. First a Date variable called endTime is declared. To initialize this, you take the current time (DateTime.Now) and add some seconds to it (AddSeconds()). Because the text box on the form holds strings, you need to convert whatever the user entered from a string (for example, “2”) into a number (2). The Integer.Parse does that for you. By giving Integer.Parse some text containing a number, it will return the integer number on its own.
The setup is now out of the way and you can focus on the While loop itself. Key in the rest of the code. Your finished button click event handler will look like the following listing (I’ve highlighted the new bits you need to type in):
Private Sub Button1_Click(ByVal sender As System.Object, _
ByVal e As System.EventArgs) Handles Button1.Click
ListBox1.Items.Clear() Dim endTime As Date
endTime = DateTime.Now.AddSeconds( _ Integer.Parse(TextBox1.Text))
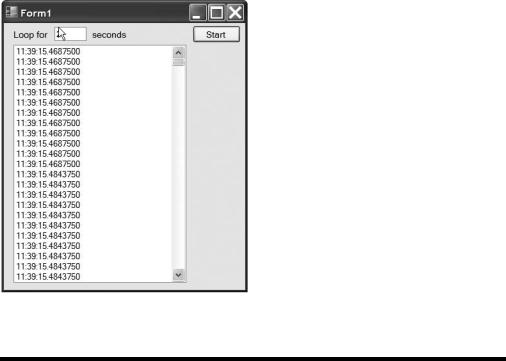
Do While DateTime.Now < endTime
ListBox1.Items.Add(DateTime.Now.TimeOfDay.ToString())
Loop
End Sub
C H A P T E R 3 ■ W O R K I N G W I T H V A R I A B L E S |
89 |
As you can see, the While loop is quite straightforward. It runs while the current time is less than the time you are supposed to stop at. Inside the list you just take the current time of day, convert it to a string, and add it to the list box. Run the app and key a number (2 is a good bet) into the text box; then click the Start button to see what happens (see Figure 3-17). Bear in mind that you don’t have any error checking on this application just yet, so be sure to enter a number and not anything else.
Figure 3-17. Run the app to see the While loop working.
If a While loop runs while some condition is true, an Until loop runs until a condition is met. It’s the reverse of a While loop. I’m not going to walk you through a complete “Try It Out” on this because it’s so simple to grasp once you understand While loops.
The format of an Until loop looks like this:
Do
Loop Until condition
So, if we were to change our loop in the previous example to use an Until loop, it would look like this:
Do
ListBox1.Items.Add(DateTime.Now.TimeOfDay.ToString())
Loop Until DateTime.Now > endTime