

Beginning Visual Basic 2005 Express Edition - From Novice To Professional (2006)
.pdf90 C H A P T E R 3 ■ W O R K I N G W I T H V A R I A B L E S
Because the two loop types are so similar, you may be wondering which you should use. There is no simple answer to that, but there is an important subtle difference between the two. The code in an Until loop will always run at least once. It runs, and then the condition is checked. A While loop, on the other hand, checks its condition before the code runs, so there’s a strong chance that sometimes the code in the loop might not even run once. That subtle difference often plays a big part in helping you choose which loop format to use (personally, I prefer While loops).
For Loops
A While loop runs for as long as a specific condition is met. A For loop, on the other hand, runs a specific number of times, until a condition is met.
The syntax is quite hard to remember at first, but you’ll get it with a bit of practice:
For somevariable as sometype = startvalue to endvalue
That’s hard to get your head around if you haven’t seen it before, but the real code is a little easier to read. Take a look at this simple console application (feel free to start a console application and key this in if you want to experiment):
Sub Main()
For index As Integer = 1 To 10
Console.WriteLine(index)
Next
Console.ReadLine()
End Sub
The For loop here declares a new Integer variable called index, and then simply counts from 1 to 10. If you wanted to go backward, from 10 to 1, you’d add step -1 to the end of the statement, like this:
Sub Man()
For index As Integer = 10 To 1 step -1
Console.WriteLine(index)
Next
Console.ReadLine()
End Sub
It’s not really so difficult, is it.
C H A P T E R 3 ■ W O R K I N G W I T H V A R I A B L E S |
91 |
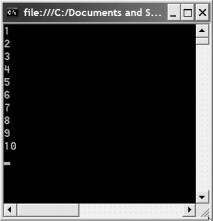
If you were to key in and run the program (the one that counts up), you’d see something like Figure 3-18.
Figure 3-18. The loop runs ten times, counting from 1 to 10.
There are two ways to get out of a For loop prematurely, something you’ll want to do sometimes. The first is to change the index inside the loop. For example:
Sub Main()
For index As Integer = 1 To 10 Console.WriteLine(index) If index = 5 Then
index = 11 End If
Next Console.ReadLine()
End Sub
This checks for a specific number in index, your loop’s index variable, and then sets index to something that breaks the For loop condition. If you do this, bear in mind that the loop will finish what it’s doing before stopping.
A much better way (and this applies to While and Until loops as well) is to use the Exit command. If you wanted to break out of a For loop, you’d type Exit For. To leave a While loop, you’d type Exit While. When you actually type in the word Exit, Visual Basic’s IntelliSense will pop up, showing you the various code constructs you can break out of and letting you choose one.
92 |
C H A P T E R 3 ■ W O R K I N G W I T H V A R I A B L E S |
It’s worth also mentioning that you can use a keyword called Step with a For loop to control how much the index variable changes. For example:
For evenNumbers As Integer = 2 To 20 Step 2
Next
This causes the loop to count from 2 to 20 in steps of 2. Equally, you could use a negative step to count backward:
For countdown As Integer = 10 To 1 Step -1
Next
This counts down from 10 to 1, since the step each time is –1.
Summary
This chapter has covered pretty much the core essence of Visual Basic. You’ve seen how to create variables and then how to write code to work with them. That code can make decisions, it can loop, and so on. Now you’ve got the basics down, you can move into the real meat, starting with functions and methods (same thing) in the next chapter. Hang in there—you don’t have far to go now before you can start making beautiful Windows applications with cool user interfaces. You have to learn to walk first, though.

C H A P T E R 4
■ ■ ■
Classes and Object Orientation
in Visual Basic 2005
Ithink Douglas Coupland first documented geeks’ obsession with LEGO bricks in his novel Microserfs (HarperCollins, 1995). In that book, a bunch of disillusioned programmers from Microsoft leave the safety of Redmond and form their own Silicon Valley startup to make a computerized version of LEGO kits, thus freeing geeks all over the world to build new models no matter where they are (so long as they have a laptop with them).
The obsession is simple to explain. LEGO building is object-oriented programming. Each LEGO brick has data (its color, size, shape, and so on) and functionality (it exposes a set of connectors that allow it to connect to other bricks). Encapsulation of data and functionality is a key tenet in object-oriented programming. However, LEGO is also a great demonstrator for other key goals of object orientation.
Using the basic LEGO building blocks, you can create more-complex components for later use. For example, you could take a bunch of blocks and connect them to form a house. The house is a “superset” of the basic building block in that it does everything the basic building block does, but adds to it. A house, for example, will still expose those little round bumps that allow it to connect to yet more blocks, but it also has specific functions in terms of housing the little LEGO guys, forming a LEGO community, or even being the object of a menacing monster’s destructive whims (mine were). In that respect then, LEGO blocks support the basic object-oriented tenets of inheritance, absorbing the data and functionality of one object into a far more specialized object.
The previous chapters focused on the essential tools and skills that you’ll need to create the basic building blocks of your application. This chapter brings all those tools together and shows you just how to use them to create classes, the building blocks of a Visual Basic 2005 application, and all the neat things that you can do as a result.
93
94 |
C H A P T E R 4 ■ C L A S S E S A N D O B J E C T O R I E N T A T I O N I N V I S U A L B A S I C 2 0 0 5 |
Classes and Objects
Every piece of code you write in VB lives inside a class. For example, you should be familiar by now with this:
Public Class Form1
End Class
So, if VB is an object-oriented programming language, and objects are like LEGO bricks, where do classes fit in? If I give you a LEGO brick, a nice small chunky one with two rows of four connectors on top, that’s an object. However, the description “a small chunky LEGO brick with two rows of four connectors” is the definition of the object. That description is in effect a class. It tells you what kind of object you are after, along with the properties and functionality that define the object.
Look at it another way. As I said in Chapter 2, Bill Gates is a billionaire. Sentences like that, with the words “is a” in the middle, tend to define a relationship between a class and an object. Bill Gates then is an object, and Billionaire is the class, or type of object. You know that Billionaire implies certain functionality and data (has lots of money, can buy a small country, and so on), and so an instance of that class is a real and tangible thing that does everything the class says it can. Get used to the word “instance.” When we talk about objects and classes together, we typically say that an object “is an instance of” a specific class. It’s kind of like saying a cookie cutter is a class, and applying the cookie cutter to some dough produces an instance of the class.
Creating Classes
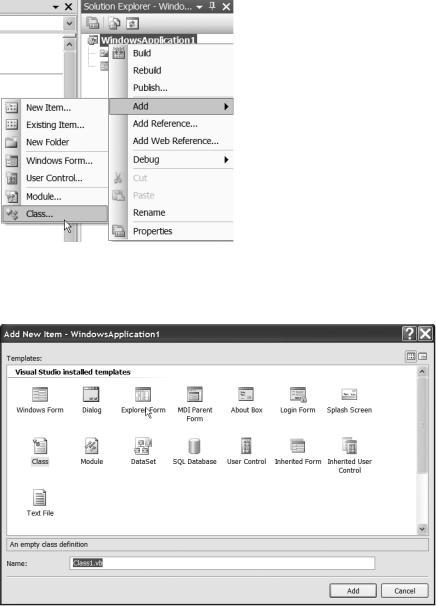
Creating a class in Visual Basic 2005 Express is trivial. With a project open in the Solution Explorer, right-click its name and then choose Add Class, as you can see in Figure 4-1.
After you choose to add a new class to the project, a dialog box appears, asking you to confirm the name of the class. You can see the dialog box in Figure 4-2.
C H A P T E R 4 ■ C L A S S E S A N D O B J E C T O R I E N T A T I O N I N V I S U A L B A S I C 2 0 0 5 |
95 |
Figure 4-1. Right-clicking on a project in the Solution Explorer pops up a context menu that lets you add new elements into the project.
Figure 4-2. Adding in a class pops open a dialog box asking for information about the class, specifically its name.
96 |
C H A P T E R 4 ■ C L A S S E S A N D O B J E C T O R I E N T A T I O N I N V I S U A L B A S I C 2 0 0 5 |
After you’ve chosen a name for the class file and clicked Add, the class is added to the solution, ready for you to open up the code editor and start writing code. If you doubleclick the class, the code editor should show a nice new empty class, just like the ones that you have already seen. Here’s the code for a new class I added called Class1:
Public Class Class1
End Class
You don’t have to let VB Express create classes for you, though. There is nothing stopping you from just going ahead and adding hand-coded classes to any source file in the project. You’ve already done this, in fact, in some of the examples earlier in the book.
The format of a class is really simple. Just start off with the word Class, followed by a name for the class. The end of the class is marked in the source with the words End Class. For example:
Class ANewClass
End Class
Notice how this class differs subtly from the one that VB Express builds automatically. If VB Express had created this class, it would look like this:
Public Class ANewClass
End Class
The difference here is obvious. The class definition itself is prefixed with the keyword Public. This changes the scope of the class, so that it can be used from any other code within the project. You’ll look at scoping in more detail a little later in this chapter, so don’t worry about it too much.
Classes bring with them two special kinds of subroutines as well that let you write code that will be executed only when an object is created from a class, and then when the object is later destroyed. The former are called constructors, and the latter, finalizers.
Using Constructors and Finalizers
Constructors are special methods. They don’t return any value of any kind, and just contain code that should run as soon as an object is created. A class can have more than one constructor as well, with each constructor having a different set of parameters. The exact method used to instantiate the code determines just which constructor will run. I know that’s a bit confusing if you’ve never come across this stuff before, so let’s take a hands-on look.
C H A P T E R 4 ■ C L A S S E S A N D O B J E C T O R I E N T A T I O N I N V I S U A L B A S I C 2 0 0 5 |
97 |
Try It Out: Constructors and Finalizers
Create a new console project in the usual way. When the code editor appears, add a new class called TestClass.vb to the project. As a reminder, you can do this by right-clicking on the name of the project in the Solution Explorer and choosing Add Class from the context menu that appears. Don’t forget to set the name of the class to TestClass.vb.
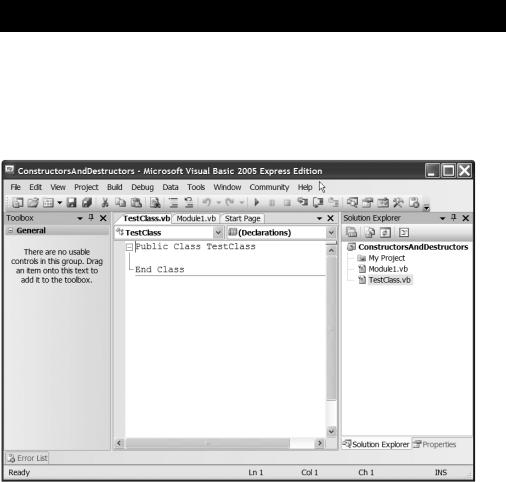
After a very short delay, the code window will change to show the new class, just as in Figure 4-3.
Figure 4-3. Adding a new class to the solution automatically drops you into the code editor for that new class.
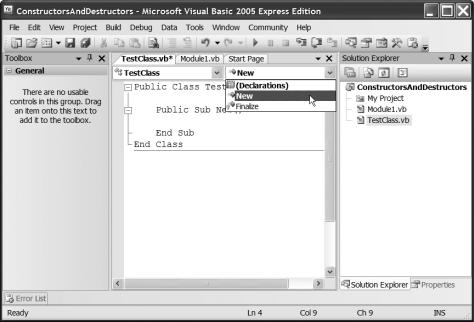
Let’s go ahead now and add a constructor. The VB Express code editor can actually help you do this. At the top of the code window are two drop-down boxes. If you look at Figure 4-3 again, you can see that these currently show TestClass in one, and (Declarations) in the other. If you were working on a source file that had more than one class in it, you could use the drop-down at the top left of the editor to quickly jump from one class to another. As you add code into a class, the drop-down at the right lets you quickly jump from subroutine to subroutine (actually, subroutines and functions inside a class are more commonly called methods). With a blank class like ours here, you can also use the drop-down on the right to create the class constructor. Simply click on it, and choose New from the list that appears, as in Figure 4-4.
98 |
C H A P T E R 4 ■ C L A S S E S A N D O B J E C T O R I E N T A T I O N I N V I S U A L B A S I C 2 0 0 5 |
Figure 4-4. You can use the Declarations drop-down in the code editor to help you quickly create constructors for classes.
As soon as you click New, an empty constructor method will be inserted into the code, as you can see in Figure 4-4. Go ahead and add a line of code to this method:
Public Sub New()
Console.WriteLine("TestClass just got instantiated")
End Sub
As soon as the class is instantiated, this code causes a message to be written out to the console. You can of course test this out by adding some code to the application to actually instantiate the class.
Double-click on Module1.vb in the Solution Explorer to jump back to the code that you first saw when you created the project. You could also switch to Module1.vb by using the tabs at the top of the editor. Notice that there are two—one for Module1.vb and another for the new class you just added into the project.
C H A P T E R 4 ■ C L A S S E S A N D O B J E C T O R I E N T A T I O N I N V I S U A L B A S I C 2 0 0 5 |
99 |
Change the Main() method so that it creates an instance of the new class in order for you to see the constructor at work:
Sub Main()
Console.WriteLine("About to create an instance of TestClass")
Dim newClass As New TestClass()
Console.WriteLine("All done!")
Console.ReadLine()
End Sub
All that’s happening here is that you are outputting a bunch of text to let you know just what’s going on in the program and creating an instance of the class.
Creating an instance of the class (creating an object, in other words) is quite easy. You just declare a variable the same way that you would declare an integer or a string, but set the type to the name of the class in question. Then, create the new class with the words New TestClass(). Notice the parentheses at the end of the class name—looks like you’re calling a subroutine, doesn’t it, and the reason is that you are. The subroutine that gets called is the constructor (if you take a look back at the code for the constructor itself, you will notice that it doesn’t have anything in its parameter list either).
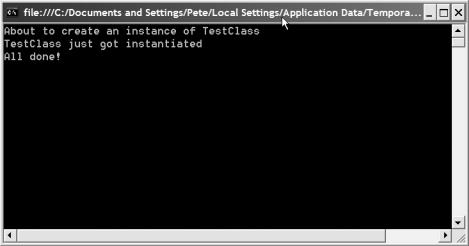
Run the program now and you’ll see a console window like the one shown in Figure 4-5.
Figure 4-5. When the class gets instantiated, the constructor runs, and the code you wrote into
that constructor outputs a message.