

Dench P.Welcome to the turtle world of Logo
.pdfWelcome to the Turtle World of Logo
Type CS and press Enter to show your turtle.
Its HOME is in the middle of the screen.
Where is its head?
Where is its tail?
Your turtle is lazy. It will not move without a
C.A.R.
Command |
What to do! |
Argument |
How much to do! |
Return (Enter ) |
Do it! |
Here are four movement commands your turtle understands
FD (FORWARD) |
RT (RIGHT) |
BK (BACK) |
LT (LEFT) |
Try a C.A.R. with each one in turn to see what they do.
E.g. FD space 100 Return (Enter )
Use CS (Clear Screen) between each C.A.R. to return HOME with a clear screen.
Now write a sequence of C.A.R.s to draw a regular square and a regular triangle. Regular means: identical 'sides' and identical 'corners'
Keep trying until you succeed. Can you see a pattern in your results?
1

REPEAT is a new command to help you make regular polygons easier and quicker to draw. Here is how to use it:
REPEATspacen [Com1spaceArg1spaceCom2spaceArg2spaceetc. ...]
The REPEAT command must have square brackets. The brackets contain as many 'command argument' pairs as it is necessary to repeat.
Try the new command on the triangle and the square.
Write those results in the table below and continue for the other 'regular' polygons. Note: You may accidentally discover the 'angle of turn' for another polygon.
Be sure to write it in before you forget it.
Polygon |
Name |
Sides |
Angle |
Instructions to the Turtle |
|
|
||||
|
|
|
|
Triangle |
3 |
|
REPEAT |
3 [ FD |
RT |
] |
|
|
|
|
|
|
|
|
|
|
|
|
|
|
|
Square |
|
|
REPEAT |
|
|
|
|
|
|
|
|
|
|
|
|
||
|
|
|
|
|
|
|
|
|
|
|
|
|
|
|
|
|
|
|
|
|
|
Here are two new commands to help you see whether your shape joins up exactly: HT - Hide Turtle
ST - Show Turtle
... and, remember, CS - Clear Screen - will allow you to start anew. Ask your Mentor for another command for a more exact method.
Pentagon
Ask your Mentor how to 'copy and edit' previous tests in the Commander Window.
Hexagon
Octagon
Nonagon
Decagon
Now try a circle. Take note of the 'sides-angle' pattern above.
How fast can you make your circle draw?
2

Look at your completed chart on the previous page.
Can you see a pattern in the Sides and the Angle columns?
For each polygon, is there a relationship between the two numbers?
Can you write a theory that says how many degrees need to be turned to complete the polygon so that your turtle returns to its original heading?
Total-trip Theorem: my hypothesis is....
The PROCEDURE Mode: Teaching your turtle new tricks
Up to now you have worked in the 'direct command' mode.
Now you will learn how to teach your turtle PROCEDURES that it can remember.
This is how to teach your turtle to draw a SQUARE (or SQU).
You will need two new commands: TO <new proc> to start the teaching mode, and END to end the teaching mode.
1.type TO SQUARE and press Enter
2.type your SQUARE commands e.g.
REPEAT 4 [ FD 50 RT 90 ]
and press Enter
3. now type END to finish your teaching. The 'Commander' window will show 'SQUARE defined'.
4. finally type SQUARE and press Enter to get the turtle to draw your square.
Good Style
Concentrate on developing 'good style' when naming your procedures.
Instead of SQUARE you could have called the square procedure S, SQ, or SQU, or BOX, or perhaps ROBERT. It is best to keep your PROC names short but still meaningful.
S would really be too short and could stand for SUN or SHADOW whilst ROBERT would not be a meaningful name for square.
3

Creating a new procedure with EDIT
You have already taught a SQUARE procedure using TO SQUARE.
Now you will teach a TRIANGLE procedure using ED "TRIANGLE.
•Type ED "TRIANGLE in the Commander Window 'Input Box' and press Enter
•Click the cursor after TRIANGLE in the Edit Window and press Enter to create an empty line with the cursor at its beginning.
•Now type your TRIANGLE commands REPEAT 3 [ FD 50 RT 120 ] in the empty line.
You are now ready to save your new procedure.
Saving the Edit Window.
•Select File>Save and Edit and click your mouse.
•Type TRIANGLE in the Commander Window 'Input Box' and press Enter to test your new procedure.
Turn to the next page to learn how to clone procedures.
4
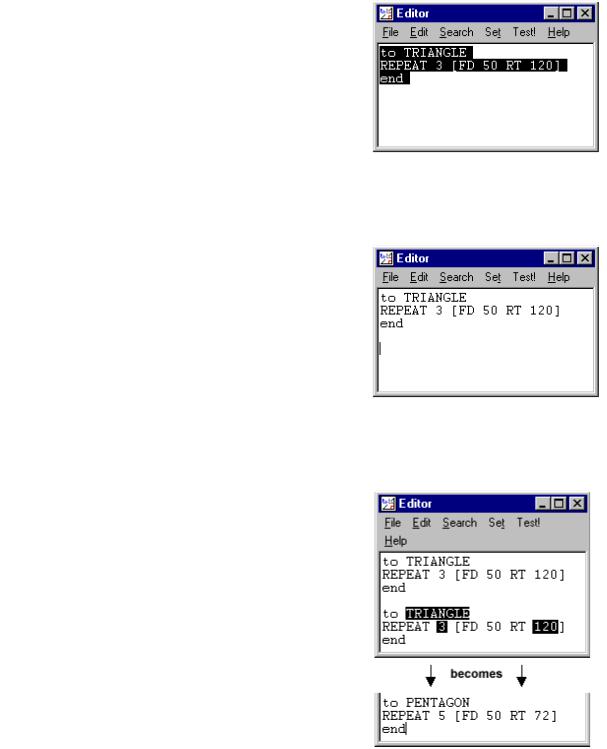
Cloning a new procedure with EDIT.
•Type ED "TRIANGLE in the Commander Window 'Input Box' and press Enter
•Highlight ALL of the procedure to cover both
TO and END
•Copy the highlighted area by Edit>Copy or by holding [Ctrl] and pressing [C] (^C)
You are now ready to clone your procedure.
•Click after END and press Enter twice to create a gap between the existing procedure and the copy to be pasted.
•Paste the copy by Edit>Paste or by holding
[Ctrl] and pressing [V] (^V)
You are now ready to edit your cloned procedure.
•Highlight the pasted procedure name i.e. TRIANGLE and type the clone procedure name i.e. PENTAGON
•then highlight the 'number of turns' after REPEAT and type 5 to delete the 3
•and then highlight the 'angle of turn' after RT and type 72 to delete the 120
•now save your cloned procedure with
File>Save and Exit.
Be sure to test your new procedure in the Commander Window.
•now repeat the above process for all your shapes.
5

Saving files of procedures
Now you have taught the turtle many things, you need a quick way to re-teach those things next time you switch the computer on. Here is how to save a file of procedures:
•First select <B>File>Save</B> on the MSWLogo Screen Menu Bar and select the Disk or Directory where your files are to be saved.
•Then type SAVE "MyFile3.LGO in the Commander Window 'Input Box' (or MyFile4, MyFile5, etc.- whatever is next in the sequence) and press Enter . Good style
requires that you use a file name that describes the procedures it contains.
You need to be very careful with your choice of filename because if it is the same name as an existing file it will over-write it and the original file will be lost forever.
A safer method is to select
File>Save As which will:
•open the file window to show the existing file names,
•allow you to type a new name, and
•if you choose an existing file name it will warn you.
Saving a file of selected procedures
It is good practice to save only the procedures that match the descriptive file name you have used.
To save a selected list of procedures you can use the 'savelist' command, e.g.
SAVEL [FLOWERS GRASS BUSH TREES ... etc.] "GARDEN
This would leave out any files not needed. Instead you could erase all the procedures not needed but you may prefer not to do that.
Loading files of procedures
Here is how to load a file of procedures:
•Select File>Load on the MSWLogo Screen Menu Bar and select the Disk or Directory from which your file is to be loaded.
•Type LOAD "MyFile.LGO in the Commander Window 'Input Box' and Enter .
Several files may be loaded at the beginning but be very careful as procedures in later files will over-write any earlier procedures that have the same name.
After you have edited, or added procedures to, the workspace you will get this warning.
Think carefully about which choice you will make.
6

Changing the size of your polygons
Use the Editor to change the size of your triangle: ED "TRIANGLE to create a triangle size 267 i.e. FD 267. Try another size.
To create two different-sized triangles at the same time you should now clone TRIANGLE to produce TRI-50 and TRI-267. To have ten different sizes simultaneously you would need ten clones. This would be a rather cumbersome method.
Logo has a better way. You can give TRIANGLE an 'argument': a variable input size, e.g. TRIANGLE 100, TRIANGLE 250, etc. just like FD 100.
ED "TRIANGLE and change the procedure so that it reads:
Tells the computer to label a store with the name "SIZE and put the number it finds here in that store.
TO TRIANGLE :SIZE
REPEAT 3 [ FD :SIZE RT 120 ] END
Tells the turtle to move forward the amount it will find in the store named "SIZE.
Now save the Editor and test your edited TRIANGLE. If you get the message "not enough inputs to TRIANGLE" you have forgotten to attach the input size, e.g. TRIANGLE 123.
Now type TRIANGLE 50 TRIANGLE 100 TRIANGLE 150 TRIANGLE 200 ... etc. in the Commander Window 'Input Box' as a single line input.
Now include an input variable on all your shapes as follows:
•EDALL
•Highlight the space:SIZE after TO TRIANGLE and copy by doing [Ctrl] [C] i.e. ^C
•Click after each TO shape in turn and paste space:SIZE by doing [Ctrl] [V] i.e. ^V
•Delete the value after each FD instruction and paste it again by doing ^V
•Save the Editor Window and test each shape procedure.
Experiment with your variable shapes. Try this pattern:
TO PATTERN
REPEAT 3 [ TRIANGLE 100 RT 120 ]
END
See what other interesting patterns you can create using TRIANGLE, SQUARE, HEX, OCT etc. with different REPEAT values and 'angle of turn' values.
7

Working with more than one variable
Before we start putting shapes together we should teach our turtle two very useful procedures: the rectangle and the arc.
Teach your turtle to draw a rectangle with sides of 300 and 100. Can you use REPEAT?
How many times does the pattern repeat?
TO RECTANGLE
END
Now your rectangle works, how are you going to control the shape to produce different rectangles of different size and proportions?
You can do this with variables!
How many numbers will change? How many variables will that need?
Each variable will need a different name. What will you call them?
Now do the same for ARC.
Clone CIRCLE; i.e. ED "CIRCLE, copy it and use the copy as a model for ARC.
TO ARC
END
How are you going to control
•how much the arc goes around the circle?
•how far 'out' it goes?
How many variables will you need?
What are going to call them?
8

Building a 'house'
Good Logo technique is to build more complex procedures from a set of simple procedures and then even more complex procedures using your new procedures.
To build a HOUSE (or HUT) you need to place a TRIANGLE brick on top of a SQUARE brick using a 'link' or 'cement'. This 'link' will use some of the primitive commands (FD, BK, RT, & LT). 'Play turtle' before you write your commands.
TO HOUSE
END
Good Logo style is to arrange your procedure so that it is easy to read the procedure and easy to see patterns. Arrange your HOUSE procedure like this:
TO HOUSE
.............................................................. ; Procedure 1 - the walls
.............................................................. ; 'link' or 'cement' to roof
.............................................................. ; Procedure 2 -the roof
END
Your house probably finishes with the turtle at the top of the wall. Add another 'link' or 'cement' after Procedure 2 to bring the turtle back to the beginning of HOUSE, to exactly the same position from which it started.
Now teach your turtle to VILLAGE using your HOUSE procedure. You could teach your turtle to SPACE: a procedure containing the commands it needs to move from HOUSE to HOUSE without drawing a line.
You will need two new commands, PU and PD, to help create SPACE between houses.
•PU means 'pen up' so your turtle does not draw as it moves
•PD means 'pen down' so your turtle continues drawing.
TO SPACE
END
TO VILLAGE
END
Could you use REPEAT for the VILLAGE procedure?
9

Linking simple 'shapes'
Start by designing a TOWER. You will need the RECTANGLE and TRIANGLE procedures. Clone HOUSE and use it as a model using the same pattern of procedures and 'links'.
TO TOWER
END
Now try to assemble a CHURCH.
TO CHURCH
END
Here are two more designs for you to try.
For this second design clone ARC to create the RARC (right-arc) and the LARC (left-arc) procedures.
10