

K-NET bus
.pdfK-NET bus
The K-Net bus is based on the SPI bus but it allows to addressing many different turrets
like the I2C bus. The K-Net is 6 a wires bus (4 for SPI wires and 2 additional wires for request and acknowledge signals) :
- /CS COM |
(standard SPI signal) |
Chip select |
- SCK |
(standard SPI signal) |
Clock |
- MOSI |
(standard SPI signal) |
Master Out Slave In |
- MISO |
(standard SPI signal) |
Master In Slave Out |
- /F7 |
(additional signal) |
Communication request |
- PAI |
(additional signal) |
Acknowledge |
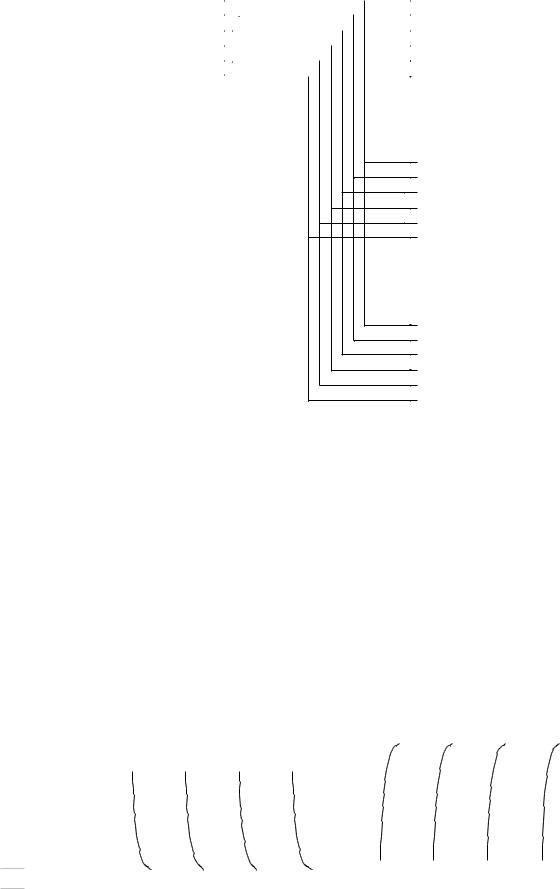
When several turrets are connected to the K-Bus, the structure of the system is as showns
MASTER |
|
|
|
SLAVE #0 |
/CS_COM |
|
|
|
/CS_COM |
|
|
|
||
MOSI |
|
|
|
MOSI |
|
|
|
||
MISO |
|
|
|
MISO |
|
|
|
||
CLK |
|
|
|
CLK |
|
|
|
||
PAI |
|
|
|
PAI |
|
|
|
||
/F7 |
|
|
|
/F7 |
|
|
|
||
|
|
|
SLAVE #1
/CS_COM
MOSI
MISO
CLK
PAI /F7
SLAVE #2
/CS_COM
MOSI
MISO
CLK
PAI
/F7
All slave turrets are in IDLE state and are waiting for a message. All pins of each turret are in input mode. Only one turret at the same time is allowed to configure the PAI and MISO pins as output. If two or more turrets set those two lines as output, a bus conflict occurs.
When the master wants to communicate with a turret, it sends the number of the turret. If the selected turret is present, it sets the PAI and MISO lines as output, and communication between the two modules may be performed. For example, when the master and the turret #1 are communicating, the system can be pictured :
MASTER |
|
|
|
|
SLAVE #0 |
|
/CS_COM |
|
|
|
|
|
/CS_COM |
|
|
|
|
|
||
MOSI |
|
|
|
|
|
MOSI |
|
|
|
|
|
||
MISO |
|
|
|
|
|
MISO |
|
|
|
|
|
||
CLK |
|
|
|
|
|
CLK |
|
|
|
|
|
||
PAI |
|
|
|
|
|
PAI |
|
|
|
|
|
||
|
|
|
|
|||
/F7 |
|
|
|
|
|
/F7 |
|
|
|
|
|
||
|
|
|||||
SLAVE |
#1 |
/CS_COM |
|
MOSI |
|
MISO |
|
CLK |
|
PAI |
|
/F7 |
|
SLAVE |
#2 |
/CS_COM |
|
MOSI |
|
MISO |
|
CLK PAI /F7
When all messages have been sent, the slave turret switches to Idle, i.e it sets all K-Net signals as input.
Protocol :
The communication between the master and one of the turret is done in three phases.
a) Request |
(The master signals that after about 500 S it starts a new message) |
b) Send |
(Each byte sent has to be acknowledged by the turret |
c) Receive |
(The turret signals that a byte is now ready and the master can get it) |
/CS COM
SCK
MOSI
MISO
/F7
PAI

a |
b |
c |
see §2.5 (page 10 & 11) of the Khepera bus and turret specifications documentation
At first, all SPI pins of slave turrets are configured as input. The master generates a low pulse on the /F7 signal for indicating that he would like to send a message. The master wait about 500 S and send the first byte.
The first byte contain the number of the selected turret and is recieved by all turrets. All turrets check if the number sent by the master corresponds to its own turret number ( routine rTrID in COM.ASI ).The correct turret then modifies the MISO and PAI pin configuration to be used as output signals and enable the SPI interrupt. A high pulse on the PAI line indicates that the turret is present and waiting for the next byte. All other unchosen turrets disable the SPI interrupt, set all SPI pins as input, and wait for the next low pulse of /F7.
The next byte sent by the master is a transaction number ( routine rTrTransaction in COM.ASI ). The transaction number is chosen by the master before each communication with a turret. The turret doesn’t careabout this number but indicates with a pulse on PAI that it has correctly received the transaction number.
The third byte sent by the master is the length of the following message to be send ( routine rTrLnMSG in COM.ASI ). The length unit is in byte. Now, the turret knows how many bytes will be send. Once again, a pulse on the PAI line is generated to indicate that the byte was correctly received.
The n next bytes are then stored in a buffer ( routine rTrMSGOK in COM.ASI ). All received bytes are acknowledged by a pulse on PAI. When the entire message is received, a flag is set to TRUE (vInt_COM). The master then stop the transmission, so no more SPI interrupts are generated and the COM_dialog routine is executed.
The COM_dialog routine checks to see if the previous command existes in the turret order table. The turret order table is declared at the top of the file NET.ASI and contains the header of the command (1 byte), the length of the answer (with header) (1 byte), the address of the routine to be executed (2 byte) and the acknowledge (1 byte).
If the command is not found in the turret order table, the turret goes into the IDLE state and waits for a reset. Otherwise, the address of the routine to be executed is called. In this routine, the slave must send data to the master, so the turret puts the bytes to be sent on a register and indicates with a pulse on the PAI line that the byte is ready to be sen. Finally, the master sends
8 pulses on the SCK line and reads the byte on the MISO line. This operation is repeated until the answer is completely sent.
State diagram
Disable SPI
MISO & PAI input mode
n
n
|
Pusle /F7 |
|
|
|
? |
|
|
|
yes |
|
|
|
n |
|
|
|
IRQ SPI ? |
|
|
|
yes |
|
|
n |
Turret ID correct |
|
|
|
? |
|
|
|
yes |
|
|
|
Enable SPI |
|
|
|
MISO & PAI |
|
|
|
output mode |
|
|
|
n |
|
|
|
IRQ SPI ? |
|
|
|
yes |
|
|
|
Get transaction |
|
|
|
number |
|
|
|
n |
|
|
|
IRQ SPI ? |
|
|
|
yes |
|
|
|
|
|
Get (from order table) |
|
Get length of |
|
the length of |
|
the message |
|
the answer |
|
n |
n |
n |
|
IRQ SPI ? |
||
|
IRQ SPI ? |
|
|
|
|
|
|
|
yes |
|
yes |
|
Get byte |
|
End of answer |
|
|
|
? |
|
|
|
yes |
|
End of message |
yes |
|
|
? |
|
|
Before sending orders to a turret :
All commands of the turret are declared in a table at the end of the file NET.ASI. The size of this table is 20 * 6 = 120 bytes (20 functions, each with 6 parameters) and it must not be changed.
Each function is declared as follows :
Byte 1 |
: |
turret number |
Byte 2 : |
command header |
|
Byte 3 |
: |
message length (whole message) |
Byte 4 |
: |
message length (usable message) |
Byte 5 |
: |
answer length |
Byte 6 |
: |
acknowledge character |
For example, the command B (get version) is declared (in CALM notation):
.8.8.8.8.8.8 kIDTourelle, ”B”, 3, 1, 3, “b”
The master must know the structure of all the turret’s commands, so when the robot is switched on, the master check for all turrets (number 0..31) and waits to receive the description table for each turret. The master sends to each turret the byte ‘X’ (see Order X)., which then returns 120 bytes (the table which contains the turret 20 instructions).
The following 4 commands exists for all turrets :
Comamnd B : ( routine rGetVers )
The command B returns the version and the revision number of the software contained in the turret P.
Command X : ( routine rGetOrd )
The command X sends turret table description to the master. This table is declared at the end of the file NET.ASI and allows up to 20 different commands.
NOTE : the size of the table must not be modified (the size must be 20*6= 120 bytes)
Command Y : ( routine rGetIDT )
This command returns the turret specification
For example, a gripper returns :
Gripper 1 |
Gripper, EF-96: |
Rev. 1.00 |
and a K213 vision turret returns
K213 |
2 |
Linear 64 pixels vision, EF-99: |
Rev. 1.00 |
The turret specification is declared at the top of the file NET.ASI
Command Z : ( routine rRese )
This command tests if the communication with a turret is OK (echo). The master sends the character ‘Z’ and if the communication with the selected turret is OK, he receives a lowercase ‘z’.