

The Art of Mixing (David Gibson)
.pdfThe primary advantage of a graphic equalizer is that you can make changes in volume at a number of different frequencies. Another advantage is the visual display that's easy to read for reference. (In fact, you can instantly tell what type of music someone is into by the curve of their graphic EQ.) Also, since the frequencies are mapped out visually from left to right, it is easy to find and manipulate the volume of any particular frequency.
Many people don't realize that when you turn up a particular frequency on a graphic, you are actually turning up a range of frequencies preset by the manufacturer. For example, if you turn up l000Hz, you are actually turning up a frequency range from around 300 to 5000Hz.
The volume of a particular frequency is shown as the brightness in that band. For example, if you turned up the highs around l000Hz, you would see it get brighter in that frequency range, like this:
Visual 67. Wide Bandwidth on Graphic EQ
This range of frequencies is called the bandwidth and is preset by the manufacturer. You have no control over the bandwidth on a graphic. Generally, the more bands (or volume controls) there are, the thinner the bandwidth. Therefore, a 31-band graphic EQ will have a more precise frequency range for each slider than a 5-band graphic. If you turn up the volume of 1000Hz on a 5-band graphic, you could be turning up from 100 to 10,000Hz. Visually, frequency is shown as a function of up and down, so highs to lows are shown in a graphic representation.
Visual 69. 1000Hz Boost
Parametrics
Engineers want to be able to control the range of frequencies, or bandwidth, they are turning up or down. With a parametric, the bandwidth knob gives you control over the width of the frequency range being manipulated. The knob is usually called "Q" because the word "bandwidth" won't fit on the knob. A thin bandwidth is normally labeled with a peak, whereas a wide bandwidth is often labeled with a hump. Sometimes ranges of musical octaves are used to define the bandwidth; for example, from .3-octaves to 3-octaves wide.
Visual 70. Wide and Narrow Bandwidths on Parametric
EQ
Visual 68. Virtual Mixer Graphic EQ
36
The Art of Mixing

Using visuals, the bandwidth can be shown with narrower or wider bands of color.
Visual 71. Wide Bandwidth of Frequencies Boosted
On a graphic equalizer, you select the frequency by placing your hand on the correct volume slider. On a parametric EQ, you select the frequency by turning the "frequency sweep" knob with two fingers. A separate volume knob is then used to turn the chosen frequency up or down.
Paragraphics
Many consoles have equalizers with frequency sweep knobs but do not have bandwidth knobs. This type of equalizer is commonly referred to as sweepable, semiparametric, quasi-parametric, or paragraphic. Be careful, though, these days some manufacturers and certain salespeople are now using the term "parametric" to refer to a paragraphic or semi-parametric even though it has no bandwidth control.
Roll-offs
A roll-off EQ rolls off low or high frequencies. They are commonly found on consoles as highpass and lowpass filters. Larger consoles often have sweepable or variable roll-off knobs, so that more of the lows or highs are rolled off. Smaller consoles often have only a button that rolls off a preset amount of lows or highs. A highpass filter rolls off the low frequencies but does nothing to the highs; it passes them.
Visual 72. Highpass (Low-Cut) Filter
Highpass filters are especially helpful in getting rid of low-frequency sounds, such as trains, planes, trucks, air conditioners, earthquakes, bleed from bass guitars or kick drums, and serious foot stomping.
Visual 73. Things That Rumble
Highpass filters can be found on microphones and smaller mixing consoles as switches that simply roll off the lows when the switch is engaged.
Visual 74. Lowpass (High-Cut) Filter
A lowpass filter rolls off the high frequencies and is especially helpful in getting rid of hiss, as on a bass guitar.
37
Chapter Four

FREQUENCY (PITCH)
NOTE: The difference between frequency and pitch is that frequencies are labeled with numbers and pitches are labeled with letters.
each frequency does to each instrument. In order to make all the frequencies in the spectrum easier to remember, they can be divided into six ranges. There is no commonly accepted framework for dividing the frequencies into ranges (every book seems to divide the frequencies a little differently), so I've divided them here in the way found in most books on the subject.
Chart 3. 6 Frequency Ranges
Low Bass: Less Than 40Hz
This range, sometimes called the "sub-bass," is commonly found in rap booms and the low bass of kick drums and bass guitars. Although it is difficult for many people to discern pitch easily at this range, it is often used in movies for earthquakes, rumbles, and explosions.
A normal vinyl LP record has about twenty-three minutes per side, usually the length of five songs. Because the grooves on a record must be wider for bass frequencies than high frequencies, you couldn't get twenty-three minutes on a record with a lot of low bass information without rolling off everything below 40Hz. This is also why you can put more low bass on a 12-inch single record. Of course, this is no longer an issue with CDs.
Chart 2. Frequencies Corresponding to Pitches
Frequency Ranges
The first step in learning to use an equalizer is to become familiar with each of the frequencies by name. This is easier than you might think because we already know all the frequencies by heart. Our body has been checking them out since the day we were born (and even before). Our entire system, our entire psyche, was designed to perceive sound. We are all professional listeners with years of experience at differentiating between frequencies.
When you learn the names of the frequencies, you can begin to remember what boosting or cutting
38
Bass: 40 to 200Hz
This is the approximate range boosted when you turn up the bass tone control on a stereo.
Oohzone: 200 to 800Hz
When frequencies are boosted too much in this range, they sound extremely muddy and unclear and can even cause extreme fatigue when not evened out. You'll also find that everybody in the room starts getting a bit irritated, and you'll hear people say things like, "Just mix the damn thing; I'm sick of this song anyway."
The Art of Mixing

Midranges: 800 to 5000Hz
We are extremely hypersensitive to this frequency. Boosting a frequency 1dB in this range is like boosting 3dB in any other frequency range. You see, this is where we live most of the time. This is where most of our language is centered. In fact, the telephone is centered around 3000Hz because we can still understand someone when only this range is present. It is critical to be careful when boosting or cutting any frequencies here. This is doubly true on vocals because we are also hypersensitive to what vocals are supposed to sound like.
Other notable frequencies in this range include l000Hz, which is the frequency of TV stations' test tones when they go off the air. The chainsaw frequency is 4000Hz, and it is the most irritating frequency there is, by far. It is also the frequency of fingernails on a chalkboard—eeeek!
Highs: 5000 to 8000Hz
This range, the one boosted when you turn up the treble tone control on a stereo, is commonly boosted in mastering to make things sound brighter and more present.
Hi-Highs: More Than 8000Hz
This is where you find cymbals and higher harmonics of sounds. Boosting this range a little on certain instruments can make the recording sound like a higher quality recording, but too much can make it irritating. By the way, that extremely high frequency that old televisions emit is 15,700Hz.
The Complexities of Frequencies:
The Harmonic Structure of Sound
Specialists don't agree on how different frequencies affect our psyche, which is quite understandable because of the subjective nature of frequency perception. Psychologists and philosophers have written books on how sounds affect our mind and body and how people organize the ways they perceive frequency differences. Different frequencies affect us differently: physiologically, psychologically, and spiritually. And even more powerful than the way specific frequencies make us feel is the way the combinations of frequencies make us feel.
Just about every sound is made up of a combination of tones, or notes. When you hear an instrument play a particular pitch, you are hearing many other notes hidden in that sound. These other notes are called harmonics or overtones. Sounds are combinations of different harmonics.
Visual 75. Pitches in Harmonic Structure for Note "A"
For example, here is the harmonic structure of the note "A" as on an acoustic guitar. Just look at all the notes present when you play what most people think of as one note:
Visual 76. Harmonic Structure of Note "A " As on Guitar
It is the particular harmonics present in a certain sound that account for the differences in sound qualities, or timbres. The term timbre refers to different sounds, such as guitar vs. piano or vocal vs. accordion, as well as the differences in the sound quality of particular instruments. For example: the difference between a Martin and a Gibson guitar.
There are two interesting things about harmonics. First, each harmonic found in a sound's timbre is a pure tone. A pure tone is the sound of a tuning fork or tone generator. It has no harmonics at all. The
39
Chapter Four
most amazing thing is that just about all sounds are made up of a combination of these pure tones. This means that even a screaming electric guitar sound is made of many pure tones.
So, how do you get an edgy sound from a bunch of pure tones? Well, certain combinations of harmonics will create a dissonant chord. These are the odd numbered harmonics. If you play a bunch of notes that are not in key or in tune, they will sound quite edgy and irritating, like the playing of Axl Rose or Tiny Tim (may he rest in peace). On the other hand, certain combinations of harmonics will create a chord that sounds good. These are the even-numbered harmonics. If the pitches of the harmonics combine to create a nice chord, the sound will be nice and round (like the performing of Chris Isaak or most opera singers). Whether an instrument puts out odd or even harmonics is based on the construction of the instrument and how the sound is produced.
The second interesting thing about harmonics is that they're all mathematical multiples of the root, or fundamental, frequency. The root frequency is the basic pitch we perceive when we hear a sound. For example, when we play an "A" on the guitar, even though there are numerous pitches or harmonics present in the sound, we still hear it as one pitch: "A," which is the root frequency.
Therefore, when we raise or lower the volume of a certain frequency with equalization, we are actually raising or lowering the volume of a particular harmonic in the sound. Because every sound has its own harmonic structure, every instrument sound responds to equalization differently.
USING EQUALIZERS
When to Equalize
There are five times when you might equalize a sound in a recording session. First, a sound is equalized individually while in solo when recording onto the multitrack. Second, while the entire band is rehearsing or running through the song, you doublecheck the EQ of each sound relative to all the other sounds. Then during mixdown, each sound can be equalized individually before building the mix. Most importantly, finishing touches are done on the sound's EQ (relative to all the other sounds) when listening to the whole mix at once. Finally, a bit of EQ is occasionally done during the mastering process. This is an overall EQ for the entire mix and is not necessary if a good job was done in the first place.
40
Equalizing in Solo When Recording Onto the Multitrack
The first step in the recording process is to equalize each sound individually. Most engineers start with the drums.
There used to be a school of thought that said you should not EQ a sound going to the multitrack. This idea was the result of inexperienced engineers screwing up the EQ on the way to the multitrack. At this point, it is very difficult to get a sound back to normal and still be able to make it sound great during mixdown. Therefore, it is important that you EQ the sound correctly onto the multitrack in the first place. The school of thought these days, though, is to definitely EQ on the way to the multitrack. In fact, professional engineers will usually try to get everything to sound like a CD on the way to the multitrack. There are some very important advantages for doing this.
First, it is much better to boost the highs on the way to the multitrack because if you boost them during mixdown you are boosting the hiss from the tape.
Secondly, the sooner you get the EQ in the ballpark, the sooner you can play ball. It is much better when you get to the final mix and the EQ already sounds close to perfect. Instead of spending all your time trying to get the mix to sound normal, you can spend your time refining extremely subtle aspects of the EQ that bring out the finer, magical aspects of the sound.
These days, most bands, especially those who have worked in major studios, expect you to get it sounding as close to a CD as possible on the multitrack. So, if you get the project sounding like a CD on the way to the multitrack, then during overdubs, everybody is thrilled with how good it sounds. And the neurons of creativity are firing everywhere because it sounds so incredible. A great mix turns people on creatively. If you don't make it sound good, you'll hear the engineer say things like, "Don't worry guys, I'll fix it in the mix." It is especially important to get things sounding great on the multitrack because overdubs can take months to complete.
The professional engineer gets to the point where he or she can guess what a sound should be alone in order for it to sound right in the mix. To do this, you must visualize what the final mix will sound like and then extrapolate how the sound should sound in solo. However, unless you have heard the band previously, you don't know what the final mix might be like. Most engineers will EQ sounds so that they sound "good" (natural or interesting) individually. The problem is that good is different for different types of music, songs, and people. However, commonly accepted values are to make sure the sound is not too muddy, too irritating, or too dull.
The Art of Mixing

Equalizing in the Mix When Recording Onto the
Multitrack
The next time to check the EQ of each sound is when the entire band starts rehearsing the song. At this point, you want to check the EQ of each instrument relative to every other instrument in the mix. You can make sounds more similar to each other or more dissimilar. You can make a lead instrument more cutting and abrasive, to really grab attention. You can give extra bass to a particular instrument to make the song more danceable or to excite the listener.
To make the process a bit easier, follow this procedure: First, scan the high frequencies and check the relative brightness of all the sounds in the song. Make sure all of them are as bright as you want them. They should have a similar amount of brightness, but sometimes you might want some sounds to be brighter or duller than others.
Second, scan the midrange frequencies, checking for the relative volume of these frequencies across all the instruments. Midrange frequencies seem to stick out when boosted too much. Make sure that all instruments have the exact amount of midrange frequencies that you want. The sounds might have a similar amount of midrange frequencies, but sometimes you may want some sounds to stick out more so they grab your attention.
Visual 78. Song With Midrange Frequencies
Highlighted
Third, scan the bass frequencies, checking for the relative volume of bass in each sound in the bass range. For example, check the relative amount of bass frequencies present in the kick drum compared to the bass guitar. Listen and make sure that it is the way you want it to be. This frequency range is the one
Visual 77. Song With High Frequencies Highlighted most commonly missed when mixing an album or project.
Visual 79. Song With Low Frequencies Highlighted
41
Chapter Four
It is critical that you check the relative EQ of each instrument in the mix at each frequency range. The amount of time you spend doing this often depends on the band. Some bands expect to be recording within a few hours of the time they arrive and have very little patience (or money). Other bands spend weeks getting the right sound and EQ before recording to the multitrack. It is a good idea to set up the band the day before the session, get all the sounds EQ'd, get a headphone mix, then go home. The next day everything is set to go and everyone is fresh.
It is also a good idea to talk with the band beforehand and let them know that you will be spending a good amount of time working on the sounds at the beginning of the session. If the band knows what is going to happen, they won't get frustrated while waiting to actually begin recording. They should appreciate the fact that you want it to sound as good as possible.
Equalizing in Solo During Mixdown
When you go to mixdown a song, the first step is to EQ each of the sounds individually. If you did your job well during the recording session (that is, if you had time), you might have little or no EQ'ing to do. "If it ain't broke, don't fix it." However, often you will need to EQ the sound again because you know what the band is going for and you have a new perspective —a fresh ear. You also have a major advantage that you didn't have when you began the recording session: You know what the whole song sounds like with all of the instruments playing together. Now you can set the EQ of each sound with the final mix in mind.
People often wonder why things don't seem to sound the same when you come back to do the mixdown. First, when using analog tape (as opposed to digital), you lose highs every time the tape is played back on the multitrack. After a couple of weeks of overdubs, the highs are dampened drastically.
Second, it is easy to think that you have something sounding right simply because you have made it sound so much better. When a band first comes in, often you listen to the sounds (and how bad they might sound), then you EQ them and you're happy because you've made the sound great compared to the original sound. The problem is that you should be EQ'ing the sound based on the real world sound of current CDs. You might have made it sound light years better, but it needed more EQ'ing . . . to sound like a CD. When you come back in to mix the song down, you have been listening to the radio or CDs in the real world. When you put on the multitrack, you automatically compare your recording to the real world and realize it didn't sound as good as you
42
thought when you did the recording session.
Also, especially with less expensive mixers, you don't have enough bands of EQ so you can't do all of the equalization required while recording the band. In this case, the EQ must be completed during mixdown. This is often the case when you don't have a full parametric EQ.
Equalizing in the Mix During Mixdown
The way the EQ sounds in the mix during the mixdown is the true test. Again, you should check all the sounds relative to each other at each frequency range: highs, midranges, and lows. If it is already pretty good, you can now work on fine-tuning the relative EQs. This is where you do the magical stuff. For example, you might add a tiny bit of 12,000Hz on some of the high-frequency sounds to make the overall mix sparkle. Or you might consider making a guitar solo track a little brighter and edgier, so that it grabs your attention.
At this point, you might actually turn the EQ knobs while the song is playing. Perhaps you might EQ an instrument differently for various sections of the song. Or, to really flip people out, you could change the EQin the middle of a section of a song. It is also interesting to EQa sound so that it seems to be coming out of a telephone.
Equalizing the Entire Mix During Mastering
There are two main types of EQ done during mastering. First, minor repairs can be done if the overall EQ doesn't sound quite right, but if the problem is very bad the entire song must be remixed. It is quite common to adjust the amount of overall bass or treble slightly. Second, the overall EQ can be adjusted to make the overall bass, midrange, and treble more similar from song to song. Again, if the difference is too great, it might require remixing the songs. There is only so much that can be done in mastering with EQ since all the sounds are no longer separate on their own tracks.
USING AN EQUALIZER: STEP-BY-STEP INSTRUCTIONS
When you approach a mixing board equalizer for the first time, it is a good idea to play with it to get to know how it works and what it does. However, when working on a project with other people, you must be quick at getting things to sound great. The following procedure will help you become more efficient whenever you use an equalizer.
The Art of Mixing
ACOMMON,STEP-BY-STEPPROCESSFOR EQ'ING A SOUND
1. Reset to "0"
Reset the volume controls on the equalizer to "0." This usually means setting the volume knob straight up (not all the way counterclockwise). At this position you are neither boosting nor cutting the volume of any frequency.
Visual 80. EQ Knob
With Volume Set
to "0"
Even if the EQ has an on/off switch, the volume knob should still be set to "0," so when the EQ is turned on, it makes no changes and you are starting from "0," not some unknown preset. In many professional studios, if you don't reset, or normal, the EQ at the end of your session, you will hear from the management later.
2.Listen
The most common mistake made by an inexperienced engineer is to begin turning the EQ knobs before listening. Don't touch the knobs until you know what you want to do. Listen to see if anything is wrong with the sound first, and if it ain't broke, don't fix it.
There are many fine details you should listen for when EQ'ing. The three main things to check are if the sound is muddy, has irritating or "honky" frequencies in the midrange, or is bright enough. If you do nothing else while recording to the multitrack, you should at least take care of each of these aspects, which make up over 75% of all EQ'ing to be done.
a)Cut Muddiness (100-800Hz): Check each instrument for muddiness. Kick drums almost always need to have the muddiness cut (unless it is a rap or hip hop kick). Other potentially muddy instruments include toms, bass guitar, piano, acoustic guitar, and harp. Muddiness is normally around 300Hz. If you cut the muddiness too much, the instrument will sound thin because this mud also contributes to the body of most sounds. When cutting muddy frequencies, always make sure that you haven't lost your bottom: the low lows. You might compensate by boosting the lows around 40-60Hz. Using a parametric to zone in on the specific muddy frequency will help to preserve the bottom of the overall sound.
b)Cut Irritation (1000-5000Hz): Cut any exces-
43
sively irritating or honky frequencies occurring in the midrange from 1000-5000Hz. Vocals, electric guitars, and cymbals (including hi-hat) often need frequencies cut in the midrange. Depending on the type of music (and the particular snare drum used), snares sometimes need this edge cut also. The best way to detect an irritating frequency is to turn the entire sound up very loud. If you and the people in the room are cringing on the floor, then it's irritating. Never boost or cut the midrange too much and make sure you haven't made the sound too dull. At that point, you might compensate by boosting the highs around 5000-8000Hz. Using a parametric to zone in on the specific irritating frequency will help to preserve the brightness of the overall sound.
c) Boost Highs (5000-8000Hz): Boosting highs on instruments that sound dull, like the snare, is largely dependent on the style of music. R&B, dance, and certain types of rock 'n' roll require more crispness than other styles. Country, middle- of-the-road, and folk music do not need as much boost in this range, so they sound more natural.
3.Set the Bandwidth
a)When getting rid of muddy frequencies, set the bandwidth as thin as possible, because if you use a wide bandwidth, you might also drop the nice "bottom."
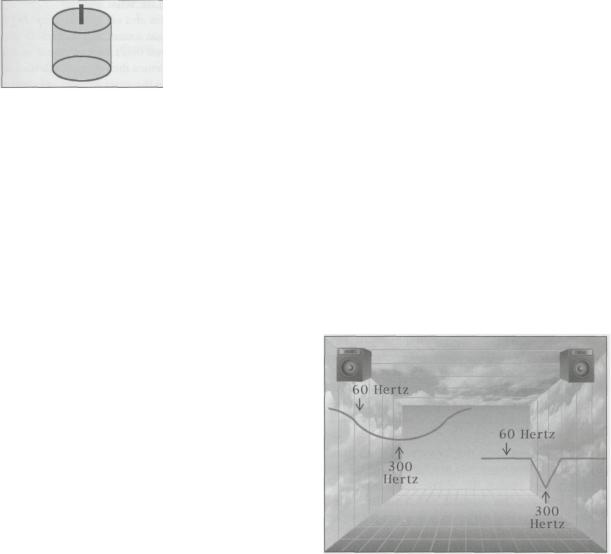
Visual 81. Wide and Thin Bandwidths on 300Hz Cut
b)When getting rid of irritating frequencies, set the bandwidth as thin as possible for very much the same reason as above. If you use a wide bandwidth on a vocal, guitar, or cymbal, you might lose the entire body of the sound in the midrange. Then the sound would be dull and not present.
c)When boosting highs, set the bandwidth to medium wide. This sounds more natural. If ever in doubt as to how to set the bandwidth, start with the
Chapter Four
thinnest one possible. Then you can try widening it out a bit to see if it does what you want and sounds better. By doing this, you end up with the center frequency where it should be.
4. Find the Frequency to be Boosted or Cut
Now that you have decided that a frequency needs to be boosted or cut, you must first find the frequency.
a) Boost the volume on the band of EQ where you think the problem is. When first starting out, it is a good idea to boost the volume all the way. Be careful, though. Boosting the volume all the way in the bass area can blow up your speakers. And boosting the volume all the way in the midrange can make you deaf. It's a good idea to keep your other hand on the channel fader or master volume control so as not to hurt anybody.
Boosting the volume all the way will help you locate the frequency you want to turn up or down. A good analogy is when you cook with new spices. Though tasting red hot chili peppers by themselves can be a bit extreme, you need to taste them before cooking with them to get an idea of what they taste like. Similarly, when you boost the EQ volume all the way, though it won't be that strong in the mix, it gives you an idea of what it might be like when added in moderation.
NOTE: You can also cut the volume all the way instead of boosting the volume all the way. Doing it this way is a little less annoying, because you are looking for "good" sounds instead of irritating or muddy sounds. However, you run the risk of not finding the exact frequency that was the problem in the first place.
b) When sweeping the frequency knob to find the culprit frequency, you are looking for the frequency that sounds the worst—the muddiest or most irritating, for example. On the other hand, when trying to find a frequency to turn up, you are looking for where it sounds the best.
If you are trying to get rid of a frequency and you have cut the volume knob all the way (instead of having boosted the volume knob all the way), sweep the frequency knob to find the spot where the sound seems to be the best.
5. Return the Volume Knob to "0"
With the volume boosted all the way, you are now in outer space. You have lost all touch with the reality of what the sound was like in the first place. Regain your perspective on the tone of the sound before it was EQ'd by returning the volume knob
to "0" (on the EQ band you are working on).
6.Boost or Cut the Volume to Taste
If you are getting rid of a frequency, slowly turn the volume down as much as you think it needs. If you are boosting a frequency, same thing. Play with the volume knob until you figure out how much it needs to be boosted.
7.Check to See IfYou Like What You Did
Turn the EQ switch on and off, compare the EQ'd sound with the original sound, and make sure you like what you did. If you don't have an on/off switch on your EQ quickly return the volume knob back to "0," then zip it back to the exact amount of boost or cut. This is also helpful when doing more than one EQ change on a sound. For example, say you have cut the muddiness on one band and you have brightened the highs on another band. If you turn off the EQ you turn off both bands. Instead, simply return the volume control to "0" on the one EQ band you are working on, so you can see what that one change is doing and whether you like it or not.
So far I have provided you with an extensive overview of how to use EQ. However, it requires practical experience to get know its intricacies. For those of you who are just beginning, here is a listing of common EQ techniques for well-known instruments—although, in reality, every sound is different.
44
The Art of Mixing

Chart 4. Equalization Chart
Chart 5. Common Quick General EQ
45
Chapter Four