

cupids-handmade-craft-eBook-valentines
.pdfCupid’s Handmade Crafts eBook
Be My Love Boxers
By: Duncan Enterprises
Be ready for cupid's arrow! These quick projects are sure to please your special Valentine! Festive boxers are a cinch to make with Tulip® Soft Fabric Paints™. Just cut a stencil from shelf paper, dab on paint with a cosmetic sponge and you're done!
4.Peel off paper backing and press into place on one side of shorts. Run fingernail around each edge of heart to prevent seepage.
5.Squeeze a puddle of Glacier White of
Tulip® Soft Paint™ onto foil. Tap flat end of wedge sponge into paint then tap excess off on foil. Pounce paint into heart stencil adding more paint to sponge as needed. Continue sponging paint into all hearts. Carefully peel off stencil.
6.Repeat step with other side of boxers and other stencil sheet, stenciling with Ebony paint. Let dry.
7.Follow paint label instructions for care of garment.
Materials:
Tulip® Soft Fabric Paint™
o BI15784 Glacier White
oBI15801 Ebony
Self-Adhesive Shelf Paper
Foil
Red Boxers
Permanent felt pen
Make-up wedge sponge
Scissors
Click here for pattern
Steps:
1.Use scissors to cut two 12‖ x 14‖ pieces of shelf paper.
2.Place pattern under paper then use felt pen to trace random hearts onto the sheet moving paper over pattern.
3.To create stencil, carefully cut out center of each heart, leaving sheet intact.
Find thousands of free crafts, decorating ideas, handmade gifts and more at www.FaveCrafts.com. |
31 |
|

Cupid’s Handmade Crafts eBook
Happy Valentine Cards
Victorian Paper Valentines
By: Heidi Borchers of Inspired at Home
Create some Victorian-inspired Valentines and garland with lace, doilies and assorted floral papers. These valentines make for a low-cost Valentine's Day craft project.
Lace: 3‖ squarewhite
Potpourri
Glue (We’ve used Aleene’s Tacky Glue)
For garland:
Hole punch-1/8‖ diameter
Metallic ThreadGold
Materials:
For each:
White watercolor paper
Scissors: regular, scalloped edge
Paper doiliesheart shapered foil, white
Stick Glue for paper (we used Aleene’s acid free Tacky Glue Stick Glue)
Assorted gift wrap and decoupage papers
Pattern
For potpourri card:
Instructions:
Cut 1 (4-½‖ x 8‖ piece of paper. Fold paper in half widthwise. With left fold line of pattern aligned with fold of paper, transfer pattern to folder paper and cut out, using regular scissors. Trim edges of heart with scalloped-edge scissors, cutting off tab on right hand side (see photo)
Center and glue red foil paper heart doily on card front, using stick glue. Let dry. Cut desired motifs from gift wrap and decoupage papers. Glue cutouts onto card front as desired, using stick glue. Let dry.
Instructions for potpourri card:
Follow first step of card directions above, to make card. Transfer cutting line for potpourri card to the back of card front. Cut out, using regular scissors. Transfer cutting line for potpourri card to lace and remaining paper; cut 1 of each, using regular scissors and adding ¼‖ all around.
Place small amount of potpourri on small paper heart.. Squeeze thin line of glue around edge of heart. With edges aligned, press lace heart into glue, covering potpourri. Let dry. Squeeze thin line of glue around edge of cutout on back of card front. Center and glue lace covered heart on back of card front so that potpourri shows through
Find thousands of free crafts, decorating ideas, handmade gifts and more at www.FaveCrafts.com. |
32 |
|

Cupid’s Handmade Crafts eBook
cutout. Let dry. Center and transfer cutting line for potpourri card on heart shaped paper doily. Center and glue doily heart on card front as desired, using stick glue. Let dry
Instructions for garland:
Cut 1 (5‖ x 16-½‖ strip of paper. Accordionfold paper to match width of pattern. Transfer pattern to folded paper and cut out, but do not cut along fold lines. Trim edges of heart with scalloped-edge scissors, but do not cut along fold lines on tabs.
Unfold garland and lay flat on work surface. Using stick glue, center and glue 1 paper heart doily on each heart, alternating colors. Cut desired motifs from gift wrap and decoupage papers. Glue cutouts onto card front as desired, using stick glue. Let dry. Punch holes around edge of first and third hearts of garland (see photo). Thread 1 piece of gold thread through holes on each and tie in bow at top of heart. Center and punch 1 hole in tab at each end of garland. Cut 2 (8‖) lengths of gold thread. Knot 1 end of 1 thread in hole at 1 end of garland for hanger. Repeat to attach remaining thread length to other end of garland.
Find thousands of free crafts, decorating ideas, handmade gifts and more at www.FaveCrafts.com. |
33 |
|

Cupid’s Handmade Crafts eBook |
|
With Love Stitched Card |
embossed (raised) on the front of the |
|
card. |
By: Ecstasy Crafts
Use the "Season of the Heart" kit from Ecstasy Crafts to make this Valentine's Day Card. This card uses a heart stencil to create the holes for stitching with embroidery thread.
Materials:
Ecstasy Crafts Season of the Heart Kit including:
Morehead 3D die cut sheet #11052312
Victorian flowers 3D die cut sheet # 82160
heart Amazing stencils #4048505
foam pads #65000001
a gold Valentine sticker sheet #307G
4 pink cards with envelopes #K409864
Instructions:
1.Use heart stencil #1 and emboss the heart design into one side of a light pink rectangle card. Place the stencil in the position on the front of the card and tape in place so that when you dry emboss the design from the back it will appear
2.Place the card and stencil on a light box or against a sunny window and emboss the heart designs and around the entire stencil. Emboss by pressing the paper into the open spaces with an embossing stylus to raise this area on the front of the card.
3.Place the card back side down on top of a piercing pad. Pierce the two layers of hearts (holes in the stencil) from the front to the back.
4.Stitch the pattern for the heart using metallic thread or rayon machine embroidery thread or embroidery floss. I used a dark pink color found in the Ecstasy Crafts bag of metallic threads. The lines on the stencil represent a thread line. I actually first did all one angle then the opposite angle. Just tape the thread to the back of the card at the beginning and when you have finished the stitching.
5.Cover the threads by cutting out a heart shaped design and place over the threads.
6.Press out layer number one of the Morehead Design and attach to the rectangle card using double sided tape or a glue pen. You may wish to gently curl the next layer with the back of a pair of scissors the place a some 3-D foam tabs to the back of layer #2 and attach directly on top of layer #1. Repeat the last step for the remaining layers.
7.Decorate with a Valentine’s sticker saying.
Heart Stamp Card
By: Amy Law for Kreinik
Find thousands of free crafts, decorating ideas, handmade gifts and more at www.FaveCrafts.com. |
34 |
|

Cupid’s Handmade Crafts eBook
If you love beads and you love card making, combine the two hobbies and make artistlevel designs you can sell in trendy stationery stores. Use this colorful, creative idea to get you started. It features red liner Treasure Tape, Kreinik metallic threads, and clear Diamond Beadlets.
Materials:
Strathmore Creative Cards blank card & envelope
Black paper
3.5x2.25 Decorative black paper (Mary Engelbreit)
Small scraps of coordinating pink print paper
Textured pink cardstock
4" x 6" sheet Treasure Tape sheet
1/8" Treasure Tape Trim
Diamond Beadlets
Kreinik 1/8" Ribbon in colors 042, 007C, 153V, and 001J
Kreinik #16 Braid in colors 031, 003V and 005C
Punch-1 9/16" stamp shape, McGill Craftivity, 3/4" square, Punch Bunch
Pencil
Scissors
Glue stick
Shallow pan or tray
1.Adhere your scrolled decorative black paper to your card. Cut a .5" x 3.5" strip of your Treasure Tape Sheet, and apply it across the center of your scrolled
paper. Press outward from the center to remove any air pockets.
2.Peel back the red liner and begin laying down rows of thread. You can alternate between ribbon and braid for different width stripes. Trim the threads at each end.
3.Using your 1/8" Treasure Trim, create a tape border around the outside of the scrolled paper, overlapping the paper and the ends of your thread stripes. Peel back the red liner and lay down a border using your 042 Ribbon.
4.Punch a "stamp" shape out of the pink cardstock. Next punch a smaller square shape out of your coordinating patterned paper. Attach it to the center of your stamp shape. Cut a small heart from your Treasure Tape sheet, and adhere it to the center of your square. Press firmly.
5.Adhere your stamped motif to the center of your card, over the stripes. Peel back the red liner on your heart shape.
Outline your heart with braid.
6.Place your card into a shallow tray or in a small bag, and pour beadlets over the exposed tape areas. Tap to remove excess beadlets.
Find thousands of free crafts, decorating ideas, handmade gifts and more at www.FaveCrafts.com. |
35 |
|

Cupid’s Handmade Crafts eBook
Blue Valentine Heart Card
By: Paula Huiras for Posh Impressions
Give a different and unique blue, heartstamped valentine to your special someone this Valentine's Day. Different layers and string accents create a beautiful, textured card.
Materials:
White cardstock using the same ink. Cut out all three pieces leaving a small white border. Punch holes in scalloped border as shown. Mount scalloped borders on either side of a Blue Metallique panel. Punch holes in three hearts piece and insert brads.
2.Tap (lightly) Blue Blending Blox inkpad onto a White card inking the paper in rows until the card is full. Stamp XO along the edges of card using the same ink. Punch corners with decorative punch. Layer to a slightly larger Navy card and then a folded White textured card. Tape strings to center of card and fray ends. Layer previous piece to base card.
Sweethearts set-Posh Impressions
White cardstock
Blue Metallique cardstock
Navy cardstock
Blue Blending Blox dye ink
Small hole punch
Decorative corner punch
Brads
Strings
Mounting Tape
Steps:
1.Stamp three hearts with Blue Blending Blox ink into White cardstock. Stamp Scalloped border twice and also on
Find thousands of free crafts, decorating ideas, handmade gifts and more at www.FaveCrafts.com. |
36 |
|

Cupid’s Handmade Crafts eBook
Pink Heart Mini Card & Envelope
By: Arnold Grummer’s
Recycle and be thoughtful at the same time - - follow these steps to create a handmade paper mini card with matching envelope. Perfect for a valentine!
Supplies:
Arnold Grummer's Tissue Tints: Color for Paper and Casts
Arnold Grummer's Medium Template: Gift Tag & Envelope
Arnold Grummer's Papermill Complete Kit
Pink paper to recycle
Pink paper for heart
Small script rubber stamp
Black ink pad
4 small paper flowers or punched flowers
Black glitter glue
Steps:
1.Recycle light pink paper scraps or wastepaper. Add dark pink Tissue Tint strip to pulp while blending. This will put varied hues of pink in the paper.
2.Slide 'Gift Tag & Envelope' template into paper making set. Follow kit directions to form, press, and dry paper.
3.Cut or tear a heart from pink paper scraps or handmade paper for card front.
4.Fold tag to make mini card. Fold envelope.
5.Use a small script rubber stamp to stamp the card and envelope fronts.
6.Attach small pink heart to the card front. Make dot dash border around heart edge for accent.
7.Attach three paper hearts to envelope and one to card as shown. Use black glitter glue to make flower centers.
8.Make a liner for the mini card and write "Love You" or your own message.
9.Tuck in a flower poke or under ribbon on your Valentine gift.
Find thousands of free crafts, decorating ideas, handmade gifts and more at www.FaveCrafts.com. |
37 |
|

Cupid’s Handmade Crafts eBook
Valentine Card and Candy Wrap
By: DecoArt
Sweets for your sweetheart and a card to match. It's so easy to create this Valentine duo with Americana Acrylics and Craft Twinkles Writers.
Materials:
DecoArt Products Required
Americana Acrylics
DA151 - Royal Fuchsia
DA229 - Jack-O'-Lantern Orange
DA234 - Calypso Blue
DA250 - Bubblegum Pink
DA254 - Avocado Dip
Craft Twinkles Writers
Sponge stamps: alphabet letters U,R,M,E; number 4; ladybug; interlocking hearts
Water container
Palette or plastic plate
Paper towels
Scissors
Double-stick tape or scrapbooking glue stick
Cosmetic sponges
5" x 7" folded card
Fuchsia cardstock
Lime Green paper
Fun stripe scrapbook paper
Polka dot scrapbook paper
1.Use scissors to cut striped paper to fit card front. Position and adhere.
2.Cut 4" x 5" piece of fuchsia cardstock and 4-1/2" x 3" piece of polka dot paper. Position and adhere.
3.Use cosmetic sponges to dab paint on stamps. Position, press, and lift. (Refer to photo for colors and placement.) Let dry.
4.Outline letters and number with Craft Twinkle Writers using corresponding colors. Let dry.
Candy Wrapper:
DCTW01 - Crystal
DCTW13 - Orange
DCTW16 - Lime Green
DCTW17 - Fuchsia
Supplies
Flat chocolate bar
1.Cut cardstock and striped paper to fit around chocolate bar.
2.Cut square from lime green paper. Cut slightly smaller square from polka dot paper.
3.Use cosmetic sponge to apply Royal Fuchsia on ladybug stamp. Position stamp on polka dot square, press, and
Find thousands of free crafts, decorating ideas, handmade gifts and more at www.FaveCrafts.com. |
38 |
|

Cupid’s Handmade Crafts eBook
lift. Let dry.
4.Adhere squares onto striped paper.
5.Outline ladybug and create lettering with Fuchsia Craft Twinkle Writer. Dot circles on bug and add small heart with Crystal. Let dry.
Find thousands of free crafts, decorating ideas, handmade gifts and more at www.FaveCrafts.com. |
39 |
|
Cupid’s Handmade Crafts eBook
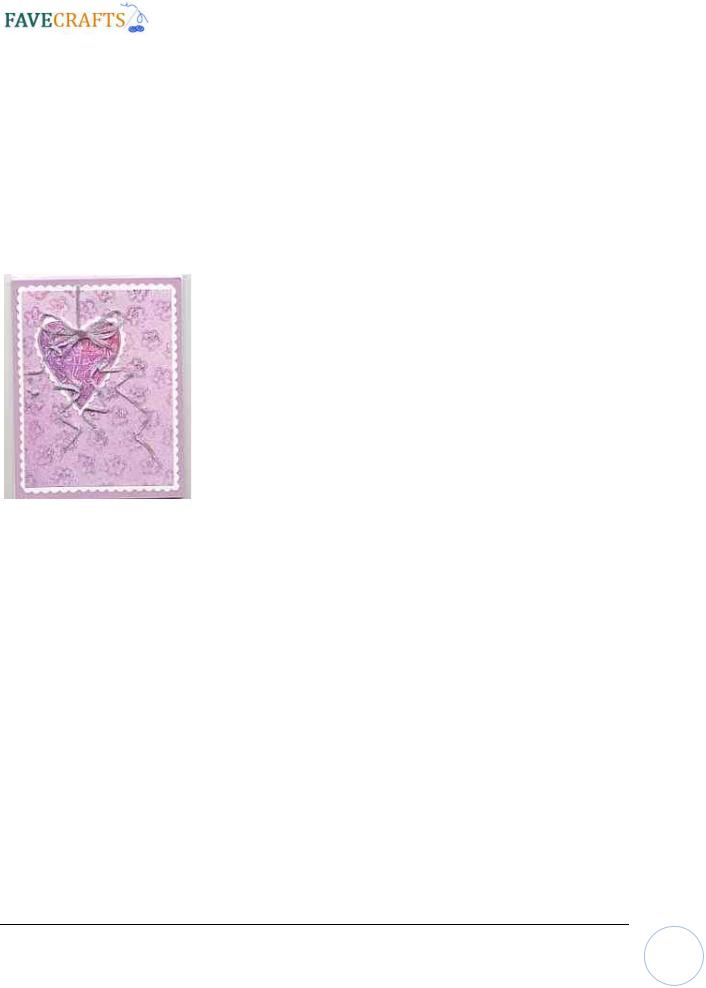
Iron-on Valentine Card
By: Barbara Swanson for Kreinik
Is there anything more romantic than a handmade Valentine card? Whether it's for your sweetie, your puppy, or your favorite niece, you can whip up this card in no time, but it will look like you bought it in a stationery boutique! It features a layered look for more dimension.
Materials:
2.Stamp a design on the lavender cardstock and glue or tape it on the white scalloped cardstock.
3.Stamp your heart image onto another piece of white cardstock and cut the edges with your scalloped scissors. Attach onto your stamped lavender cardstock as desired.
4.Lay a piece of iron-on ribbon leading from the edge of the scalloped paper to your heart. Lay the thread at the starting point, cover with the teflon press cloth, and press for several seconds until the thread adheres. Continue laying the iron-on thread in bows and curls as desired.
Lilac card base
White cardstock with scalloped edges
Lavender cardstock with purple rubberstamped flower background
Rubber stamped heart with scalloped edge
Iron-on 1/8" ribbon in 6500 Hydrangea in bows on the heart
Note: You will need a mini craft iron or home iron plus a Teflon Press cloth to use the iron-on threads in this design.
Steps:
1.Cut your white cardstock to fit onto your card base and attach with Treasure Tape or glue.
Find thousands of free crafts, decorating ideas, handmade gifts and more at www.FaveCrafts.com. |
40 |
|