

Publishing history - Basic Armouring
.pdfLEGS
Hanging and Assembly
There are several ways to hold your legs up. The most authentic is to attach a leather flap to the top and use this to point them onto 

 your gamberson. A common method is to buckle them to
a kidney belt for which you require a buckle on the belt and a strap at the top of the leg harness. Another method
it to hang over a hip belt by means of a strap and a buckle attached to the leg.
You will also need strapping to hold the armour to the leg. You can use a single strap, or make a Y strap as shown in the illustrations. For more flexible armour you might want to consider two straps. The buckles should go on
the inside/rear of the armour where they are less likely to be struck and won’t catch when you run; hey, you don’t
want to spend your entire life standing in a shield wall do you?
A floating cop will require a strap around the back to hold it in place. I find a strap around the lower plate of my articulated ones holds them well, and a strap at the back of the knee merely gets in the way when I kneel.
Floating cops can be hung from the upper leg by the use of two
straps. Alternatively they
can be pointed in place.
Articulated knees are
simply riveted to the upper leg armour which is where those long
rivets can come in handy! If you are riveting the cop to a soft or non hard wearing material (leather, Cuir Bouilli, thermoplastic, etc.) be sure to use a washer between the material and the peined head of the rivet or the cop will soon fall off the leg!
85
LEGS
86

Chapter 15 — Shields
Shields are generally made from 12 mm (1/2 inch) plywood (marine ply is best). Less authentic, but longer lasting, shields can be constructed from Dural, aircraft grade aluminium. Small bucklers can also be fabricated from steel. Shield size is very much a case of personal choice. Some brave souls do incredible things with tiny bucklers, others provide sterling service in the shield wall with things that look like barn doors—the rest of us have something in between! Experiment until you find a size and shape you like.
Hand and Arm Protection
If you have a nice BIG shield no blow can get behind it, right? Sorry—wrong—axe and halberd heads come inside shields, people can hook your shield open exposing your hand and arm, and crafty people will always find ways of getting in shots behind it! Whilst not as vulnerable as a weapon holding arm the shield arm still needs protecting, in particular the fingers, hand and elbow.
Facings, Shield Edging and Padding
The simplest facing you can give a shield is none at all—yes wood is period! A nice effect for Viking shields, and the like, is to carve a few small groves to give fake planking. Protecting a shield against the elements is, however, a good idea and even a ‘wood effect’ shield can benefit from a coat of matt varnish. Once the strap and grip fitting holes have been drilled the face of the shield
can have a layer of cloth glued to it, which both protects it from
blows and gives a good surface for painting. For heraldry and the  like you need a layer of undercoat (you need a special non-ferrous
 metals one for Dural) followed by a topcoat of household enamels
or similar paint.
Shield edges can be protected, either to stop them being chewed up when struck or, when non-steel weapons are being employed, to pad the shield to stop it destroying weapons! Edging a shield
87
SHIELDS
also makes it safer to use as a jagged, splintering edge is a hazard to both you and your opponent.
The most epic thing you can do to the edge your shield is to cover it with 20-gauge steel. Simply cut a strip as shown, fold it around the edge and rivet it on—of course this won’t actually make it last forever but it may seem that way after you’ve lugged it around for a bit! A lighter, more practical edging can be made with rawhide leather. This can be purchased in convenient strips as dog chews; but I suggest you avoid the flavoured ones! Simply soak in water until
soft, cut to size then tack on and allow to dry. A coating of paint stops them going soft again after fighting in the rain,
any time during the British summer.
There are several ways to pad a shield edge but first edge it,
even if it’s Dural, with rawhide—this stops a wooden shield
disintegrating and the hard edge of a Dural one cutting
straight through the padding. You now need to add some-
thing resilient over this edges don’t need to be soft for most


 combat forms, they just have to have enough give to make weapons last more than one blow. Sticking a layer of felt on works as does split rubber tubing, water hose, thick leather and the like. Finally
you need to hold everything in place. Felt or soft tubing will need something tough such as a layer of leather over it, thick tubing (unless it’s a really horrendous colour) or leather can simply be laced in place.
Round, Heater and Kite Shields
Flat, round shields are very easy to make; buy a piece of plywood, mark out a circle then cut it out (a jig saw speeds things up).
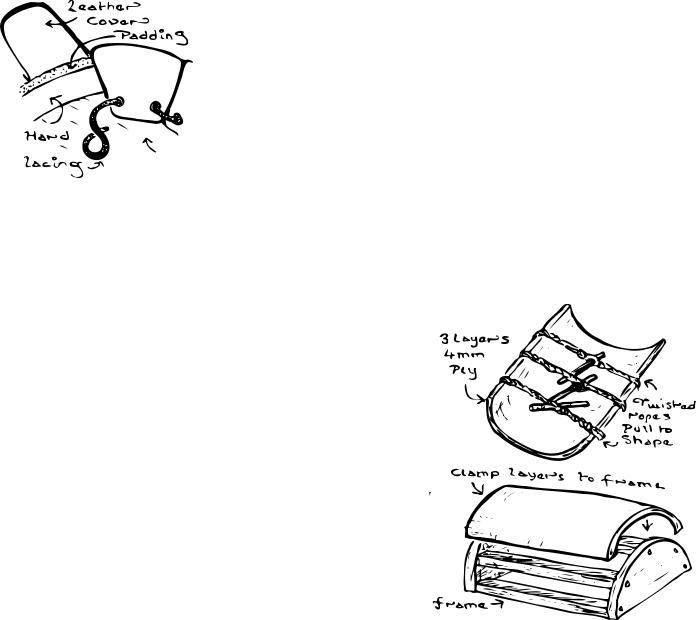
Heaters and kites can be made either flat or curved. If you can’t work out how to do a flat one then you haven’t been paying attention! For a curved one buy two (or more) pieces of ply whose combined thickness come to about 12 mm (three layers of 4 mm works well) and some waterproof, slow setting, wood glue (e.g. Cascemite). Glue the pieces together then either curve the wood over a former or simply pull it to shape with rope. Ply tends to bend better in one direction than the other so assemble the pieces to curve the easy way! Allow to dry then cut to final shape.
Centre Grip Shields
These require a boss to protect the hand and a gauntlet to protect the wrist. If you are feeling lazy go and buy a spun boss at a re-enactors market! Failing that dish one out or, for a really deep one, build it up like a mini domed top helm. Viking rounds are large wooden centre boss shields; wooden bucklers are simply
88

SHIELDS
a mini version! To fabricate cut the wooden round then cut out a hole in the centre to fit your hand. Rivet the boss, over the centre hole, using two of the rivets to hold the handgrip in place. An alternative way to make a buckler is from a thick piece of steel (14 gauge or so). Dish the centre, roll the edges then add a handgrip. The shape of the handgrip will depend on the depth of your boss, the size of your hand and how you like to use your shield. I make mine from bar stock with a wooden covering for the hand; other people prefer a wrapped leather covering.
Shield Fittings
It should be emphasised that shields are very personal items. How a shield is hung will depend on the length of your arm, your preferred hand/wrist angle and to a large extent how you use your shield. The most important point is that your shield should feel comfortable in the normal guard position. If it’s putting a strain on your arm/wrist at this rest position then it is going to cause a lot of discomfort at the end of the day; anyway you are supposed to be fighting your opponent not your shield! Additionally remember to keep the elbow free; straps that cut into the elbow are very annoying! Unfortunately finding the ideal position is largely a matter of trial and error keep experimenting until you find that perfect shield.
Handgrips
For a simple handgrip take a large door handle, raise it to a comfortable height above the back of the shield (with wooden spacers) and then bolt it in place.
Cutting the required shape from a piece of thick, stiff leather can make a flexible grip.
You can make a solid grip from a piece of around 2 cm (3/4 inch) wide strip of 14 gauge or heavier bar stock. The approximate size is shown below, however as your hand in unlikely to be the same size as mine make a cardboard template first then adjust the size to fit before cutting the metal up. Remember to allow room for your glove or gauntlet.
1.Cut out the metal strip, drill two holes to take your bolts then bend into the shape shown.
2.Glue a piece of wood to either side of the metal then cover these with leather to ensure a comfortable, non-slip grip.
89

SHIELDS
Arm Straps
The most basic form of arm strap is made by bolting on two crossed straps of 4 cm (1.5 inch) wide leather to the shield. Another simple grip is a single piece of leather, shaped to your forearm, attached to the back of the shield. If you are using such unadjustable fastenings then you will need some way of holding the shield on your arm. To this end you can either use thick, spongy padding behind the straps or else hang them as shown to right thereby using the weight of the shield to hold it in place.
Personally, I much prefer adjustable straps, if only because they are so much easier to put on and take off! They also allow for changes in padding, arm armour and the huge increase in your forearm muscles as you diligently practice for several hours every day! Several attachment methods are shown in figure 15-1—take your pick.
Padding
Shields tend to get thumped pretty hard so unless you have some padding, between it and you, you are going to end up with a sore arm! This padding should extend from just behind your elbow to either your wrist or hand depending on the type of gauntlet you plan to use. Felt or close cell foam covered in cloth or leather will make a perfectly adequate pad.
Hanging
The final stage is to attach all the bits to the shield. Coach bolts are good for this, as they don’t protrude at the front. Alternatively you could rivet everything on, the major disadvantage with this being that it is then difficult to transfer the fittings to another shield when the wood on the original gives way. Remember to cut off any protruding length of bolt flush with the nut—you don’t want to impale yourself on your shield now do you? It is also important that your hand and elbow aren’t too close to the shield edge as axe and halberd heads can strike over it. Even then blows can still come inside a shield (especially if it’s hooked by a pole arm) so don’t throw away your hand protection and shield arm elbow cop.
For a round shield lay your arm along the diameter with your
elbow at least 5 cm from the edge. Next, with the padding under
your arm and holding onto your handgrip, move your wrist
about until it feels right. Mark the positions for the bolts through
the holes in the grip. Then lay your straps over your arm and
mark their bolthole positions as well. Temporally rough tack
or screw everything in place, put the shield on rotate it a few
times and carefully try a few blocks. Adjust the grip and strap positions until the shield feels comfortable,
does not twist around the arm and does not put too much strain on the wrist. After adjusting glue the padding in and bolt everything else in place.
90

SHIELDS
To hang a heater you first need to find how it balances. Hold the shield, and a plumb line (bit of string with a weight on the end), on the corner nearest to where your hand will go. Allow the shield to hang naturally (as shown below) then mark the position of the plumb line onto the back 
of the shield. Using this line is a first estimate of where
your arm will go roughly attach the grip and straps (tacks work quite well) to the back of the shield. You will want your hand to be at least 8 cm from the edge (thereby avoiding axe heads etc.) and your wrist at a natural angle. Next carefully move the shield up and down a few times adjusting the placement of the fittings until they feel comfortable; don’t do anything too dramatic or the shield is liable to fall off onto your foot! Once they are
positioned to your satisfaction bolt them in place and glue in the padding.
91

SHIELDS
Figure 15-1: Shields
92

Chapter 16 — Maintaining Armour
When armour gets hit it absorbs part of the impact by deforming. It should therefore be obvious that if you don’t straighten it out it won’t work as well next time it gets struck.
It is vitally important to regularly check your armour for dents, cracks, lose rivets, breaking straps, slipping padding and the like.
The easy way to remove a dent from one side of your armour is to hit it on the other side with a hammer! Legs and the like can normally be beaten back into shape, in this manner, over a suitable former, a bit of wood works well. Remember to take the padding out before hammering.
Helms can present a problem because it is difficult to wield a hammer inside their narrow confines! A simple way to get around this is to use a metal bar as shown below. Another way is to push the helm back into shape with a car jack (a small hydraulic one works well). Support the undamaged side with a piece of wood. This technique can also be used to reshape helms that have started to flatten inwards at the sides; barrel helms are particularly prone to losing their oval shape.
Cracks are worrying as they indicate material fatigue. If a crack appears somewhere important replace the cracked piece—at once! If you can’t replace it bin it! Minor cracks in steel can be welded or braised back together again, however cracks are a definite case of “if in doubt throw it out!”
Straps should be replaced as soon as they show any sign of wear; having a strap break in the middle of a battle is not recommended; been there! Please note that holding your armour together with sticky tape is neither ascetically pleasing, period, nor safe! If a strap keeps breaking find out why. For example was it in the wrong place or does it require thicker leather?
93

MAINTAINING ARMOUR
Rusting will reduce the strength of your armour and regular polishing will gradually reduce its thickness. Painting the inside of your armour and coating the outside with oil, wax or polish will help to keep it rust free and make it last longer.
Padding will gradually become compressed, and hence less efficient, it gets regularly impacted. It’s worth changing your helmet padding on a regular basis.
Remember, there is nothing dishonourable in retiring from a fight if your armour becomes unsafe—don’t just fight on and get hurt!
94