

Publishing history - Basic Armouring
.pdfPADDING
Sewing an arming point
1. Work from the right (outer) side of the fabric. Make a circle of stab stitching round the eyelet position; finish by bringing the needle up just outside the circle.
2. Now push a sharp point (scalpel, scissors point, stiletto...) into the centre of the circle and start forcing it through, working from both sides alternately until the hole is almost as big as the outline stitching.
3. Put the needle down through the hole and back out a little further round, whipping over the edge of the hole and the outline stitching. Pull each stitch tightly as you go round. The stitches should just touch as they pass through the hole and radiate out a little.
4. To finish off make one or two small stab stitches from back to front, then lose the end in the stitching at the back. You should have a firm slightly raised ring.
The best thread to use is firm cotton or linen thread, 40 gauge or thicker; synthetic threads fray too much for hand sewing.
Limb Padding
Armour, by itself, will absorb a portion of any blow hitting it. The purpose of padding it to reduce what remains to an acceptable level; where you don’t get hideous bruises but you can still feel the blows; yes you can over pad things! You have two choices; either you allow what is below the armour (gamberson, padded hose, flesh) to absorb the remaining impact; or you add extra padding to the inside of the armour. Felt, leather, or closed cell (backpackers’ sleeping mat type) foam can all help, experiment until you find what suits you.
25

PADDING
Joint Padding
Joints are susceptible to damage and should therefore be well protected. Extra protection can be built into your under garment; an extra pad worn under the armour, such as one from a sport like hockey or skate boarding; or padding added to the inside of the armour, such as sleeping mat foam. Again experiment until good protection and mobility are achieved.
Helmet Padding
The amount of padding required depends on how hardand how often you expect to be hit on the head. (For further information see Chapter 18.) The way you pad it depends on personal choice, there are three basic ways; line it with foam or felt, build the padding into a coif (close fitting cap) or else build a leather suspension ring like the inside of a modern combat helmet. Of course you can always use combinations of the above. To keep things simple I’ll just describe padding for the most extreme case, tourney fighting. For this you need a layer of closed cell (backpacking sleeping mat) foam with either, extra reinforcing pads (made of less dense foam) or a coif.
Padding the Pot and Great Helms is fairly straight forward. Cut the foam to the shape of the individual panels of metal and fit them inside. First put in a layer of closed cell foam against the steel. Then add open cell (mattress or packing type) foam where needed to make a snug fit.
To pad a curved top helm make a liner as follows:
1.Measure the circumference of your helm at about brow level. This gives you your base line. Next measure up from the brow to the crown of the helmet (the top most point). This gives the height. Divide the baseline into four segments and turn each segment into a triangle with rounded
edges. Measure the depth of the rest of the helm and add this to the bottom of the triangles. Allow a hole for the face.
2. Cut the resulting shape from closed cell foam. Trim as necessary to get a good fit inside your helmet then duct tape together.
3. Take strips of open cell foam and put a strip across the brow, at the back of the head, at each side and put a disk of foam at the top. Leave plenty of room between strips for air circulation.
4. Try the helm on and see how it feels. Trim padding until a snug and comfortable fit is achieved
26
PADDING
Don’t glue your padding fully in - you may need to tighten your rivets or take a dent out—try a removable liner or Duct Tape instead.
Gauntlet Padding
Gauntlets tend to be fairly tight fitting leaving little room for padding. Gauntlets, however, don’t need much padding as they achieve a lot of their effect by spreading the force of a blow—along the hand, onto the arm and onto the hilt or haft of your weapon. Start with a good pair of leather gloves; quantity welding or gardening gloves work fine. Hold onto a convenient haft and tap your gauntlets. Sting or touch anywhere? Then add a thin layer of felt or back packing foam to this point. Good areas to pad are the fingertips, knuckles and around the wrist guard. Keep padding until it feels right.
27
PADDING
28
Chapter 9 — Head
When designing helms beware of gaps between head and neck armour and sword sized holes at the throat! Helmets should be made from at least 16-gauge steel. Making a cardboard template and adjusting this to fit your head, rather than playing with bits of steel, saves a lot of time and effort!
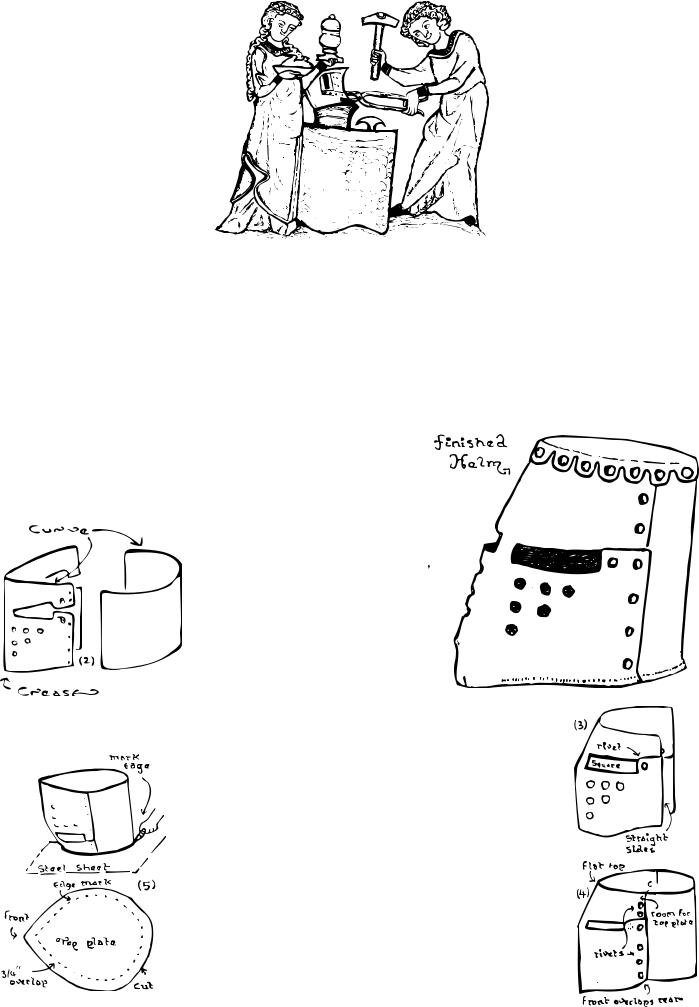
Pot Helm
I designed this helm as an exercise in minimalist cutting—it only has three plates
1. Cut the front and back plates as shown on the pattern, figure
9-1. To cut the eyeholes drill
a series of holes around the inside of the slots. Cut between
the holes with a hacksaw or
cold chisel then file the remain-
ing points back to the marked
line.
2. Curve the plates as shown. The crease at the front is simply
achieved by bending the plate over a flat edge.
3. Bend the top of the face plate down so that tab
B covers tab A. Rivet them together, on both sides, using the holes nearest to the eye slot (don’t
rivet the other hole yet). Pein rivets on inside of helmet.
4. Rivet the front plate over the back plate. The front
plate should reach the line labelled overlap on the
template. Don’t rivet the very top of the helm, or
you won’t be able to get the top plate on! You can
use one of the lower rivets on each side to hold a
chinstrap in place.
5. Turn the helm over onto the steel sheet and trace around the outside of the helm. Add about 2 cm
29

HEAD
Figure 9-1: Pot Helm Pattern
30
HEAD
overlap to this and cut the resultant shape out. This is the top plate for the helm.
6. Make a series of evenly spaced holes, 1 cm from the edge, approximately 3.5 cm apart around the circumference of the top plate. Cut around these holes, up to the edge mark line, so as to turn the overlap area into tabs. Using a soft face hammer bend the tabs down so the touch the sides of the helm.
7.Place the top plate on the bottom plate and rivet them together through the tab nearest the front crease. Next rivet the tab at the rear and then one tab on either side of the helm thereby holding the top plate evenly in place.
8.Rivet the rest of the tabs. The Tab method is the easiest way to fit the top plate; an alternate method, using less cutting but more hammering, is to raise the overlap down (see Raised Helm Top).
9.Curl the back edge and sides of the helm to prevent them hitting your shoulders.
10.Pad inside of helm - especially the top, these helms made great “mace landing pads!”
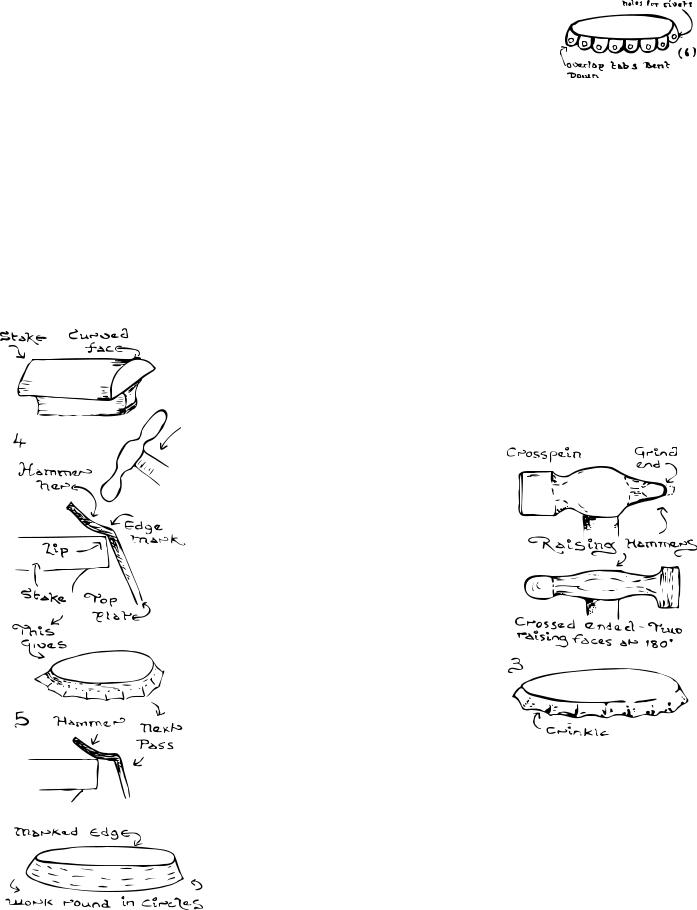
Raised Helm Top
Want even less cutting? Then raise the top plate edge over: 1. Turn the helm over onto the steel sheet and trace around the outside of the helm. Add about 2 cm overlap to this and cut the resultant shape out. This
is the top plate for the helm. 2. Mark the overlap onto both sides of
the plate. Draw a few intermediate lines on the outer surface.
3. Cut a 2.5 cm wide grove into a thick
piece of wood. Using this as a former beat the overlap into V shaped crin-
kles. 4. Take a raising hammer (a cross pein
with the back smoothed will do) and
a convenient stake (ideally with a curved face and a flat end). Place the
top plate onto the stake so that the
marked edge is at the lip of the stake. Strike the overlap, immediately next to the marked line, so as to force the
metal at this point down onto the surface of the stake. This will force the metal inwards. Strike in an identical manner evenly all around the top of the overlap until you come back to were you started.
5. Move the top plate further out (this is where those intermediate lines help) and hammer another circle down. Repeat this process hammering further out
31

HEAD
Figure :
32

HEAD
each time until you reach the far edge of the overlap. This is one pass; now anneal the piece.
6. Starting at the inner edge each time do enough
passes to bring the overlap into the correct shape to
fit the helmet top. Note: you have to raise more at
the back than at the front.
7. When the plate is the right shape planish the
hammer marks out by placing the lip over the stake and striking it evenly with a flat faced hammer. If the top plate is not entirely flat, a likely event espe-
cially on your first try, place it upside down onto a flat wooden surface and beat it into a better shape. Hammer or file the lower edge until it is even.
8. Rivet in place. Enjoy.
Great Helm
This helm can use either of the last two methods of attaching the top plate or the method given below. Isn’t choice a wonderful thing?
1. Scale up the templates over page to fit your head, transfer them to steel then cut them out.
2. Crease the centre line of plate 4; curve the plates to the shapes shown bellow.
3.Make the upper half; place plate 1 over plate 2 with a 20 mm overlap and rivet them together with four rivets. Leave room for rivets at the top (for the top plate) and at the bottom (for plates 4 & 5).
4.Check that the upper half fits your head; it will be difficult to change after the next stage! It should be slightly egg shaped (I’ve yet to meet anyone with a round head.)
5.Mark a circle 20 mm down from the top of the upper half then raise/ bend this in a little.
33

HEAD
6.Turn the upper half over onto the steel sheet and trace around the outside of the helm. Add about 2 cm overlap to this and cut the resultant shape out. This is the top plate for the helm.
7.Dish the top plate to meet the raised curve on the upper half. This shouldn’t be an extreme bowl shape, just a gentle curve. Rivet the top plate inside the upper half.
8.Take plate 3 and curve the upper edge inwards a little by hammering it over a suitable former.
9.Rivet plate 3 to the rear of the upper half. Don’t rivet at the very end because you will need this space to rivet the front plate on! If you rivet the two ends then the middle you can adjust the shape of the overlap, with a suitably large hamme, to ensure a good fit all round for the rest of the rivets.
10.Bend the two tabs on plate 4 inwards so that they match the curve on the bottom of plate 1then rivet the plate to the rest of the helmet.
11.If necessary file the eye slot to give an even gap. Cut a small nasal bar and rivet it across the centre of the eye slot. Pad and enjoy.
Variations on the ‘Great Helm’ design
34