

Microsoft Windows XP Networking Inside Out
.pdfPart 2: Internet Networking
6 Chapter
158
Figure 6-18. Use the General tab to configure user and supervisor access along with the supervisor password and additional ratings.
■Supervisor Password. In this section, you can change your supervisor password. Keep in mind that the supervisor password you assign is used to control and even turn off content management, so keep track of it. However, if you should forget your password, you can override it by editing the registry. The registry is a storehouse of information in Windows that contains essentially all the software and hardware configuration settings for your computer. Using Registry Editor, you can directly make changes and add or remove items (see the Troubleshooting sidebar on the next page). You’ll find an entire chapter devoted to the registry in Microsoft Windows XP Inside Out by Ed Bott and Carl Siechert (Microsoft Press, 2001).
caution Incorrect registry edits can cause Windows XP to stop functioning, so you should only edit the registry as a last resort and only if you are sure of what you’re doing.
■Rating Systems. In this section, you can find the available rating systems offered by other companies. Click the Find Rating Systems button to open a Web page on the Microsoft Web site that lists any additional ratings providers. The Rating Systems button can be clicked to view, add, or remove any of the rating systems installed on the computer including the default RSACi system.
6Click the Advanced tab to see the options to locate and use a ratings bureau and to use PICSRules. A ratings bureau is an Internet site that can check a rating of a site if the site is not rated by the ICRA. However, using a ratings bureau can seriously slow down browsing speed. You can also import PICSRules. PICSRules are labels a site can contain that also help you determine if the site should be viewed or not. There are no default rules configured, but you can import them if desired.
2: Internet Networking

Chapter 6: Using Internet Explorer Advanced Features
If you decide that you no longer want to use Content Advisor after you have configured it, you can always return to the Content tab and click the Disable button. You’ll need to provide your supervisor password to turn off the feature. Thereafter, you can quickly reenable the site by clicking the same button, now labeled Enable, and entering your old supervisor password again.
You forgot your supervisor password and need to remove it by editing the registry.
To remove the supervisor password for Content Advisor from the registry should the password be forgotten, follow these steps:
1Choose Start, Run.
2Type regedit in the Open box and click OK or press Enter to open Registry Editor.
3In Registry Editor, you’ll see a listing of root keys, which are different divisions of the registry that hold different kinds of information. The Content Advisor password is stored in the HKLM root key, which represents HKey_Local_Machine.
4Expand the HKLM root key by clicking the plus sign to its left, and then keep expanding by clicking Software, followed by Microsoft, Windows, CurrentVersion, Policies, and Ratings.
5Select Ratings in the left pane. In the right pane in the Name column, select Key and press the Delete key.
6When asked to confirm the deletion, click Yes.
7Expand Ratings in the left pane and select Default. In the right pane, doubleclick the Enabled item. In the dialog box that opens, type 0 (zero) in the Value Data box and press Enter.
8Close Registry Editor.
If you are worried that your computer-savvy kids or coworkers might access the registry and delete the Content Advisor password, you can use a Group Policy setting to control access to the registry for all users of the computer who do not have administrative privileges. See “Managing Internet Explorer with Local Group Policy” on page 174 to learn more about using Group Policy with Windows XP Professional. If you are using Windows XP Home Edition, Group Policy is not available.
Setting Additional Internet
Explorer Features and Settings
Chapter 6
You can customize Internet Explorer in a number of different ways so that the browser both looks and acts in the way that you want. The settings mentioned in this section are found in the Internet Options dialog box (choose Tools, Internet Options to open
159
2: Internet Networking

Part 2: Internet Networking
it), and they can have a big impact on your Internet Explorer experience. The settings you’ll learn about in the following sections are quick and easy to implement options that you might consider using on your system.
Choosing a Home Page
Internet Explorer uses a default home page when you first open the browser. This home page might be www.msn.com, or it might be the home page of your computer manufacturer, such as Dell, Compaq, or Gateway. No matter, you can change the home page to whatever you want, or you can remove it. In Internet Options, select the General tab, enter a new URL under Home Page in the Address box, and click the Apply button. If you’re currently viewing the page you want to use as your home page, you can click Use Current instead. If you want Internet Explorer to open to a blank page (which is the fastest way to open the browser), click the Use Blank button. Should you want to return to the original home page configured by Windows XP or the manufacturer of your computer, click Use Default.
tip Getting to Your Destination Faster
If you are using a slow Internet connection, consider selecting the Use Blank option unless you really want to go to the same page every time you start Internet Explorer. The Use Blank option loads Internet Explorer quickly and allows you to immediately enter a URL without waiting for a home page to load every time.
Customizing the Appearance of Internet Explorer
Internet Explorer uses a collection of default colors, fonts, and languages to display Web pages to you. However, those default preferences might not be suitable, depending on your likes and needs. You can easily change them, by clicking the Colors, Fonts, and Languages buttons on the General tab of Internet Options. These configuration buttons open simple dialog boxes, such as the Colors dialog box shown in Figure 6-19, so that
6 Chapter
Figure 6-19. Use the Colors dialog box to adjust the colors of the text and background of Web pages and the colors of links.
160
2: Internet Networking

Chapter 6: Using Internet Explorer Advanced Features
you can make Internet Explorer display Web pages in a way that is pleasing to you. Also, note that you can configure Accessibility options for Internet Explorer by clicking the Accessibility button on the General tab. This feature gives you some additional options that might make Internet Explorer easier for you to use.
Managing AutoComplete
AutoComplete is a feature that enables Internet Explorer to remember what you have typed in Internet Explorer, such as URLs of Web pages or information like your name and address in forms on Web pages. When you start to reenter that information,
Internet Explorer tries to complete it for you. If the suggested completion is correct, you can select it, and press Enter instead of typing the rest of the information. Some people find this feature useful, whereas others find it annoying. You’ll have to decide what works best for you. You can adjust AutoComplete’s behavior by selecting the Content tab in Internet Options and clicking the AutoComplete button to open the AutoComplete Settings dialog box shown in Figure 6-20.
Figure 6-20. Use the AutoComplete Settings dialog box to adjust the way AutoComplete works.
Select or clear the appropriate check boxes in the Use AutoComplete For section to configure AutoComplete (or clear them all if you do not want to use AutoComplete).
A notable feature of AutoComplete is its ability to remember passwords. For example, you probably log on to a number of Web sites using different passwords. AutoComplete can remember your passwords and make the logon process easier. The problem, however, is that someone else using your computer can easily access those sites as well. So, depending on the sensitive nature of your Internet usage, you might consider clearing the User Names And Passwords On Forms option, and then clicking the Clear Passwords button to delete any passwords that Internet Explorer already has in memory.
161
Chapter 6
2: Internet Networking

Part 2: Internet Networking
Setting Default Programs
Internet Explorer maintains a list of default programs for certain Internet tasks. For example, Outlook Express is the default e-mail and newsgroup client, whereas
NetMeeting is the default Internet call program. When you click one of the options on the Internet Explorer toolbar, such as the Mail button, Internet Explorer checks the settings on the Programs tab shown in Figure 6-21 to determine which program to open. However, if you have other programs installed on your computer that you want Internet Explorer to use, such as a different e-mail client, select the Programs tab and use the boxes to change the default options.
6 Chapter
162
Figure 6-21. You can select alternative Internet programs for each of the six categories listed under Internet Programs.
tip Choose Your Default Internet Browser
Two obscure settings are also found on the Programs tab. If you’ve made a number of changes to your Internet Explorer home and search pages, you can reset them to the default settings by clicking the Reset Web Settings button at the bottom of the Programs tab. Also, are you tired of Internet Explorer always asking you if it should be your default browser? This can happen if you install another browser after installing Windows XP, and it becomes the default. The next time you open Internet Explorer, you’ll be told it’s not the default browser, and you’ll be asked if you want to make it the default. If you want to use the other browser by default and not see this message every time you choose to start a session with Internet Explorer, clear the check box on the Programs tab labeled Internet Explorer Should Check To See Whether It Is The Default Browser. On the other hand, if you want to reestablish Internet Explorer as your default browser, click the Reset Web Settings button on the Programs tab.
2: Internet Networking
Chapter 6: Using Internet Explorer Advanced Features
Choosing Advanced Settings
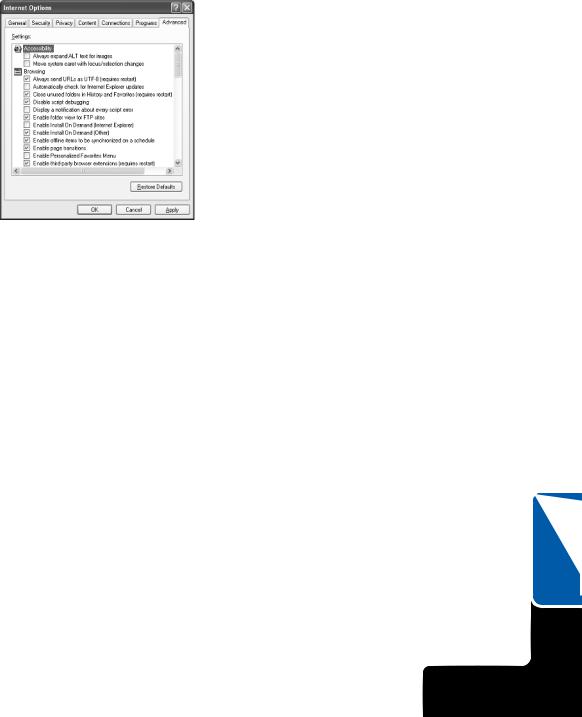
The Advanced tab of Internet Options provides a number of additional settings in different categories, namely Accessibility, Browsing, HTTP, Multimedia, Printing, Searching, and Security, as you can see in Figure 6-22.
Figure 6-22. Use the Advanced tab to adjust additional settings arranged by category.
Under most circumstances, the default settings you see on this tab are all you need for the best browsing experience. However, there are several options that might be important to you. The following list points out some of the more interesting items you might consider changing:
●Under Browsing, consider enabling Automatically Check For Internet Explorer Updates if it is not currently enabled. If you have a broadband or network connection to the Internet, Internet Explorer can periodically check the Microsoft Web site for updates. With a dial-up connection,
you should still check for updates periodically by selecting Tools, Windows Update.
●Under Browsing, consider disabling Enable Page Transitions if you are using a slow Internet connection. Some Web sites have page transitions configured so that one page fades into another. Although visually appealing, these transitions consume bandwidth and time, so disable this feature if your Web surfing is annoyingly slow.
●Under Browsing, consider selecting Enable Personalized Favorites Menu. If you use many favorite pages, the list can become long and hard to navigate. Selecting this option hides the links you haven’t used in awhile so that the list is easier to see and use. You can still access the seldom-used links by clicking the arrow at the bottom of the Favorites menu.
163
Chapter 6
2: Internet Networking

6 Chapter
164
Part 2: Internet Networking
●Under Browsing, consider clearing Notify When Downloads Complete. This removes that extra OK message box you see when a download finishes.
●Under Browsing, if you want Internet Explorer to help you complete Web addresses that you have used previously, select Use Inline AutoComplete.
●Under Multimedia, consider clearing the three options labeled Play Animations In Web Pages, Play Sounds In Web Pages, and Play Videos In Web Pages if you have a slow Internet connection. This will help speed up your browsing experience instead of waiting for multimedia content to download.
●Under Printing, Print Background Colors And Images is not selected by default. However, if you want the entire Web page to print, you can enable this option.
●Under Security, consider selecting Empty Temporary Internet Files Folder When Browser Is Closed to keep Internet Explorer clean and cookies deleted.
●Under Security, consider clearing Warn If Changing Between Secure And Not Secure Mode if you do not want to see the Security Alert dialog box that appears when moving in and out of secure and nonsecure pages.
Customizing the Internet Explorer Interface
Up to this point, the chapter has explored the configuration options provided to you through the Internet Options tabs. As you have seen, there are many customizable features and security options available to you. However, Internet Explorer can be customized in additional ways so that Internet Explorer is easy for you to use and makes your browsing experience more enjoyable. This section covers several categories of Internet Explorer settings and configuration options that aren’t configured in the Internet Options dialog box. The more obvious settings are not covered to allow space for more advanced configuration features that you are likely to enjoy.
Configuring the Internet Explorer Toolbar
The purpose of the Internet Explorer toolbar is to provide you with easy access to functions and related programs, such as searching Web sites and retrieving e-mail. The Internet Explorer toolbars are easily customizable, and you can choose which toolbars you want to display by choosing View, Toolbars, and clicking the desired toolbar. You can also choose which Explorer bar appears in the left pane of Internet Explorer by choosing View, Explorer Bar, and clicking one of the five Explorer bars. You can even move the toolbars around so they are placed in different locations within the Internet Explorer window. You can separate toolbars on the top and bottom of the screen, or you can combine them into one long toolbar to save more screen space. The choice is yours—so experiment with the options to find what works best for you by dragging a toolbar by the handle at its left edge.
2: Internet Networking

Chapter 6: Using Internet Explorer Advanced Features
tip If you don’t see the toolbar handles and can’t move your toolbars, choose View, Toolbars, and clear the Lock The Toolbars command. The toolbar handles will appear on the left side of the toolbars, and you can drag and drop them at will.
You can also customize the Internet Explorer toolbar by selecting the buttons that appear. To customize the Standard Buttons toolbar, choose View, Toolbars, Customize. In the Customize Toolbar dialog box, shown in Figure 6-23, you can see the toolbar buttons that are available to you, and you can see the current toolbar buttons.
Figure 6-23. Use the Customize Toolbar dialog box to select which buttons appear on the Standard Buttons toolbar in Internet Explorer.
To customize the toolbar, follow these steps:
1In the Available Toolbar Buttons list, select a button that you want to add to the toolbar, and click the Add button. The new button appears in the Current Toolbar Buttons list.
2If you want to remove a button from the toolbar, select the button in the Current Toolbar Buttons list, and click the Remove button.
3You can then configure the toolbar buttons to appear in any order that you want by selecting the buttons one at a time and clicking the Move Up or Move Down button. Buttons toward the top of the list appear on the left of the toolbar, and those near the bottom appear on the right side.
4In the Text Options list, choose Show Text Labels, Show Selective Text On Right, or No Text Labels. If you know what each button’s image means, you can save space with the No Text Labels option. The default is to show selective text, which occupies less space than the Show Text Labels option, but still labels some of the most important buttons.
5In the Icon Options list, select Small Icons or Large Icons.
Chapter 6
165
2: Internet Networking

6 Chapter
166
Part 2: Internet Networking
6Click OK when you are done. Keep in mind that you can reconfigure the toolbar at any time to meet your current needs.
Using Internet Explorer to Access Your Local and Network Files
Internet Explorer is designed to be a Web browser, but remember that Internet Explorer is also integrated with the Windows XP operating system. This means that Internet Explorer can provide you with access to Web pages as well as to resources on your local computer. The idea is to integrate the Internet with your local computing experience, making both easier. As you are using Internet Explorer, keep these helpful ideas in mind:
●You can store Web page URLs in your Favorites folder, and you can store any shortcut on your computer in your Favorites list as well. Just drag the shortcut to the Favorites button on the Internet Explorer toolbar.
●Your most frequently accessed URLs, documents, files, folders, and so on can be stored on the Links toolbar for easy access. Just drag and drop them on the Links toolbar. If you don’t see the Links toolbar, choose View, Toolbars, Links to display it.
●You can access Web pages as well as drives, files, and folders using the Address bar. Just enter the URL for a Web or intranet page. To access a local or network resource, specify its Universal Naming Convention (UNC) name, which takes the form \\computername\drivename\foldername\filename. For example, to open a file named News.doc located in the Data folder on a shared network drive named Datadisk on a network computer named Sales, you would type the UNC as \\sales\datadisk\data\news.doc.
Managing Internet Explorer History
Internet Explorer keeps track of the Web sites that you or anyone using your computer accesses. The sites are listed by URL on the History bar and are kept for 20 days by default (you can change the default setting on the General tab of Internet Options). The idea behind maintaining a history of visited sites is to enable you to find Web sites you have accessed but cannot remember their URLs, have not saved in your Favorites menu, or that are buried so deeply within a complex Web site you can’t find your way back to them a second time. Also, the History bar enables you to see which sites other users are accessing when they use your computer.
You can display the History bar by clicking the History button on the toolbar, as shown in Figure 6-24. By clicking on the day and week categories to expand them, you can see the sites that have been accessed during those periods.
2: Internet Networking

Chapter 6: Using Internet Explorer Advanced Features
Figure 6-24. Use the History bar to see which Web sites have been visited.
The History bar is a simple feature, but there are a few important points to remember:
●You can click the View menu button at the top of the History bar to sort the items by date, size, most frequently visited, or by the order visited today.
●You can delete history items individually by right-clicking them and clicking Delete. You can clear the history from an entire day or week by rightclicking the category and clicking Delete. You can also delete all history items by clicking the Clear History button on the General tab of the Internet Options dialog box.
●Even though you can delete the Today category, it will reappear as you surf the Internet and will replenish itself with new sites you visit. In other words, you cannot stop the History bar from collecting a list of the sites you visit. You can, however, individually delete the items from the Today list or periodically delete the Today category as it accumulates new entries.
●If you change the Days To Keep Pages In History value to 0 on the General tab of Internet Options, the current day’s history is still recorded, although it will be removed the next day and be replaced by that day’s visited sites.
If you don’t want others to see where you’ve been, you’ll have to remember to open Internet Options, go to the General tab, and click Clear History before closing Internet Explorer. Even then, the current page you were viewing before clearing history will become (when you return from clicking the Clear History button) the first new site recorded on the History bar under Today. If having even one remaining entry bothers you, in the Address bar, type the URL about:blank (which displays the same blank page you can choose as your home page on the General tab of Internet Options by clicking Use Blank), and then click the Clear History button. All history entries will be removed until you start surfing again.
Chapter 6
167
2: Internet Networking