


138 Part II Installation
Install the Linux system
2.1 Determine appropriate method of installation based on the environment (e.g., boot disk, CD-ROM, Network (HTTP, FTP, NFS, SMB))
2.6Partition according to your pre-installation plan using fdisk (e.g., /boot, / , /usr, /var/home, SWAP)
2.7Configure file systems (e.g., (ext2) or (ext3) or REISER)
After the hard drive has been partitioned, the main setup program is started. This initiates a shell program — the second type of text-based installation — which will be used to continue the installation of the Linux kernel and any additional packages. The menu is a text-based installation, but it is using a shell program to display the information in a more organized manner, as shown in Figure 5-7.
Figure 5-7: The Slackware Linux Setup Shell
This shell has many options — the first of which supplies the Help files for the installation. You can use these help files to answer any unresolved questions before continuing the installation. The next option allows for the customization of the keyboard, depending on the country and language you wish to set it for.

Chapter 5 Advanced Installation 139
More disk configurations
The addswap command will activate the swap partition for the rest of the installation. You can also use mkswap /dev/<partition> and then swapon /dev/ <partition> at the command prompt before entering setup to activate the swap partition; this is the method that I recommend. After the swap partition has been activated, you can configure the partitions that were created with the cfdisk command. Use the TARGET menu command to set up the target partitions, which create the file system necessary for this installation. The menu then displays a list of the partitions that you previously created — not including the swap partition — and allows you to select a partition. Selecting a partition prompts a menu, as illustrated in Figure 5-8, which shows that the first partition selected is the /, or root partition.
Figure 5-8: Selecting Inode Density
This installation section allows you to select the size of disk Inodes, which is a data structure that holds information about files in a Unix file system. The menu provides a useful help function to let you know why certain selections would be made. Basically, the smaller the files you want to install on the system, the smaller the Inode should be. For example, suppose that you have a database server of names and addresses. These files are very small, so if you select the smaller Inode size of 1024, while wasting a small amount, you save 3072 bytes per file saved. After you have selected the Inode, the partition is formatted and the partition selection menu returns, showing that the partition is now in use. Continue selecting partitions and creating the file systems according to your pre-installation plan.
140 Part II Installation
Select the source and packages
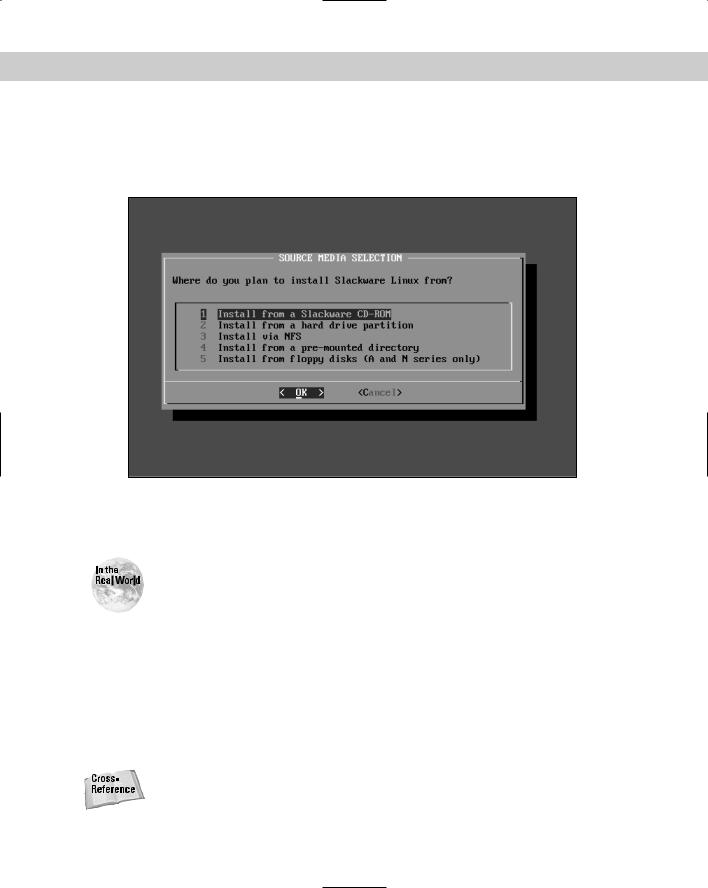
At this point, the partitioning is complete, and your next step is to select the installation media. You have plenty of options to choose from, as shown if Figure 5-9.
Figure 5-9: The Source of the Installation Media is selected
The installation media can consist of a CD-ROM, HDD, NFS, a pre-mounted directory, or even a floppy (although this is not the fastest method).
Using a NFS, or any other network installation of Linux, poses a security risk. Although most network installations proceed safely, the system is susceptible to attack during installation because most security measures of the system are not in place. For example, the system may be altered or reconfigured before it is complete. To prevent possible problems, isolate any installation from the network.
Select the CD-ROM method of installation, and the package selection screen appears. Here, you can make selections of large groups of packages, including the most common packages that come with Linux. Select the options that fulfill the needs of the machine and meet the pre-installation plan. The large groups of packages don’t always contain the specific packages that you want. The next screen allows you to select among the other packages in one of several ways, as shown in Figure 5-10.
See the network installation section for more on NFS installations.

Chapter 5 Advanced Installation 141
Figure 5-10: Selecting Optional Packages
You actually have the ability to select every package in the distributions, but this option is seldom used in working environments because it uses a lot of space and does not provide the security that is desired in most environments. Needlessly installing services and applications can open up your system to network activity that may compromise your system, such as FTP or HTTP. The menu grouping selects the packages in a pre-bundled way, as deemed best by the distribution. The expert mode is intended only for advanced installers who can select not only the packages, but also the dependencies for the packages selected. For example, one package often requires another package to be installed in order for it to function correctly. In most expert modes, the system requires that the installer ensure that all dependent services and files are installed in order to install the package and enable it to function properly. Finally, you also have the ability to call a file that has a pre-determined configuration. You can use this ability, for example, to retrieve a configuration of the desired packages from a diskette or other media. In fact, this is an excellent way to install the same packages on several workstations in a large environment, such as a government or corporate office. A Help menu item can provide some assistance in using the package selection menu. After you select any of these options, the installation of the individual packages will proceed. Some choices require interaction from the installer, while others simply start installing all the files to the hard drive.
Finalize the installation
2.16 Install boot loader (e.g., LILO, MBR vs. first sector of boot partition.)
After the installation has completed, the system asks to be configured. If the system isn’t configured, it may not boot; this is not true of all distributions, but most