


Ä |
|
FRAME AND BUMPERS 13 - 5 |
|
(2)Disconnect front park and turn signal lamp wire connector.
(3)Remove front side marker lamp socket from lamp assembly and position socket out of the way.
(4)Remove bolt holding front bumper fascia to wheelhouse splash shield.
(5)Remove nuts holding fascia to front fender.
(6)Support front bumper on lifting device.
(7)Remove bolts holding front bumper reinforcement to energy absorber units.
(8)Separate front bumper from vehicle.
INSTALLATION
Reverse the preceding operation.
Fig. 10 Front BumperÐAP-Vehicle
FRONT BUMPERÐAY-VEHICLE
BUMPER AND FASCIA REMOVALÐAY/P-BODY (FIG. 11)
(1)Remove wheel house splash shields as necessary to gain access to fascia attaching nuts.
(2)Remove lower fascia bottom extension cover.
(3)Remove nuts holding fascia to fender, from behind forward flange of fender.
(4)Support front bumper assembly on suitable lifting device.
(5)Remove nuts holding bumper to energy absorber units.
(6)Separate bumper from vehicle.
INSTALLATION
Reverse the preceding operation. Align bumper height to fit flush to bottom of filler panel.
FRONT BUMPER AND FASCIA REMOVALÐAY/ S-BODY (FIG. 12)
(1)Raise vehicle and support on safety stands.
(2)Remove push-in fasteners holding bumper fascia to front wheel opening lip.
(3)Support bumper on a suitable lifting device.
Fig. 11 Front Bumper and FasciaÐAY/P-Body
(4)Remove nuts holding bumper reinforcement to energy absorbers.
(5)Separate bumper from vehicle.
INSTALLATION
Reverse the preceding operation.
Fig. 12 Front BumperÐAY/S-Body
BUMPER OVERHAULÐAY/S-BODY
(1)Position bumper assembly on a suitable padded work surface to avoid damage to painted fascia.
(2)Remove bolts holding bumper face bar to reinforcement.
(3)Remove push-in fasteners holding fascia to reinforcement.
(4)Separate reinforcement from fascia.
To assemble, reverse the preceding operation.
REAR BUMPERÐAA-VEHICLE
REAR BUMPER AND STANDARD FASCIA REMOVAL (FIG. 13)
(1)Open trunk lid and separate quarter panel liners (if equipped) from tail panel area.
(2)Remove rear fascia attaching nuts at rear of inner quarter panel drop-down wells.
13 - 6 FRAME AND BUMPERS |
|
Ä |
|
(3)Remove lower fascia push-in fasteners holding fascia to bottom of bumper reinforcement.
(4)Remove fascia nuts holding fascia to trunk opening panel.
(5)Remove fascia bolts holding fascia to ends of bumper reinforcement.
(6)Separate fascia from reinforcement and separate fascia from vehicle.
(7)Support bumper reinforcement. Remove reinforcement attaching bolts and separate assembly from energy absorbers.
INSTALLATION
Reverse the preceding operation.
Fig. 13 Standard Rear BumperÐAA-Vehicle
REAR BUMPER AND WRAP-AROUND FASCIA REMOVAL (FIG. 14)
(1)Remove push-in fasteners holding rear fascia to rearward edge of wheel opening.
(2)Open trunk lid and separate quarter panel liner from tail panel area ,if equipped.
(3)Remove pal-nut fasteners located behind quarter panel, holding fascia to quarter panel.
(4)Perform steps 2 through 7 of Rear Bumper and Standard Fascia Removal/Installation procedure.
INSTALLATION
Reverse the preceding operation.
REAR BUMPERÐAC-VEHICLE
REMOVALÐAC/D-BODY (FIG. 15)
(1)Disconnect license plate lamps wire connectors.
(2)Remove nuts holding fascia to quarter panel
ends.
Fig. 14 Wrap-around Rear BumperÐAA-Vehicle
(3)Support bumper assembly on suitable lifting device and remove bolts holding bumper reinforcement to energy absorber units.
(4)Separate bumper from vehicle.
INSTALLATION
Reverse the preceding operation. Align bumper height to fit flush to bottom of tail lamp.
Fig. 15 Rear BumperÐAC/D-Body
REAR BUMPER OVERHAULÐAC/D-BODY (FIG. 16)
(1) Position bumper assembly on a suitable padded work surface to avoid damage to painted fascia.
(3)Remove push-in fasteners holding fascia to bottom of reinforcement.
(4)Remove bolts holding fascia to reinforcement and separate fascia from reinforcement.
(5)Remove bolts holding bumper guards to fascia and separate guards from fascia.
To assemble reverse the preceding operation.

Ä |
|
FRAME AND BUMPERS 13 - 7 |
|
Fig. 16 Rear Bumper OverhaulÐAC/D-Body
REAR BUMPER REMOVALÐAC/C-BODY (FIG. 17)
(1)In luggage compartment, separate liners from quarter panels to gain access to fascia nuts.
(2)Remove nuts holding bumper fascia to quarter panels.
(3)Remove fasteners holding bumper fascia to wheel opening flange.
(4)Disconnect license plate lamp wire connectors.
(5)Remove bolts holding bumper to rear closure panel.
(6)Remove nuts holding bumper to energy absorber units.
(7)Separate bumper from vehicle.
INSTALLATION
Reverse the preceding operation.
Fig. 17 Rear BumperÐAC/C-Body
REAR BUMPERÐAG-VEHICLE
REMOVAL (FIG. 18)
(1)Raise vehicle and support on safety stands.
(2)Remove nuts holding rear fascia to luggage compartment tail panel.
(3)Remove nuts holding fascia ends to quarter panel end flanges.
(4)Remove pop-rivets holding bumper fascia to wheel lip flanges.
(5)Remove nuts holding bumper fascia to quarter panel along belt line.
(6)Support rear bumper assembly on lifting de-
vice.
(7)Remove nuts holding rear bumper reinforcement to energy absorbers.
(8)Separate bumper from vehicle.
INSTALLATION
Reverse the preceding operation.
Fig. 18 Rear Bumper Fascia and
ReinforcementÐAG-Vehicle
REAR BUMPERÐAJ-VEHICLE
REMOVAL (FIG. 19)
(1)Remove nuts holding rear fascia to quarter panel ends.
(2)Remove push-in fasteners holding fascia to bottom of bumper reinforcement.
(3)Remove nuts holding fascia to trunk tail panel.
(4)Remove bolts holding fascia to ends of bumper reinforcement.
(5)Separate fascia from reinforcement and separate fascia from vehicle.
(6)Support bumper reinforcement on a lifting device. Remove bolts holding reinforcement to energy absorbers. Separate reinforcement from energy absorbers.
INSTALLATION
Reverse the preceding operation.

13 - 8 FRAME AND BUMPERS |
|
Ä |
|
Fig. 19 Rear Bumper and FasciaÐAJ-Vehicle
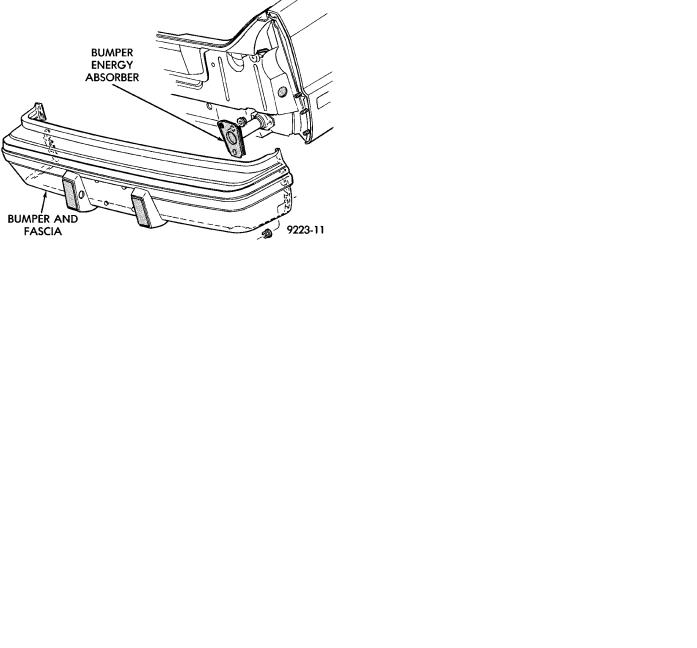
REAR BUMPERÐAP-VEHICLE
REMOVAL (FIG. 20)
(1)Raise vehicle and support on safety stands.
(2)Support rear bumper on lifting device.
(3)Remove bolts holding rear bumper reinforcement to energy absorber units.
(4)Pull rear bumper assembly rearward to disengage retainers from quarter panel.
(5)Separate front bumper from vehicle.
INSTALLATION
Reverse the preceding operation.
Fig. 20 Rear Bumper
REAR BUMPERÐAY-VEHICLE
REAR BUMPER REMOVALÐAY/P-BODY (FIG. 21)
(1) Remove nuts holding fascia to quarter panel ends.
(2)Support bumper assembly on suitable lifting device and remove bolts holding bumper reinforcement to energy absorber units.
(3)Separate bumper from vehicle.
INSTALLATION
Reverse the preceding operation. Align bumper height to fit flush to bottom of tail lamp.
REAR BUMPER OVERHAULÐAY/P-BODY
(1)Position bumper assembly on a suitable padded work surface to avoid damage to painted fascia.
(2)Remove bolts holding bumper face bar to reinforcement and separate face bar from assembly.
(3)Remove push-in fasteners holding fascia to reinforcement.
(4)Remove upper reinforcement to fascia attaching bolts and separate reinforcement from fascia.
To assemble, reverse the preceding operation.
Fig. 21 Rear BumperÐAY/P-Body
REAR BUMPER REMOVALÐAY/S-BODY (FIG. 22)
(1) In luggage compartment, separate liners from quarter panels to gain access to fascia nuts.
Fig. 22 Rear BumperÐAC/S-Body