

Pavel Tsatsouline - Bullet Proof Abs (2nd Ed)
.pdfHOW TO TRULY ISOLATE YOUR ABS—FOR FASTER, MORE EFFECTIVE RESULTS
Before accepting the solution, you must understand the problem.
The abdominals (rectus abdominis) connect your pubic bone to your breast bone. When this muscle contracts, it pulls your pelvis and rib cage together, rounding your back in the process, as in a crunch. This is called 'forward spinal flexion'. (Fig. 1)
Fig. 1
Psoas major originates on the vertebrae of the lower back, and inserts into the top of the thigh bone. When this muscle contracts, it pulls the body into a jackknife position. When you do a situp, you literally pull yourself up by your lumbar spine, or lower back (Fig. 2)—which can lead to back problems or aggravate the existing ones.
Fig. 2
Don’t strain your lower back!
11
HOW TO TRULY ISOLATE YOUR ABS—FOR FASTER, MORE EFFECTIVE RESULTS
A common so called 'solution' is to avoid hip flexion, or situps, and do only spinal flexion, or crunches. A number of gizmos were designed to capitalize on the public obsession with crunches. All of them were supposed to make crunches stricter. The Ab Isolator immobilized the hip joint; the AbFlex increased the recruitment of the abdominals during the crunch by providing direct pressure on the muscles; the AbRoller tracked the crunch mechanically.
There are two problems with these products. First, they are gimmicks. According to John Jakicic, Ph.D., an exercise physiologist and assistant professor at the University of Pittsburgh School of Medicine, these devices "offer no physiological advantage over doing crunches with good form."
The second problem is the crunch itself. Contrary to the popular opinion, the crunch does NOT isolate the abs. Ditto for any crunch
based device. Because the crunch does not involve hip flexion, it supposedly does not involve the psoas group and stress the lower back. Wrong.
Well known physical therapists Kendall, Kendall, and Wadsworth determined that it is impossible to completely eliminate the hip flexor
recruitment during a crunch. One of the fundamental laws of physiology, the Law of Irradiation, dictates that the contraction of a muscle, the abdominals in this case, will set off a contraction of the adjacent muscles, or the hip flexors. Like a stone dropped in the water sends ripples across the surface, tension spreads—irradiates—from the muscle directly responsible for the job at hand towards its neighbors. To test this phenomenon, make a white knuckle fist. Your biceps will tense up, although there is no movement in the elbow joint!
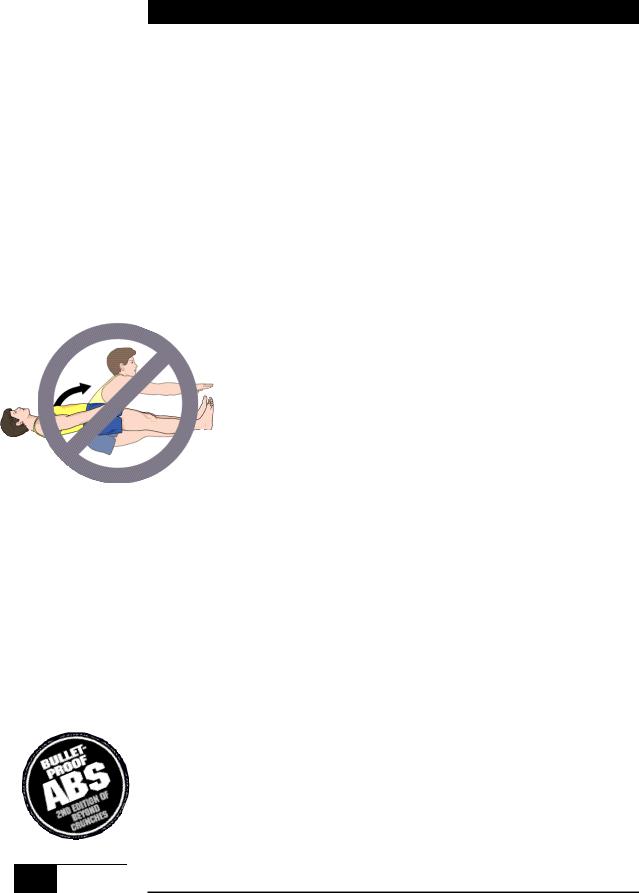
According to John Scaringe, D.C., the president of the American Chiropractic Board of Sports Physicians, a person with weak abdominals relies on his or her stronger hip flexors even during crunches. The trainee cannot get his torso off the floor by rounding his back with his abs, so he yanks on his spine with his hip flexors to gain momentum! (Fig. 3) It does not take an Einstein to figure out that such training is worthless for the abs and dangerous to the spine.
12
HOW TO TRULY ISOLATE YOUR ABS—FOR FASTER, MORE EFFECTIVE RESULTS
Fig. 3
The problem of the hip flexor involvement was radically solved by |
|
Vladimir Janda, M.D., from Czechoslovakia, the consultant on |
Bad |
rehabilitation for the World Health Organization and the world's |
Form! |
leading expert on back problems, muscle function analysis and eval- |
|
uation. |
|
Professor Janda relaxed the psoas group using another neurological phenomenon: the Law of Reciprocal Inhibition. When a muscle contracts, its antagonist, or the opposite number, relaxes. It is about efficiency. The alternative would be similar to stepping on the gas and the brake simultaneously.
Dr. Janda had his patient assume the standard bent knee situp/crunch position and placed his hands under the latter’s calves. The patient attempted to sit up while steadily pushing against the doctor's hands. This activated the knee flexor and hip extensor muscles (the hamstrings and glutes). Reciprocal inhibition took place and the hip flexors relaxed. The result: back stress was eliminated and the abdominals were isolated! (Fig. 4)
13
HOW TO TRULY ISOLATE YOUR ABS—FOR FASTER, MORE EFFECTIVE RESULTS
Fig. 4
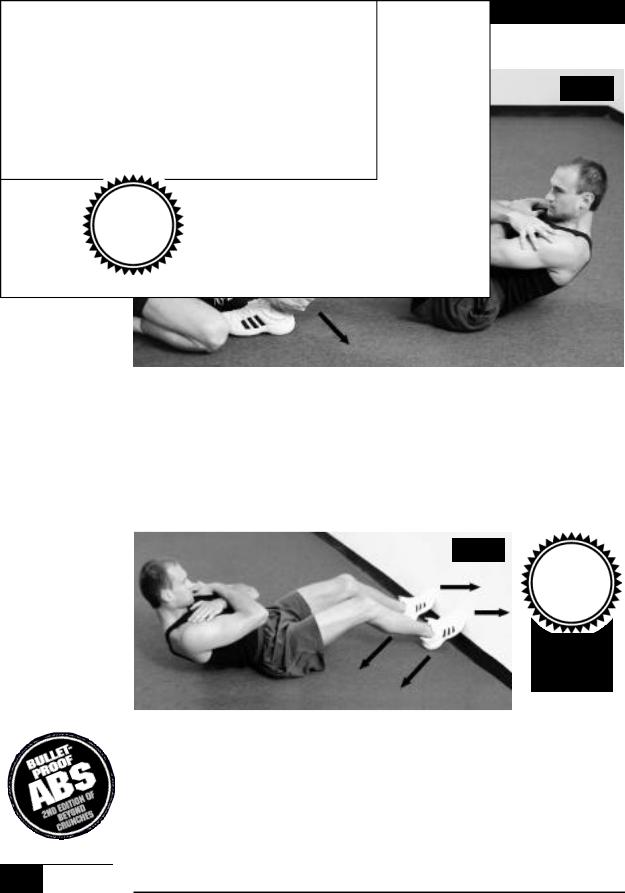
Until recently the Janda situp could not be performed without a training partner. Although the professor recommended pressing into the wall with the toes and simultaneously down into floor (Fig. 5), it does not work. It is very tempting to leg press the wall instead of pulling down. This is exactly what a trainee will do when he gets tired. Then the contraction of the quads engages the hip flexors next door, thanks to the good ol' Law of Irradiation.
Fig. 5
Not reliable!
14
HOW TO TRULY ISOLATE YOUR ABS—FOR FASTER, MORE EFFECTIVE RESULTS
Pushing through the floor with one's heels or feet, as in ‘the crunch with active prepositioning’, proposed by chiropractors Jerry Hyman and Craig Liebenson, is also ineffective because of poor leverage. The muscular tension—and training effect—is minimal (Fig. 6A, 6B). Ditto for crunches with your paws up on a bench.
Fig. 6A
No leverage!
Fig. 6B
Weak!
15
HOW TO TRULY ISOLATE YOUR ABS—FOR FASTER, MORE EFFECTIVE RESULTS
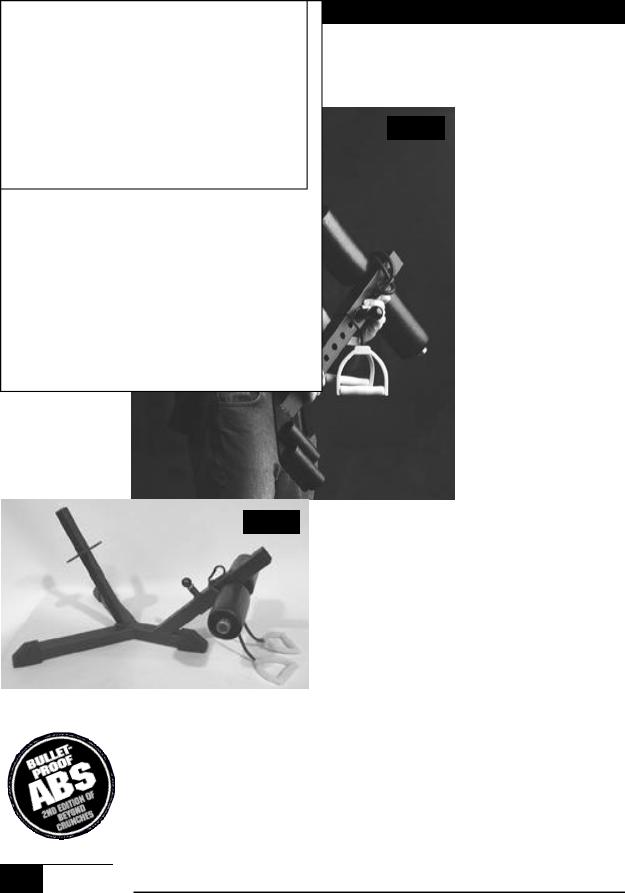
The Ab Pavelizer™
Enter the Ab
Fig. 7 Pavelizer™. This new product allows the performance of the Janda situp without a training partner (Fig. 7). In fact, it is more comfortable because the trainee regulates the pressure, rather than the training partner.
This portable new device fits under a door and provides comfortable padded rollers to push against with the back of your legs while doing Janda situps. It comes with is a bungee cord
Fig. 7A with handles to assist the individuals who are too weak to perform the exercise—which means most people!
When I challenged the audience at a recent Arnold’s Seminar to do five strict Janda situps, a husky bodybuilder who came onstage barely managed two reps! I repeated the challenge when I returned to my booth at Arnold Schwarzenegger
Fitness Expo. I even went as far as promising to print the names of the tough cookies who managed a fiver on the Ab Pavelizer™ in my column in a bodybuilding magazine. Many world class bodybuilders, powerlifters, and martial artists tried—and only a handful earned the fame!
16

HOW TO TRULY ISOLATE YOUR ABS—FOR FASTER, MORE EFFECTIVE RESULTS
According to Joseph Horrigan, D.C., of the Soft Tissue Center in Los Angeles, two or three Janda situps are considered to be 'good'. When you do a set of Janda situps to the limit, the high level of difficulty and the extreme isolation of the abs are obvious.
After performing a Janda, then immediately hook your feet under a couch and do a standard situp. You will find that you can do many—easily. Doing Ab Pavelizer™ situps back to back with crunches—with or without any flaky crunch gizmo—is also a revelation. The tension you feel in the abs is clearly superior with the new machine. The crunch belongs on the junk pile of history next to communism! The movement is just too subtle to generate high tension in the target muscles.
If you do not have an Ab Pavelizer™ yet, call (800) 899-5111 to get it, and let’s start rocking!
How do I use my Ab Pavelizer™?
Open a door and slide the device underneath. You may want to place a towel between the door and your Ab Pavelizer™ to protect the former from being damaged by the industrial steel machine. No cheap imported plastic here, Comrade! There is enough metal in an Ab Pavelizer™ to forge an RPK, or a Kalashnikov machine gun!
Shut the door—and make sure that no one tries to open it! Lie on the floor, the way you used to for crunches, and place your calves atop the roller pads. Do not wear pants made of slippery fabric like nylon or your calves will slide off the roller pads (Fig. 8). You may also end up dragging your butt toward the machine.
17

HOW TO TRULY ISOLATE YOUR ABS—FOR FASTER, MORE EFFECTIVE RESULTS
Fig. 8 Begin
Your knees should be at the ninety-degree angle—square at the corner —and the pads should hit you about half way between your ankles and your knees. Adjust them accordingly.
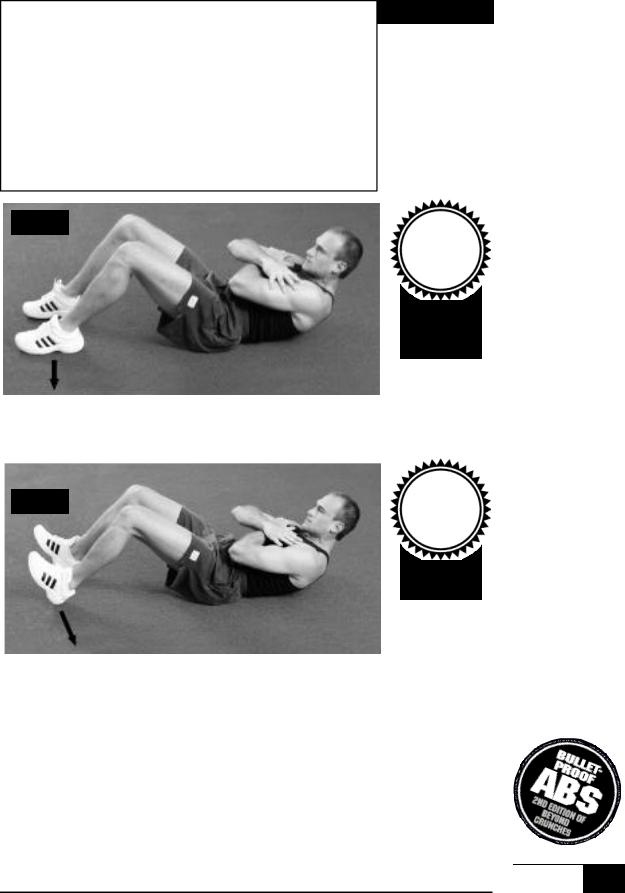
Ab Pavelizer™ situps are difficult and your best bet is to start by doing ‘negatives’, or only the lowering half of the drill. Sit upright with your knees at a ninety-degree angle, your calves touching the pads, and your feet flat on the floor (Fig. 9).
Fig. 9 High Point
Keep feet flat on the floor!
18
HOW TO TRULY ISOLATE YOUR ABS—FOR FASTER, MORE EFFECTIVE RESULTS
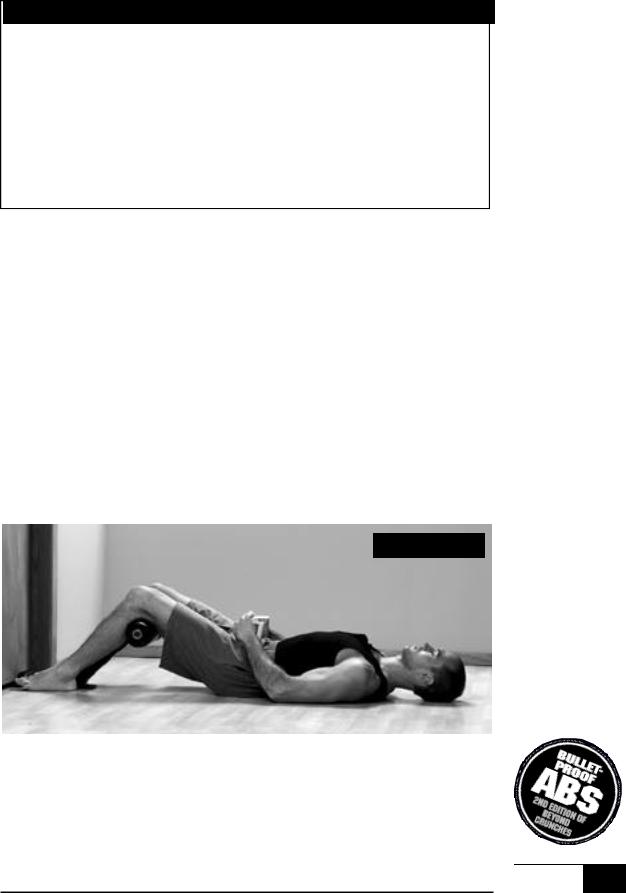
Keep your arms nearly straight and your hands on the floor by your sides. Take a normal breath, squeeze your butt as hard as you can, and slowly lower yourself to the ground WHILE MAINTAINING THE TENSION IN THE GLUTES, keeping your feet down and exerting pressure against the roller pads—as if you are pawing the ground. Initially you may have trouble keeping your feet down. It will pass.
Descend slowly, especially during the last couple of inches above the ground. You will only be able to do so if your keep your glutes tight! Take three to four seconds to get all the way down. Keep your chin tucked in until your shoulders touch the floor. Stay tight until your head reaches the floor.
In the beginning it is a good idea to hold on to the bungee cord for extra assistance; Ab Pavelizer™ situps are a lot more challenging than they look! We have installed a bungee cord rather than some solid object to hold on to because a rubber band gives you immediate feedback on the amount of help you are getting. The more assistance you need, the closer to the device you should grab the cords. Hold your breath when you are in motion—unless your doctor told you otherwise (Fig. 10). In this and other drills where holding the breath is recommended, it is OK to take a mini breath of air here and there as long as it is barely noticeable and the abs stay tight.
Fig. 10 Finish
19

HOW TO TRULY ISOLATE YOUR ABS—FOR FASTER, MORE EFFECTIVE RESULTS
Once you have reached the bottom, rest your head on the floor and totally relax for a few seconds. Get up in any comfortable manner that is not hard on your body, for example rolling off to the side or helping with your arms. Do three to five sets of three to five reps with three to five minutes of rest in between. 3-5, it’s easy to remember!
You can Pavelize your abs daily, but you will also get good results from every other day training. Once you can easily do 5x5 (five sets of five reps), bend your elbows and hold your fists by your face like a boxer. The next stage is holding your arms straight over your head. Once this stage is mastered, it is time to do the full drill, down and up!
After the first negative, relax, then take a normal breath, squeeze your glutes, and SLOWLY get up while keeping your glutes flexed and your feet flat. Once you have reached the upright position, exhale and relax. Feel free to rest for a couple of seconds, then inhale and perform the negative as described earlier.
It should take you three to four seconds to get up. It is not just a safety measure. You cannot have a high level of muscular tension if you move fast; therefore you will not gain much strength or muscle tone. It is much better to move slowly through the full range of the exercise with the humbling assistance of the bungee cord than to mindlessly knock off quick reps!
As before, start with the easiest version of the Ab Pavelizer™ situp, with your arms by your sides, and even holding on to the bungee cord, eventually work up to the ‘boxer’ position, and then the arms overhead position. One option is
to lower yourself in a more challenging position than the one you used for getting up.
If even the most challenging position becomes easy, hold a light barbell plate or something like a soup can in your straight arms. Even if you are a stud, don’t scoff at the soup can; it may take you a long time to work up to it!
20