

Beginning Visual C++ 2005 (2006) [eng]-2
.pdfApplications Using Windows Forms
property for the upperValuesLimit control to 49; this is the value displayed initially in the control. If you also set the ReadOnly property value for each of the NumericUpDown controls to True, this prevents the entry of a value from the keyboard. You are using the NumericUpDown control very simply here. You can change the up down increment by setting the Increment property value. The Increment property is of type Decimal so you can set this to non-integral values, too.
Figure 21-25
You can set the values of the (Name) property for the ComboBox controls in the lower group box to lowerStarsLimits and upperStarsLimits. You can enter values to be displayed in a ComboBox quite easily. Click the small arrow at the top right of the leftmost ComboBox control to display the menu shown in Figure 21-26.
Figure 21-26
1069
Chapter 21
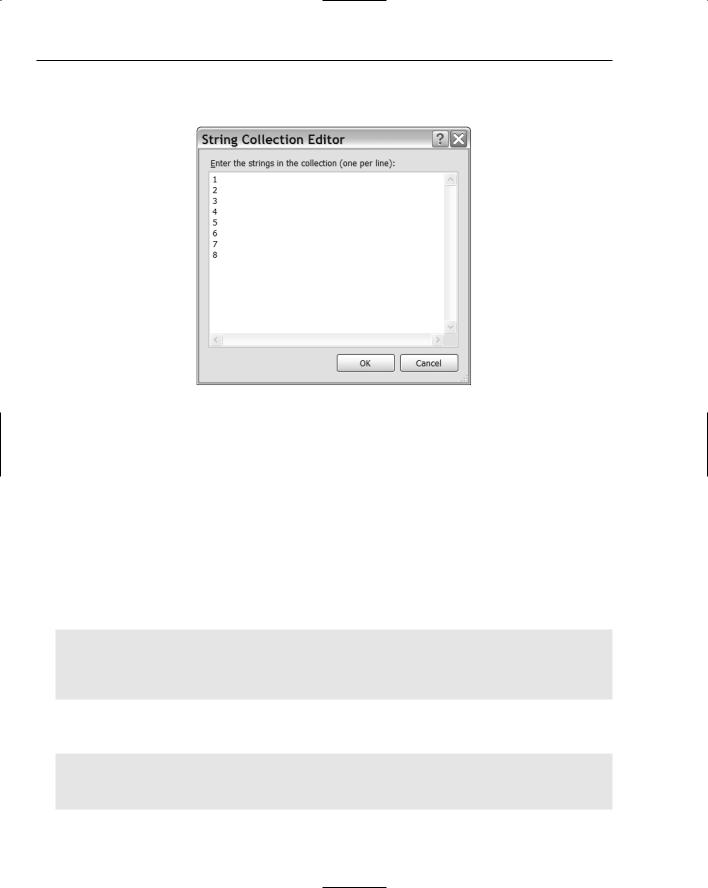
Select the Edit Items menu item at the bottom of the menu to display the dialog window for the
String Collection Editor shown in Figure 21-27.
Figure 21-27
Figure 21-27 shows the values entered for the ComboBox control on the left. For the ComboBox control on the right you can enter the values from 2 to 9 inclusive.
The ComboBox is not ideal for this application because it allows text input as well as selection from a list; you want to have a limit value selected only from the list. The control gets its name, ComboBox, because it combines the function of a ListBox control that allows selection from a list with that of a TextBox control that provides for text input.
Getting the Data from the Dialog Controls
You’ll get the limit values back from the controls in essentially the same way as you did for the dialog box for Lotto limits. You can add some new data members to the EuroLimitsDialog class to hold the user limit values first:
private:
int lowerValuesLimit; int upperValuesLimit; int lowerStarsLimit; int upperStarsLimit;
To be on the safe side you had better initialize these members in the class constructor:
EuroLimitsDialog(void)
:lowerValuesLimit(1)
,upperValuesLimit(50)
,lowerStarsLimit(1)
,upperStarsLimit(9)
{
1070

Applications Using Windows Forms
InitializeComponent();
//
//TODO: Add the constructor code here
//
}
You’ll also need some public properties defined in the dialog class to make the limits accessible from the application window object:
public: |
|
property int LowerValuesLimit |
|
{ |
|
int get() { return lowerValuesLimit; |
} |
void set(int limit) |
|
{ |
|
lowerValuesLimit = limit; |
|
lowerValuesLimits->Value = limit; |
// Set as selected in NumericUpDown |
} |
|
} |
|
property int UpperValuesLimit |
|
{ |
|
int get() { return upperValuesLimit; |
} |
void set(int limit) |
|
{ |
|
upperValuesLimit = limit; |
|
upperValuesLimits->Value = limit; |
// Set as selected in NumericUpDown |
} |
|
} |
|
property int LowerStarsLimit |
|
{ |
|
int get() { return lowerStarsLimit; |
} |
void set(int limit)
{
lowerStarsLimit = limit;
lowerStarsLimits->SelectedItem = limit; // Set as selected in ComboBox lowerStarsLimits->SelectedIndex = // Set index for selected item
lowerStarsLimits->FindString(limit.ToString());
}
}
property int UpperStarsLimit
{
int get() { return upperStarsLimit; }
void set(int limit)
{
upperStarsLimit = limit;
upperStarsLimits->SelectedItem = limit; // Set as selected in ComboBox upperStarsLimits->SelectedIndex = // Set index for selected item
upperStarsLimits->FindString(limit.ToString());
}
}
1071

Chapter 21
The get() function for each property returns the value of the corresponding private member of the dialog class. The set() function sets the value of the data member and also updates the control in the dialog box so that the value set becomes the selected value. The SelectedIndex property value is the index to the selected item. You set this using the FindString() function for the ComboBox control that returns the index value for the first occurrence of the argument in the control’s collection of items. The value at this position is displayed initially in the control.
Add a Click event handler for the OK button in the EuroLimitsDialog class by double-clicking the button in the Design window. You won’t need to implement a handler for the Cancel button. You can implement the OK button handler like this:
System::Void euroOK_Click(System::Object^ sender, System::EventArgs^ e)
{
::DialogResult result;
// get the limits for values
int valuesLower = Decimal::ToInt32(lowerValuesLimits->Value); int valuesUpper = Decimal::ToInt32(upperValuesLimits->Value);
if(valuesUpper - valuesLower < 4) // Check for an adequate range
{
result = MessageBox::Show(this, |
// |
Range insufficient so |
“Upper values limit: “+valuesUpper + |
// |
display message box |
“Lower values limit: “+ valuesLower+
“\nUpper values limit must be at least 4 greater that the lower limit.”+ “\nTry Again.”,
“Limits Invalid”, MessageBoxButtons::OKCancel, MessageBoxIcon::Error);
if(result == ::DialogResult::OK) |
// If message box OK clicked |
DialogResult = ::DialogResult::None; |
// prevent dialog from closing |
else |
// Messag box Cancel clicked |
DialogResult = ::DialogResult::Cancel; |
// so close the dialog |
return; |
|
}
// Get stars limits
int starsLower = lowerStarsLimits->SelectedItem == nullptr ? lowerStarsLimit : Int32::Parse(lowerStarsLimits->SelectedItem->ToString());
int starsUpper = upperStarsLimits->SelectedItem == nullptr ? upperStarsLimit : Int32::Parse(upperStarsLimits->SelectedItem->ToString());
if(starsUpper - starsLower < 1) |
// Check for an adequate range |
{ |
|
result = MessageBox::Show(this, |
// Range insufficient so |
“Upper stars limit: “+starsUpper + |
// so display message box |
“Lower stars limit: “+ starsLower+
“\nUpper stars limit must be at least 1 greater that the lower limit.”+ “\nTry Again.”,
“Limits Invalid”,
1072

Applications Using Windows Forms
MessageBoxButtons::OKCancel, |
|
MessageBoxIcon::Error); |
|
if(result == ::DialogResult::OK) |
// If message box OK clicked |
DialogResult = ::DialogResult::None; |
// prevent dialog from closing |
else |
// Message box Cancel clicked |
DialogResult = ::DialogResult::Cancel; |
// so close the dialog |
} |
|
// Store the new limits |
|
lowerValuesLimit = valuesLower; |
|
upperValuesLimit = valuesUpper; |
|
lowerStarsLimit = starsLower; |
|
upperStarsLimit = starsUpper; |
|
}
The Value property for a NumericUpDown control returns a value of type Decimal. To convert this to type Int32 you pass it as the argument to the static ToInt32() function in the Decimal class. The value that this function returns is automatically unboxed so that it can be stored in the variable of type int.
The value returned by the SelectedItem property for a ComboBox control is of type Object^, so to be on the safe side you check whether it is null. If it is null, you set the local variable to the current value recorded in the dialog object; if it isn’t null, you store the value represented by the SelectedItem property. You can’t store the value directly, but calling the ToString() function for the object produces a string representation of the object that you are then able to convert to type int using the static Parse() function in the Int32 class.
You will need a private member of the Form1 class that stores a handle to the new dialog box:
private:
EuroLimitsDialog^ euroLimitsDialog; // Dialog to set Euromillions limits
You can add the following statements to the end of the code in the Form1 class constructor to create the dialog object and update the properties for the stars limit values:
euroLimitsDialog = gcnew EuroLimitsDialog; euroLimitsDialog->LowerStarsLimit = euroStarsLowerLimit; euroLimitsDialog->UpperStarsLimit = euroStarsUpperLimit;
By setting the LowerStarsLimit and UpperStarsLimit properties for the dialog object, you ensure that the ComboBox controls show these values when the dialog box is initially displayed. If there is no selected item set for a ComboBox control, it displays nothing initially.
Don’t forget to add the #include directive for the EuroLimitsDialog class definition to Form1.h:
#include “EuroLimitsDialog.h”
Disabling Input Controls
When the Limits > Upper menu item is clicked, you want to prevent the input for a lower limit being entered, and when the Limits > Lower menu item is selected, you want to prevent input for an upper limit value. You can add a couple of member functions to the EuroLimitsDialog class to make this possible:
1073

Chapter 21
public:
//Disables controls for selecting upper limits void SetLowerEnabled(void)
{
upperValuesLimits->Enabled = false; upperStarsLimits->Enabled = false; lowerValuesLimits->Enabled = true; lowerStarsLimits->Enabled = true;
}
//Disables controls for selecting lower limits void SetUpperEnabled(void)
{
upperValuesLimits->Enabled = true; upperStarsLimits->Enabled = true; lowerValuesLimits->Enabled = false; lowerStarsLimits->Enabled = false;
}
The value of the Enabled property for a control determines whether it is enabled. A true value enables the control, and a value of false disables it so the user cannot interact with it. The SetLowerEnabled() function disables the controls used to enter upper limits and enables those for entry of lower limits. The SetUpperEnabled() function does the reverse.
Updating the Limits Menu Item Handlers
The last step to complete the support for entering limits for the Euromillions lottery is to update the Click event handlers in the Form1 class for the items in the Limits menu. The handler for the Upper menu item should be modified as follows:
System::Void upperMenuItem_Click(System::Object^ sender, System::EventArgs^ e)
{
::DialogResult result; if(lottoTab->Visible)
{
lottoLimitsDialog->SetUpperEnabled();
result = lottoLimitsDialog->ShowDialog(this); if(result == ::DialogResult::OK)
{
lottoUserMaximum = lottoLimitsDialog->UpperLimit; lottoUserMinimum = lottoLimitsDialog->LowerLimit;
}
}
else if(euroTab->Visible)
{
euroLimitsDialog->SetUpperEnabled();
result = euroLimitsDialog->ShowDialog(this); if(result == ::DialogResult::OK)
{
euroUserMaximum = euroLimitsDialog->UpperValuesLimit; euroUserMinimum = euroLimitsDialog->LowerValuesLimit; euroStarsUserMaximum = euroLimitsDialog->UpperStarsLimit;
1074

Applications Using Windows Forms
euroStarsUserMinimum = euroLimitsDialog->LowerStarsLimit;
}
}
}
The local variable result is used in both if statements, so it is now declared at the beginning of the function. After enabling the controls in the dialog box appropriately by calling the SetUpperEnabled() function for the dialog object, you display the dialog box as modal. If the user closes the dialog box by clicking the OK button, you store the results available through the properties of the dialog object.
The changes to the handler for the Click event for the Lower menu item are very similar:
System::Void lowerMenuItem_Click(System::Object^ sender, System::EventArgs^ e)
{
::DialogResult result; if(lottoTab->Visible)
{
lottoLimitsDialog->SetLowerEnabled();
result = lottoLimitsDialog->ShowDialog(this); if(result == ::DialogResult::OK)
{
lottoUserMaximum = lottoLimitsDialog->UpperLimit; lottoUserMinimum = lottoLimitsDialog->LowerLimit;
}
}
else if(euroTab->Visible)
{
euroLimitsDialog->SetLowerEnabled();
result = euroLimitsDialog->ShowDialog(this); if(result == ::DialogResult::OK)
{
euroUserMaximum = euroLimitsDialog->UpperValuesLimit; euroUserMinimum = euroLimitsDialog->LowerValuesLimit; euroStarsUserMaximum = euroLimitsDialog->UpperStarsLimit; euroStarsUserMinimum = euroLimitsDialog->LowerStarsLimit;
}
}
}
The logic here is the same as in the previous handler function.
Implementing the Help | About Menu Item
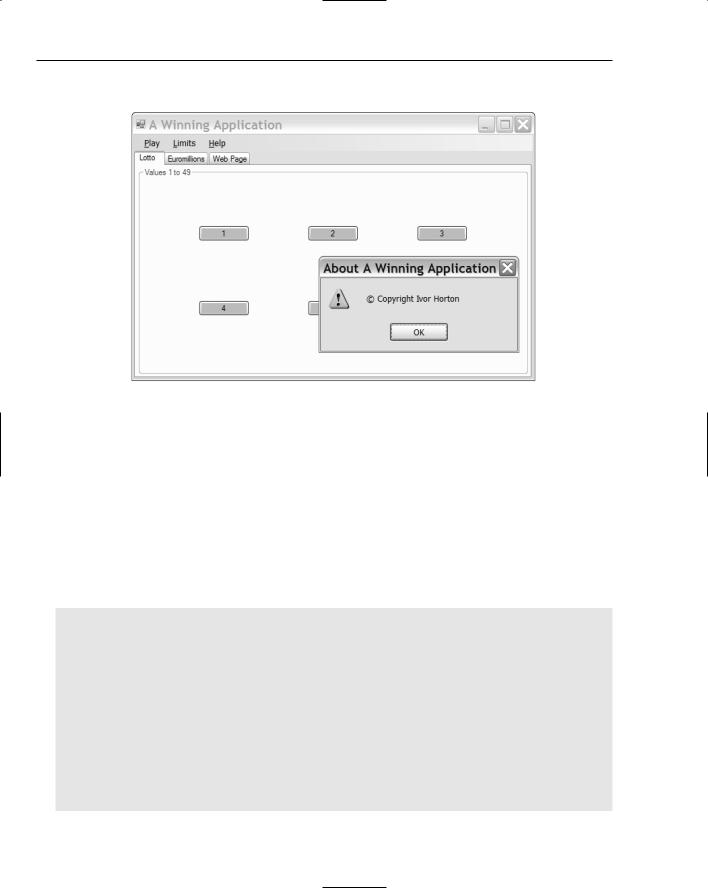
This is easy now that you know about the MessageBox class. You can just show a message box when the Help > About menu item is clicked:
System::Void aboutToolStripMenuItem_Click(System::Object^ sender, System::EventArgs^ e)
{
MessageBox::Show(L”(c) Copyright Ivor Horton”, L”About A Winning Application”,
MessageBoxButtons::OK, MessageBoxIcon::Exclamation);
}
1075
Chapter 21
When the the menu item is clicked, the handler function displays the message box shown in Figure 21-28.
Figure 21-28
Handling a Button Click
Clicking a button should change the value on the button to a new random value. Of course, the value must be different from values on the other buttons as well as being different from the value for the button that was clicked. It would be a good idea to present the whole set in sorted order; this may result in the new value being on a different button, but that’s likely to be better that not having the values in sequence.
The process for handling a button click is going to be the same for all the buttons, so you’ll be able to economize on code by creating a generalized function to do the work. You can define a private function member of the Form1 class that generates a new value for a given Button object from an array of buttons:
// Generates a new value for button different from current button values void SetNewValue(Button^ button, array<Button^>^ buttons,
int lowerLimit, int upperLimit)
{
int index = 0; |
// Index of button in buttons |
// Array to store button values
array<int>^ values = gcnew array<int>(buttons->Length);
// Get values from buttons and find index for button for(int i = 0 ; i < values->Length ; i++)
{
values[i] = Int32::Parse(buttons[i]->Text); // Get current button value
// If current handle is same as button, save the index value
1076
|
|
Applications Using Windows Forms |
|
|
|
|
|
|
|
|
|
|
if(button == buttons[i]) |
|
|
|
index = i; |
|
|
|
} |
|
|
|
int newValue = 0; |
// Store the new button value |
|
|
// Check if it is different from the other button values |
||
|
for(;;) |
// Loop until we get a good one |
|
|
{ |
|
|
|
newValue = random->Next(lowerLimit, upperLimit); // Generate a value |
||
|
if(IsValid(newValue, values, values->Length)) |
// If it’s OK... |
|
|
break; |
|
// ...end the loop |
|
} |
|
|
|
values[index] = newValue; |
// Store the new value at index |
|
|
Array::Sort(values); |
|
// Sort the value |
|
for(int i = 0 ; i < values->Length ; i++) |
// and set the values |
|
|
buttons[i]->Text = values[i].ToString(); |
// as text on the buttons |
|
|
} |
|
|
|
|
|
|
The first two function parameters are the button that is to have a new number and the array of buttons in the group to which the first button belongs. The next two parameters specify the lower and upper limits for the values. The current values of the buttons in the array are stored in the values array in the first loop. This loop also finds the index value in the buttons array for the Button^ handle that is the first argument. You need this so you know which element of the values array is to be replaced by a new value.
The new value is created in the indefinite for loop. This is the same mechanism that you used to
create the values for the button in the first instance. After you have a valid new value, you store it in the values array. You then sort the elements in the values array before storing them as the values for the Text properties for the buttons in the buttons array. You’ll be able to use this function for dealing with the Click events for all of the buttons.
If you have not already done so, double-click the first button on the Lotto tab to generate a Click event handler function for it. You can edit the name of the handler function by opening the Properties tab for the button, selecting the Events button, and changing the value for the Click event. When you press Enter, the code is updated with the new name. I changed the value to lottoValue_Click.
You can amend the Click event handler to call the SetNewValue() function you have just added to the Form1 class:
System::Void lottoValue_Click(System::Object^ sender, System::EventArgs^ e)
{
Button^ button = safe_cast<Button^>(sender);
// Create the array of button handles
array<Button^>^ buttons = {lottoValue1, lottoValue2, lottoValue3,
lottoValue4, lottoValue5, lottoValue6};
// Replace the value on button
SetNewValue(button, buttons, lottoUserMinimum, lottoUserMaximum);
}
1077
Chapter 21
The availability of the SetNewValue() function makes this handler function very simple. The first statement stores the handle to the button that was clicked. The first parameter to the event handler is a handle to the object that originated the event, so all that’s necessary is to cast it to the appropriate type. You then just assemble the handles for the buttons in an array and call the new function — job done!
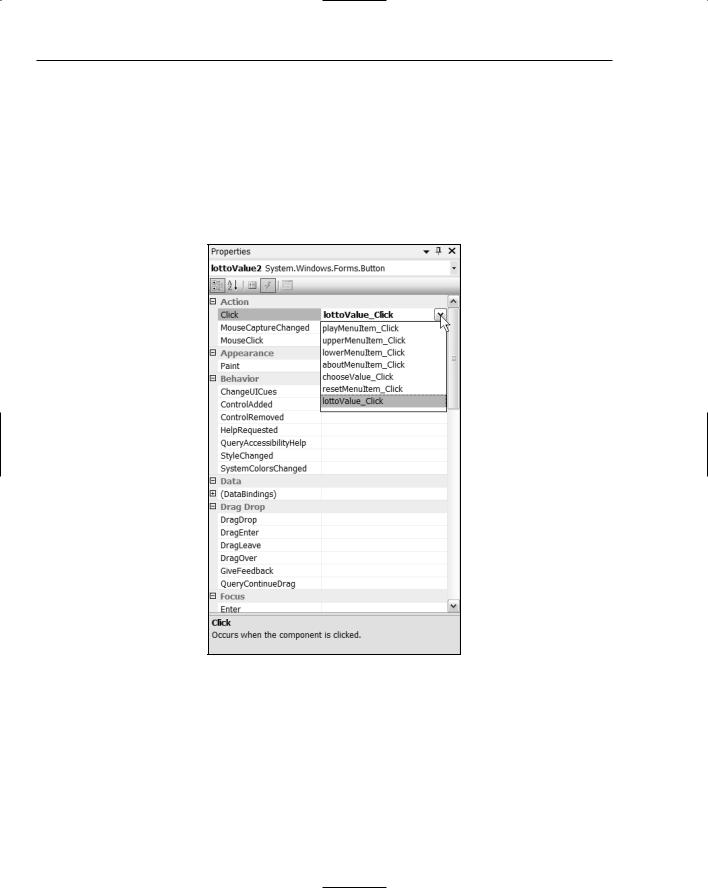
You still have to deal with the Click event for the other buttons on the Lotto tab, but this doesn’t require any more code. Open the Properties window for the second button and then click the Events button. If you click the Click event value, you’ll see a list of the existing event handlers as shown in Figure 21-29; if you select lottoValue_Click from the list, the event handler for the first button will be registered as the event handler for the second button, too.
Figure 21-29
You can repeat the process for the remaining four buttons on the Lotto tab so that the one event handler is called in response to the Click event for any of the buttons on the Lotto tab.
The Click event handlers for the buttons on the Euromillions tab are going to be very easy. Double-click the first of the five buttons in the Values group to create the event handler. Open the Properties window for the button and change the value for the Click event to euroValue_Click. You can then modify the code for the handler like this:
1078