Добавил:
Опубликованный материал нарушает ваши авторские права? Сообщите нам.
Вуз: Предмет: Файл:

Beginning Visual C++ 2005 (2006) [eng]-2

.pdf
Скачиваний:
74
Добавлен:
16.08.2013
Размер:
18.66 Mб
Скачать

22

Accessing Data Sources in a

Windows Forms Application

In this chapter, you’ll investigate how you can develop form-based applications that will display data from a variety of sources and specifically how you can create form-based programs to access an existing database. In this chapter, you will learn about:

What kind of classes are involved in encapsulating a data source

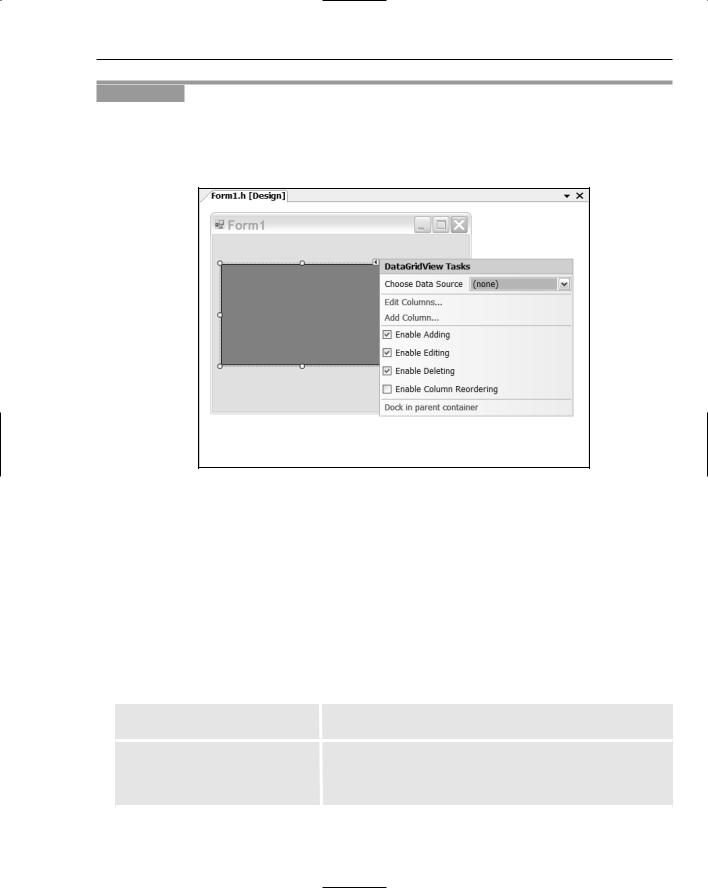
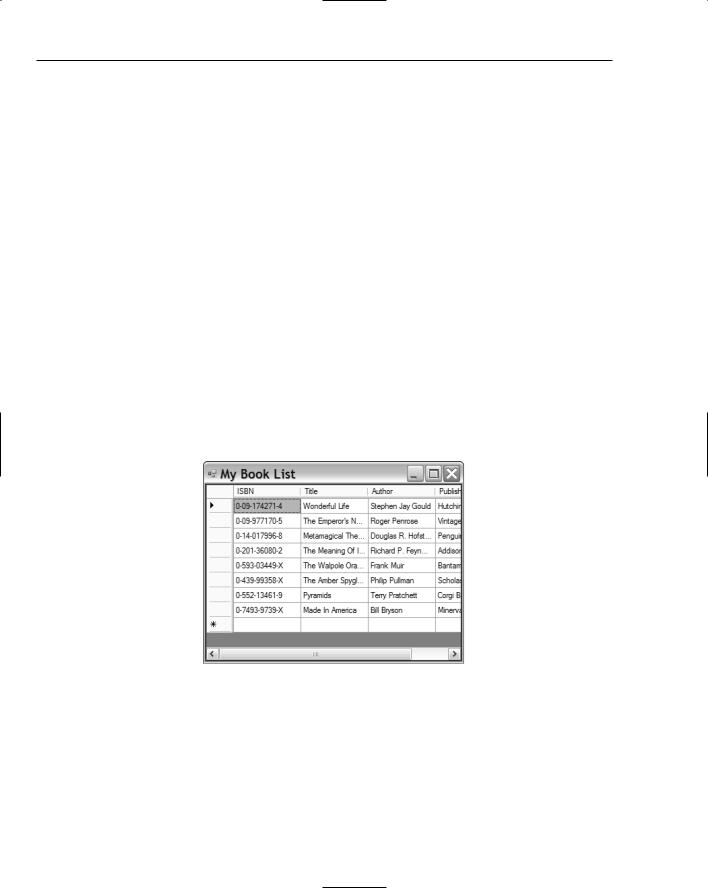
How you can use the DataGridView control to display your own data

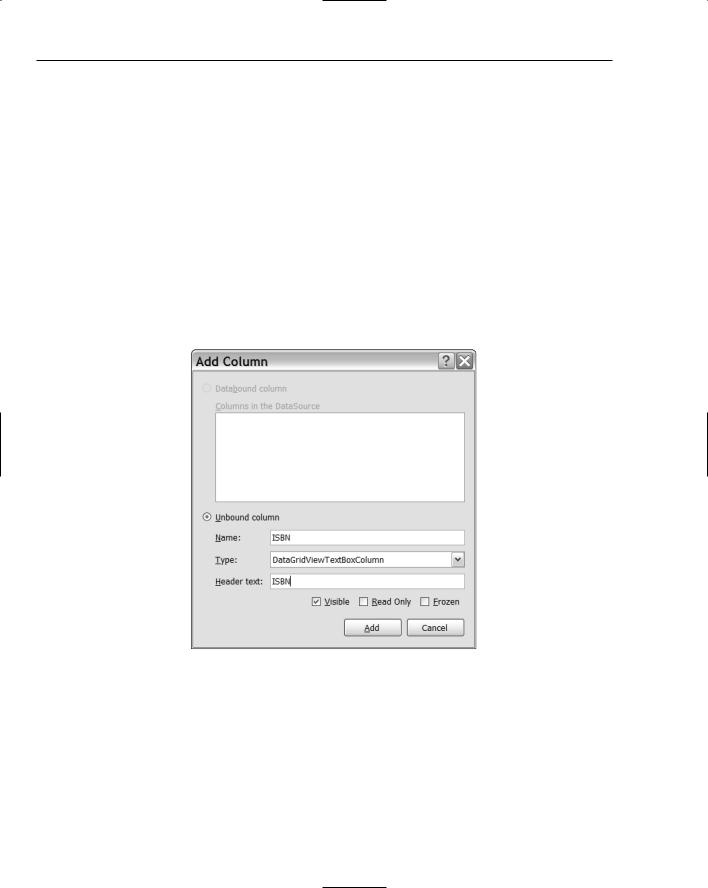
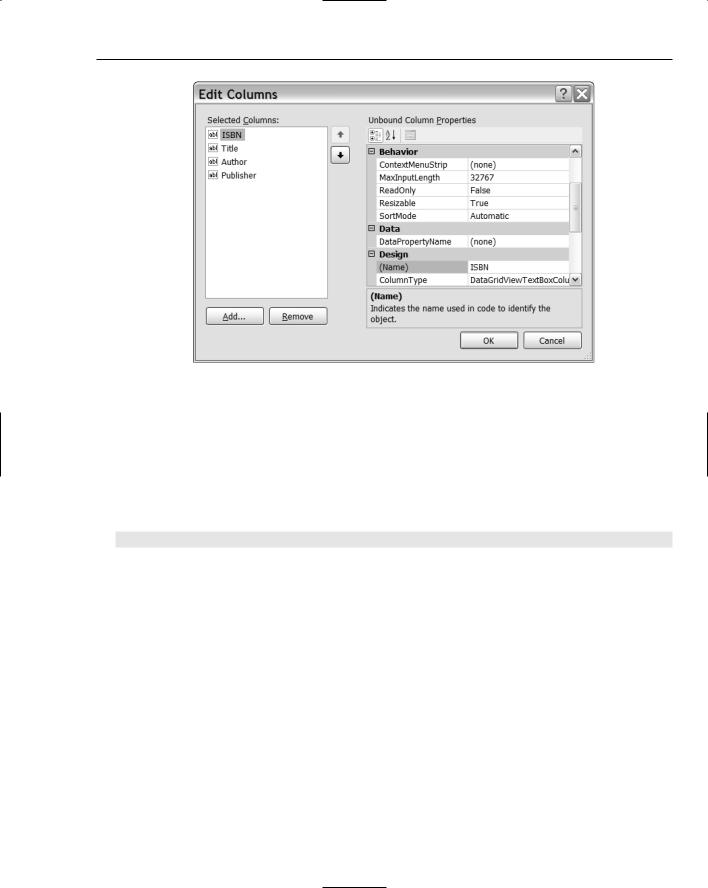
How you can customize the appearance of a DataGridView control

What the function of the BindingSource component is and how you use it with a

DataGridView control

How you use a BindingNavigator control to navigate data from a source managed by a BindingSource control

How you expedite updating of a database using a BindingNavigator control and a

BindingSource component

Visual C++ 2005 provides a high degree of automation for creating Forms-based applications that access data sources but you will start by ignoring the automation and get a feel for how you can work with components programmatically. With this approach, you’ll not only get a good insight into how things work; you’ll also appreciate how much the automation is doing for you.

Working with Data Sources

A data source is any source of data for your application; relational databases, Web services that access data, and objects can all be data sources. When you are developing an application that will work with an existing data source, you will usually need to identify the data source within your project. You’ll do this through the Data Sources window that is displayed when you select Data > Show Data Sources item from the main menu or when you press Shift+Alt+D.

Chapter 22

A data source is represented by a class object, so inevitably adding a data source to your project adds definitions for a number of classes. Take a brief look at what they are.

Data Source

A data source is defined by a class that is derived from the DataSet class that


is defined in the System::Data namespace. This class encapsulates an in-


memory cache of all the data from the database that is accessible in your


project.

Database Tables

Each table in the database is defined by a nested class in the DataSet class


that represents the database, and the class that defines a table is derived from


the System::Data::DataTable class. The classes representing tables also


define events that signal changes to the data in the table and propertie, making


each of the values of the current database record available.


Each table in a data source is identified by a member in the DataSet class that


is a handle to the corresponding DataTable object.

Table Columns

Each column in a given database table is identified by a member of the Data


Table class that defines the table. The members representing columns are of


type System::Data::DataColumn and define the characteristics of the col-


umn, such as the column name and the type of data in the column. These char-


acteristics are collectively referred to as the schema for the column.

Table Rows

A row in a table is represented by an object of type System::Data::DataRow.


A DataRow object contains the data in a row and has as many data items as


there are columns in the DataTable object.


Clearly, with a database that involves several tables that each have a number of columns, you are going to see quite a lot of code generated to represent a data source; certainly, tens of thousands of lines of code are not uncommon in a practical context.

The classes I have identified in the previous table are solely to encapsulate data from a data source; they do not provide the mechanism for connecting to a data source such as a database and accessing the data within it. That capability is provided by a component class called a table adapter that will be generated automatically. A table adapter establishes a connection to a database and executes the commands or SQL statements that operate on the database. There is one table adapter class for each DataTable member in the DataSet object, so if your application is going to work with three tables from a database, there are three table adapter classes defined. A table adapter object populates a DataTable member of a DataSet object with data and can update the table in the database when required.

Accessing and Displaying Data

There are three components defined in the System::Windows::Forms namespace that are designed to be used together for accessing and displaying data in a Windows Forms application:

1090

Accessing Data Sources in a Windows Forms Application

Component

Description


DataGridView

This control can display virtually any kind of data in a rectangular


grid. You can use this control quite independently of the other two


components.

BindingSource

This component is used to encapsulate data from a data source. The


component can manage accessing and updating the data source, and


can be used as the vehicle for displaying data in a DataGridView


control.

BindingNavigator

This control provides a toolbar containing controls for navigating and


manipulating data from a data source, typically a data source encapsu-


lated in a BindingSource control.


The BindingSource component is not a control as it has no graphical representation that a user can interact with, but it’s designed to complement and work with the DataGridView control and the BindingNavigator in database applications. The BindingSource component provides the communications with the data source necessary to execute queries and update commands, the DataGridView controls provides the user interface for viewing and entering the data and the BindingNavigator control provides a toolbar that simplifies data navigation. Using the BindingNavigator control is optional. If you prefer, you can change records programmatically yourself.

Although these three components are designed to work as a team, the DataGridView control is a particularly useful tool in its own right, as you can use it quite independently from the other two. It provides an astonishing range of capabilities for changing the visual appearance of the grid that displays the data. You’ll explore some of the ways in which you can customize the DataGridView control before going into how you can use it combined with the BindingSource and BindingNavigator components.

Note that you can also use the SqlConnection, SqlDataAdapter, and DataSet controls for accessing a data source. If you want to use these controls, then you may need to add them to the ToolBox yourself. You do this by selecting Tools > Choose ToolBox Items from the main menu and checking the controls in the list that you want to have added to the ToolBox.

Using a DataGridView Control

The DataGridView control enables you to display and modify a rectangular array of data from a wide range of data sources. You can also use the DataGridView control to display almost any kind of data that originates directly in a program. Under the covers it is a complex control that provides an enormous amount of flexibility, and you can take advantage of its many features through its many properties, functions, and events. At the same time, the DataGridView control can be remarkably easy to use. You can ignore the complexity of the internals and use it through the Form Design capability that takes care of all the basic detail for you. You’ll see later in this chapter how you can produce a complete working program example to access the Northwind database with no programming at all on your part; the whole program will be generated through the Form Design capability and by setting properties for components used in the project.

1091

Chapter 22

The data in a DataGridView control is displayed in a rectangular array of cells that you can envisage as a collection of rows or as a collection of columns. Each column of cells has a header cell at the top that typically contains text that identifies it, and each row has a row header cell at the beginning, as shown in Figure 22-1.

DataGridView^ gridCntrl = gcnew DataGridView; // Creates the control

There are the

gridCntrl->Columns[3]


refers to a single


row headers


These are the

gridCntrl->ColumnCount

column


column headers


is the number of columns


Column0

Column1

Column2

Column3

Column4

gridCntrl->RowCount

Row0


is the number


of rows


Row1


gridCntrl->Rows[2]

Row2


refers to a


single row

Row3


gridCntrl->Rows references the collection of rows

gridCntrl->Columns references the collection of columns

gridCntrl->Rows[2]>Cells[3] references the 4th cell in the 3rd row

Figure 22-1

You reference rows and columns of cells through properties of the DataGridView control object. The Rows property returns a value of type DataGridRowCollection that is a collection of all the rows, and you refer to a particular row using an index, as illustrated in Figure 22-1. Similarly, the Columns property for the control returns a value of type DataGridViewColumnCollection that you can also index to reference a particular column. Rows and columns are indexed from zero. The Cells property for a DataGridRowCollection object represents a collection containing the cells in the row, and you can index the Cells property to access a specific cell in a row. Figure 22-1 shows an example of how you reference the fourth cell in the third row.

The number of rows is available as the value of the RowCount property for the control, and the ColumnCount property returns the number of columns. Initially, when the control is not bound to a data source, it will have no columns or rows. You can set the number of columns and or the number of rows by setting property values for the control, but when you use the control to display data from a data source, this is taken care of automatically.

You can use the DataGridView control in three different modes:

1092

Accessing Data Sources in a Windows Forms Application

unbound mode

In unbound mode you transfer the data to the control yourself, typically using


the Add() function for the Rows property for the control. You would use this


mode for displaying relatively small amounts of data.

bound mode

In this mode you identify a source for the data that is to be displayed by set-


ting a value for the DataSource property of the control.

virtual mode

In virtual mode you connect the control to a data cache in memory that you


fill with data from a separate data source. You would use this mode to display


data from a source where you want to manage data access in order to opti-


mize performance.


In unbound mode, you can use the DataGridView control to display any data in your application that can be displayed in a grid. This makes it a very convenient tool for displaying data in many different kinds of applications. The next section looks into using the control in unbound mode in a little more depth.

Using a DataGridView Control

in Unbound Mode

The data in DataGridView control is stored in a rectangular arrangement that is identified by the Rows and Columns properties for the control. In unbound mode you’ll add the data to the control using the Add() function for the Rows property, but before you can add rows to the control, the columns need to be defined, at least to establish how many items are in a row. Setting the ColumnCount property for the control programmatically sets how many columns there are and determine that the control is to work in unbound mode. The following statements create a control that you reference using the handle dataGridView and then set the number of columns to 3:

DataGridView^ dataGridView = gcnew DataGridView;

dataGridView->ColumnCount = 3; // Set number of columns

You can optionally label the columns in the control by specifying headers to identify the data in each column by setting the Name property for each column. Here’s how that could be done:

dataGridView->Columns[0]->Name = L”Name”; dataGridView->Columns[1]->Name = L”Phone Number”; dataGridView->Columns[2]->Name = L”Address”;

The Columns property for the control is an indexed property so you access individual columns using index values starting from 0. Thus these statements label the three columns in the dataGridView control. You can also set the column headers through the Properties window for the control, as you’ll see in the next working example.

The value returned by the Rows property is a collection of type DataGridViewRowCollection, and this type is defined in the System::Windows::Forms namespace. The Count property for the collection returns the number of rows and there is also a default indexed property to return the row at a given index position. The collection of rows has a large number of functions; I won’t go through them all here, but here are a few of the most useful ones for adding and deleting rows:

1093

Chapter 22

Add()

Adds one or more rows to the collection.

Insert()

Inserts one or more rows in the collection.

Clear()

Deletes all rows in the collection.

AddCopy()

Adds a copy of the row specified by the argument.

InsertCopy()

Inserts a copy of the row specified by the first argument at


the position specified by the second argument.

Remove()

Removes the row specified by the argument, which is of


type DataGridViewRow^.

RemoveAt()

Removes the row specified by the index value you supply


as the argument.


The Add() function for the value returned by the Rows property comes in four overloaded versions that enable you to add a row of data to the control in a variety of ways.

Add()

Adds one new row to the collection.

Add(int rowCount)

Adds rowCount new rows to the collection. An exception of


type System::ArgumentOutOfRangeException is thrown


if rowCount is zero or negative.

Add(DataGridViewRow^ row)

Adds the row specified by the argument. A DataGrid


ViewRow object contains the collection of cells in a row as


well as the parameters that determine the appearance of the


cells in the row.

Add(... Object^ object)

Adds a new row and populates the cells in the row with the


objects specified by the arguments.

All versions of the Add() function return a value of type int that is the index of the last row that was added to the collection. If the DataSource property for the DataGridView control is not null, or the control has no columns, all versions of the Add() function throw an exception of type

System::InvalidOperationException.

You could add rows to the dataGridView control that has three columns with the following statements:

dataGridView->Rows->Add(L”Fred Able”, L”914 696 1200”,

L”1235 First Street, AnyTown”);

dataGridView->Rows->Add(L”May East”, L”914 696 1399”,

L”1246 First Street, AnyTown”);

Each of these statements adds a new row to the collection and the three arguments to the Add() function correspond to the three columns in the control. The control must have sufficient columns to accommodate the number of items you add in a row. If you attempt to add more data items to a row than there are columns in the control, the excess items are ignored.

You will first try unbound mode in a working example where you set up the DataGridView control by setting its properties from the Form Design tab.

1094

Accessing Data Sources in a Windows Forms Application

Try It Out

The DataGridView Control in Unbound Mode

This example displays a list of books where each book is specified by the ISBN, the title, the author, and the publisher. Create a new Windows Form project with the name Ex22_01. Add a DataGridView control to the form and click the arrow at top-right of the control to displays the pop-up menu show in Figure 22-2.

Figure 22-2

If you click the bottom menu item, Dock in parent container, the control fills the client area of the form. The top menu item is for selecting a data source, but you are not going to specify a data source this time. If you click the AddColumn menu item, the dialog box shown in Figure 22-3 for entering columns to the control is displayed.

The Unbound column radio button is checked because there is no data source identified for the control, which is the way it should be for this example. The Name: entry is the value of the Name property for the column, and the Header Text: entry is the value of the HeaderText property, which corresponds to the text that is shown in the control as the column heading. If you extend the list box that is for selecting the Type: value, you’ll see you have a range of choices for the type of column. Here you should leave it as the default choice — a TextBox column — because you’ll be adding strings as the data to be displayed. The other column types in the list deal with provide for various controls in the cells representing the data:

DataGridViewButtonColumn This type is used to display a button in each cell in the column.

DataGridViewCheckBoxColumn This type is used when you want to store bool values (System::Boolean objects) or

System::Windows::Forms::CheckState objects as checkboxes in the cells in the column.

Table continued on following page

1095

Chapter 22

DataGridViewComboBoxColumn

This type is used when you want to display a drop-down list


in each cell in the column.

DataGridViewImageColumn

You select this type when each cell in the column is to dis-


play and image in each cell in the column.

DataGridViewLinkColumn

You use this type when each cell in the column is to display


a link.


To add a column to the control, you enter values for the Name: and Header Text:, select the Type: from the list if you want other than the default type, and click the Add button. In this example, you can add columns with the names ISBN, Title, Author, and Publisher. The Header Text: entry can be the same as the name in each case. When you have entered the columns, click the Close button to close the dialog (the Close button is visible after you have added at least one column).

You can edit the columns at any time by clicking the Edit Columns item in the pop-up menu; it displays the dialog box shown in Figure 22-4.

Figure 22-3

The Edit Columns dialog box enables you to resequence existing columns, to add new columns, or to delete columns; you can also edit any of the properties for a column.

1096

Accessing Data Sources in a Windows Forms Application

Figure 22-4

Return to the Design tab and change the Text property for the form to My Book List. If you display the code for the form, you can modify the constructor to add data to the DataGridView control using the Add() function for the Rows property, like this:

Form1(void)

{

InitializeComponent();

//

//TODO: Add the constructor code here // Create book data, one book per array

array<String^>^ book1 = {L”0-09-174271-4”, L”Wonderful Life”, L”Stephen Jay Gould”, L”Hutchinson Radius”};

array<String^>^ book2 = {L”0-09-977170-5”, L”The Emperor’s New Mind”, L”Roger Penrose”, L”Vintage”};

array<String^>^ book3 = {L”0-14-017996-8”,L”Metamagical Themas”, L”Douglas R. Hofstadter”, L”Penguin”};

array<String^>^ book4 = {L”0-201-36080-2”, L”The Meaning Of It All”, L”Richard P. Feynman”, L”Addison-Wesley”};

array<String^>^ book5 = {L”0-593-03449-X”, L”The Walpole Orange”, L”Frank Muir”, L”Bantam Press”};

array<String^>^ book6 = {L”0-439-99358-X”, L”The Amber Spyglass”, L”Philip Pullman”, L”Scholastic Children’s Books”};

array<String^>^ book7 = {L”0-552-13461-9”, L”Pyramids”, L”Terry Pratchett”, L”Corgi Books”};

array<String^>^ book8 = {L”0-7493-9739-X”, L”Made In America”, L”Bill Bryson”, L”Minerva”};

// Create Array of books

array<array<String^>^>^ books ={book1, book2, book3, book4, book5, book6, book7, book8};

1097

Chapter 22

// Add all the books to the control

for each(array<String^>^ book in books ) dataGridView1->Rows->Add(book);

//

}

There’s an array of type array<String^> created for each book, and the handle to each array is stored in a variable of type array<array<String^>^>^. Each of the arrays of strings has four elements that contain data items that correspond to the columns in the DataGridView control, so each array defines a book.

For convenience, you assemble the handles to the arrays of strings into the books array. The type for books looks a little messy because of the ^ repetitions, but it is simply a handle to an array of elements where each element is of type array<String^>^. The books array enables you to set up all the data in the control in a single for each loop. The Rows property for the DataGridView object returns a handle of type DataGridViewRowCollection^ that references the collection of rows in the control. Calling the Add() function for the object returned by the Rows property adds a complete row to the collection. Each element in the array that is passed as the argument corresponds to a column in the control, and the type of data element must correspond with the type you selected for the column. Here all the columns have the same type, so all the cells in a row can be passed in an array. If the columns were of different types, you could specify the item for each column by a separate argument to the Add() function, or you could use an array of elements of type Object^.

If you compile and execute the example by pressing Ctrl+F5, you should see the application window shown in Figure 22-5.

Figure 22-5

You get the scrollbars automatically because the DataGridView control extends beyond the boundaries of the client area of the form. If you resize the window, eventually the scrollbars disappear.

It would be nice if the columns were wide enough to accommodate the maximum length of text they contain. Changing the value of the AutoSizeColumnsMode property in the Layout group fixes that. Open the Properties window for the DataGridView control from the Form1[Design] tab in the Editor pane and change the AutoSizeColumnsMode property value to AllCells. If you recompile the program and run it again, you’ll see that the application window is now as shown in Figure 22-6.

1098