


Interoperating with Microsoft Windows and Apple Mac OS X
support_mip6 on; generate_policy off; nonce_size 16; proposal {
encryption_algorithm 3des; hash_algorithm md5; authentication_method rsasig; dh_group modp1024;
}
}
sainfo address 10.0.1.2/32 any address 192.168.1.0/24 any { pfs_group modp1024;
lifetime time 28800 seconds; encryption_algorithm 3des; authentication_algorithm hmac_md5; compression_algorithm deflate;
}
listen {
isakmp 10.0.1.2;
}
log debug2;
And here is setkey.conf for the kernel policies:
flush;
spdflush;
spdadd 192.168.1.0/24 10.0.1.2/32 any -P in ipsec esp/tunnel/193.110.157.13110.0.1.2/require;
spdadd 10.0.1.2/32 192.168.1.0/24 any -P out ipsec esp/tunnel/10.0.1.2- 193.110.157.131/require;
This of course depends on your local IP address, in this case 10.0.1.2.
Importing X.509 Certificates into Windows
Unfortunately, Microsoft imports the X.509 Certificate (the .p12 file) into the wrong place in the Registry when you double-click it. Instead of the certificate becoming a 'local machine' certificate, it becomes a 'user certificate', and as a result, the Microsoft IPsec subsystem will not be able to find it. To make matters more complicated, adding a certificate to the 'local machine' certificate store unfortunately also requires administrative rights.
Do not double-click the certificate and use the Certificate Import wizard. Instead, use the Microsoft Management Console (MMC) by selecting Start | Run and typing mmc in the input box.
Select Console | Add/Remove Snap-in. When the Add/Remove Snap-in dialog opens, click the Add button to open the Add Standalone Snap-in dialog.
198
Chapter 8
Choose Certificates from the list of snap-ins, and click Add again to confirm. When prompted, select Computer Account, not the default selection of User Account, which will not work. You will then be asked to select the computer that the snap-in is to manage. Choose Local Computer, and then Finish.
This gives us the starting point for the actual import. While we have MMC open, we might as well prepare everything, including the IPsec monitor. Click the Add button again, but now scroll down and select IPsec Security Policy Management. Choose Local Computer when prompted for the computer the snap-in will manage.
Close the Add Standalone Snap-in dialog and the Add/Remove Snap-in dialog. We now have all the MMC components that we need. Expand the Certificates node in the left-hand tree view, and right-click the Personal folder. Select All Tasks | Import... from the context menu.
199

Interoperating with Microsoft Windows and Apple Mac OS X
Browse to the .p12 file that you have created for this computer and click Next. If you have not removed the password from the file, you now need to type the password. Here you also have the possibility to make the key exportable, which will allow you to copy the key from the Registry to a file again. If you do not make it exportable, you will not be able to do this.
Be aware that this is pseudo-security, at best. Windows hackers will still be able to get to the key. If the laptop is lost, always consider the key and certificate compromised and revoke them.
On the next screen, ensure that the import is set to Automatically select the certificate store based on the type of certificate. This ensures that your personal certificate will be imported under Personal, and the CA certificate will be imported under Trusted Root Certificates. You have now completed the import process. Click Finish, and if you expand the Trusted Root Certificates folder in the MMC tree view, you should now see your CA certificate.
Similarly, you should be able to find your personal certificate in the Personal folder. If the import of the corresponding key went OK, then if you double-click your personal certificate, you should see You have a private key that corresponds to this certificate at the bottom. Furthermore, if you open the Certification Path tab of the certificate, you should see the Root CA listed as the parent certificate of the personal certificate. In the lower Certificate Status pane, it should say This certificate is OK.
Some extra information is shown in the Details tab of the certificate. If you added a dynamic CRL to your certificate, then you will see that displayed here.
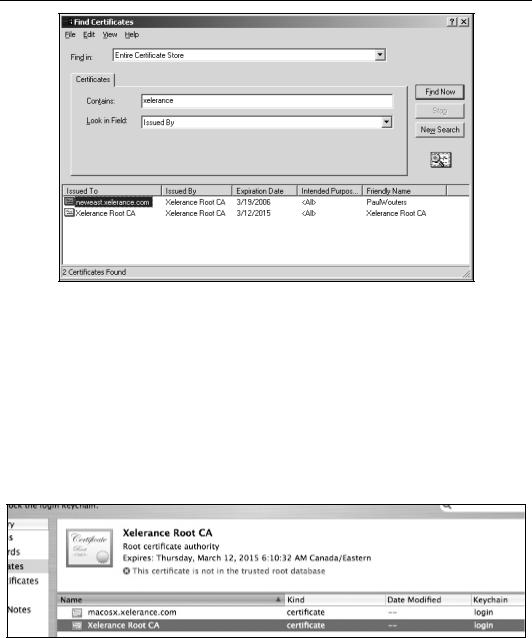
If you can't find a certificate, which can easily happen if you have many, as is often the case in the Trusted Certificates store, you can use the Find Certificates option to locate it based on the (partial) content of the DN.
200
Chapter 8
Do not forget that the Xelerance certimport.exe utility, discussed in the section on the WaveSEC client earlier in this chapter, will import certificates for you without a zillion mouse clicks, which is particularly useful if you are importing certificates on every computer in the company network.
Importing X.509 Certificates on Mac OS X (Tiger)
Mac OS X versions including Tiger do not make using X.509 Certificates for IPsec or L2TP/IPsec particularly straightforward.
Importing your own PKCS#12 certificate (.p12 file) that contains the CA certificate, your personal certificate, and your private key through the KeyChain Access.app will most likely fail, since such a root CA will not be trusted properly. This can be seen by a red warning sign when viewing the personal certificate details, and the text This certificate is not in the trusted root database.
This personal certificate will be listed as valid listed as valid but it won't be accepted as it is untrusted because the CA is itself untrusted.
201

Interoperating with Microsoft Windows and Apple Mac OS X
The following procedure has been put together with the help of Jacco de Leeuw, and should work in most instances. Your results may be completely different, however, and we welcome any feedback in this regard. Let us hope the next Mac OS X update will address these issues.
Firstly, the Openswan server side must have a FQDN or an IP address as its ID. This IP address or FQDN must match the value in the Server address input field on the L2TP configuration tab of Internet Connect. You can do this when creating the X.509 Certificate, if you add one or both of the following options to the openssl.cnf file before generating the certificate:
[usr_cert] subjectAltName=DNS:TheFullyQuantifiedHostName subjectAltName=IP:193.110.157.131
Log into your Mac OS X machine as an administrative user and start the KeyChain Access.app. You can find it using the Finder by selecting Application and then scrolling down to Utilities where you will find the KeyChain Access.app. Alternatively, start it with this command:
# sudo "/Applications/Utilities/Keychain Access.app/Contents/MacOS/Keychain Access"
Click on Show keychains and select System. Select Import from the menu and import the PKCS#12 file (.p12 file). You will notice three items will be added to your keychain. You need to move the imported CA certificate from the System keychain to the X509 Trusted Anchors keychain. Restart KeyChain Access.app and see if the imported certificates and private key now show up as valid.
Once you have done all of this, you can open Internet Connect and you should be able to select X.509 Certificate as the method for Machine Authentication. You need to specify the Openswan FQDN or IP address, as previously entered in Server address input field.
There have been some reports that this requires a restart of Internet Connect, or even a reboot, before the VPN will work properly.
An alternative approach is to use a third-party tool called CertToolGui. This presents a user interface that should help in importing the necessary files.
Choose Import Certificates, and select the caCert.pem file. It will ask you for your password to obtain access to the necessary keychains. Choose X509Anchors as the keychain to import the CA into.
202

Chapter 8
Change the extension of your personal certificate file from .pem to .crt and import it into the System keychain.
If you get errors about a certificate or key already existing in the keychain, then it is likely imported in another keychain. You first need to remove it from that other keychain.
A third method is to import the certificates from the command line. Open Terminal.app located in the Utilities folder. Copy the System's X509Anchors database to your local Keychains directory by executing the following command:
# cp /System/Library/Keychains/X509Anchors ~/Library/Keychains
Run certtool to import the cacert.pem file using:
# certtool i ~/caCert.pem k=X509Anchors
Move your local X509Anchors file back to the System's Keychains folder:
# sudo mv ~/Library/Keychains/X509Anchors /System/Library/Keychains/X509Anchors
Note that in theory, you should be able to do the following command as well:
# sudo certtool i ca.crt v k=/System/Library/Keychains/x509Anchors
203