

enswm24e
.pdfEthernut
Software Manual
Manual Revision: 2.4
Issue date: November 2005
Copyright 2001-2005 by egnite Software GmbH. All rights reserved.
egnite makes no warranty for the use of its products and assumes no responsibility for any errors which may appear in this document nor does it make a commitment to update the information contained herein.
egnite products are not intended for use in medical, life saving or life sustaining applications.
egnite retains the right to make changes to these specifications at any time, without notice.
All product names referenced herein are trademarks of their respective companies. Ethernut is a registered trademark of egnite Software GmbH.
Contents
About Nut/OS and Nut/Net . . . . . . . . . . . . . . . . . . . . . . . . . . . . . . . . . . . . . . . . .1
Nut/OS Features . . . . . . . . . . . . . . . . . . . . . . . . . . . . . . . . . . . . . . . . . . . . . . . .1
Nut/Net Features . . . . . . . . . . . . . . . . . . . . . . . . . . . . . . . . . . . . . . . . . . . . . . .1
Quick Start with ICCAVR . . . . . . . . . . . . . . . . . . . . . . . . . . . . . . . . . . . . . . . . . . .2 Installing ICCAVR . . . . . . . . . . . . . . . . . . . . . . . . . . . . . . . . . . . . . . . . . . . . . . .2 Installing Nut/OS . . . . . . . . . . . . . . . . . . . . . . . . . . . . . . . . . . . . . . . . . . . . . . .2 Configuring Nut/OS . . . . . . . . . . . . . . . . . . . . . . . . . . . . . . . . . . . . . . . . . . . . .4 Configuring ImageCraft . . . . . . . . . . . . . . . . . . . . . . . . . . . . . . . . . . . . . . . . . .8 Creating the First Nut/OS Application . . . . . . . . . . . . . . . . . . . . . . . . . . . . .11
Quick Start with AVR-GCC on Linux . . . . . . . . . . . . . . . . . . . . . . . . . . . . . . . . .14 Installing AVR-GCC on Linux . . . . . . . . . . . . . . . . . . . . . . . . . . . . . . . . . . . .14 Installing Nut/OS . . . . . . . . . . . . . . . . . . . . . . . . . . . . . . . . . . . . . . . . . . . . . .14 Configuring Nut/OS . . . . . . . . . . . . . . . . . . . . . . . . . . . . . . . . . . . . . . . . . . . .14 Creating the First Nut/OS Application . . . . . . . . . . . . . . . . . . . . . . . . . . . . .19
Quick Start with WinAVR . . . . . . . . . . . . . . . . . . . . . . . . . . . . . . . . . . . . . . . . . .22 Installing AVR-GCC on Windows . . . . . . . . . . . . . . . . . . . . . . . . . . . . . . . . .22 Installing Nut/OS . . . . . . . . . . . . . . . . . . . . . . . . . . . . . . . . . . . . . . . . . . . . . .22 Configuring Nut/OS . . . . . . . . . . . . . . . . . . . . . . . . . . . . . . . . . . . . . . . . . . . .24 Creating the First Nut/OS Application . . . . . . . . . . . . . . . . . . . . . . . . . . . . .27
Running the Embedded Webserver . . . . . . . . . . . . . . . . . . . . . . . . . . . . . . . . .29
Nut/OS . . . . . . . . . . . . . . . . . . . . . . . . . . . . . . . . . . . . . . . . . . . . . . . . . . . . . . . . .31
System Initialization . . . . . . . . . . . . . . . . . . . . . . . . . . . . . . . . . . . . . . . . . . . .31
Thread Management . . . . . . . . . . . . . . . . . . . . . . . . . . . . . . . . . . . . . . . . . . .31
Timer Management . . . . . . . . . . . . . . . . . . . . . . . . . . . . . . . . . . . . . . . . . . . .32
Heap Management . . . . . . . . . . . . . . . . . . . . . . . . . . . . . . . . . . . . . . . . . . . . .33
Event Management . . . . . . . . . . . . . . . . . . . . . . . . . . . . . . . . . . . . . . . . . . . .33
Stream I/O . . . . . . . . . . . . . . . . . . . . . . . . . . . . . . . . . . . . . . . . . . . . . . . . . . . .34
File System . . . . . . . . . . . . . . . . . . . . . . . . . . . . . . . . . . . . . . . . . . . . . . . . . . .36
Device Drivers . . . . . . . . . . . . . . . . . . . . . . . . . . . . . . . . . . . . . . . . . . . . . . . .36
Nut/Net . . . . . . . . . . . . . . . . . . . . . . . . . . . . . . . . . . . . . . . . . . . . . . . . . . . . . . . . .37
Network Device Initialization with DHCP . . . . . . . . . . . . . . . . . . . . . . . . . . .37
Socket API . . . . . . . . . . . . . . . . . . . . . . . . . . . . . . . . . . . . . . . . . . . . . . . . . . . .38
Protocols . . . . . . . . . . . . . . . . . . . . . . . . . . . . . . . . . . . . . . . . . . . . . . . . . . . . .40
Conversion Function . . . . . . . . . . . . . . . . . . . . . . . . . . . . . . . . . . . . . . . . . . .41
Network Buffers . . . . . . . . . . . . . . . . . . . . . . . . . . . . . . . . . . . . . . . . . . . . . . .41
Simple TCP Server . . . . . . . . . . . . . . . . . . . . . . . . . . . . . . . . . . . . . . . . . . . . . . .43 Initializing the Ethernet Device . . . . . . . . . . . . . . . . . . . . . . . . . . . . . . . . . . .43 Connecting a Client to a Server . . . . . . . . . . . . . . . . . . . . . . . . . . . . . . . . . .44 Communicating with the Client . . . . . . . . . . . . . . . . . . . . . . . . . . . . . . . . . .45 Trying the Sample Code . . . . . . . . . . . . . . . . . . . . . . . . . . . . . . . . . . . . . . . .46
Reference Material . . . . . . . . . . . . . . . . . . . . . . . . . . . . . . . . . . . . . . . . . . . . . . .47
Troubleshooting . . . . . . . . . . . . . . . . . . . . . . . . . . . . . . . . . . . . . . . . . . . . . . . . .49
About Nut/OS and Nut/Net
About Nut/OS and Nut/Net
Connects embedded applications to a local Ethernet and the global Internet.
Nut/OS Features
Nut/OS is a very simple Realtime Operating System (RTOS) providing the following features
Open Source
Modular design
Highly portable (AVR and ARM7 available, more to come)
Cooperative multithreading
Event queues
Dynamic memory management
Timer support
Stream I/O functions
Expandable device driver interface
File system support
Nut/Net Features
Nut/Net is a TCP/IP stack providing
Open Source
ARP, IP, UDP, ICMP and TCP protocol over Ethernet and PPP
Automatic configuration via DHCP
HTTP API with file system access and CGI functions
SNTP, DNS, Syslog, TFTP, FTP and more
TCP and UDP socket API for other protocols
The first decision, that has to be made for the AVR platform, is to select the development environment you want to use, either ImageCraft's ICCAVR or GNU's AVR-GCC. The commercial ImageCraft Compiler offers an advanced IDE and is the first choice of most professional developers using a Windows PC. The GNU compiler is available for Linux and Windows.
For the ARM platform only GCC had been tested.
The next chapters will guide you to quickly set up and start Nut/OS application development for each environment. It is assumed, that you are using Nut/OS 3.9.9 or above.
1

Ethernut Software Manual
Quick Start with ICCAVR
Getting a professional environment up and running.
Users of GCC will skip this chapter.
Not all sample applications may run with the demo version. A license is available from most distributors of the Ethernut Hardware or from ImageCraft directly.
Installing ICCAVR
This guide has been tested with ICCAVR Version 7.03C with Beta2 Patch and may work with Version 6.31A. Please follow the installation instructions that came with your compiler. By default the target directory will be C:\icc7avr or C:\iccavr for the Version 6.
Installing Nut/OS
The installation for Windows is packed into a self-extracting executable named ethernut-X.Y.Z.exe, where X.Y.Z has to be replaced with the version number. The file contains the complete code, some Nut/OS tools and the API reference.
After starting the installation, you can choose the language. The selected language is used during the installation only. All other parts and the Nut/OS documentation are available in English only.
After selecting the installer language and clicking OK, a welcome screen will appear. Click Next to continue.
2
Quick Start with ICCAVR
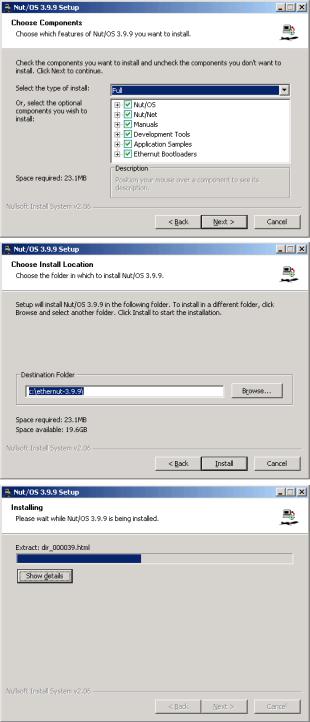
The next dialog lists all Nut/OS components, which are included in the installation. If unsure, leave Full selected and click Next to continue.
You can now select the installation directory. By default all files will be installed in C:\ethernut-X.Y.Z and the source code will be installed in C:\ethernut- X.Y.Z\nut, which is called the top source directory or the source tree.
Click Install to start the installation.
The next dialog will show the installation progress. This will take a few seconds. You can click Show details to view the list of files being installed.
3
Ethernut Software Manual
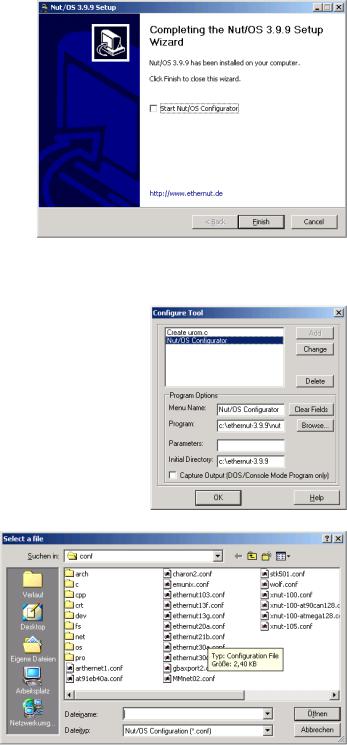
When all files had been copied to the installation directory, a final dialog appears. We will later use the ImageCraft IDE to start the Nut/OS Configurator. Thus, leave the checkbox to
Start Nut/OS Configurator unchecked.
Click Finish to close the installation wizard.
Configuring Nut/OS
Start the ImageCraft IDE and select Configure Tools from the Tools menu.
Enter Nut/OS Configurator as a menu name, select nutconf.exe in the Nut/OS installation directory (C:\ethernut-x.y.z\nutconf.exe) as the
Program and enter the installation directory (C:\ethernut-x.y.z) as the Initial Directory. Then click on Add to store this new entry and click on OK to return to the main window. Now you can select Nut/OS Configurator from the Tools menu. This will start the Nut/OS Configurator. In this chapter we will not handle the details of this tool, but concentrate on the ICCAVR specific settings.
When started, a file selection dialog is presented. If not already displayed, navigate to the nut/conf directory, where the hardware configuration files are located.
Select the configuration file for your board and click on Open.
ethernut13f.conf for board versions 1.3 Rev-F or previous.
ethernut13g.conf for board version 1.3 Rev-G.
ethernut21b.conf for board versions 2.0 Rev-A or 2.1 Rev-B.
4

Quick Start with ICCAVR
The selected file will be loaded and the hardware related configuration for this board will be automatically set by the Configurator. Then the main configuration window will receive the focus.
Select Settings from the Edit entry of the main menu.
The settings notebook with four pages named Repository, Build, Tools and Samples will appear. Usually the first page can be left unchanged. The entry specifies the path to the Nut/OS component repository. Use slashes instead of backslashes with path names.
The first entry on the second page specifies the path to the source tree. The Configurator will scan this directory for predefined platform settings and add them to the Platform drop down list. If this list is empty, make sure that the first entry points to the correct Source Directory. and that this directory contains a file named Makedefs.avr-icc.
Select avr-icc as the platform.
The First and Last Include Directories should be left empty. If using ICCAVR V6, enter the path of your ImageCraft include directory as the Last include directory.
For the next step it is important to understand, that we distinguish between the source directory and the build directory. During Nut/OS installation, the Nut/OS source code is copied to the source directory. Files in the source directory will not
change and no new files will be added to this directory. On the other hand, all system configurations will result in one or more new header files, which will be created by the Configurator in the build tree. Later, when building the newly configured system, the compiler will first check the build tree for the required header files. The big advantage is, that we are able to create several system builds for different configurations from a single source tree, e.g. building Nut/OS for different Ethernut board revisions.
The build directory can be located anywhere, but it is recommended to put it in the parent of the top source directory and choose a meaningful name. For example, if Nut/OS has been installed in C:/ethernut-3.9.9/nut, then C:/Ethernut/nutbld-21b-icc would be a good directory name to build a
5

Ethernut Software Manual
system for Ethernut 2.1 Rev-B with ICCAVR. Using the Browse button offers to create new directories.
Finally enter an Install Directory. It is recommended, to specify a directory within the build tree. Previous versions of the ImageCraft compiler can't search more than one directory for libraries. Thus it was required to enter the path name of the ICCAVR lib directory. After system build, the Configurator will copy the libraries to this destination.
On the third page enter the paths to the directories containing the required tools, separated with semicoli. It is very important to add one additional semicolon after the last path. The Nut/OS tools should be first, followed by the ImageCraft bin directory.
The tools directory contains a set of executables, which are required to build the system on the Windows PC. Most of them mimic Unix like commands, which are typically more powerful than their Windows counterparts. Some of them do not like backslashes. That’s why we specify all paths with slashes. However, the Tools Path itself is passed to the Windows command line interpreter, which requires backslashes. Thus, we must use backslashes here.
Entries on the last page of the settings notebook are used to create a sample application directory. Nut/OS comes with a few samples, which demonstrate its capabilities. This includes the HTTP server we are going to build in this chapter. The Configurator can create a new directory for you, copying the sources from the source tree and creating ImageCraft project files. Such a directory may also host your own Nut/OS applications later.
The Programmer selection can be left alone, because the ICCAVR IDE provides its own programming interface. Press OK to save your entries.
We are back to Configurator’s main window with one configuration option left. Actually we already selected the proper tools when specifying the platform. Due to the internal structure used by the Configurator, we need to specify once again, that we are going to use the ImageCraft compiler. Click on Tools in the tree
6