

MusculoSkeletal Exam
.pdf ASIS
ASIS
Figure 6.16 Palpation of the anterior superior iliac spine (ASIS).
Umbilicus
Chapter 6 The Lumbosacral Spine
Soft Tissues
Abdominal Muscles
The abdominal muscles play a major role in supporting the trunk. They also play a role in influencing the position of the pubic symphysis and sacroiliac alignment. The group consists of the rectus abdominis, obliquus externus abdominis, and the obliquus internus abdominis. The rectus abdominis covers the anterior aspect of the trunk and attaches from the fifth through seventh ribs to the crest of the pubis. The muscles are segmentally innervated. The muscle belly of the rectus abdominis can be made more distinct by asking the patient to place the arms behind the head and perform a curl-up. Note for symmetry in the muscle and observe for any deficits (Figure 6.18).
Psoas Muscle
The psoas is extremely important in patients with a low-back condition because of its attachment to the lumbar transverse processes and the lateral aspects of the vertebral bodies of T12 and L1–L5. The muscle can be palpated at its insertion on the lesser trochanter and medial and deep to the anterior superior iliac spine
Umbilicus
Anterior supeior iliac spine
|
A |
Pubic |
|
tubercles |
|
A |
B |
Figure 6.17 Palpation of the pubic tubercles.
105

The Lumbosacral Spine Chapter 6
bosacral spinal muscles are illustrated in Figures 6.20 through 6.25.
Figure 6.18 Palpation of the abdominal muscles.
on the medial aspect of the sartorius (Figure 6.19). The belly is made more distinct by resisting hip flexion.
Trigger Points of the Lumbosacral
Region
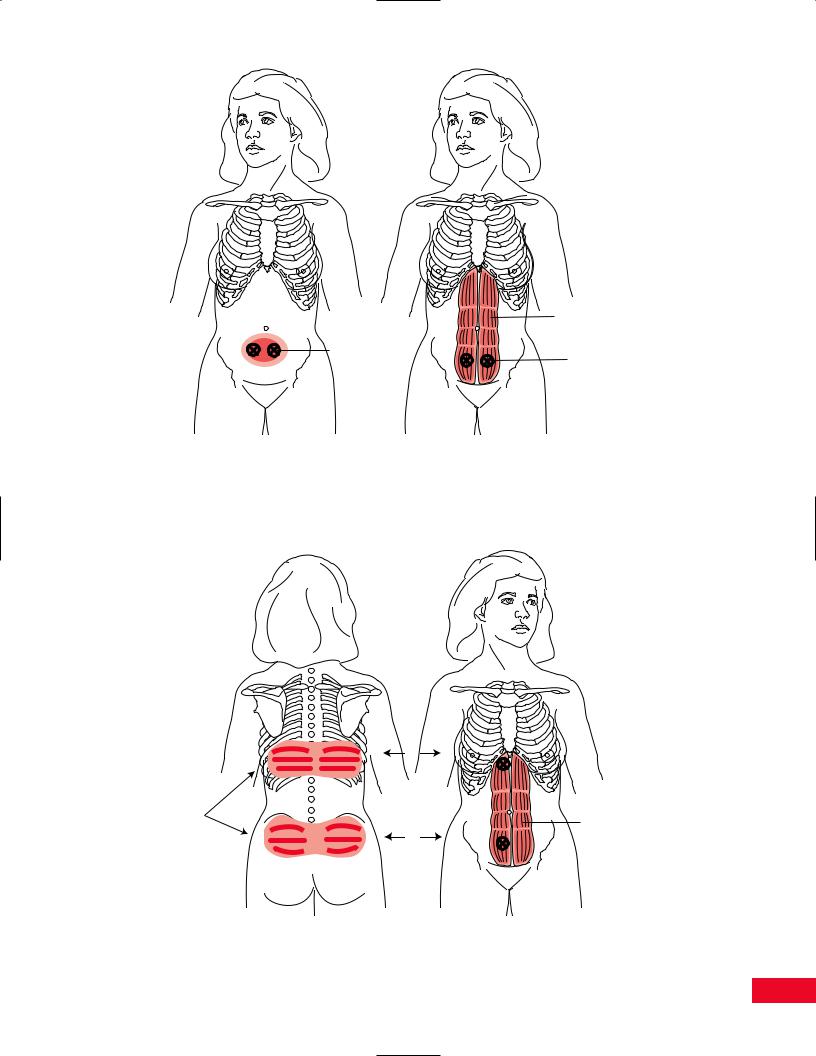
Trigger points and myofascial pain are frequently noted in the abdominal muscles and in the intrinsic and extrinsic lumbar spinal muscles. Trigger points in the abdominal muscles may radiate pain posteriorly, and trigger points in the lumbar spinal muscles may radiate pain anteriorly. Occasionally, trigger points in the lumbosacral spine will mimic the symptoms of a herniated disc. Characteristic locations of referred pain patterns of trigger points in the abdominal and lum-
Active Movement Testing
The patient should be appropriately disrobed so that you can observe the entire back. Have the patient stand without shoes in a well-lit area of the examination room. Shadows from poor lighting will affect your perception of the movement. You should observe the patient’s active movements from the anterior, posterior, and both lateral aspects. While observing the patient move, pay particular attention to his or her willingness to move, the quality of the motion, and the available range. Lines in the floor may serve as visual guides to the patient and alter his or her movement patterns. It may be helpful to ask the patient to repeat movements with the eyes closed.
Before your examination of the lumbar spine movements, you should have the patient perform a quick test to clear the joints of the lower extremities, by asking the patient to perform a full flat-footed squat. This will check the range of motion of the hip, knee, ankle, and foot. If the movement is full and painless, then the joints can be cleared.
You should then have the patient perform the following movements: forward and backward bending, lateral bending to the right and left, and rotation to the right and left. You should observe for the amount
Psoas muscle
Figure 6.19 Palpation of the psoas muscle.
106
Rectus
abdominus
muscle
Area of
referred pain Location of the trigger
points
C
Figure 6.20 Trigger points in the rectus abdominis may simulate the pain of dysmenorrhea. Adapted with permission from Travell J, Rinzler SI. The myofascial genesis of pain. Postgrad Med 1952; 31: 425–431.
1 |
|
X |
|
Areas of |
|
radiating |
Rectus |
pain |
|
2 |
abdominus |
muscle |
A
Figure 6.21 Trigger points in the rectus abdominis may also radiate pain into the posterior lower part of the thorax and lower back. Adapted with permission from Travell J, Rinzler SI. The myofascial genesis of pain. Postgrad Med 1952; 31: 425–431.
107
|
L2 |
X |
X |
|
S1 |
|
S4 |
A |
B |
Multifidi |
Multifidi |
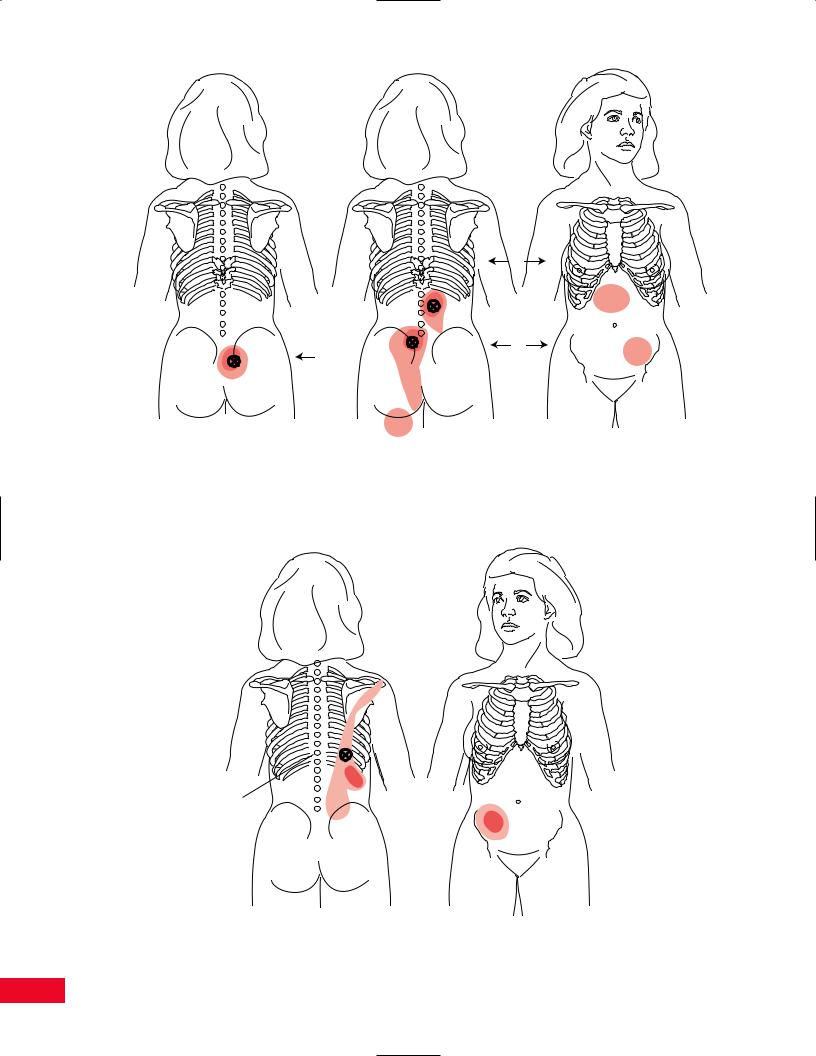
Figure 6.22 Trigger points within the multifidi muscles may cause referred pain in the paraspinal region. Pain may also radiate anteriorly or inferiorly. Adapted with permission from Travell J, Rinzler SI. The myofascial genesis of pain. Postgrad Med 1952; 31: 425–431.
X
T11
Iliocostalis
thoracis
Figure 6.23 Trigger points in the iliocostalis thoracis muscle may radiate pain superiorly and inferiorly as well as anteriorly. Adapted with permission from Travell J, Rinzler SI. The myofascial genesis of pain. Postgrad Med 1952; 31: 425–431.
108
Chapter 6 The Lumbosacral Spine
X X
L1
Iliocostalis |
Longissimus |
lumborum |
thoracis |
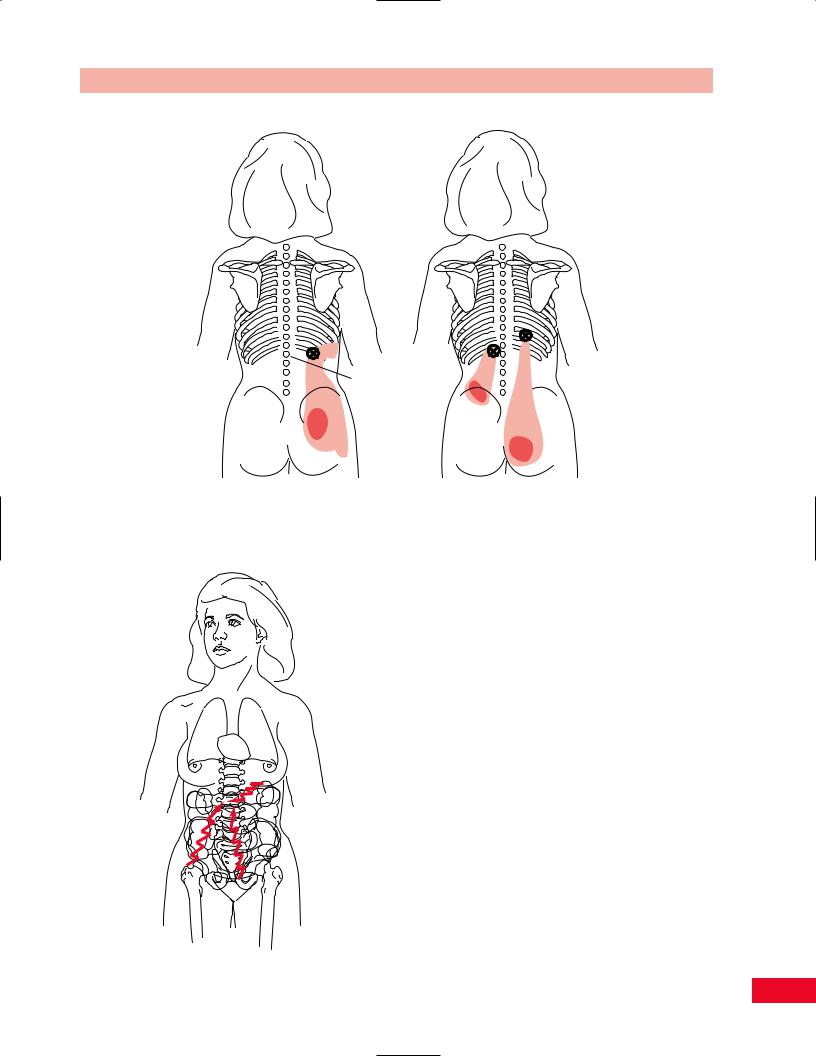
Figure 6.24 Trigger points in the iliocostalis lumborum and longissimus thoracis muscles radiate pain inferiorly. Adapted with permission from Travell J, Rinzler SI. The myofascial genesis of pain. Postgrad Med 1952; 31: 425–431.
of available range, smoothness of movement, the willingness of the patient to move, and the alignment and symmetry of the spinal curves. You may note a flattening in a particular area as the patient bends to the side or a deviation to one side during forward bending. These deviations should alert you to examine the involved area more carefully. The patient may demonstrate a pattern of limitation referred to as the capsular pattern (see section on passive movement testing). If the motion is pain free at the end of the range, you can add an additional overpressure to “clear” the joint (Cyriax, 1979). You can also ask the patient to sustain the position for 15 seconds to determine whether the symptoms can be reproduced. Sustained movements of lateral bending and rotation can also be combined with flexion and extension to increase the degree of compression. If the patient experiences pain during any of these movements, you should note the position that increases the symptoms and whether any position alleviates the symptoms.
Figure 6.25 (left) Pelvic, abdominal, and retroperitoneal organs may radiate pain to the lumbar spine. The hip may also cause low-back pain.
109
The Lumbosacral Spine Chapter 6
Forward Bending
Instruct the patient to stand with the feet approximately 6 in. apart. Stand behind the patient to observe the back during the movement. Additionally, observe the patient from the side, to have a better view of the lumbosacral curve contour. To initiate the movement, ask the patient to bend the head forward by tucking the chin toward the chest, then drop the arms, and allow the trunk to roll forward with the fingertips reaching downward. Have the patient go as far as he or she can (Figure 6.26A). Observe the available range and deviation to either side if one occurs. If you feel that the patient is able to compensate for the deviation by using visual cues, have the patient close their eyes during the movement. Observe how much movement is actually coming from the lumbar spine and not by substitution from the hip joint and the normal lumbar-pelvic rhythm (Cailliet, 1995). To separate the movements, you can stabilize the pelvis with your arm to limit the degree of hip flexion. Patients also try to substitute by allowing knee flexion. Note the smoothness of the movement as each intervertebral level opens. At the end range, note if the range is limited by pain or the patient’s anticipation of pain. The normal range of motion of flexion is 80 degrees (American Academy of Orthopedic Surgeons, 1965).
McKenzie (1981) also has the patient perform flexion in the supine position, asking the patient to bring the knees up to the chest. The movement is therefore initiated from below, as opposed to above when the patient is standing. Therefore, pain noted at the beginning of the movement may be originating from L5–S1.
The amount of movement can be recorded on a movement diagram. Deviations to the side and the onset of symptoms can also be recorded. Objective methods of measuring the range of motion in flexion are as follows: (1) Use a ruler to measure the distance from the patient’s middle fingertip to the floor.
(2) Measure the distance from T12 to the S1 spinous processes while the patient is in neutral position. Then have the patient complete a forward bend and measure from the same landmarks. The normal excursion observed should be 7–8 cm. To perform the Schober test, measure the point midway between the posterior superior iliac spines, which is approximately the level of the second sacral vertebra. Mark 5 cm below and 10 cm above. Measure the distance between the outer landmarks, first in neutral and then in flexion (Magee, 1997). Record the difference in the distance measured. A gravity-assisted bubble goniometer can be placed on the patient to give you the actual degrees of movement.
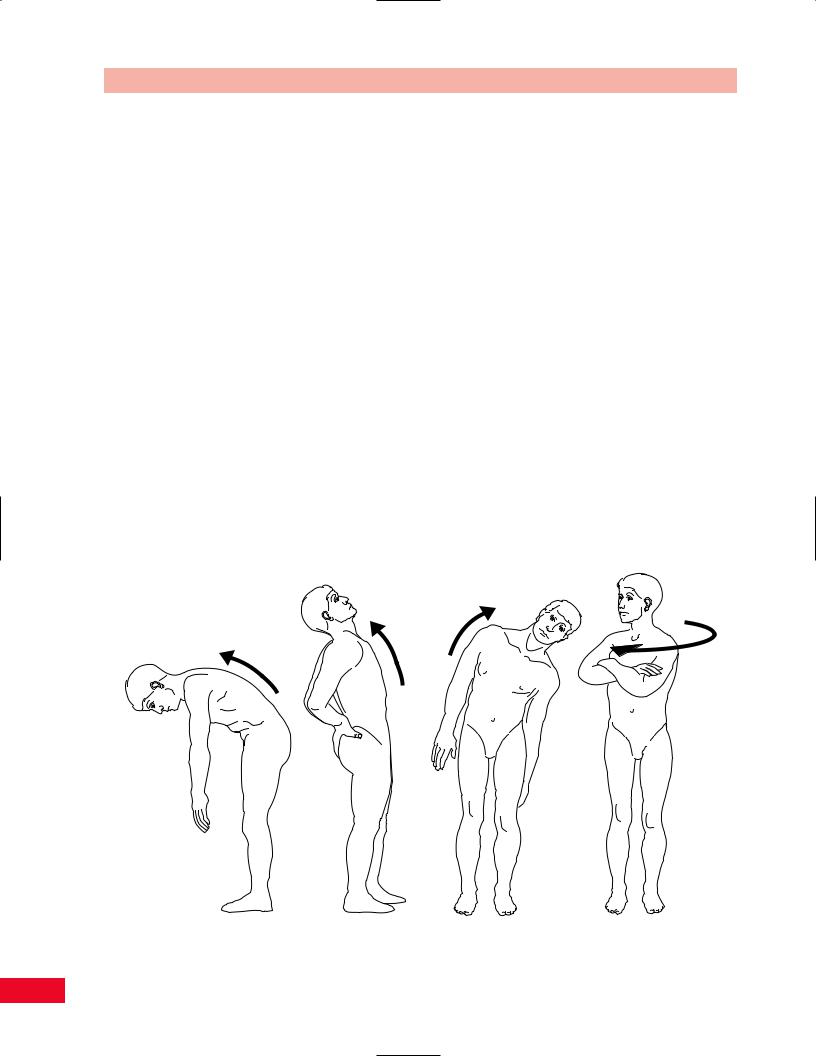
A B C D
Figure 6.26 Active movement testing. (A) Lumbar forward bending. (B) Lumbar backward bending. (C) Lumbar side bending.
(D) Lumbar rotation.
110

Backward Bending
Instruct the patient to stand with the feet approximately 6 in. apart. Stand behind the patient to observe the back during the movement. Ask the patient to place his or her hands behind the back so that the palms contact the buttocks. Instruct the patient to allow the neck to extend, but not hyperextend, and then slowly allow the trunk to move backward toward their hands (Figure 6.26B). Patients will often substitute by flexing their knees when they have limited back extension. Observe the smoothness in which each intervertebral level closes. Note whether the range is limited by pain or the patient’s anticipation of pain.
As an alternative method of performing back extension Bourdillon, Day and Bookhout (1992) and colleagues and Greenman (1996) prefer to have the patient bend backward by allowing him or her to prop up on the elbows and support the chin on the hands (sphinx position) while in a prone position. This allows for easier palpation of the bony position since the patient’s muscles are relaxed. McKenzie (1981) prefers to have the patient perform a full push-up with the arms fully extended and the pelvis sagging to the table. This allows the patient to passively extend the back by using the upper-extremity muscles (McKenzie, 1981).
Range of motion should be recorded on a movement diagram. Normal range of motion is 30 degrees (American Academy of Orthopedic Surgeons, 1965).
Lateral Bending
Instruct the patient to stand with the feet approximately 6 in. apart. Stand behind the patient to observe the back during the movement. Instruct the patient to allow their ear to approach the shoulder on the side to which he or she is moving. Then ask the patient to slide the hand down the lateral aspect of the lower extremity as he or she bends the trunk to that side (Figure 6.26C). This movement should be repeated to the right and left and comparison of the degree and quality of movement noted. Patients may try to increase the motion by lifting their lower extremity off the floor and hiking their hip. This can be minimized by stabilizing the pelvis with your arm as the patient performs the movement testing. Note any discontinuity of the curve. An angulation of the curve may indicate an area of hypermobility or hypomobility. Note the smoothness in which each intervertebral level contributes to the overall movement. Note whether the range is limited by pain or the patient’s anticipation of pain. Range of motion is most easily recorded on a
Chapter 6 The Lumbosacral Spine
movement diagram. You can measure the distance from the tip of the middle finger to the floor and compare one side to the other. Normal range of motion is 35 degrees (American Academy of Orthopedic Surgeons, 1965).
McKenzie (1981) prefers to have the patient perform a side-gliding movement while standing instead of side bending. This movement is accomplished by instructing the patient to move the pelvis and trunk to the opposite direction while maintaining the shoulders level in the horizontal plane. This movement combines rotation and side bending simultaneously.
If the patient experiences increased symptoms as he or she bends toward the side with the pain, the problem may be caused by an intra-articular dysfunction or a disc protrusion lateral to the nerve root. If the patient experiences increased symptoms as he or she bends away from the side with the pain, the problem may be caused by a muscular or ligamentous lesion, which will cause tightening of the muscle or ligament. The patient may have a disc protrusion medial to the nerve root. A detailed neurological examination will help differentiate between the diagnoses.
Rotation
Instruct the patient to stand with the feet approximately 6 in. apart. Stand behind the patient to observe the back during the movement. Instruct the patient to start by turning the head in the direction in which he or she is going to move and allowing the trunk to continue to turn (Figure 6.26D). Patients tend to compensate for limitation of rotation by turning the entire body. This can be minimized by stabilizing the pelvis with your arm or having the patient perform the test while sitting. This movement should be repeated toward the right and left. Compare the degree and quality of movement from side to side. Note any discontinuity of the curve. Note the smoothness in which each intervertebral level contributes. Note whether the range is limited by pain or the patient’s anticipation of pain.
Range of motion can be recorded on a movement diagram. Normal range of motion is 45 degrees (American Academy of Orthopedic Surgeons, 1965).
Passive Movement Testing
Passive movement testing can be divided into two categories: physiological movements (cardinal plane), which are the same as the active movements, and
111

The Lumbosacral Spine Chapter 6
mobility testing of the accessory (joint play, component) movements. You can determine whether the noncontractile (inert) elements can be incriminated by using these tests. These elements (ligaments, joint capsule, fascia, bursa, dura mater, and nerve root) (Cyriax, 1979) are stretched or stressed when the joint is taken to the end of the available range. At the end of each passive physiological movement, you should sense the end feel and determine whether it is normal or pathological. Assess the limitation of movement and determine whether it fits into a capsular pattern. The capsular pattern of the lumbar spine is equally limited lateral bending and rotation followed by extension (Magee, 1997). This pattern is only clearly noticeable when multiple segments are involved. Paris (1991) described a capsular pattern for the lumbar spine secondary to a facet lesion. With the facet lesion on the right, lateral bending is limited to the left, rotation is limited to the right, and forward bending deviates to the right.
Physiological Movements
Passive testing of the gross physiological movements is difficult to accomplish in the lumbar spine because of the size and weight of the trunk. Maneuverability of the trunk is cumbersome and the information that
can be obtained is of limited value. You can obtain a greater sense of movement and understanding of the end feel by performing passive intervertebral movement testing.
Mobility Testing
Mobility testing of intervertebral joint movements and accessory movements will give you information about the degree of laxity present in the joint and the end feel. The patient must be totally relaxed and comfortable to allow you to move the joint and obtain the most accurate information.
Intervertebral Mobility of the Lumbar Spine
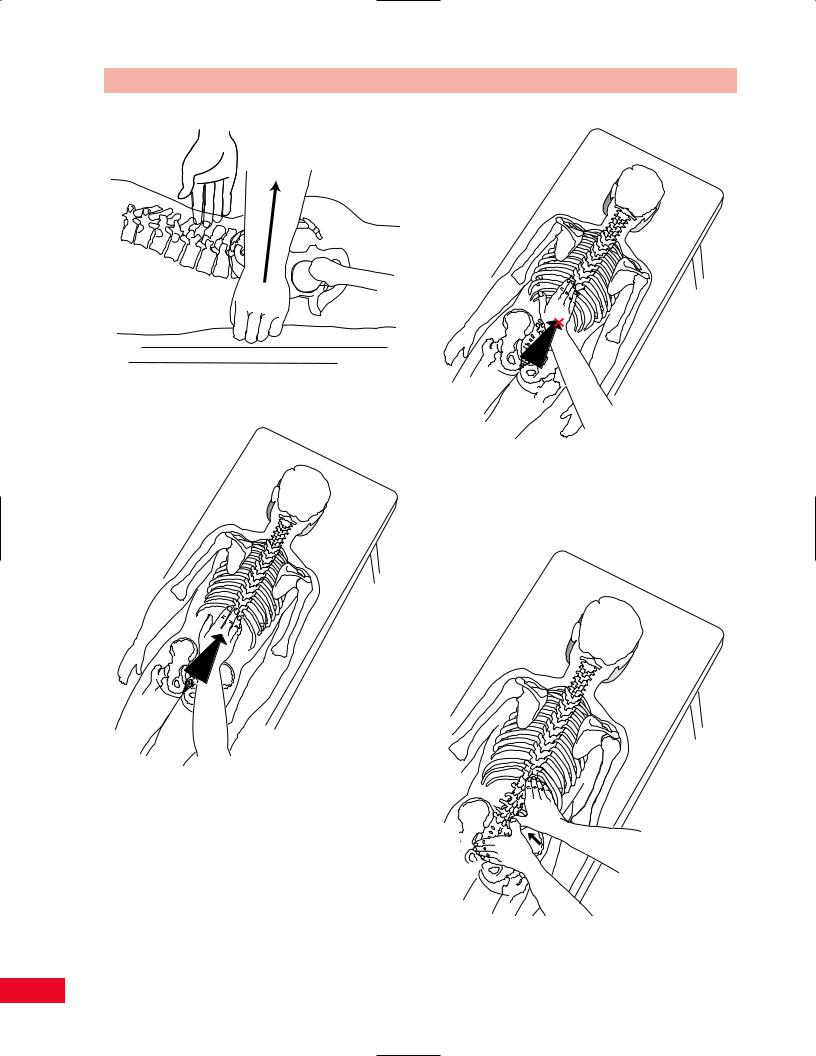
Flexion
Place the patient in the side-lying position facing you, with the head and neck in neutral alignment. Stand so that you are facing the patient. Be careful not to allow the trunk to rotate or your findings will be distorted. Place your middle finger in the interspace between the spinous process of L5 and S1. Flex the patient’s hips and knees. Support the patient’s lower extremities on your hip creating flexion of the lumbar spine to the level that you are palpating by increasing the degree of hip flexion. Note the opening of the
Figure 6.27 Mobility testing of lumbar spine flexion.
112

intervertebral space. You can slightly extend the spine to get a better sense of opening and closing. Slightly increase the degree of flexion to palpate the next intervertebral segment and continue in a cranial fashion (Figure 6.27).
Side Bending
Place the patient in the prone position with the neck in neutral rotation. Stand on the side of the patient that is on the side of your dominant eye, with your body turned so that you are facing the patient’s head. Place your middle finger in the interspace between the spinous processes of L5 and S1. Hold the patient’s lower extremity that is closer to you. Flex the patient’s knee to shorten the lever arm and support the lower extremity with your arm. Move the lower extremity into abduction until you feel movement at the interspace that you are palpating. This will create bending to the side on which you are standing and you will feel a narrowing of the interspace. You can also palpate on the opposite side and you will feel opening of the interspace. Slightly increase the degree of side bending by creating additional abduction to palpate the next intervertebral segment and continue in a cranial fashion (Figure 6.28).
Chapter 6 The Lumbosacral Spine
Rotation
Place the patient in the prone position with the neck in neutral rotation. Stand on the side of the patient that is on the side of your dominant eye, with your body turned so that you are facing the patient’s head. Place your middle finger on the side of the spinous process of L5 that is closest to you. Hold the patient’s innominate bone on the side opposite from which you are standing. Lift the pelvis toward the ceiling. This will create rotation of L5 away from you and you will sense the spinous process moving into your palpating finger (Figure 6.29).
Accessory Movements of the Lumbar Spine
Central Posteroanterior Spring on the Spinous Process
Place the patient in the prone position with the neck in neutral rotation. Stand on the side of the patient that is on the side of your dominant eye, with your body turned so that you are facing the patient’s head. Place the central portion of your palm (between the thenar and hypothenar eminences) over the spinous process and press directly over the process in an anterior direction until all the slack has been taken up (Figure 6.30).
Figure 6.28 Mobility testing of lumbar spine side bending.
113
The Lumbosacral Spine Chapter 6
Figure 6.29 Mobility testing of lumbar spine rotation.
Figure 6.31 Mobility testing of central posteroanterior spring on the transverse process.
Figure 6.30 Mobility testing of central posteroanterior spring on the spinous process.
Posteroanterior Spring on the Transverse Process
Place the patient in the prone position with the neck in neutral rotation. Stand on the side of the patient that is on the side of your dominant eye, with your body turned so that you are facing the patient’s head. Place the hypothenar eminence, just medial to the pisiform, over the transverse process on the side closest to you.
Figure 6.32 Mobility testing of transverse pressure on the spinous process.
114