

MusculoSkeletal Exam
.pdfChapter 8 The Shoulder
Dislocation
Figure 8.85 Appearance of a dislocated right shoulder. Always assess the patient for neurovascular damage when a dislocation is suspected.
Suprascapular nerve can be compressed against the spine of the scapula
Figure 8.86 The location of the suprascapular nerve close to the skin can cause it to be compressed against the underlying bone.
Figure 8.87 Characteristic position of a patient with an ErbDuchenne palsy of the upper extremity, also referred to as a waiter’s tip posture. The shoulder is internally rotated and adducted, and the wrist is flexed.
per cent of shoulder dislocations occur anteriorly. The patient with acute shoulder dislocation shows a characteristic posture of the arm held close to the body, with a prominent acromion and a depression below the deltoid. Any movement of the arm or shoulder is extremely painful.
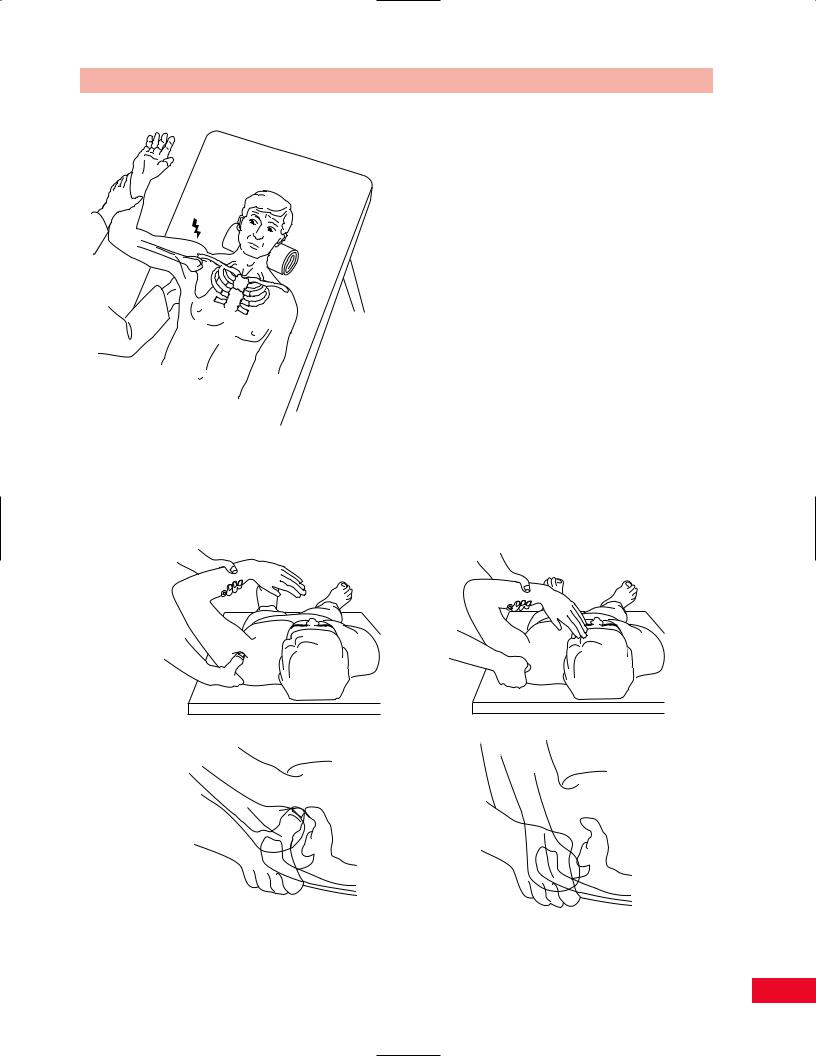
The apprehension test is performed with the patient in the supine position. Take the patient’s forearm with one hand and support the patient’s upper arm posteriorly with your other hand. Gently and slowly abduct and externally (laterally) rotate the arm. A positive finding is noted when the patient appears to be afraid that the arm may dislocate. The patient may resist further motion and may state that the shoulder feels as though it is going to pop out (see Figure 8.89).
As you are performing this test, note the degree of external rotation at which the patient begins to become apprehensive. At this point, put a posterior stress on the humerus with one of your hands by pressing on the proximal part of the humerus anteriorly. You may now be able to further externally rotate the arm with this posterior stress. This is called a relocation test (Fowler or Jobe relocation test).
185
A B
C  D
D
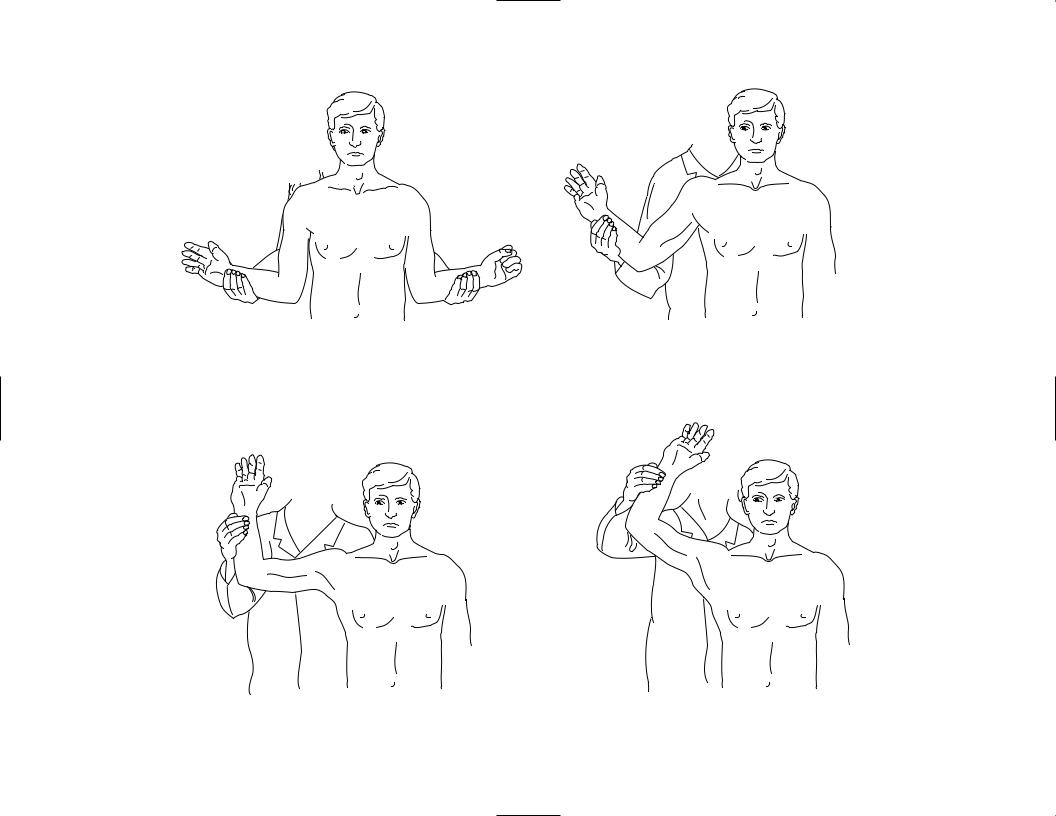
Figure 8.88 Anterior instability test (Rockwood test). This test is used to identify weakness or insufficiency of the anterior capsular and labral structures. (A) With the arms at the sides. (B) With the arm in 45 degrees of abduction. (C) With the arm at 90 degrees of abduction. Look for apprehension and posterior pain in this position, for a positive test result. (D) With the arm at 120 degrees.
Chapter 8 The Shoulder
Figure 8.89 The anterior apprehension test.
Posterior Drawer Test of the Shoulder
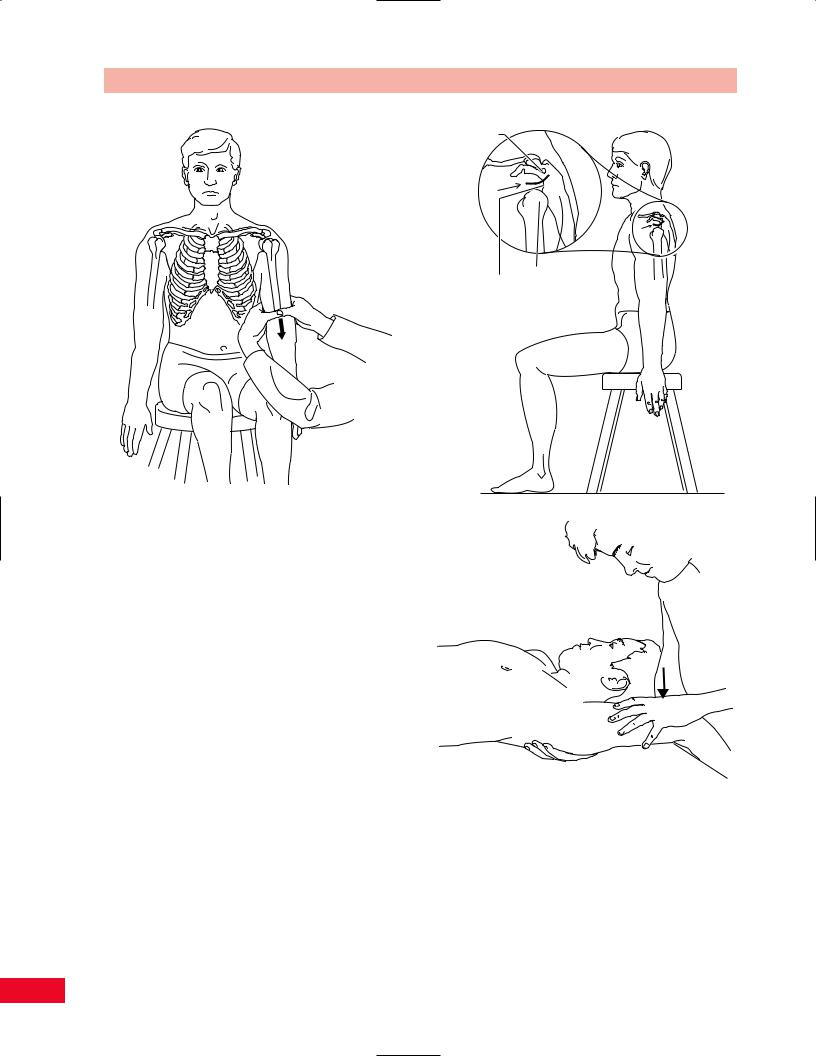
This test is used to determine whether there is posterior shoulder instability. The test is performed with the patient in the supine position. Stand next to the patient and grasp the proximal end of the forearm with one hand while allowing the elbow to flex to 120 degrees. Now position the shoulder so that it is in 30 degrees of forward flexion and approximately 100 degrees of abduction. Take your other hand and stabilize the scapula by placing your index and middle fingers on the spine of the scapula and your thumb over the coracoid process. Now flex the shoulder forward to 80 degrees and rotate the forearm medially. While doing this with one hand, move your thumb off the coracoid process and push the head of the humerus posteriorly. You should be able to palpate the head of the humerus with the index finger of your hand. If this test causes apprehension in the patient, or if there is greater posterior mobility of the humeral head than on the opposite side, the test result is positive and indicates posterior instability (Figure 8.90A–D).
A |
B |
C D
Figure 8.90 Test for posterior drawer of the shoulder. (A, B) How the test is performed. (C, D) The test with a superimposed drawing of the bones on the skin.
187
The Shoulder Chapter 8
Acromium
Humeral Sulcus head sign
A
Figure 8.91 Testing for inferior instability.
Inferior Instability and Multidirectional
Instability Test
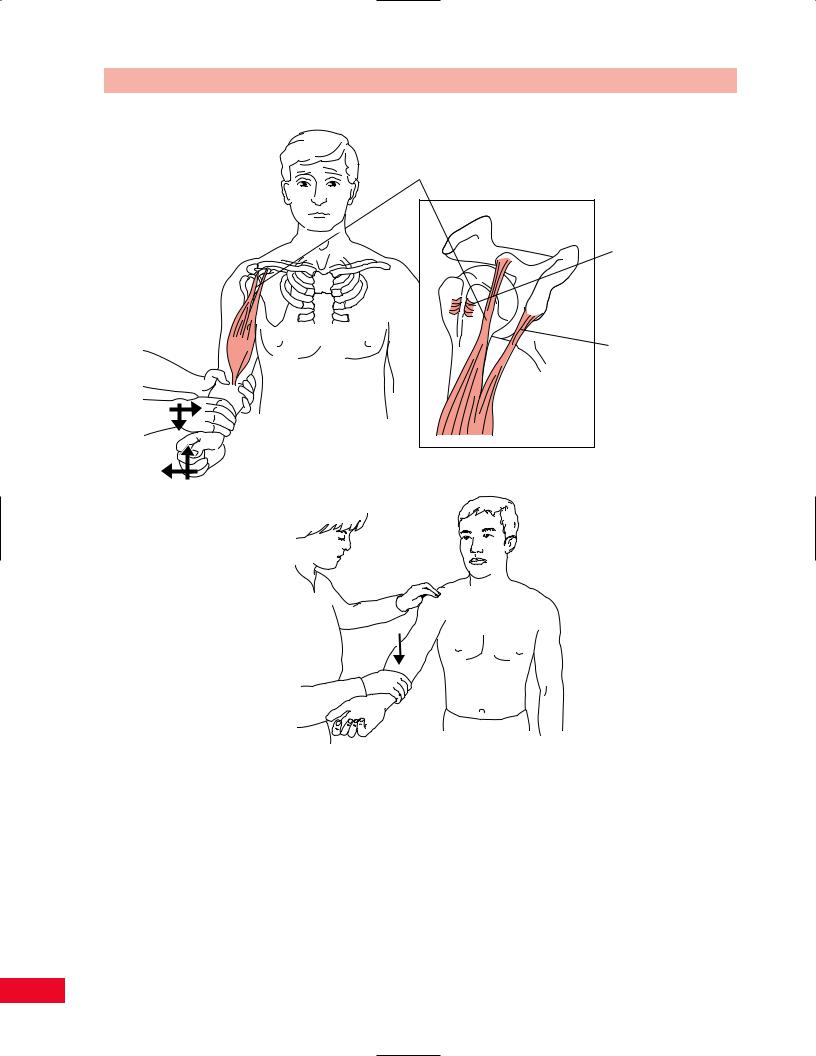
This test is performed to find multidirectional or inferior instability of the shoulder joint. It can be done with the patient sitting or lying down. Traction along the long axis of the humerus is performed by placing one hand on the scapula for stabilization, with your index finger just below the acromion. Take your other hand and apply downward traction force on the humerus by holding the middle part of the patient’s forearm. Try to appreciate a palpable gap between the acromion and the humerus, which indicates inferior instability. The patient may have a notable gap, on observation, below the acromion. This is called a sulcus sign. This is very common in stroke patients (Figures 8.91 and 8.92).
Other tests for multidirectional instability of the shoulder include the Feagin test and the Rowe test.
Clunk Test
This test is performed to confirm a tear of the glenoid labrum. The patient is in supine. Place one hand on the arm above the elbow and put your other hand
B
Figure 8.92 (A) The appearance of a gap below the acromion in a patient who has hemiplegia. (B) The clunk test for glenoid labral tears.
over the humeral head. Now, bring the arm into full abduction. Push the humeral head anteriorly while your other hand laterally rotates the humerus. A grinding sound or “clunk” indicates a labral tear (Figure 8.92A).
188
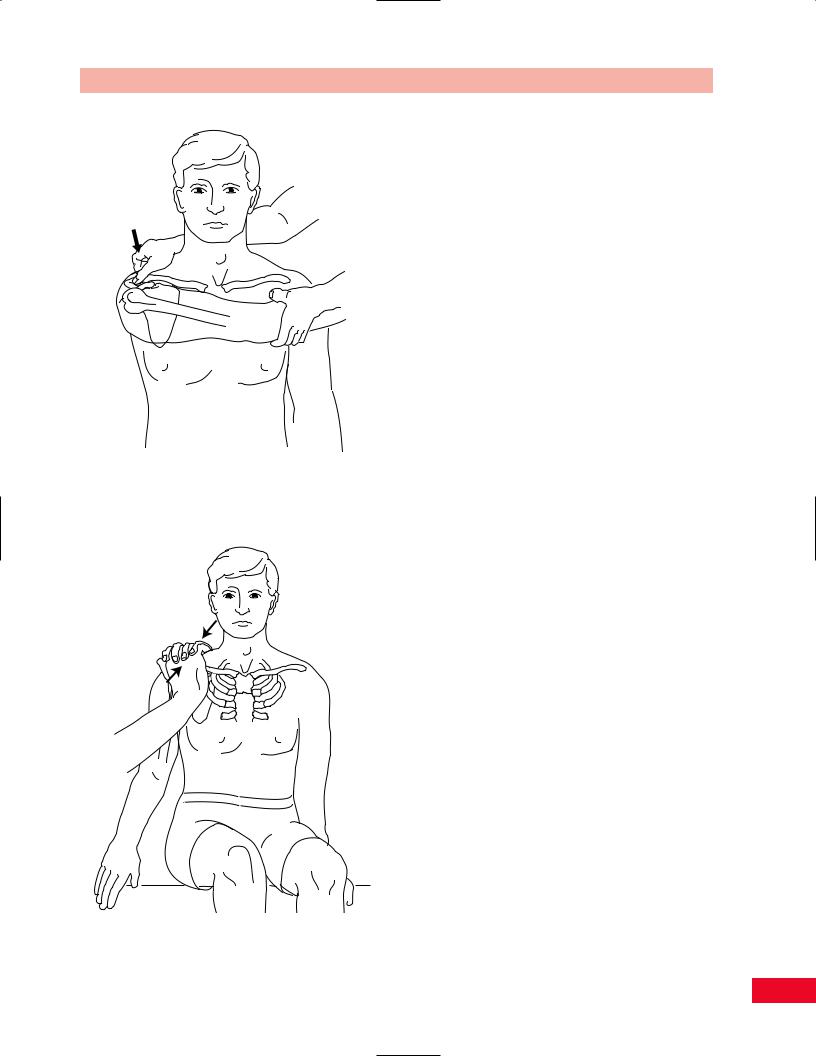
Figure 8.93 The cross-flexion test.
Figure 8.94 The acromioclavicular shear test.
Chapter 8 The Shoulder
Tests for the Acromioclavicular Joint
Cross-Flexion Test
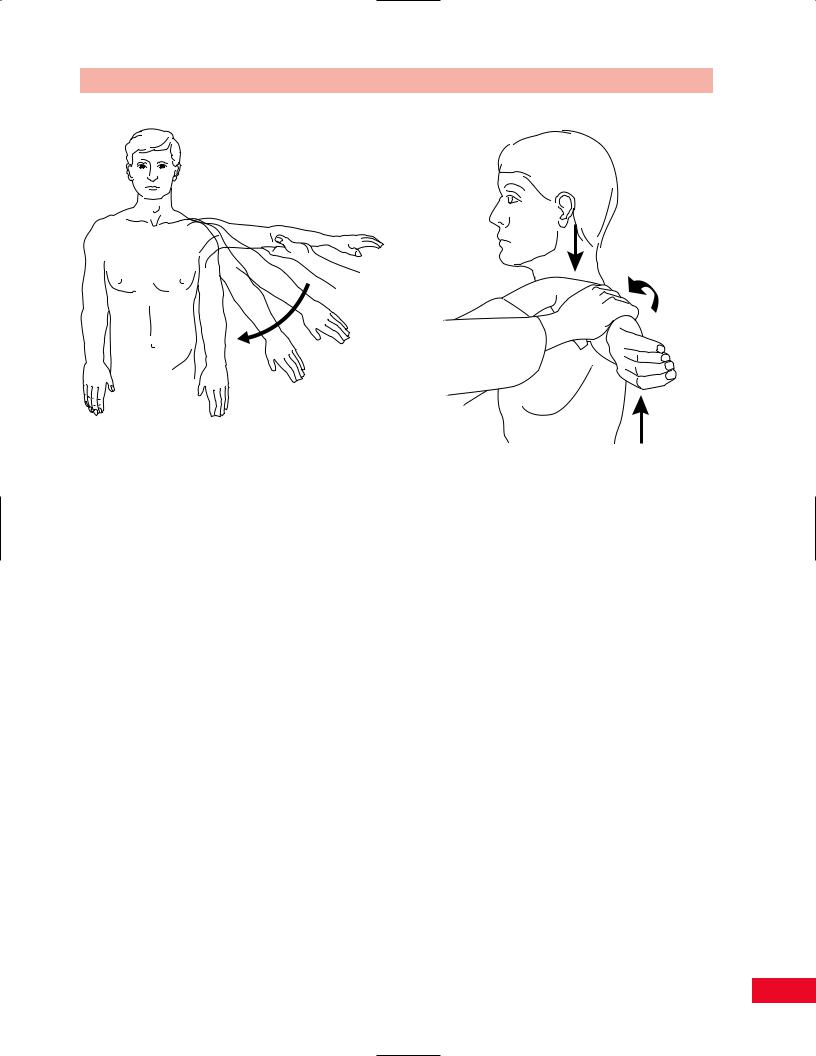
By taking the patient’s arm and abducting it to 90 degrees, and flexing the arm across the body, you can exacerbate the pain emanating from the acromioclavicular joint. Palpate the joint with your thumb while forcing cross-flexion of the patient’s arm with your other hand (Figure 8.93).
Acromioclavicular Shear Test
This test is used to determine whether the source of pain is the acromioclavicular joint. With the patient in the seated position, cup your hands over the anterior and posterior aspects of the shoulder. Squeeze the clavicle and scapular spine toward each other with your palms. This compresses the acromioclavicular joint. The result is positive if the patient complains of pain or if you note any abnormal movement (Figure 8.94).
Test for Tendinous Pathology
Yergason’s Test of the Biceps
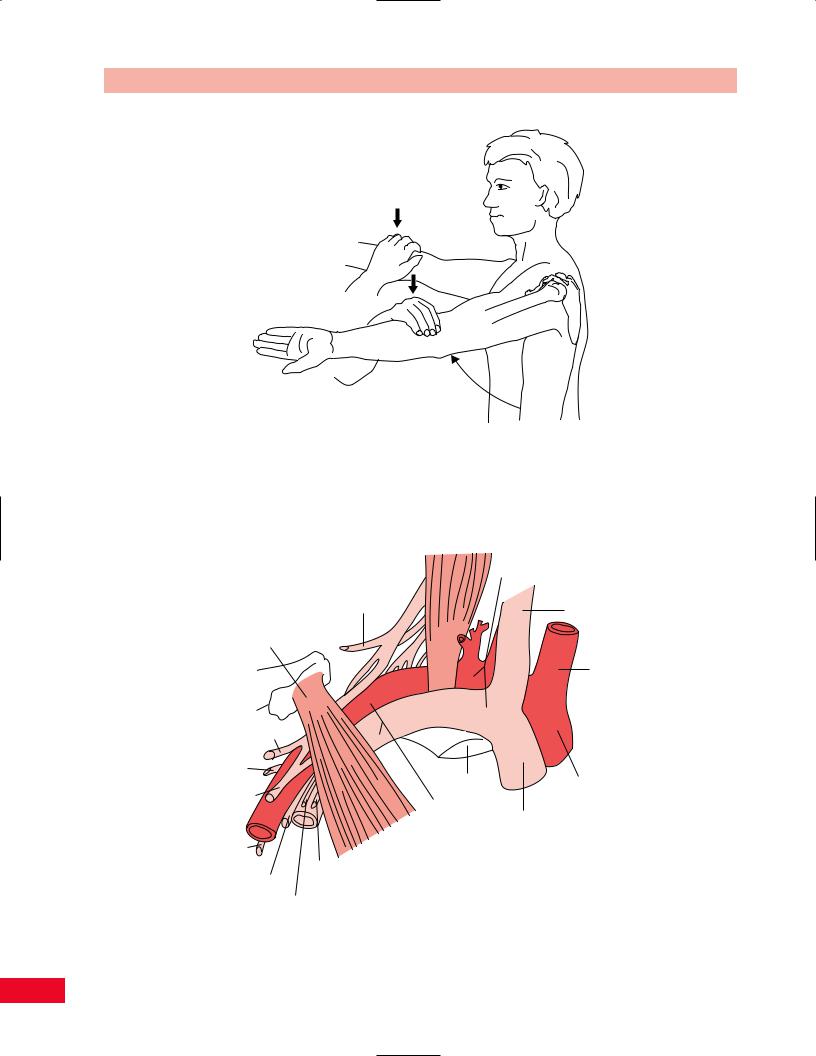
This test stresses the long head of the biceps tendon in the bicipital groove to determine if it remains within the groove. The patient is in the standing position with you at the side. Take the patient’s elbow with one hand and grasp the forearm with the other. The patient’s elbow should be flexed to 90 degrees and the arm should be against the thorax. Ask the patient to resist external rotation of the arm as you pull the forearm toward you. At the same time, push downward as the patient also resists flexion of the elbow. Resistance of attempted supination can also be included. If the biceps tendon is unstable within the bicipital groove, the patient will experience pain and the tendon may pop out of place (Figure 8.95A,B).
Speed’s Test of the Biceps
This test is used to confirm biceps tendinitis or partial rupture of the tendon. The patient is sitting with the elbow fully extended and the shoulder forward flexed to 90 degrees. Resist forward flexion with the forearm in supination and then pronation. The test is positive when the patient feels pain in the bicipital groove (Figure 8.95C).
189
The Shoulder Chapter 8
Tendon of the long head of biceps
Torn transverse humeral ligament
Short head of the biceps
B
A
C
Figure 8.95 (A) The Yergason test for integrity of the long head of the biceps tendon in the bicipital groove. (B) If the ligament that restrains the long head of the biceps tendon within its groove is damaged, the biceps will sublux, as shown. (C) Speed’s test for biceps tendinitis.
Tests for Impingement of the
Supraspinatus Tendon
Drop Arm Test
This test is performed to determine whether there is a tear of the rotator cuff tendons. The patient can be standing or sitting. Stand behind the patient and abduct the arm to 90 degrees passively with the elbow extended. Ask
the patient to slowly lower the arm back to the side. The test result is positive if the patient is unable to lower the arm slowly (i.e., it drops), or if the patient has severe pain while attempting this maneuver (Figure 8.96A,B).
Hawkins Supraspinatus Impingement Test
This test brings the supraspinatus tendon against the anterior portion of the coracoacromial ligament. With
190
Chapter 8 The Shoulder
Figure 8.96 (A) The patient’s arm is passively elevated by the |
|
examiner. (B) The patient’s arm drops suddenly due to an |
|
inability to hold the arm up as a result of tears in the rotator cuff. |
Figure 8.97 The supraspinatus impingement test (Hawkins’ test). |
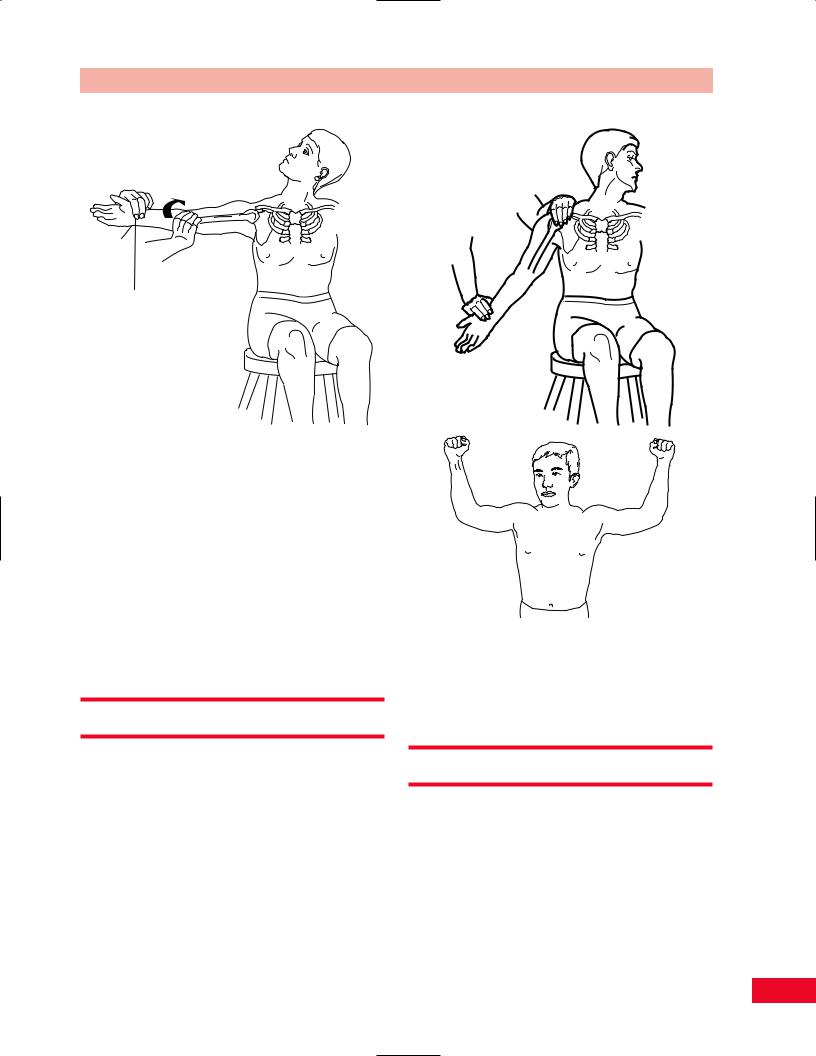
the patient standing, take the arm and forward flex the shoulder to 90 degrees; then forcibly internally rotate the shoulder. This will cause pain if the patient has supraspinatus tendinitis (Figure 8.97).
Supraspinatus Test (Empty Can Test)
This test is also performed to examine the supraspinatus tendon for pathology. The patient can be sitting or in the supine position. Stand in front of the patient and have him or her abduct the shoulder to 90 degrees and then forward flex the arm approximately 30 degrees with the arm internally rotated so that the thumb points down to the ground. Place your hand over the patient’s elbow and apply downward pressure as the patient attempts to raise the arm upward against your resistance. If this is painful, the patient likely has pathology of the supraspinatus tendon (Figure 8.98).
Tests for Thoracic Outlet Syndrome
The tests used for diagnosis of thoracic outlet syndrome attempt to narrow the thoracic outlet and reproduce symptoms or signs of neurovascular compression (numbness, tingling, pain, loss of palpable pulses) (Figure 8.99).
Adson’s Maneuver
The patient is sitting and the arm is outstretched. Find the patient’s radial pulse with one hand. While palpating the pulse, ask the patient to turn his or her head so as to face the test shoulder. Then ask the patient to extend the head while you laterally rotate and extend the patient’s shoulder and arm. Now ask the patient to take a deep breath and hold it (Valsalva’s maneuver). A disappearance of the pulse indicates a positive test result (Figure 8.100). This occurs because the anterior scalene muscle is being stretched and it pulls the first rib upward, narrowing the thoracic outlet.
Wright’s Maneuver
The patient is seated, with you on the side to be tested. Palpate the patient’s radial pulse with one hand. Ask the patient to rotate the head away from you and the test shoulder. Ask the patient, at the same time, to elevate the chin in a torsional manner, again away from the side that is being tested. Now ask the patient to take a deep breath and hold it in (Valsalva’s maneuver). The test result is positive if symptoms are aggravated or precipitated, or if the pulse is no longer palpable (Figure 8.101A).
191
The Shoulder Chapter 8
30°
Figure 8.98 The supraspinatus test.
Subclavian artery and vein
Suprascapular nerve |
Internal jugular vein |
|
Pectoralis minor
Right common carotid artery
Musculocutaneous nerve |
|
|
Axillary nerve |
|
|
|
1st rib |
Brachiocephalic |
Median nerve |
|
|
Axillary artery |
trunk |
|
|
|
|
|
and vein |
Right |
|
|
brachiocephalic |
Radial nerve |
|
vein |
|
|
|
|
Medial brachial |
|
Ulnar nerve |
cutaneous nerve |
|
Medial antebrachial cutaneous nerve
Figure 8.99 The structures of the thoracic outlet. Note the position of the nerves, arteries, and veins as they pass over the first rib and beneath the pectoralis minor muscle.
192
Chapter 8 The Shoulder
Check the pulse
Figure 8.100 Adson’s maneuver for testing for thoracic outlet syndrome.
Roos Test
The patient stands and abducts and externally rotates their arms. The elbows are flexed to 90 degrees. The patient then opens and closes their fists for 3 minutes. If they experience ischemic pain in the arm, numbness or tingling in the hand, or extreme weakness, the test is positive for thoracic outlet syndrome on the affected side (Figure 8.101B).
A
B
Figure 8.101 (A) Wright’s maneuver for testing for thoracic outlet syndrome. (B) Roos test for thoracic outlet syndrome.
Referred Pain Patterns
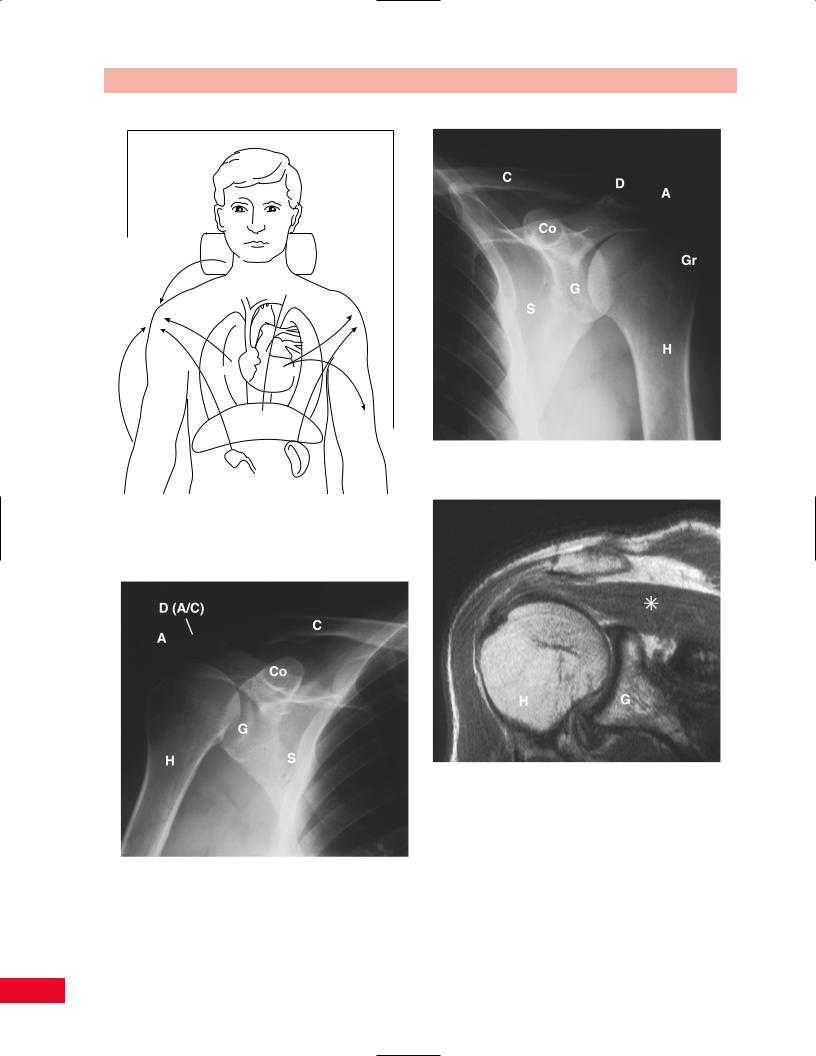
A painful shoulder may be due to irritation of the diaphragm that can occur with hepatobiliary or pancreatic disease. An apical lung tumor (Pancoast’s tumor) may cause pain in the shoulder as well. A C5 or C6 radiculopathy frequently causes shoulder pain. Pain may radiate from the elbow to the shoulder. Cardiac pain is also sometimes felt in the shoulder. Embryologically, there is a common origin of innervation of the diaphragm and adjacent internal organs (liver, gallbladder, and heart). This innervation originates near the midcervical spine (Figure 8.102). For this reason, inflammation of these organs may be perceived as discomfort (referred pain) in the C5 or C6 dermatome.
Radiological Views
Radiological views of the shoulder are presented in Figures 8.103, 8.104, and 8.105.
A = Acromion
C = Clavicle
Co = Coracoid process D = A/C joint
G = Glenoid
Gr = Greater tubercle of the humerus H = Humerus
S = Scapula
193
The Shoulder Chapter 8
Cervical spine
Lungs Heart
Diaphragm
Elbow
Figure 8.104 External rotation view of the shoulder.
Gallbladder
Spleen
Figure 8.102 Structures referring pain to the shoulder. These organs have a common embryological origin with the midcervical spine and therefore may radiate pain to the shoulder.
Figure 8.105 Magnetic resonance image of the shoulder (* = rotator cuff).
Figure 8.103 Internal rotation view of the shoulder.
194