

Beginning CSharp Game Programming (2005) [eng]
.pdfThis page intentionally left blank

PART II
Game
Programming
in C#
Chapter 6
Setting Up a Framework . . . . . . . . . . . . . . . . . . . . . . . . . . . . . . . . . . . . .123
Chapter 7
Direct3D . . . . . . . . . . . . . . . . . . . . . . . . . . . . . . . . . . . . . . . . . . . . . . . . . .145
Chapter 8
DirectInput . . . . . . . . . . . . . . . . . . . . . . . . . . . . . . . . . . . . . . . . . . . . . . . .197
Chapter 9
DirectSound . . . . . . . . . . . . . . . . . . . . . . . . . . . . . . . . . . . . . . . . . . . . . . .219
Chapter 10
Programming the Keyboard, Mouse, and Joystick . . . . . . . . . . . . . . . .227
Conclusion . . . . . . . . . . . . . . . . . . . . . . . . . . . . . . . . . . . . . . . . . . . . . . .283

ou’ve just completed five chapters that showed you most of what you should need Yto know about C# in order to get on your way into game programming, but you’re not all the way there yet! You’ve only learned about the C# language itself—you’ve yet to learn many general game programming concepts or which important multimedia
components you’ll need to create your own games. This part of the book aims to remedy that problem by teaching you how to build a framework in C#, as well as how to use the graphics, input, and sound libraries of DirectX. Finally, in this part of the book, I’ll show you how to assemble a game on your own.

chapter 6
Setting Up a
Framework
So far all you’ve been doing is simple console-mode stuff. That’s great, but it really doesn’t help you make a game with all the graphical goodness that DirectX provides. I’m going to cut right to the chase and leave out all the stupid GDI and GUI control stuff because, as a game programmer, you probably aren’t going to need to know it anyway. Learning about the GUI components may come in handy later on, when you make complicated game resource editors, but unfortunately, there’s just not enough room to include that information in this book.
This chapter will teach you:
How to create a new project in SharpDevelop.
How to create a new project in Visual C#.
How to use project wizards to create a framework.
How to use the basic features of a form.
How to use form event handlers.
How to use the DirectX high precision timer.
How to use the Advanced Framework’s timer.
How the Advanced Framework works.
How to play nicely with the operating system.
How to handle losing window focus.
Creating a Project
The absolute neatest thing about today’s modern Integrated Development Environments (IDEs) is that they contain wizards.
123

124 Chapter 6 Setting Up a Framework
n o t e
An IDE is simply the program you use to develop and compile your code. Microsoft’s Visual C# is an IDE, and so is SharpDevelop. SharpDevelop is a completely free C# IDE that you can download at http://www.icsharpcode.net/OpenSource/SD/.
A wizard is simply a simple program that performs a complex task for you, handling all the messy little details so that you don’t have to waste your time handling them yourself.
In the bad old days of game programming, people would spend hours piecing together a little framework to use. A framework, in a programming sense, is something that would not contain code that was specific to any single game, and so could be used over and over with a variety of different games. Frameworks would typically have code to handle interfacing with the operating system and so on.
Today, both of the major C# IDEs (VC# and SharpDevelop) have wizards that will generate frameworks for you automatically.
SharpDevelop
In SharpDevelop, creating a Direct3D project is pretty easy. All you have to do is go to the File menu, click on New, and then select Combine. The project wizard will pop up, displaying a screen something like that in Figure 6.1.
n o t e
In some older versions of the SharpDevelop IDE, you’ll select New Project rather than New Combine, so don’t be discouraged if the New Combine option doesn’t appear. A project is a collection of source files, and a combine is a collection of projects. As with all software, versions may vary, so be sure to read the documentation of the version you’re using to figure out how to create a combine.
Figure 6.1 The SharpDevelop project wizard.
Creating a Project |
125 |
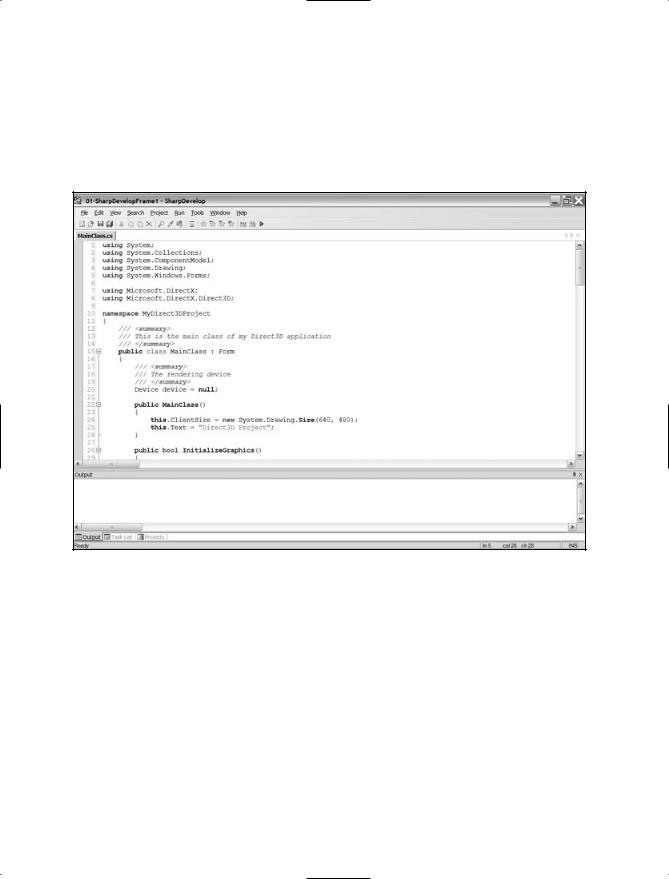
The wizard is pretty robust and gives you a lot of options. The option you’re interested in is shown in Figure 6.1: Direct3D Project. The wizard asks you for a name for your project and a place to put it in, and that’s about all. Once you’ve entered in this information, the wizard will automatically generate source code files and project files for you, and you’ll be ready to go! Figure 6.2 shows the final product.
Figure 6.2 The final result of the SharpDevelop project wizard
You now have a simple framework that will allow you to create your very own Direct3D projects.
Files
On my version of SharpDevelop (0.99), the wizard created four files, which you can find on the CD as Demo 6.1. They are
01-SharpDevelopFrame1.cmbx
01-SharpDevelopFrame1.prjx
AssemblyInfo.cs
MainClass.cs

126Chapter 6 Setting Up a Framework
The first two files are the combine file and the project file, respectively. They simply store information about your project files. The next file, AssemblyInfo.cs, is a C# source file that contains information that tells .NET how your project is assembled—you’re more than likely not going to need to touch this file at all. The final file is what you saw in Figure 6.2. This source file contains all the code you need in order to start making your own Direct3D application.
Explanation of the Code
The code is fairly straightforward, but you haven’t seen a lot of the things in it before, so I’m going to go over it piece by piece in the next subsections.
The Libraries
The first part of the framework is the libraries used:
using System;
using System.Collections; using System.ComponentModel; using System.Drawing;
using System.Windows.Forms;
using Microsoft.DirectX;
using Microsoft.DirectX.Direct3D;
You’ve used the first two libraries before, but you haven’t used the next five.
System.ComponentModel holds various classes needed for basic control behavior in a windowed program.
System.Drawing holds classes that are used for (obviously) drawing functions.
System.Windows.Forms holds classes that are used for displaying forms.
Microsoft.DirectX holds DirectX information.
Microsoft.DirectX.Direct3D holds information about Direct3D.
The Class Outline
The main class, with all the code chopped out, looks like this:
public class MainClass : Form
{
Device device = null;
public MainClass()
public bool InitializeGraphics()

Creating a Project |
127 |
virtual void InvalidateDeviceObjects(object sender, EventArgs e) virtual void RestoreDeviceObjects(object sender, EventArgs e) virtual void DeleteDeviceObjects(object sender, EventArgs e) virtual void EnvironmentResizing(object sender, CancelEventArgs e)
virtual void FrameMove() virtual void Render() public void Run()
override void OnPaint(PaintEventArgs e) override void OnKeyPress(KeyPressEventArgs e)
static void Main()
}
n o t e
I removed the protected tags from a lot of the functions because it made them too long to fit on the page. Anything that doesn’t have an access modifier on it in the previous code listing is supposed to be protected.
The first thing you should notice about this class is that it inherits from System.Windows. Forms.Form, which is a class that you need to use whenever you make a windowed application. Whenever you open up a new Windows program, the window you see is called a form, and the Form class provides all of the functionality needed to operate a form. So whenever you create a new windowed program, you must derive from the Form base class.
The Mainclass contains a Direct3D device, named device. I’ll get into Direct3D devices in a later chapter.
The Constructor
The constructor of your class sets up the form:
public MainClass()
{
this.ClientSize = new System.Drawing.Size(640, 480); this.Text = “Direct3D Project”;
}
The constructor sets the size of the window to 640×480, and then sets the window title to Direct3D Project. Obviously, you’re going to want to change these values to whatever you would like them to be later on.

128Chapter 6 Setting Up a Framework
Initializing the Graphics
The next function initializes the graphics engine. I’m just going to do a brief rundown of the code here, and then give you a far more in-depth tutorial on graphics in Chapter 7,“Direct3D.”
public bool InitializeGraphics()
{
try {
PresentParameters presentParams = new PresentParameters(); presentParams.Windowed = true;
presentParams.SwapEffect = SwapEffect.Discard;
device = new Device(0, DeviceType.Hardware, this, CreateFlags.SoftwareVertexProcessing, presentParams);
The previous code creates a new graphics device. It’s not going to make a whole lot of sense to you right now, but don’t worry that much about it. Just know that it works, and that I’ll get to it in much more detail in Chapter 7.
The next part of the code sets up the event handlers (which are delegates):
device.DeviceLost |
+= new EventHandler(this.InvalidateDeviceObjects); |
device.DeviceReset |
+= new EventHandler(this.RestoreDeviceObjects); |
device.Disposing |
+= new EventHandler(this.DeleteDeviceObjects); |
device.DeviceResizing += new CancelEventHandler(this.EnvironmentResizing);
The first three events handle whenever a device is lost (say, if the user switches to another window), the device is reset for any reason, or the device is disposed of. These first three events are solid events; when they happen, you have to handle them. No ifs, ands, or buts about it—the operating system is telling you something happened and your event handler has to take care of the situation.
The final event handles when the graphics device is resized, which is a special kind of event because it can be cancelled. A cancelable event is an event that your program can decide to reject. For example, if the user says he’s going to resize your game window, your program will get the event, but you can tell the operating system, “Nope, it’s not gonna happen!” and the event won’t complete. This behavior is used mostly to prevent forms from closing before the user saves his data in windows applications.
The final part of the code returns true for a successful initialization, or catches any DirectXExceptions that may have been thrown and returns false:
return true;
} catch (DirectXException) { return false;
}
}

Creating a Project |
129 |
The Event Handlers
There are four event handlers to handle the four events you saw earlier:
virtual void InvalidateDeviceObjects(object sender, EventArgs e) virtual void RestoreDeviceObjects(object sender, EventArgs e) virtual void DeleteDeviceObjects(object sender, EventArgs e) virtual void EnvironmentResizing(object sender, CancelEventArgs e)
All four of these functions are protected, and none of them has any code in them. The code is something you’re supposed to put in them yourself, depending on how you want the program to respond. The first parameter for each function is the sender, the object that is sending the event to the handler. In this case, the sender would be the Direct3D device variable sending the messages, but it’s never a good idea to assume so.
The second parameter for each is the event arguments (EventArgs), which describes information about the event for you. I’ll go into much more detail about these in Chapter 7.
Game Processing
Most game frameworks are very similar; they have separate functions to perform game logic, and then draw the current scene to the user. This framework is no exception, and provides these two functions for you:
protected virtual void FrameMove()
{
// TODO : Frame movement
}
The FrameMove function is completely bare; you have to fill it in yourself. That function is where you would put all of your actual game logic calculations, AI processing, physics modeling, network communication, and so on.
protected virtual void Render()
{
if (device != null) {
device.Clear(ClearFlags.Target, Color.Blue, 1.0f, 0); device.BeginScene();
// TODO : Scene rendering
device.EndScene();
device.Present();
}
}