

Beginning ActionScript 2.0 2006
.pdfChapter 1
About Layers, Depth, and Levels
Timelines enable you to add layers. If you place content on unique layers, you can then sort the layer order to affect which content appears in front and which appears behind. You can change the order of layers by dragging them up or down within the timeline.
Layers are an authoring time convention. Flash Player doesn’t know anything about layers. Instead, when a Flash movie is exported, it converts all content on layers to depths. Conceptually, depths are similar to layers, but they are accessible programmatically. Flash allows only one object per depth. If you add content to a depth that already contains content, the existing content is deleted.
ActionScript enables you to add content programmatically. Because programmatic content is added at runtime, you must use depths and not layers. Methods such as attachMovie() and createTextField() that add content programmatically require that you specify depths. Depths are integer values. The higher the number, the further in front an object appears. For example, an object with a depth of 2 appears in front of an object with a depth of 1. Content added at authoring time (on layers on the timeline) are placed at depths starting at –13683. That means that authoring time content appears behind content added programmatically, assuming you use positive depths when you add that content.
Every movie clip encapsulates its own set of depths. For example, if you have two Movie Clip instances, A and B, and each contains nested Movie Clip instances, the depths of A and B affect how the contents of each movie clip appear relative to one another. If A has a higher depth, then all the contents of A appear in front of all the contents of B, even if the contents of B have higher depths than the contents of A. That also means that you can add content to A at depth 1 and content to B at depth 1 without one overwriting the other.
Flash also uses a concept called levels. By default there is just one level in a Flash movie. It has the name _level0. You can only add levels by loading content using MovieClipLoader or the older global function loadMovieNum(). In general it’s not advantageous to work with levels; levels are primarily a legacy concept going back to a time when Flash didn’t have programmatic depths.
Setting Up Your Scripting Environment
In this book you use the Flash IDE for writing the majority of the code examples. When you are writing ActionScript in Flash you’ll likely appreciate the capability to customize how the code is formatted and how Flash assists you in adding code. In the next sections you read about the Actions panel and the options available for customizing it.
Introducing the Actions Panel
When you want to add ActionScript within a Flash document, you’ll need to use the Actions panel. You can open the Actions panel by selecting Window Actions or by pressing F9. From the Actions panel you can add ActionScript to a keyframe or a symbol instance. Flash will add the script to a keyframe if you’ve selected the keyframe from the timeline and it will add the script to a symbol instance if you’ve selected the instance on the stage. Adding code to symbol instances is no longer advisable. Prior to Flash MX it was the only way to add certain types of code. However, adding code to symbol instances has disadvantages in that it generally requires much more code, it doesn’t scale well, and it can be difficult to keep track of where you’ve placed code. For those reasons it’s recommended that when you add code to a Flash document, you always add it to a keyframe. A common mistake made by novices and experts
8
Getting Started with Macromedia Flash
alike is to accidentally add code to a symbol instance when intending to add it to a keyframe. Before you attempt to add any code to the Actions panel, always make sure it says Actions – Frame in the title bar of the panel.
On the left side of the panel is the Actions toolbox and Script navigator. Both are seldom necessary or useful for anyone wanting to learn ActionScript beyond a very basic level. On the right is the Script pane where you can directly add ActionScript code. The Script pane is essentially a text editor.
Exploring ActionScript Preferences
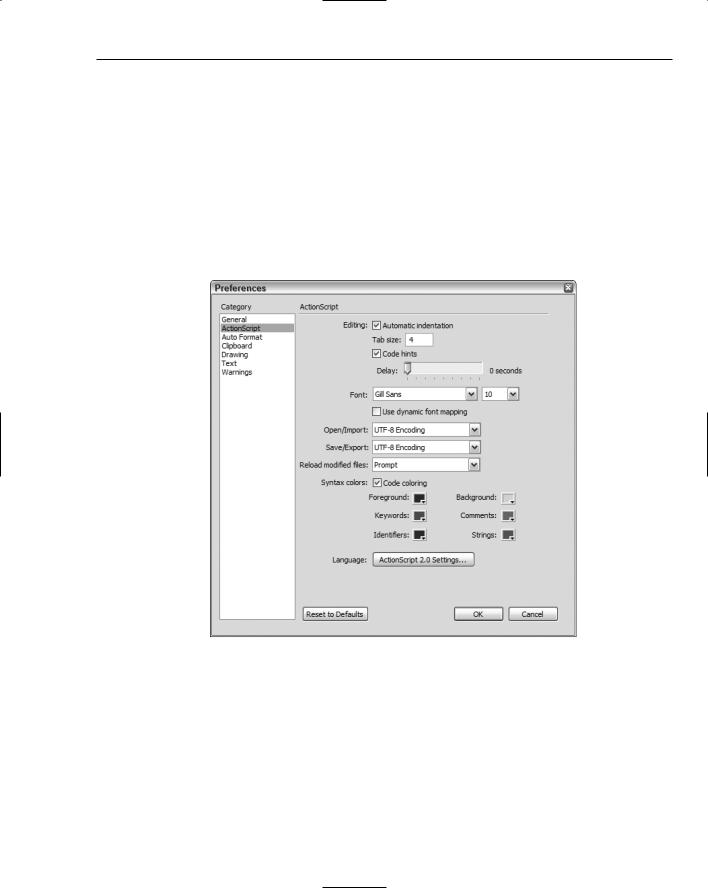
Next you see how to customize the Actions panel. You can open the Preferences dialog by selecting Edit Preferences (see Figure 1-4).
Figure 1-4
The following sections introduce you to some of the ActionScript preferences (select ActionScript from the Category list on the left side of the Preferences dialog).
Automatic Indentation
By convention code blocks are indented for readability. Code blocks are denoted by curly braces ({ and }). When you add a left curly brace ({) and a newline, Flash can automatically indent the next line. The Automatic indentation option is selected by default. If you don’t want Flash to automatically indent your code, deselect the option.
9

Chapter 1
Tab Size
The default tab size is the equivalent of four spaces. You can change the value if you want to indent more or less when pressing the Tab key.
Code Hints
Code hints are a way that Flash can help you by providing a list of likely options based on what code you’ve provided so far. For example, if you type the name of a variable that Flash recognizes as a movie clip, it can automatically display a list of functionality associated with movie clips.
Code hints can be triggered manually by using suffixes after an underscore in the variable name. For example, type the following code into the ActionScript panel:
example_array.
After you type the dot a drop-down menu of available array methods is presented. You can read a list of suffixes Flash uses in a document entitled “About Using Suffixes To Trigger Code Hints” in the Help panel.
Although suffixes work, they are no longer the preferred method of triggering code hints. With ActionScript 2.0, you can use strict typing to control code hints. Strict typing tells Flash what type of data a variable points to. That, in turn, allows Flash to display code hints regardless of whether you use suffixes in the variable name. For example, type the following code into the ActionScript panel:
var example:Array; example.
The drop-down list of available methods for an array is presented as before. However, this time you aren’t required to use a specific suffix as part of the variable name. You learn more about ActionScript syntax, variable declaration, and strict typing in the following chapters.
You can also specify how long a delay Flash should use before displaying code hints. The delay is between the trigger (usually a dot following a variable name) and the display of the code hints. A short delay could mean that code hints might appear even if you don’t want them to appear. If the delay is too long, you’ll have to wait for the code hints to appear. The default value is 0 seconds, which means the code hints appear immediately after the trigger.
Font
Although font is generally a matter of personal taste, some fonts are not advisable for coding. Georgia, for example, is a font in which the lowercase o is identical to its zero. This can make debugging and reading code extremely difficult. You want to avoid fonts that cause this type of problem.
Serif fonts are generally better for distinguishing letters from numbers and they better define individual words. Monospace fonts are generally better for code as well. For that reason the default ActionScript font that Flash uses is a monospace serif font such as Courier or Courier New.
You’ll want to experiment. If you have colors and a font you like in another editor, carry them over. You’ll be glad you did. If you don’t yet have a preference, take the time to try some out. A scripting environment that suits you specifically is more welcoming, easier to work with, and more conducive to your way of working.
10

Getting Started with Macromedia Flash
Color
One of the basic Actions panel enhancements you can make is color — color of the background, keywords, strings, comments, and so on. You can reduce eyestrain by changing the colors to those that suit you. For example, I generally don’t like to code on a stark white background because after many hours of coding, I can no longer look at the screen without squinting. To alleviate this, I give the Background color a newsprint shade, somewhere near #E0DBC7.
Because there are generally few keywords in code, I set them apart from the rest of the code by assigning the Keywords color setting to #0066CC, which is a blue.
Identifier words are the names of classes and data types you use to declare variables. As such, they appear very frequently in code. I want to be able to quickly scan the code for identifiers, so I set the Identifiers color to a red, #990000.
Foreground color applies to the text, which is the meat and potatoes of the code, including functions that you create and methods that aren’t tied to specific objects (clear() rather than this.clear(), for instance). The default color is black, but I prefer a lower contrast, so I generally choose #333333, which is on the gray side of black.
Comments are like road signs in code. They can often warn you of certain code peculiarities, as well as show you how the code is used or fits within the larger project. I usually set the Comments color to orange (#CC6600) so that I can easily see alerts and comments placed in the code.
Strings are a special case. It is important to be able to scan the code quickly and see the difference between this.n.clear() and this.n = “clear”;. I use #009900, a primary green, for my Strings color; it’s easy to discern among other colors.
Of course, you’ll want to choose your own colors, and you can always return to the Preferences dialog and change them.
ActionScript 2.0 Settings
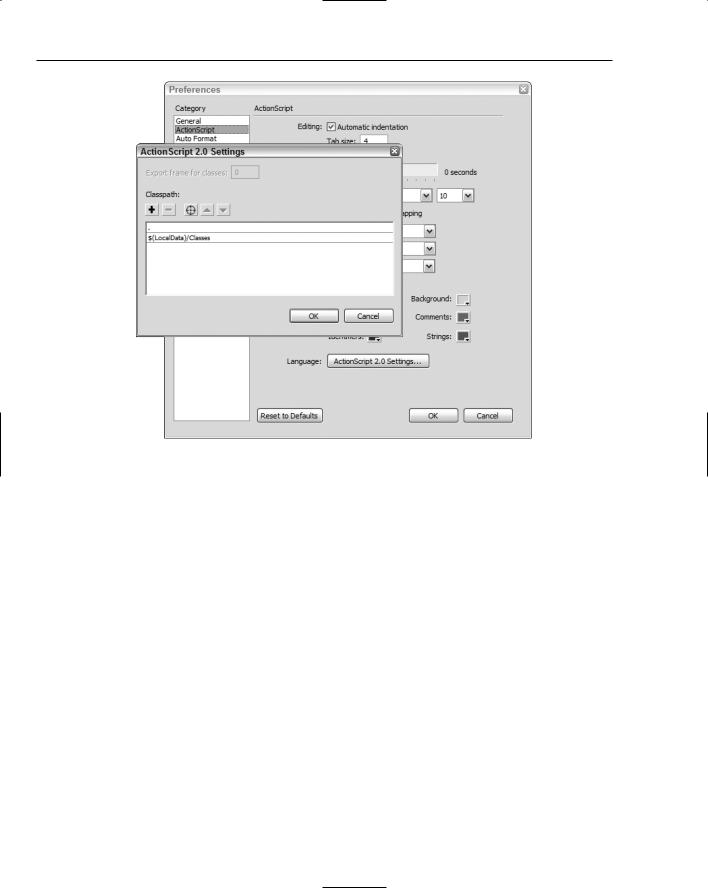
The Language section at the bottom of the ActionScript preferences dialog has a button that leads you to ActionScript 2.0 settings. A new dialog box opens (see Figure 1-5) that enables you to assign values for the classpath.
The classpath is a list of locations where Flash can locate code in class files when compiling. A class package can reside anywhere, as long as you have a classpath specified so that the compiler can find it. That means you can build libraries of code that you can use in many projects.
The list of classpaths should contain a default classpath, which targets the classes that ship with Flash. Do not remove the default classpath. You will also see a classpath that is simply a period (.). It specifies that Flash also looks in the same folder as the Flash document for any classes that are referenced by your code.
Flash searches for classes in the order in which you list the directories in the classpath. Flash uses the first instance of a class it encounters to compile. You can add a new directory to the classpath by clicking the plus sign (+), and you can remove an existing directory from the classpath by selecting it from the list and clicking the minus sign (–). You can reorder the directories with the arrow buttons.
11
Chapter 1
Figure 1-5
Exploring Auto Format Preferences
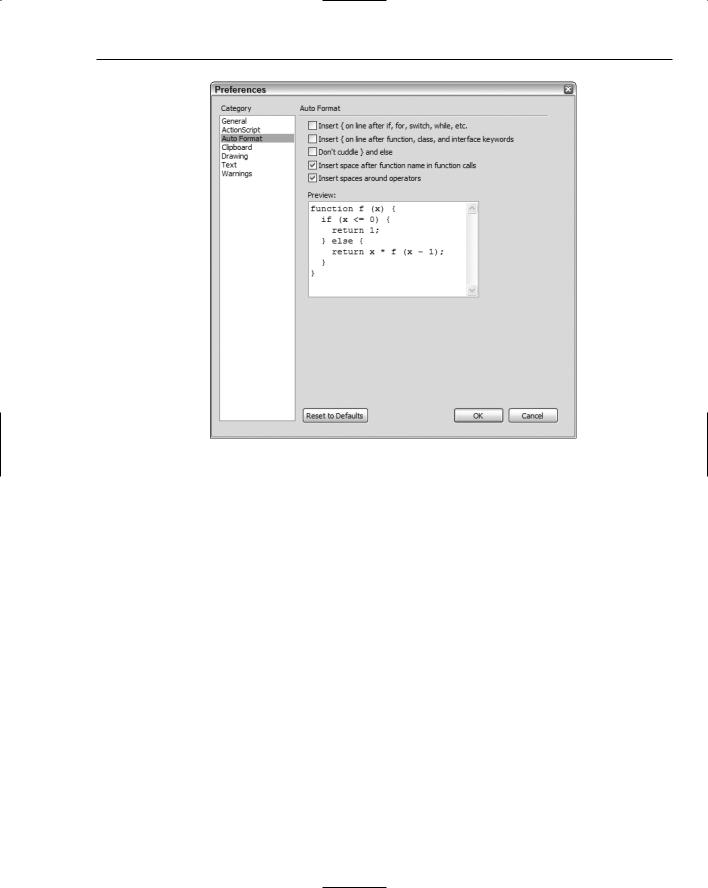
The Actions panel adds and indents characters when the Auto Format button is clicked. You can specify a few of those behaviors by first selecting Auto Format in the Preferences dialog box to display the appropriate page (see Figure 1-6).
The first two settings determine where Flash inserts the curly brace. If you check these options, the curly brace remains on the same line. If you leave these options unchecked, the curly brace is placed on the following line. If you’ve never used ActionScript before, you probably have no idea what this is about, but rest assured that you’ll find out when you begin looking at functions and statements.
Just keep the Preferences dialog in mind for now because you’ll probably want to come back to these settings once you start coding with ActionScript and become more familiar with how you prefer to work. Code examples in this book generally are formatted with none of the Auto Format options checked. The default settings are easy to read, though, and don’t contain any surprises for fellow coders.
12
Getting Started with Macromedia Flash
Figure 1-6
Publishing a Project
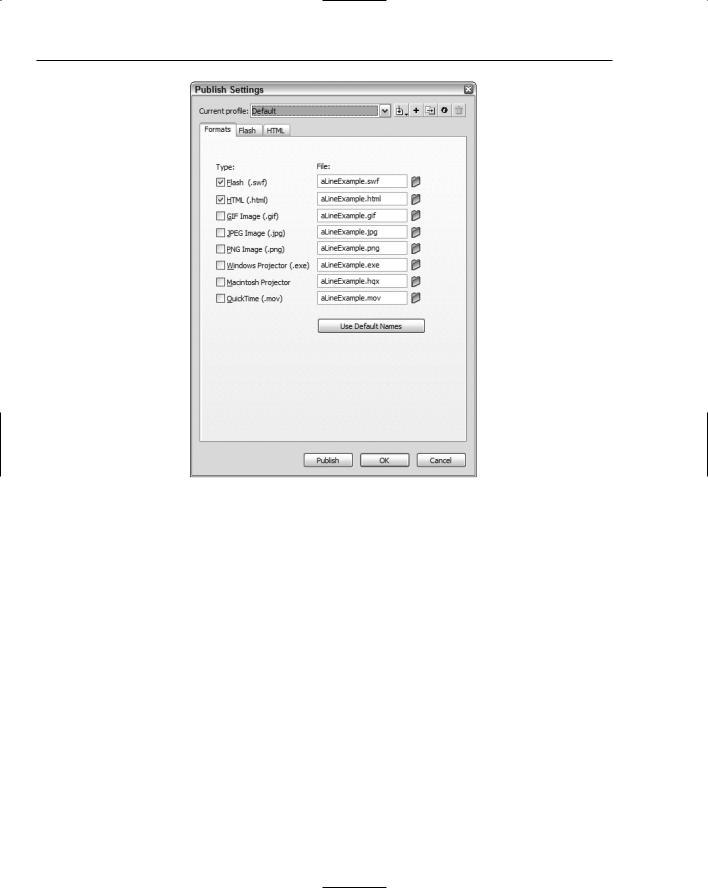
Once you’ve authored your Flash project you’ll want to publish it so that you can deploy it. Flash has a Publish command that enables you to export to a variety of formats such as SWF, Quicktime, and even standalone executables. The Publish Settings dialog gives you the capability to select the formats to which you want to publish. It also enables you to customize the settings for each format. The Publish Settings dialog lets you automate the construction of JavaScript Flash Player detection as well as replacement images or HTML when a Flash player is not detected. The Publish Settings panel can help you target special Flash players such as Flash Lite and the Pocket PC player.
The Publish Settings dialog (see Figure 1-7) enables you to save and preserve profiles. This is handy for sharing the proper publish settings among developers or for storing a specific default profile you’d like to start with for all projects.
In the Publish Settings dialog you can select which formats you want to publish. By default the Flash and HTML formats are selected. When you select the Publish command (File Publish), Flash exports those formats that are checked in the Publish Settings dialog. You can use default paths to publish your assets. Alternatively, you can specify unique paths for each format. The Publish Settings are saved when you save your Flash document.
13
Chapter 1
Figure 1-7
A new tab appears for each format you select (except the Projector formats, which don’t have any special settings). By default, therefore, the Publish Settings dialog has three tabs — Formats, Flash, and HTML.
The Flash Tab
The Flash tab in the Publish Settings panel specifies the options for the SWF file. The version setting determines which players will be able to display your application. You should target a Flash version that best suits your audience and what you’d like your application to do. For example, if your Flash application takes advantage of Flash 8 text rendering because you require text to display at its best, you’ll need to require Flash 8. However, if you’re building a simple animation and interaction you may only need Flash 5. When you publish the FLA to SWF, the IDE will warn you if the code within the Flash document will not work in the targeted player specified in the Publish Settings panel.
Load order specifies how the first frame of the application should initially render. On slower machines this draw is more visible, so you should consider how you would like it to look. The default top to bottom, however, is sufficient.
The ActionScript version should match the ActionScript type you plan to use in your application. Although you can use ActionScript 2 output and use no version 2 code constructs, you should change this setting to at the very least alert future developers who might open your Flash document about the syntax used. The setting affects the compiler and compiler directives as well as error checking and strict type compliance.
14

Getting Started with Macromedia Flash
The next group of options enables you to set attributes in the resulting SWF application. If you select Protect From Import as an attribute to include in your SWF, you are given the option of allowing the SWF to be accessed via a password. This can help protect your SWF file should anyone find it and attempt to load it into a new FLA or larger application.
Debugging allows the debugger to access the SWF file. Be careful to not have this setting selected on your actual deployment SWF application. This is just a faux pas, and wouldn’t affect the application for regular users.
Compress Your Movie is a handy setting that enables you to save 10, 20, or even 30% of your SWF file size. The SWF player has a built-in decompressor to decompress the file when it’s loaded into the player. This attribute is very handy for rich applications with a lot of skin attributes, ActionScript, and embedded content, but less so for fully dynamic SWF files, which import almost everything at runtime.
JPEG Quality is an often overlooked setting that can help cut down on overall SWF size. This setting affects any bitmap that does not have an individual quality setting applied to it. Open the Properties panel for each bitmap in the Library to specify the quality attribute for individual images.
The two Audio settings affect only audio that has been placed directly upon a timeline from the Library.
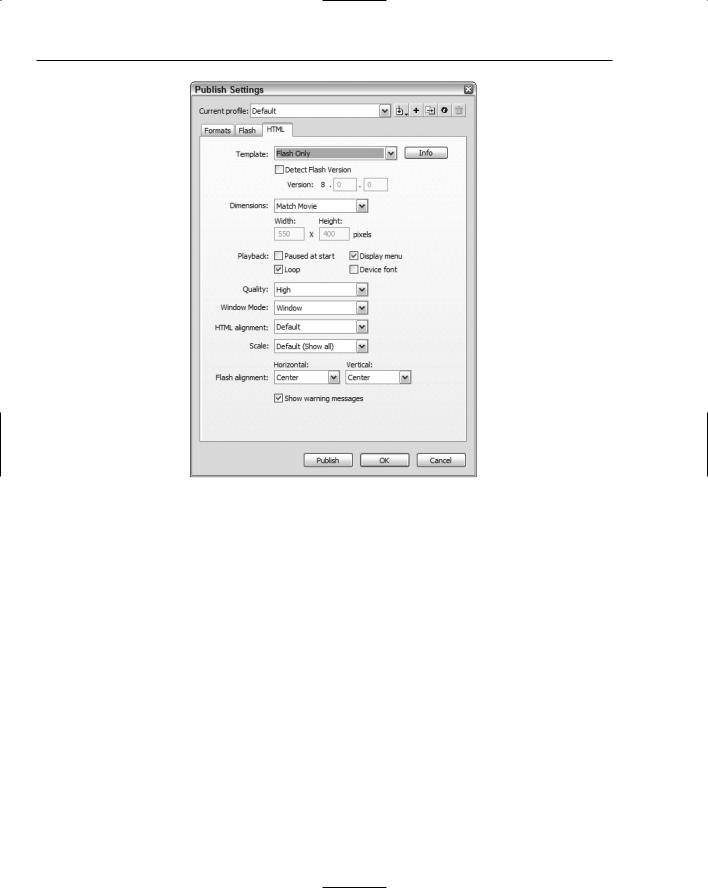
The HTML Tab
When publishing an SWF file it is often advantageous to define an HTML wrapper for it. Although most browsers will open the Flash plug-in and play SWF content as is, it is difficult to know if the Flash version installed on the user system is new enough for your SWF content. The HTML wrapper can include JavaScript and object tag plug-in version checking to automate the process of checking for the correct version of Flash.
The HTML you choose can also be specific to a device or target browser. For example, mobile devices have their own markup for inserting plug-in objects upon a page. Just as the Flash Player version is carefully considered, so to should the target HTML be considered for compliance with end user systems. You can use the drop-down menu to select the HTML wrapper for your target system. The next section covers some simple JavaScript detection of the Flash Player version.
In the HTML Publish Settings panel (see Figure 1-8), you can select playback states and attributes to be placed in the object and embed tags automatically. You can, of course, create your own HTML, and change the attributes any way you like.
As with any Publish Settings selection, you should test each decision to see how it affects performance and cross-browser compatibility.
It is possible to create custom HTML templates.
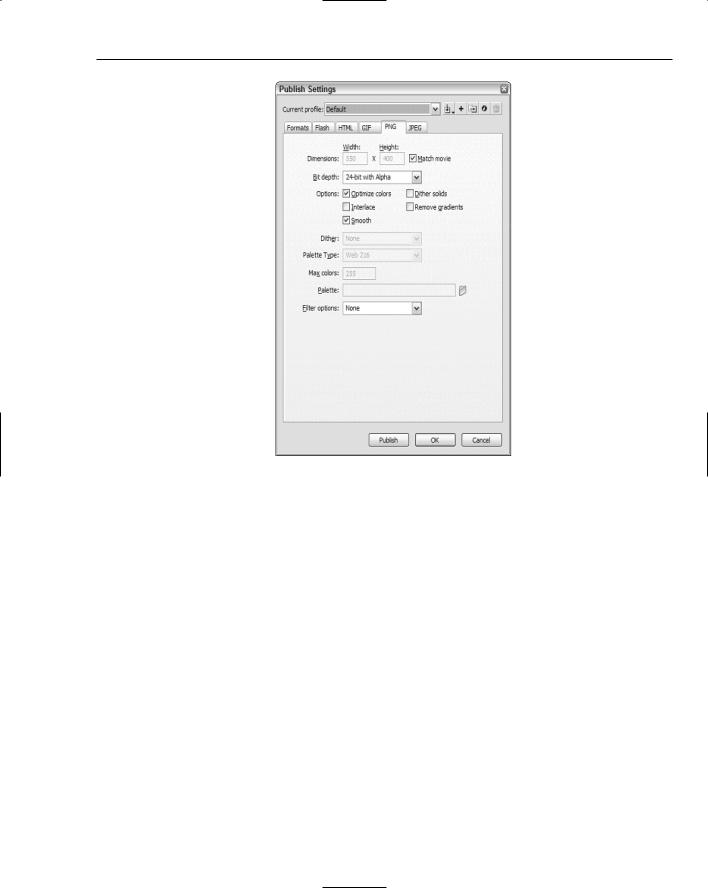
The Image Tabs
If you return to the Publish Settings Formats panel, you see the three types of images that can be created when the SWF file is compiled. Each of these file types has options for setting image attributes when the images are created. The attributes include size, quality, smoothing, and more. As with all publish settings, trial and error is the best way to understand how the settings affect the image output. The goal in publishing images is to create the highest quality image with the lowest possible file size. This is always a compromise and dependent upon the complexity of the content within the image.
15
Chapter 1
Figure 1-8
For example, Figure 1-9 shows the PNG tab in Publish Settings panel.
Options for Detecting the Flash Player
Once you have created the SWF file you’ll want to be sure that all that hard work can be viewed on as many systems as possible. You have several options to choose from. The most robust, and easiest to use, is the Flash Detection Kit. Flash 8 integrates the kit into the HTML Publish dialog. The kit is also available as download. The downloadable kit can help implement the kit within servlet pages, as well as legacy HTML pages that require the detection update.
The default Flash Only HTML template provided by the Publish dialog can display your content when a Flash player is known to exist on a system. This template is fine for testing your SWF locally. However, using no detection leaves the plug-in issue resolution to the browser. Internet Explorer utilizes an alert message to ask the user if he would like to install or update the Flash player. It then automatically begins the install process using a simple certificate-based installation. Due to malware and other concerns, many users simply reject a certificate when presented. On all other browsers, however, a plug-in issue is often a simple message with no resolution or a link about where to go to get help about plug-ins. This is hardly acceptable, or user friendly.
16
Getting Started with Macromedia Flash
Figure 1-9
The detection kit exports a JavaScript-based SWF wrapper within an HTML page. After the kit has detected that Flash exists and the Version Is passes true, the JavaScript uses the document.write method to print the actual object and embed tags.
In the event that the Flash player is too old to play your SWF file, an alternative method is called that writes an image tag and specifies a .gif image.
If the browser does not have JavaScript enabled, the kit has a third and final method, which uses the noscript html tag to write an image tag and specify a .gif image.
Generally, I allow Flash to publish the kit in this way and then edit the output HTML file to behave the way I want. In some cases, replacing SWF content with GIF is acceptable, but generally not for SWF applications. In these cases it is better to use the document.write method to print HTML with instructions on how to resolve a plug-in update. This enables users to update their systems, and understand why the SWF application may not have worked on their first visit.
For any plug-in detection, it is better to display what you can right away and seamlessly integrate each level of compliance into your page design. Then gracefully deal with updates without alarming warnings and zero content displays.
17