

Beginning JavaScript With DOM Scripting And Ajax - From Novice To Professional (2006)
.pdf216 C H A P T E R 6 ■ C O M M O N U S E S O F J A V A S C R I P T : I M A G E S A N D W I N D O W S
Not all of the properties listed here are supported in all browsers, but they can be used in most of them:
•height: Defines the height of the window in pixels.
•width: Defines the width of the window in pixels.
•left: Defines the horizontal position of the window on the screen in pixels.
•top: Defines the vertical position of the window on the screen in pixels.
•location: Defines whether the window has a location bar or not (yes or no)—remember this will be a fixed yes state in future browsers.
•menubar: Defines whether the window has a menu bar or not (yes or no)—this is not supported by Opera and Safari (being a Mac tool, Safari has no menu bar on the window but on top of the screen).
•resizable: Defines whether the user is allowed to resize the window in case it is too small or too big. Opera does not allow this property, so Opera users can resize any window.
•scrollbars: Defines whether the window has scrollbars or not (yes or no). Opera does not allow suppressing scrollbars.
•status: Defines whether the window has a status bar or not (yes or no). Opera does not allow turning off the status bar.
•toolbar: Defines whether the window has a toolbar or not (yes or no)—turning the toolbar off is not supported by Opera.
■Note Other Mozilla/Firefox-only properties are hotkeys (which turns the keyboard shortcuts on and off in a given window), innerHeight and innerWidth (which define the display size as opposed to window size), and dependent (which determines whether the window should be closed when the window that opened it is closed). The latter is also supported by Konqueror on Linux.
To open a window that is 200 pixels wide and high and 100 pixels from the top-left corner of the screen, and then load into it the document grid.html, you have to set the appropriate properties as shown here:
var windowprops = "width=200,height=200,top=100,left=100";
C H A P T E R 6 ■ C O M M O N U S E S O F J A V A S C R I P T : I M A G E S A N D W I N D O W S |
217 |
You can try to open the window when the page loads:
exampleWindowPopUp.html (excerpt)
function popup() {
var windowprops = "width=200,height=200,top=100,left=100";
var myWin = window.open( "grid.html", "mynewwin" ,windowprops );
}
window.onload = popup;
Notice that the outcome is slightly different from browser to browser. MSIE 6 shows the window without any toolbars, MSIE 7 shows the location bar, and Firefox and Opera warn you that the page is trying to open a new window and asks you whether you want to allow it to do so.
This is handled slightly differently when the window is opened via a link:
exampleLinkWindowPopUp.html
<a href="#" onclick="popup();return false"> Open grid
</a>
Neither Opera nor Firefox complain about the pop-up window now. However, if JavaScript is disabled, then there won’t be a new window, and the link doesn’t do anything. Therefore, you might want to link to the document in the href and send the URL as a parameter instead.
exampleParameterLinkWindowPopUp.html (excerpts)
function popup( url ) {
var windowprops = "width=200,height=200,top=100,left=100"; var myWin = window.open( url, "mynewwin", windowprops );
}
<a href="grid.html" onclick="popup(this.href);return false"> Open grid
</a>
Notice the name parameter of window.open() method. This one is seemingly pretty pointless for JavaScript, as it does not do anything (there is no windows collection that you could use to reach the window via windows.mynewwin, for example). However, it is used in the HTML target attribute to make links open their linked documents in the pop-up window instead of the main window.
218 C H A P T E R 6 ■ C O M M O N U S E S O F J A V A S C R I P T : I M A G E S A N D W I N D O W S
In this example, you define the name of the window as “mynewwin”, and you target a link to open http://www.yahoo.co.uk/ in there:
exampleParameterLinkWindowPopUp.html (excerpts)
function popup( url ) {
var windowprops = "width=200,height=200,top=100,left=100"; var myWin = window.open( url, "mynewwin", windowprops );
}
<a href="http://www.yahoo.co.uk/" target="mynewwin">Open Yahoo</a>
Unless you use nontransitional XHTML or strict HTML (where target is deprecated), you can also use the target attribute with a value of _blank to open a new window regardless of the availability of JavaScript. It is good practice then to tell the visitor that the link is going to open in a new window inside the link to avoid confusion or accessibility issues:
<a href="grid.html" onclick="popup(this.href);return false" target="blank"> Open grid (opens in a new window)
</a>
However, as you might want to use strict HTML and XHTML, and you have a lot more control over the pop-up when using JavaScript, it might be a better solution to not rely on target but turn links into pop-up links only if and when scripting is available. For that you need something to hook into and identify the link as a pop-up link. You could for example use a class called popup.
exampleAutomaticPopupLinks.html (excerpt)
<p><a href="grid.html" class="popup">Open grid</a></p>
<p><a href="http://www.yahoo.co.uk/" class="popup">Open Yahoo</a></p>
Planning the script doesn’t entail much: you need the class to trigger the pop-up, the textual add-on, and the window parameters as properties, an init() method to identify the links and add the changes, and an openPopup() method to trigger the pop-ups.
automaticPopupLinks.js (skeleton)
poplinks = {
triggerClass : 'popup',
popupLabel : ' (opens in a new window)',
windowProps : 'width=200,height=200,top=100,left=100', init : function(){ },
openPopup : function( e ){ },
}
The two methods are pretty basic. The init() method checks for DOM support and loops through all the links in the document. If the current link has the CSS trigger class, it adds the label to the link by creating a new text node from the label and adding it as a new child to the link. It adds an event when the link is clicked pointing to the openPopup() method and applies the Safari fix to stop the link from being followed in that browser.
C H A P T E R 6 ■ C O M M O N U S E S O F J A V A S C R I P T : I M A G E S A N D W I N D O W S |
219 |
automaticPopupLinks.js (excerpt)
init : function() {
if( !document.getElementById || !document.createTextNode ) { return;
}
var label;
var allLinks = document.getElementsByTagName( 'a' ); for( var i = 0; i < allLinks.length; i++ ) {
if( !DOMhelp.cssjs( 'check', allLinks[i], poplinks.triggerClass ) ) {
continue;
}
label = document.createTextNode( poplinks.popupLabel ); allLinks[i].appendChild( label );
DOMhelp.addEvent( allLinks[i], 'click', poplinks.openPopup, false ); allLinks[i].onclick = DOMhelp.safariClickFix;
}
},
The openPopup() method retrieves the event target, makes sure that it was a link, and opens a new window by calling window.open() with the event target’s href attribute as the URL, a blank name, and the window properties stored in windowProps. It finishes by calling the cancelClick() method to stop the link from being followed.
automaticPopupLinks.js (excerpt)
openPopup : function( e ) {
var t = DOMhelp.getTarget( e );
if( t.nodeName.toLowerCase() != 'a' ) { t = t.parentNode;
}
var win = window.open( t.getAttribute('href'), '', poplinks.windowProps );
DOMhelp.cancelClick( e );
}
There is more to this topic, especially when it comes to usability and accessibility concerns, and making sure that pop-up windows are used only when they really are opened and not blocked by some software or otherwise fail to open; however, going deeper into the matter is not within the scope of the current discussion. It suffices to say that it is not easy to rely on pop-ups of any kind in today’s environment.
Window Interaction
Windows can interact with other windows using a number of their properties and methods. First of all there is focus() and blur(): the former brings the pop-up window to the front, the latter pushes it to the back of the current window.

220 C H A P T E R 6 ■ C O M M O N U S E S O F J A V A S C R I P T : I M A G E S A N D W I N D O W S
You can use the close() method to get rid of windows, and you can reach the window that opened the pop-up window via the window.opener property. Suppose that you’ve opened two new windows from a main document:
w1 = window.open( 'document1.html', 'win1' );
w2 = window.open( 'document2.html', 'win2' );
You can hide the first window behind the other by calling its blur() method:
w1.blur();
■Note In online advertising, the trick of opening an unsolicited window and hiding it immediately via blur() is called a pop-under and is considered by advertisers to be less annoying than pop-up windows, as they don’t cover the current page. If you’ve ever found several windows you don’t remember opening when you shut down the browser, this is likely what has happened.
You can close the window by calling its close() method:
w1.close();
If you want to reach the initial window from any of the documents in the pop-ups, you can do this via
var parentWin = window.opener;
If you want to reach the second window from the first window, you’ll also need to go through the window.opener, as the second window was opened from this one:
var parentWin = window.opener; var otherWin = parentWin.w2;
Notice that you need to use the variable name the window was assigned to, and not the window name.
You can use any of the window methods of any of the windows this way. Say for example you want to close w2 from within document1.html; you do this by calling
var parentWin = window.opener;
var otherWin = parentWin.w2.close();
You can also call functions of the main window. If the main window has a JavaScript function that is called demo(), you could reach it from document1.html via
var parentWin = window.opener; parentWin.demo();
C H A P T E R 6 ■ C O M M O N U S E S O F J A V A S C R I P T : I M A G E S A N D W I N D O W S |
221 |
■Caution If you try to close the initial window with window.opener.close(), some browsers will give a security alert asking the user if he wants to allow that. This is another security feature to prevent site owners with malicious intentions spoofing a different web site. A lot of design agencies used to close the original browser in favor of a window with a predefined size—this is not possible any longer without the aforementioned security alert, and it might be a good idea to avoid this kind of behavior unless you want to scare or annoy your visitors.
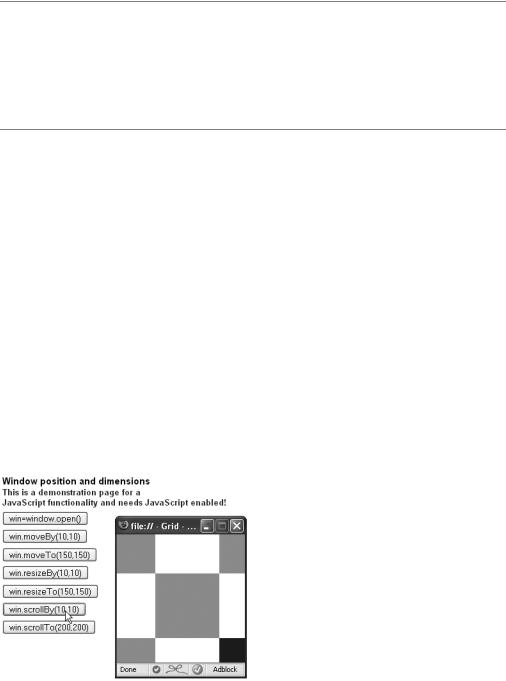
Changing the Position and the Dimensions of a Window
Each of the methods in the following list has x and y parameters. x is the horizontal position and y the vertical position in pixels from the top left of the screen. The moveBy(), resizeBy(), and scrollBy() methods allow for negative values, which would move the window or the content to the left and up or make the window smaller by the stated amount of pixels.
•moveBy(x,y): Moves the window by x and y pixels
•moveTo(x,y): Moves the window to the coordinates x and y
•resizeBy(x,y): Resizes the window by x and y
•resizeTo(x,y): Resizes the window to x and y
•scrollBy(x,y): Scrolls the window’s content by x and y
•scrollTo(x,y): Scrolls the window’s content to x and y
If you check the example document exampleWindowPosition.html, you can test out the different methods as shown in Figure 6-13. Note that this example appears in Firefox. In Opera 8 or MSIE 7, the small window will have a location bar.
Figure 6-13. Changing the window position and dimension

222 C H A P T E R 6 ■ C O M M O N U S E S O F J A V A S C R I P T : I M A G E S A N D W I N D O W S
Animation with Window Intervals and Timeouts
You can use the setInterval() and setTimeout() window methods to allow for timed execution of code. setTimeout means you wait a certain time before executing the code (once only); setInterval() executes the code every time the given time period has passed.
•name = setInterval( 'someCode', x ): Executes the JavaScript code passed to it as someCode every x milliseconds
•clearInterval( name ): Cancels the execution of the interval called name (keeps the code from being executed again)
•name=setTimeout( 'someCode', x ): Executes the JavaScript code someCode once, after waiting x milliseconds
•clearTimeout( name ): Stops the timeout called name if the code hasn’t yet been run
■Note The parameter someCode in setInterval() and setTimeout() is a string and can be any valid JavaScript code. Usually, it’s most convenient simply to call a function you’ve already defined elsewhere.
Classic examples for the use of these methods are news tickers, clocks, and animation. However, you can also use them to make your site less obtrusive and more user beneficial.
One example of this is a warning message that vanishes after a certain amount of time. The demo exampleTimeout.html shows how you can use setTimeout() to display a very obvious warning message for a short period or allow the user to get rid of it immediately. The HTML has a paragraph warning the user that the document is out of date:
exampleTimeout.html (excerpt)
<p id="warning">This document is outdated and kept only for archive purposes.</p>
A basic style sheet colors this warning red and shows it in bold for non-JavaScript users. For users that have JavaScript enabled, add a dynamic class that makes the warning a lot more obvious.
timeout.css
#warning{ font-weight:bold; color:#c00;
}
C H A P T E R 6 ■ C O M M O N U S E S O F J A V A S C R I P T : I M A G E S A N D W I N D O W S |
223 |
.warning{
width:300px;
padding:2em;
background:#fcc; border:1px solid #c00; font-size:2em;
}
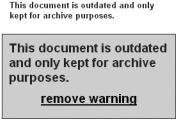
The difference between the two is shown in Figure 6-14.
Figure 6-14. Warning message without and with JavaScript
The user can click the “remove warning” link to get rid of the warning or wait, and it will vanish automatically after 10 seconds.
The script is pretty easy; you check whether DOM is supported and whether the warning message with the right ID exists. Then you add the dynamic warning class to the message and create a new link with an event handler pointing to the removeWarning() method. You append this link as a new child node to the warning message and define a timeout that automatically triggers removeWarning() when 10 seconds are over.
timeout.js (excerpt)
warn = {
init : function() {
if( !document.getElementById || !document.createTextNode ) { return;
}
warn.w = document.getElementById( 'warning' ); if( !warn.w ){ return; }
DOMhelp.cssjs( 'add', warn.w, 'warning' );
var temp = DOMhelp.createLink( '#', 'remove warning' ); DOMhelp.addEvent( temp, 'click', warn.removeWarning, false ); temp.onclick = DOMhelp.safariClickFix;
warn.w.appendChild( temp );
warn.timer = window.setTimeout( 'warn.removeWarning()', 10000 );
},

224 C H A P T E R 6 ■ C O M M O N U S E S O F J A V A S C R I P T : I M A G E S A N D W I N D O W S
All the removeWarning() method needs to do is remove the warning message from the document, clear the timeout, and stop the default action of the link.
timeout.js (continued)
removeWarning : function( e ){ warn.w.parentNode.removeChild( warn.w ); window.clearTimeout( warn.timer );
DOMhelp.cancelClick( e );
}
}
DOMhelp.addEvent( window, 'load', warn.init, false )
One web application that pioneered this kind of effect is Basecamp (http:// www.basecamphq.com/), which highlights the recent changes to the document in yellow when the page loads and gradually fades out the highlight. You can see the effect rationale at 37signals (http://www.37signals.com/svn/archives/000558.php) and a demo JavaScript at YourTotalSite (http://www.yourtotalsite.com/archives/javascript/ yellowfade_technique_for/).
Timeouts are tempting to use on web sites because they give the impression of a very dynamic site and allow you to transition smoothly from one state to the other.
■Tip There are several JavaScript effect libraries available that offer you premade scripts to achieve tansition and animation effects. While most of them are very outdated, there are some exceptions, like script.aculo.us (http://script.aculo.us/) and FACE (http://kurafire.net/projects/face).
However, it might be a good idea to reconsider using a lot of animation and transitions in your web site. Remember that the code is executed on the user’s computer, and depending on how old or how busy it is with other tasks, the transitions and animations may look very clumsy and become a nuisance rather than a richer site experience.
Animations can also be an accessibility issue if the functionality of the site is dependent on them, as they might make it impossible for some groups of disabled visitors to use the site (cognitive disabilities, epilepsy). The Section 508 accessibility law (http://www.section508.gov/) states quite clearly that for software development you need to provide an option to turn off animation:
(h) When animation is displayed, the information shall be displayable in at least one non-animated presentation mode at the option of the user.
—http://www.section508.gov/index.cfm?FuseAction=Content&ID=12#Software
C H A P T E R 6 ■ C O M M O N U S E S O F J A V A S C R I P T : I M A G E S A N D W I N D O W S |
225 |
However, for web sites this is not formulated as clearly. The W3C accessibility guidelines, on the other hand, state explicitly in a level-two priority that you should avoid any movement in web pages.
Until user agents allow users to freeze moving content, avoid movement in pages.
—http://www.w3.org/TR/WCAG10-TECHS/#tech-avoid-movement
Let’s try an example that allows the user to start and stop an animation. Take the embedded slide show developed earlier in the chapter and instead of giving it forward and backward links, you’ll add a link to start and stop an automated slide show using a setInterval().
The HTML and the CSS will stay the same, but the JavaScript has to change a lot.
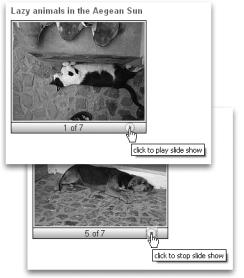
If you open exampleAutoSlideShow.html in a browser, you’ll get a slide show with a Play button that starts the show when you click it. You could easily start the animation when the page loads, but it is a good idea to leave the choice to the user. This is especially the case when you need to comply with accessibility guidelines, as unsolicited animation can cause problems for users suffering from disabilities like epilepsy. Once clicked, the button turns into a Stop button that stops the slide show when activated. You can see how it looks in Firefox in Figure 6-15.
Figure 6-15. An automatic slide show changing the Play button to a Stop button
You start with the necessary CSS classes, which are the same as in the first slide show example with the exception of the hide class. As you won’t hide any buttons this time, there is no need for it.