

Beginning JavaScript With DOM Scripting And Ajax - From Novice To Professional (2006)
.pdf196 C H A P T E R 6 ■ C O M M O N U S E S O F J A V A S C R I P T : I M A G E S A N D W I N D O W S
and named class consists of the dynamicLink property value and the current index plus one (as it is easier for humans to have a first class called item1 class instead of item0):
parentCSSrollover.js as used in parentCSSrollover.html (abbreviated)
pr = {
navId : 'nav', currentLink : 'current', dynamicLink : 'item',
init |
: function() |
{ |
// [... same as |
in parentRollover.js ...] |
|
}, |
|
|
Roll |
: function( |
e ) { |
// |
[... same as |
in parentRollover.js ...] |
var action = e.type == 'mouseover' ? 'add' : 'remove'; DOMhelp.cssjs( action, pr.nav, pr.dynamicLink + ( t.index + 1 ) );
}
}
DOMhelp.addEvent( window, 'load', pr.init, false );
This way you allow the CSS designer to define the different states for the rollover navigation as classes in the CSS:
parentCSSrollover.css as used in parentCSSrollover.html (excerpt)
#nav.item1{ background-position:0 0;
}
#nav.item2{ background-position:0 -50px;
}
#nav.item3{ background-position:0 -100px;
}
#nav.item4{ background-position:0 -150px;
}
This also provides the CSS designer with one more hook to design the navigation: the dynamic class can be used to define the current rollover or highlight state of the link itself differently from item to item.
Slide Shows
Slide shows are small images embedded in the page with previous and next buttons or sometimes even automatic changing of images after a certain time. They are used to illustrate text or offer different views of a product.
We can distinguish between two kinds of slide shows: embedded ones that have all the images in the same document and dynamic ones that load the images when they are needed.
C H A P T E R 6 ■ C O M M O N U S E S O F J A V A S C R I P T : I M A G E S A N D W I N D O W S |
197 |
Embedded Slide Shows
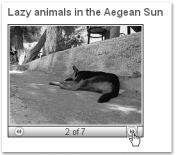
Probably the easiest way to add a slide show to a page is to add all the images as a list. You can then use JavaScript to turn this list into a slide show by hiding and showing the different list items with the embedded images. The demo document examplePhotoListInlineSlideShow.html does exactly that, as Figure 6-7 shows.
Figure 6-7. An embedded slide show with JavaScript
The underlying HTML is an unordered list with all the images as list items. Notice that this also allows you to set a proper alternative text for each of the images.
examplePhotoListInlineSlideShow.html (excerpt)
<ul class="slides"> <li>
<img src="pictures/thumbs/cat2.jpg" alt="Lazy Cat" /> </li>
<li>
<img src="pictures/thumbs/dog10.jpg" alt="Dog using the shade" /> </li>
<li>
<img src="pictures/thumbs/dog12.jpg" alt="Squinting Dog" /> </li>
<li>
<img src="pictures/thumbs/dog63.jpg" alt="Dog cooling off in the sand" /> </li>
<li>
<img src="pictures/thumbs/dog7.jpg" alt="Very flat dog" /> </li>
<li>
<img src="pictures/thumbs/donkeyeating.jpg" alt="Hay-eating Donkey" /> </li>
<li>
<img src="pictures/thumbs/kittenflat.jpg" alt="Ginger and White Cat" /> </li>
</ul>
198 C H A P T E R 6 ■ C O M M O N U S E S O F J A V A S C R I P T : I M A G E S A N D W I N D O W S
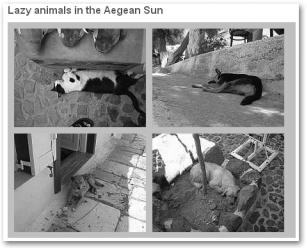
All future maintainers have to do to change the order of the images or add or delete images is to change the HTML; there is no need to change the JavaScript at all. Provided that you supply an appropriate style sheet, visitors without JavaScript will get all the images displayed as shown in Figure 6-8. Users without style sheets will get a list with image thumbnails.
Figure 6-8. The embedded slide show without JavaScript
One effect of embedding all images in the document is that they will all be loaded when the visitor loads the page. This could be a good or a bad thing, depending on the visitor’s connection speed. Later on we’ll look at an example that loads the larger images only when the user clicks smaller ones.
Let’s look at the script that turns this list into a slide show. You will use the DOMhelp library you developed in previous chapters to work around browser issues and shorten the code slightly.
As always, the first thing to do is to plan your script. In this case, you should give the CSS designer and HTML developer several classes as hooks to trigger functionality or define look and feel:
•A class to indicate that the list should be turned into a slide show
•A class to define the look and feel of the dynamic slide show list
•A class to show elements that were previously hidden
•A class to define the look of the image counter (e.g., image 1 of 3)
•A class to hide elements that should not be there at a certain state of play

C H A P T E R 6 ■ C O M M O N U S E S O F J A V A S C R I P T : I M A G E S A N D W I N D O W S |
199 |
You should also allow the maintainer to change the look and content of the forward and backward links and the text content of the image counter.
As for methods, all you need (apart from the helper methods contained in DOMhelp) is a global initialization method, a method to initialize each slide show, and one to show a slide. All of this together makes up the skeleton of your script:
photoListInlineSlides.js (skeleton)
inlineSlides = {
//CSS classes slideClass : 'slides',
dynamicSlideClass : 'dynslides', showClass : 'show', slideCounterClass : 'slidecounter', hideLinkClass : 'hide',
//Labels
//Forward and backward links, you can use any HTML here forwardsLabel : '<img src="control_fastforward_blue.png" alt="next" />',
backwardsLabel : '<img src="control_rewind_blue.png" alt="previous" />',
//Counter text, # will be replaced by the current image count
//and % by the number of all pictures
counterLabel : '# of %',
init : function() {}, initSlideShow : function( o ) {}, showSlide : function( e ) {}
}
DOMhelp.addEvent( window, 'load', inlineSlides.init, false );
■Note Notice that you offer an HTML-based option in the labels for the forward and backward links. This allows for much more flexible styling of the slide show, as the maintainer can add his own HTML (like images). Furthermore, if you want to allow the maintainer to change dynamic text like the counter, it might be beneficial to use placeholders like # and % and explain what they will be replaced with.
200 C H A P T E R 6 ■ C O M M O N U S E S O F J A V A S C R I P T : I M A G E S A N D W I N D O W S
Let’s go through the methods in the script step by step. First up is the global initialization method init():
1.Test for DOM support.
2.If the test is successful, loop through all the UL elements of the document.
3.For each UL, check whether it has the class defining it as a slide show (which is stored in the slideClass property), and skip the rest of the steps performed by this function if it doesn’t have the class (use continue to do this).
4.If the current UL is to become a slide show, you replace the class defining it as a slide show with the class defining the dynamic slide show; add a new property called currentSlide to the list and call the method initSlideShow with the list as a parameter.
photoListInlineSlides.js (excerpt)
init : function() {
if( !document.getElementById || !document.createTextNode ) { return;
}
var uls = document.getElementsByTagName( 'ul' ); for( var i = 0; i < uls.length; i++ ) {
if( !DOMhelp.cssjs( 'check', uls[i], inlineSlides.slideClass ) ) {
continue;
}
DOMhelp.cssjs( 'swap', uls[i],inlineSlides.slideClass, inlineSlides.dynamicSlideClass );
uls[i].currentSlide = 0; inlineSlides.initSlideShow( uls[i] );
}
},
You can spare yourself a lot of looping and checking with these tricks. First of all, replacing the class only when JavaScript is available with another class allows you to hide all the list items in the CSS instead of looping through them in the initSlideShow() method:
photoListInlineSlides.css (excerpt)
.dynslides li{ display:none; margin:0; padding:5px;
}
C H A P T E R 6 ■ C O M M O N U S E S O F J A V A S C R I P T : I M A G E S A N D W I N D O W S |
201 |
Other dynamically assigned CSS classes you have to define to make the slide show work are a hide class to remove the backward link when the first image is shown or the forward link when the last image is shown and a show class to overrule the hiding you achieved with the
.dynslides li selector. All the other CSS selectors and properties inside the demo are of a purely cosmetic nature.
photoListInlineSlides.css (excerpt)
.dynslides .hide{ visibility:hidden;
}
.dynslides li.show{ display:block;
}
By storing the current visible image in a property of the list, you don’t need to loop through all the images and hide them before you show the current one. Instead, all you need to do is to determine which one will have to be shown, read the property of the parent list element, and hide the previous image stored in this property.
You then reset the property to the new image, and the next time an image gets shown, the cycle starts anew. You could have stored the current image in a property of the main object, but storing it in a property of the list means you allow for several slide shows on the same page.
The initSlideShow() method gets each slide show list as a parameter called o. First, define the variables you’ll use with the var keyword to make sure they don’t overwrite global variables with the same name. Then create a new paragraph element to host the forward and backward links and the image counter and insert it immediately after the list (using o.nextSibling).
photoListInlineSlides.js (continued)
initSlideShow : function( o ) { var p, temp, count;
p = document.createElement( 'p' );
DOMhelp.cssjs( 'add', p, inlineSlides.slideCounterClass ); o.parentNode.insertBefore( p, o.nextSibling );
Next, create the backward link by means of DOMhelp’s createLink method and add the proper label using innerHTML. Add an event handler to call the showSlide method, hide the link by applying the appropriate CSS class, and add the link to the newly created paragraph. You’ll store the link in a property of the list called rew to make it easier to reach it later on.
photoListInlineSlides.js (continued)
o.rew = DOMhelp.createLink( '#', ' ' ); o.rew.innerHTML = inlineSlides.backwardsLabel;
DOMhelp.addEvent( o.rew, 'click', inlineSlides.showSlide, false ); DOMhelp.cssjs( 'add', o.rew,inlineSlides.hideLinkClass ); p.appendChild( o.rew );

202 C H A P T E R 6 ■ C O M M O N U S E S O F J A V A S C R I P T : I M A G E S A N D W I N D O W S
A new SPAN element that acts as the image counter is next. Get the counterLabel property of the main object and replace the # character with the current list’s currentSlide property value and add 1 to it (because humans start counting at 1 and not at 0 like computers do). Replace the % character with the number of LI elements in the list, and add the resulting string as a new text node to the SPAN before adding it as a new child node to the paragraph.
photoListInlineSlides.js (continued)
o.count = document.createElement( 'span' ); temp = inlineSlides.counterLabel. replace( /#/, o.currentSlide + 1 );
temp = temp.replace( /%/, o.getElementsByTagName( 'li' ).length ); o.count.appendChild( document.createTextNode( temp ) ); p.appendChild( o.count );
■Note Notice that you store the counter SPAN in a property of the list, called count. This is pure laziness, as it saves you having to reach it via getElementsByTagName('span')[0] later on. It also makes the script less likely to be broken by maintainers who might add other spans inside the list items at a later stage.
Adding the forward link works analogously to adding the backward link, except that the forwardsLabel property is used as the content and a new property called fwd as the shortcut.
photoListInlineSlides.js (continued)
o.fwd = DOMhelp.createLink( '#', ' ' ); o.fwd.innerHTML = inlineSlides.forwardsLabel;
DOMhelp.addEvent( o.fwd, 'click', inlineSlides.showSlide, false ); p.appendChild( o.fwd );
The method concludes with taking the list item that corresponds to the currentSlide property and adding the show class to it. You could have just used o.firstChild instead, but a future maintainer might want to initially show a different photo than the first one.
photoListInlineSlides.js (continued)
temp = o.getElementsByTagName( 'li' )[o.currentSlide]; DOMhelp.cssjs( 'add', temp, inlineSlides.showClass );
},
The showSlide() method defines a variable called action and gets the event target via getTarget(e). Since you don’t know if the maintainer used an image in the link labels, you need to find the link by testing whether the nodeName of the target’s parentNode is A. This also

C H A P T E R 6 ■ C O M M O N U S E S O F J A V A S C R I P T : I M A G E S A N D W I N D O W S |
203 |
counteracts the Safari bug of sending the text contained in a link as the target instead of the link itself. The method then grabs the list the event was triggered in by reading the closestSibling() of the target’s parentNode.
photoListInlineSlides.js (continued)
showSlide : function( e ) { var action;
var t = DOMhelp.getTarget( e );
while( t.nodeName.toLowerCase() != 'a'
&& t.nodeName.toLowerCase() != 'body' ) { t=t.parentNode;
}
var parentList = DOMhelp.closestSibling( t.parentNode, -1 );
■Summary The visitor clicks the content of the link to go one image forward or backward. The event target could be an image (as it is in this example) or text—or anything else the maintainer of this script put in the forwardsLabel and backwardsLabel properties. Therefore—and because Safari sends the text contained in a link as the target rather than the link itself—you need to check for the name of the node and compare it with A. Then, you take the parent node of this A—which is the paragraph that was newly cre- ated—and get its previous sibling, which is the UL that contains the images.
Next, you need to find the currentSlide property from the list in question and the total number of images by checking the length property of the list item array. Hide the previously shown image by removing the show class.
photoListInlineSlides.js (continued)
var count = parentList.currentSlide;
var photoCount = parentList.getElementsByTagName( 'li' ). length - 1;
var photo = parentList.getElementsByTagName( 'li' )[count]; DOMhelp.cssjs( 'remove', photo, inlineSlides.showClass );
Determine whether the link that was activated was the forward link by comparing the target with the fwd property of the list, and then increment or decrement the counter accordingly.
If the counter is larger than 0, remove the hide class from the backward link; otherwise, add this class, effectively hiding or showing the link. The same logic applies for the forward link, although the comparison criteria this time is the counter being less than the total number of list items. This prevents the backward link from showing on the first slide and the forward link from showing on the last slide.

204 C H A P T E R 6 ■ C O M M O N U S E S O F J A V A S C R I P T : I M A G E S A N D W I N D O W S
photoListInlineSlides.js (continued)
count = ( t == parentList.fwd ) ? count+1 : count-1; action = ( count > 0 ) ? 'remove' : 'add' ; DOMhelp.cssjs( action, parentList.rew, inlineSlides.hideLinkClass );
action = ( count < photoCount ) ? 'remove' : 'add'; DOMhelp.cssjs( action, parentList.fwd, inlineSlides.hideLinkClass);
That took care of the links; now you need to increment the counter display. Since the counter is stored as a property of the list, it is easy to read the first child node of that property— that is, the text inside the SPAN. You can then use the replace() method of the String object to replace the first numerical entry (here via a regular expression) with the new image number, which is count+1—again, because humans do count from 1 and not from 0. Next, reset the currentSlide property, grab the new photo (remember you changed count), and show the current photo by adding the show class. All that is left to do is start the init() method when the window has loaded.
photoListInlineSlides.js (excerpt)
photo = parentList.getElementsByTagName( 'li' )[count]; var counterText = parentList.count.firstChild counterText.nodeValue = counterText.nodeValue. replace( /\d/, count + 1 );
parentList.currentSlide = count;
photo = parentList.getElementsByTagName( 'li' )[count]; DOMhelp.cssjs( 'add', photo, inlineSlides.showClass ); DOMhelp.cancelClick( e );
}
}
DOMhelp.addEvent( window, 'load', inlineSlides.init, false );
However, you are not quite finished yet. If you try out the slide show in Safari, you will realize that the forward and backward links do get hidden, but they are still clickable and cause errors when you try to reach images that are not there.
■Caution This is a common mistake in dynamic web development—hiding things visibly does not necessarily make them disappear for all users. Think of people who are blind, or users of textual browsers (such as Lynx). And then there are browser bugs and oddities to consider, too.
C H A P T E R 6 ■ C O M M O N U S E S O F J A V A S C R I P T : I M A G E S A N D W I N D O W S |
205 |
Preventing this issue is rather easy though: all you need to amend is the showSlide() method so as not to do anything when the target that was clicked has the hide CSS class assigned to it. And when fixing that you might as well add the Safari fix to cancel the default action of the newly generated links. The demo examplePhotoListInlineSlideShowSafariFix.html incorporates these changes:
photoListInlineSlidesSafariFix.js
inlineSlides = {
//CSS classes slideClass : 'slides',
dynamicSlideClass : 'dynslides', showClass : 'show', slideCounterClass : 'slidecounter', hideLinkClass : 'hide',
//Labels
//Forward and backward links, you can use any HTML here forwardsLabel : '<img src="control_fastforward_blue.png" alt="next" />',
backwardsLabel : '<img src="control_rewind_blue.png" alt="previous" />',
//Counter text, # will be replaced by the current image count
//and % by the number of all pictures
counterLabel : '# of %',
init : function() {
if( !document.getElementById || !document.createTextNode ) { return;
}
var uls = document.getElementsByTagName( 'ul' ); for( var i = 0; i < uls.length; i++ ) {
if( !DOMhelp.cssjs( 'check', uls[i], inlineSlides.slideClass ) ) {
continue;
}
DOMhelp.cssjs( 'swap', uls[i], inlineSlides.slideClass, inlineSlides.dynamicSlideClass );
uls[i].currentSlide = 0; inlineSlides.initSlideShow( uls[i] );
}
},