Beginning Ubuntu Linux - From Novice To Professional (2006)
.pdf
378 |
C H A P T E R 2 6 ■ I N D E P T H : B A S E |
Figure 26-3. You can choose from a variety of look and feel options for your form, and each will be previewed behind the wizard dialog box.
6.You’re invited to give the form a name. Enter a suitable name, such as CD-Collection. You are also given the option of entering data directly into the form or modifying it manually. You might have noticed that the field you created, the Scratched yes/no check box, isn’t present on the form. Therefore, you need to add it to the form, so select to modify it manually. You’ll do that in the next section.
■Note There are no rules governing form names, and you can use virtually any symbols and also insert spaces into the name. However, it’s a good idea to keep the form name simple and concise.
Adding Controls to the Form Manually
When the Form Wizard finishes, you should find yourself editing the form directly. A floating palette—the Form Control toolbar—will appear, offering various form-specific functions. Follow these steps to add the check box field to your form:
1.On the Form Control toolbar, click the icon that looks like a check box (on my computer, it was the third icon from the left), and then click and drag to draw a check box on the form. You need to make it big enough so that the label can be seen. If you release the mouse button too early, simply click and drag the handles at the edges to resize the control.

C H A P T E R 2 6 ■ I N D E P T H : B A S E |
379 |
2.Once the check box has been drawn, double-click it. This will open Properties dialog box. Click in the Label box, delete what’s there already, and type Scratched? (or anything else that will help you identify the check box on the completed form).
3.Click the Data tab and, in the Data Field box, select Scratched from the drop-down list, as shown in Figure 26-4.
Figure 26-4. Creating a custom control is simply a matter of drawing it on the form, and then matching it with a data field.
4. Close and save the form.
You can add more custom controls following the same basic approach you used here. Simply draw them on to the form, and then match them up with an entry in the table using the Data tab.
The database is almost ready for use. You just need to take one more step to modify the table, which you’ll do next.
Editing the Database Table
Before you can use the database, you need to make a small change to the table you created earlier. Although the Table Wizard created a primary key, it didn’t make it into an automatically updating number. Without this option activated, the user will need to manually number each entry in the database as it’s created.
Follow these steps to edit the table and activate automatic numbering for the ID field:

380 |
C H A P T E R 2 6 ■ I N D E P T H : B A S E |
1.Click the Tables icon in the Database pane of the main program window, right-click the table you created earlier, and select Edit.
2.Look for the entry in the table list labeled ID. It should be first in the list. Make sure that the cursor is on the ID line, and click the Autovalue drop-down list at the bottom of the window. Make sure that it reads Yes, as shown in Figure 26-5.
Figure 26-5. Set the primary key to automatically update by editing its value in the table.
3. Close the window and opt to save the table.
That’s it! Your database is now ready to use.
Using the Database
Entering data into the finished database is easy. Click the Forms icon in the Database pane, and then double-click the form you created earlier.
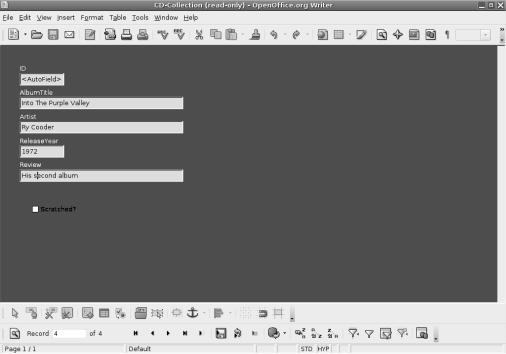
The Form Control toolbar will still be visible. To hide it, click its close button at the topright corner of the toolbar. After this, you can start to enter data into the form, as shown in the example in Figure 26-6. Note that you do not need to enter data in the ID field, because this will automatically be filled with the primary key number.

C H A P T E R 2 6 ■ I N D E P T H : B A S E |
381 |
Figure 26-6. The finished database form lets you enter data into the input fields and navigate using the toolbar at the bottom.
Once you’ve filled in the form, you can click the Next Record button in the Form Navigation toolbar running along the button of the window (don’t forget that hovering the mouse cursor over each button reveals a tooltip explaining what the button does). This will move you on to the next blank form, where you can enter more data. Repeat this as many times as necessary.
The Form Navigation toolbar contains other handy tools. For example, the first button— a magnifying glass—lets you search the database for a particular entry. It’s well worth investigating the functions.
Summary
In this chapter, we looked at the Base database component of OpenOffice.org and how to use it to easily create and edit simple databases. We stepped through an example of setting up a database table and creating a database form that users can employ to enter and edit data.
In the next chapter, we will look at how to run Microsoft Office and many other Windows programs under Ubuntu.

C H A P T E R 2 7
■ ■ ■
In Depth: Evolution
Evolution isn’t part of the OpenOffice.org suite. It was originally created by Ximian, an organization founded by the creators of the GNOME Desktop Project and acquired by Novell in August 2003. Even long after the acquisition, Evolution is still developed by many of the key GNOME desktop developers.
Although it’s not explicitly described as such by its developers, Evolution is considered the “official” GNOME desktop e-mail program. Nearly every Linux distribution that uses the GNOME desktop system also uses Evolution. Evolution even retains the same look and feel as many elements of the Ubuntu desktop.
In terms of functionality, Evolution is similar to Microsoft Outlook, in that as well as being a powerful e-mail client, it incorporates contacts management, a calendar, and a to-do list. Evolution is even able to connect to Microsoft Exchange (2000 and above) groupware servers and synchronize with contact and calendar data, in addition to fetching e-mail. Of course, it can also connect to standard POP3/SMTP e-mail servers, as well as IMAP and also Novell GroupMail servers. This means it is compatible with practically every e-mail system in use today.
Although Evolution offers many of the functions of Microsoft Outlook, it differs in some key ways. Therefore, this chapter describes how to perform basic tasks, as well as more advanced everyday jobs.
Evolution Modes
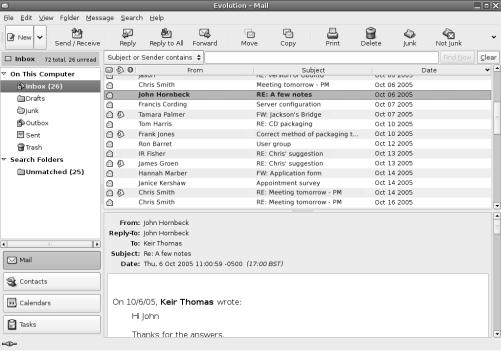
Evolution consists of four components: Mail, Contacts, Calendars, and Tasks. These are interconnected but operate as separate modes within the program. Each mode can be selected using the switcher located at the bottom-left side of the program window. Simply click the button for the mode you wish to use. The program window, toolbar, and menu system will change to accommodate whichever mode is selected. Figure 27-1 shows the program in Mail mode.
■Tip You can shrink the switcher component to small icons by clicking View Switcher Appearance Icons Only.
383

384 |
C H A P T E R 2 7 ■ I N D E P T H : E V O L U T I O N |
Figure 27-1. You can switch between Evolution’s modes by clicking the buttons at the bottom left of the program window.
The four Evolution modes work as follows:
Mail: At the top left of the program window are the mail folders. Here, you’ll find the Inbox and Sent folders, along with any other mail folders you create. On the right is the list of e-mail messages, and beneath this is the message preview pane, where the body of any message you select will be displayed. Above the message list is the search box, which works like most e-mail search routines: type the relevant word(s) and then click Find Now. Notable icons running along the top of the window include the New button, which will let you compose an e-mail message, and the Send/Receive button, which will download new messages and also send any messages in the Outbox folder.
Contacts: At the left side of the program window are listed the various contact folders. For most users, there will be just one, named Personal, but if you specified a groupware server during setup, you will also be able to connect to this by clicking its entry. At the top right is the list of contacts. Clicking any contact displays that individual’s information at the bottom of the window, in the contact information area. The search bar at the top of the window beneath the toolbar lets you quickly search for contacts using their name. The New button on the toolbar lets you create a new contact.

C H A P T E R 2 7 ■ I N D E P T H : E V O L U T I O N |
385 |
Calendars: On the left side of the program window are the various calendars you can access. For most users, the Personal calendar will be the principal one, but you can also access shared calendars here. To the right is the monthly calendar and, in the middle of the program window, the appointment list, with half-hour entries covering the working day. By default, the current day is shown. To select a different day, simply double-click the day in the month view. You can switch between day, week, and month appointment views by clicking the Day, Work Week, and Month buttons on the toolbar.
Tasks: Your tasks lists are listed on the left side of the program window. Once again, most users will use just the Personal task list. The task list itself appears in the main program window.
Basic E-Mail Tasks
Evolution’s e-mail functionality is arguably the heart of the program. Although it offers a lot of features, it is quite simple to use. If you’ve ever used any other e-mail client, such as Microsoft Outlook, you have a head start.
This section describes how to accomplish several everyday tasks within the e-mail component of Evolution. When you start Evolution, the e-mail mode is selected automatically. However, if it isn’t, or if you’ve switched to a different mode within the program, simply click the Mail button at the bottom right of the program window.
Sending and Receiving E-Mail
Once Evolution has been set up correctly to work with your e-mail servers, as outlined in Chapter 8, you can simply click the Send/Receive button on the toolbar to connect to the server(s) and both send and receive e-mail.
You may need to enter your password if you didn’t enter it during setup. You can check the Remember Password box to avoid having to type it again, but this will mean the password is then stored on your hard disk, possibly posing a security risk.
■Note Although e-mail is normally sent as soon as you click the Send button when composing e-mail, if the sending has been delayed for any reason (such as because you were offline at the time), it will be sent as soon as you click the Send/Receive button. Until that point, it will be held in the Outbox folder on the left side of the program window.
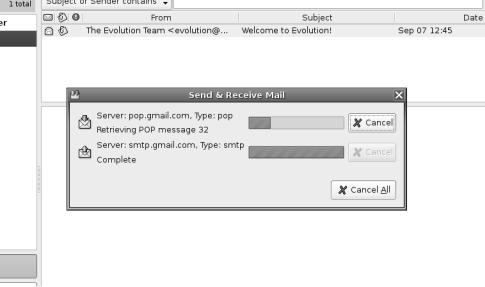
Any outstanding mail is sent first, and then the receiving procedure is started. As shown in Figure 27-2, a status dialog box will tell you how many messages there are and the progress of the download. Clicking the Cancel button will stop the procedure (although some messages may already have been downloaded).

386 |
C H A P T E R 2 7 ■ I N D E P T H : E V O L U T I O N |
Figure 27-2. You’ll see how many messages there are to download whenever you click the Send/ Receive button.
Reading E-Mail
Simply click an e-mail message to view it in the preview pane at the bottom of the screen. Alternatively, you can double-click a message to open it in its own program window (selecting a message and pressing Enter will have the same effect).
As with most e-mail clients, any unread messages in the list appear in bold, and messages that have been read appear in ordinary type. By default, each message is marked as read after 1.5 seconds, but you can alter this value. To change it, click Edit Preferences, click the Mail Preferences icon in the Preferences dialog box, and then change the value under the Message Display heading. A value of 0 will cause the mail to switch to read status as soon as it’s clicked, which can be useful if you want to quickly clear a lot of messages.
You can also mark many messages as read by highlighting them all, right-clicking an individual one, and selecting Mark As Read from the menu that appears. You can select multiple messages in the usual way: Shift-click to select a consecutive list or Ctrl-click for nonconsecutive selections.
Deleting Messages
You can delete messages by highlighting them and pressing the Delete key. Alternatively, rightclick any message (or a selection of them) and select Delete.

C H A P T E R 2 7 ■ I N D E P T H : E V O L U T I O N |
387 |
The way Evolution handles deleted messages is rather unusual in that messages aren’t deleted instantly. They simply disappear from view. You can view all deleted messages by clicking the Trash icon on the left side of the program window, but, technically speaking, the messages haven’t been moved to the Trash folder. The Trash folder merely displays in one place messages marked for deletion. You can right-click each message in the Trash view and select Undelete, which will unhide the message, but you can’t “empty the trash,” as you might be used to doing in other applications.
To get rid of deleted messages permanently, you need to right-click the folder where you deleted the message (such as the Inbox) and click Folder Expunge. You’ll be asked if you really want to delete the messages, as shown in Figure 27-3.
■Note If you move any messages from folder to folder, as described later in the “Sorting and Filtering Messages” section, a copy of the mail will end up in the Trash folder. This is because Evolution doesn’t literally move messages. Instead, it copies them from the old to the new location and deletes the original. This can be a little disconcerting at first, but there’s nothing to worry about. The mail message will remain wherever you moved it, and it won’t disappear when you expunge any folders.
Figure 27-3. To permanently delete messages, it’s necessary to expunge them from the folder from which they were deleted.
Flagging Messages
You can flag messages in a variety of ways to help remind you of their status or purpose. The simplest form of flagging is to mark a message as important: right-click the message and select Mark As Important, or click in the space beneath the Important column (this is located to the left of the From column).
Alternatively, you can add several different flags by right-clicking a message and selecting Mark for Follow Up. Your choices range from Do Not Forward to No Response Necessary and Review. This heading will then appear in the message preview at the bottom of the window whenever the mail is selected.
