

Beginning Ubuntu Linux - From Novice To Professional (2006)
.pdf398 |
C H A P T E R 2 7 ■ I N D E P T H : E V O L U T I O N |
simply select Forever from the drop-down list. Then click the Add button to add the details of the recurring event to the appointment.
In the case of meeting appointments, you can click the Invitations tab to invite others to the meeting, via iCal invitations which will be sent out by e-mail as soon as you’ve finished creating the appointment. Simply click the Add button and then, in the empty field that appears, start typing the contact name of the individual you want to invite. If the person is already in your contacts list, the name will be automatically completed, but you can also type individual e-mail addresses.
Clicking the Scheduling tab will show you who can and can’t attend, according to replies to the invitations sent out (obviously, this is a feature you’ll be using after you initially created the appointment). On the left side of the dialog box, you will see the list of attendees and also their status: whether they’ve accepted or not, or whether they’ve sent a busy/tentative reply (in which case, you might choose to reschedule the meeting).
Tasks
The Tasks mode is the simplest component within Evolution and allows you to create a to-do list. After you’ve made an entry, clicking the check box alongside it will mark it as completed. Completed items appear with strike-through, as shown in Figure 27-10.
Figure 27-10. The Tasks mode lets you catalog chores that you have to do during the day.
C H A P T E R 2 7 ■ I N D E P T H : E V O L U T I O N |
399 |
Switch to Tasks mode by clicking its button on the bottom-left side of the program window. To add a new task, click the bar that reads Click to Add a New Task. Type a description of the task, and then press Enter. You will then be able to enter further tasks in the same field.
Double-clicking a task allows you to fine-tune its details. For example, you can add a due date, so you’ll know when the task must be completed. You can also add a description for future reference.
By clicking the Status tab, you can also set a percentage figure for completion of the task, as well as its priority, ranging from Low to High.
Summary
This chapter has been a whistle-stop tour of Evolution’s main features. We’ve looked at e-mail creation and organization, contacts management, working with the appointments calendar, and editing the task list.
Evolution is a powerful program. Be sure to take a look at its help documentation (Help Contents) to learn more about it.
In the next chapter, we’ll look at running Microsoft Office under Ubuntu. Yes, you read that right. It’s entirely possible to run certain Windows applications under Linux.

C H A P T E R 2 8
■ ■ ■
Running Microsoft Office
Under Ubuntu
The title of this chapter might sound somewhat strange. How can a Windows program be run under Linux? The answer comes courtesy of the Wine project and the set of add-on programs it offers for Linux. Wine is an acronym for Wine Is Not an Emulator, which is a way of saying that the Wine software doesn’t emulate Windows but instead re-creates certain parts of it called the Application Programming Interface (API).
In theory, the vast majority of Windows program can be run using Wine. The reality is that some work easily, some require a little configuration to run, and others don’t work at all.
Getting a Windows program to run under Wine is rarely difficult, but essentially it’s a “hack”—a way of making something work when it’s not intended to do so. Such hacks are the lifeblood of Linux, but this should serve as a warning to the less-experienced Ubuntu user: don’t expect to be able to simply insert the Microsoft Office CD, click a few times, and have a working Office installation! A handful of preparatory steps are necessary.
In this chapter, you’ll learn how to install both Wine and Microsoft Office. Because the presence of Internet Explorer is critical to many pieces of Windows software nowadays, we also cover the installation of this web browser.
Installing and Configuring Wine
Wine isn’t installed by default under Ubuntu. Although you usually should download new software from the Ubuntu repositories, in the case of Wine, it’s a better idea to download it directly from the people behind the software. This is because Wine is constantly being updated and made more compatible with new Windows software, and you’ll find the latest version at the SourceForge.net site.
Downloading Wine
To get the latest version of Wine, add a new download repository to the Synaptic Package Manager, as follows (see Chapter 8 for details on setting up the Synaptic Package Manager):
401
402 |
C H A P T E R 2 8 ■ R U N N I N G M I C R O S O F T O F F I C E U N D E R U B U N T U |
1.Select System Administration Synaptic Package Manager. Click Settings Repositories.
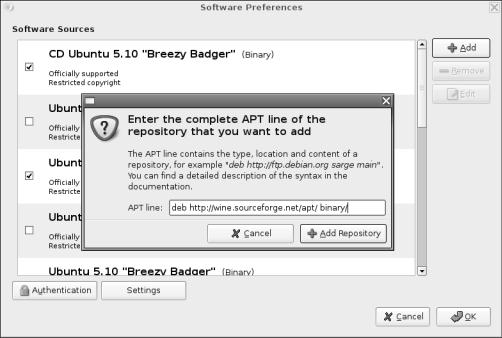
2.Click the Add button, and then the Custom button in the dialog box that appears. In the APT Line field, enter the following (note the space inserted before binary/), as shown in Figure 28-1:
deb http://wine.sourceforge.net/apt/ binary/
Figure 28-1. Getting the latest version of Wine ensures maximum compatibility with Windows programs.
3.Click the Add Repository button.
4.Click OK in the Software Preferences dialog box, and then agree to the reloading of package listings.
5.In the main Synaptic Package Manager window, click Search and enter wine as a search term.
6.In the list of results, look for the wine entry (this will simply be the word wine on its own, without any additional text). Click the check box, and then click Mark for Installation.

C H A P T E R 2 8 ■ R U N N I N G M I C R O S O F T O F F I C E U N D E R U B U N T U |
403 |
7.Search for winetools and mark it for installation.
8.Click Apply. You’ll be warned that some of the downloads you’re about to install are not authenticated. However, in this case, you’re downloading from a trusted location (http://sourceforge.net, in fact, the home of many key open-source projects). So it’s safe to click Apply.
9.When Wine has downloaded and installed (it was around 15MB on my system), close the Synaptic Package Manager.
CROSSOVER OFFICE
The developers behind Wine also produce a proprietary version of Wine called CrossOver Office. Technically speaking, this is actually no different from any other version of Wine, except that a GUI-based front end is added to make installation of programs simpler. It also includes several scripts to overcome various incompatibilities between Windows programs and Wine. This makes it possible to install the very latest version of Office, for example. In addition, CrossOver Office also lets you use Internet Explorer-based plug-ins within Linuxbased browsers.
You can learn more about CrossOver Office by visiting its official web site at www.codeweavers.com. CrossOver Office is available for a fee from CodeWeavers, but considering they are one of the major sponsors of the Wine project, this is an excellent way of investing in the community.
Configuring Wine
The Sidenet Wine Configuration Utility is a series of scripts by a third-party programmer (who isn’t related to the Wine project) that automatically configures Wine so that it’s much more compatible with current software. Sidenet automates the installation of Internet Explorer 6 and Windows Media Player 6.4 (you might find the versions numbers differ). It also tweaks the Wine configuration in a handful of ways to make it work with a lot of software.
■Note A script is a series of commands within a text file. By running the script, you work through the series of commands automatically.
The Sidenet script can create several different types of Wine configuration. The first is a completely Microsoft-free Wine installation, which means that it won’t install any Windowsbased system files or Internet Explorer. The other options let you install Internet Explorer and Windows Media Player 6. This is strongly advisable, because many Windows programs demand the presence of these two programs (particularly Internet Explorer). Additionally, it’s very useful to download several additional components that can then be installed using Sidenet.

404 |
C H A P T E R 2 8 ■ R U N N I N G M I C R O S O F T O F F I C E U N D E R U B U N T U |
■Caution According to the wording of Microsoft’s End User License Agreements, you can download and install the Windows components only if you have a valid Windows license. That’s to say you can download Internet Explorer and Windows Media Player only if you own Windows XP, 2000, Me, 98, or 95. If you don’t own these operating systems, then you’ll be violating copyright laws. Also, you can install DCOM98, an additional component, only if you have a Windows 98 license; to do otherwise is to break copyright laws.
Here are the steps for installation:
1.Open a web browser and go to http://sidenet.ddo.jp/winetips/config.html. From there, download the latest version of the Sidenet binary release.
2.When the download of Sidenet has finished, open a GNOME Terminal window (Applications Accessories Terminal) and type the following at the prompt (change the filename listed on the tar line to the match the name of the file you downloaded; these steps assume the file was downloaded to the desktop):
cd ~/Desktop
tar zxf wine-config-sidenet-1.9.0.tgz
This will switch to where the download has been saved and unpack the downloaded archive into its own directory.
3.Download the following manually and place the downloaded files in the Sidenet directory you created earlier (on my system, this was wine-config-sidenet):
•DCOM98: www.microsoft.com/com/default.mspx
•Windows Installer add-in: www.microsoft.com/downloads/ release.asp?releaseid=32831
•MFC 4.0 Runtime: www.softlookup.com/download.asp?ID=10315
The MFC 4.0 Runtime is supplied in a zip file. Open it with File Roller and extract all the contents of the zip to the Sidenet directory.
■Note The URLs for the additional Windows components were correct as this book went to press but it’s possible that they may change. If that happens, searching the Web for the files in question should return ample download sites.
4.Once all the files are downloaded, click the GNOME Terminal window and type the following (this again assumes that you created the Sidenet directory in your desktop directory):
cd ~/Desktop/wine-config-sidenet
./setup
C H A P T E R 2 8 ■ R U N N I N G M I C R O S O F T O F F I C E U N D E R U B U N T U |
405 |
5.Answer the prompts until you are offered the choice of the kind of Wine setup you want. Choose to manually install (this was option 3 on the version of Sidenet that I installed, but might be different for you).
6.You need to answer more questions about which programs you want to install. Answer Yes to each, and agree to create the C:\ folder in your /home directory.
■Note During installation of Sidenet, the Windows components you install might ask you to reboot. It isn’t necessary for you to actually reboot Linux. Instead, a Windows reboot is faked within the Wine software (this is done automatically by Sidenet). You can do this yourself at any time from the GNOME Terminal window by typing wineboot.
7.Eventually, the DCOM98 installation window will appear. As you would within Windows, work through the options, agreeing to install the software.
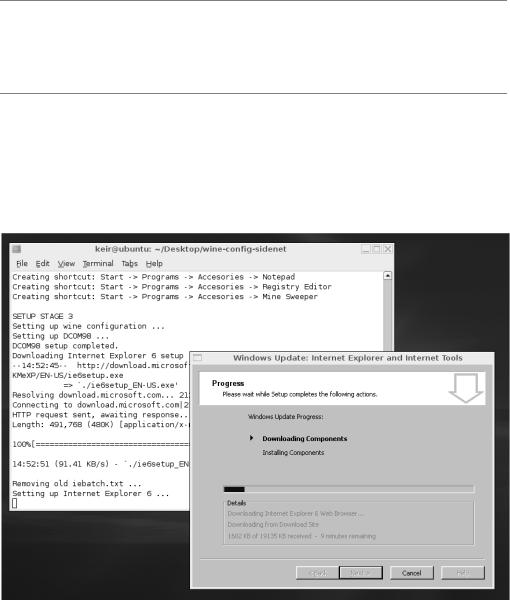
8.Following this, the Internet Explorer installation program will download and then start. Again, work through the installer. Choose the Install Now Typical Set of Components option. The program will load, as shown in Figure 28-2.
Figure 28-2. The Sidenet script will download and install Internet Explorer and also configure vital Wine settings.

406 |
C H A P T E R 2 8 ■ R U N N I N G M I C R O S O F T O F F I C E U N D E R U B U N T U |
9.At the end of installation, an Internet Explorer 6 window will open, informing you that the installation has finished. Closing this window will also end the script.
10.You can delete the wine-config-sidenet folder, as well as any other files you downloaded.
■Note I saw an error dialog box about ieinfo5.ocx when installing Internet Explorer. Don’t worry if you see the same thing, or even a handful of other errors. Chances are everything will still run smoothly.
Showing Hidden Files on CDs
You need to make one final change so that Wine can see hidden files on certain Windows CDs. This involves manually editing /etc/fstab, the configuration file that controls how and where file systems are mounted (fstab and mounting are covered in Chapter 15), to add the word unhide to the line relating to the CD-ROM within fstab. Here’s the procedure:
1.Make sure the CD-ROM drive is unmounted. If you’re browsing the CD, close the file window and make sure that any programs that might access the CD are closed, too.
2.Type the following at the GNOME Terminal command prompt: umount /media/cdrom
3.Load the fstab file into the Gedit text editor: sudo gedit /etc/fstab
4.Search for the line that contains the words /media/cdrom0 and add unhide just before the user,noauto entries in the Options column. The final line should look something like this:
/dev/hdc /media/cdrom0 udf,iso9660 unhide,user,noauto 0 0
5. Save the file and quit Gedit.
Installing Microsoft Office
The best choice of Microsoft Office product to install is Office 2000. This has a proven record of installing and generally running well under Wine. It also uses file formats that are, for all practical purposes, unchanged in the more recent versions of Office (XP and 2003) and universally recognized in the business world.

C H A P T E R 2 8 ■ R U N N I N G M I C R O S O F T O F F I C E U N D E R U B U N T U |
407 |
■Note The Wine programmers are constantly striving to make Wine compatible with all Windows software packages, but at the time of writing, Office XP and 2003 didn’t work, although some people have reported moderate success. The Wine project has a database explaining which software packages work and which don’t. Often, any tricks or tips others have used to make the software work are also detailed. You’ll find the database at http://appdb.winehq.org.
Follow these steps to install Office 2000:
1.Insert the Office 2000 CD, and then click on the GNOME Terminal window.
2.Mount the CD, switch to the /media/cdrom folder, and use Wine to run the Office setup program:
mount /media/cdrom cd /media/cdrom wine SETUP.EXE
3.Work your way through the Office 2000 installation program as you would if you were running Windows. Select the default installation option.
Installation didn’t run perfectly smoothly on my test PC, although it may work fine for you. I received several errors messages, which I simply clicked through. At the end, the Office installation program seemed to be locked into a cycle of configuring itself. Eventually, it finished and presented the Office installer repair dialog box. I clicked to cancel this, and was then told that installation had failed. However, I found that Office 2000 had, in fact, installed perfectly.
Another test I undertook resulted in error messages about Internet Explorer being split from the Windows Update process. In addition, the installation window was very small and the text within it largely illegible. However, I was able to work through the installation wizard by pressing Enter a few times. You may find it worthwhile to install the Microsoft Core Fonts package before installing Office; see Chapter 21.
As I mentioned at the beginning of this chapter, Wine is something of a hack, so you may encounter some challenges. However, with a little common sense, you should be able to get Office 2000 onto your computer.
Running Office Components
In order to install programs, Wine creates an entire pseudo file system that mirrors a typical Windows hard disk. This is normally located in the hidden .wine directory in your system folder, but the Sidenet script you used to configure Wine will have placed it in your /home directory. Therefore, you should be able to browse to /home/<username>/c/Program Files to see a listing of all installed Windows software (replacing <username> with your username).