

Beginning Ubuntu Linux - From Novice To Professional (2006)
.pdf348 |
C H A P T E R 2 3 ■ I N D E P T H : W R I T E R |
Figure 23-5. Just select the Table icon on the Main toolbar and drag the mouse to define the size of the table. Release the mouse button when you’re finished.
Whenever your cursor is inside the table, a new toolbar will appear, offering handy options. Once again, simply hover your mouse over each button to find out what it does via a tooltip.
As with spreadsheets, tables consist of cells arranged into rows (running horizontally) and columns (running vertically). Altering the size of a column is easy. Just hover the mouse over the edge of a cell until it changes to a resizing cursor, and then click and drag. You can do the same on a horizontal bar to alter a cell’s height, but a far better method is to right-click within the cell, select Row Height, and enter a value. This will ensure that subsequent cells are shifted down to make space for the newly enlarged cell, which doesn’t happen when you click and drag the cell’s border.
■Tip An alternative way of resizing cells is to click in a cell and press the Enter key, which inserts a carriage return. Cells expand in size to fit their contents.
Once the cursor is within a table, you can move from cell to cell using the Tab key. Alternatively, you can move backward through the cells by pressing Shift+Tab.
To add more rows or columns, click the relevant icon on the Table toolbar (the fourth and fifth buttons on the bottom row). To split an existing cell, ensure your cursor is inside it, rightclick, select Cell from the menu, and then click Split.
If you want to total figures within a table, click in an empty cell, and then click the Sum icon on the Table toolbar (the Greek sigma symbol on the right side of the bottom row). This is similar to inserting a function in a spreadsheet. The cell holds the formula for the sum and clicking additional cells, or a range of cells, adds them to the sum.
■Note Only correctly formatted cells can be summed using the Sum icon on the Table toolbar. Cells with spaces or text within them cannot be added to the formula.

C H A P T E R 2 3 ■ I N D E P T H : W R I T E R |
349 |
You can alter the styling of any cell using various icons on the Table toolbar, as well as the standard text formatting tools on the Formatting toolbar. The Table toolbar allows you to add borders to the cells and change the background colors. Alternatively, you can choose to remove all borders from the cells by clicking the Borders icon and then the No Borders option (note that gray borders will remain in place, but these are only for your convenience and won’t appear in printouts).
Mail Merging
Mail merging refers to automatically applying a database of details, such as names and addresses, to a document, so that many personalized copies are produced. It’s ordinarily used to create form letters for mailings.
OpenOffice.org makes the procedure very easy, but it requires source data that will be merged into the document. As with Microsoft Word, you can either enter this data within Writer itself or choose to import data from a separate document. Unless you have enough knowledge of databases to connect one to OpenOffice.org (the program works with dBase and MySQL files, among others), you may want to input existing data in the form of a comma-separated value (CSV) text file. This is the simplest form of data file that is understood by the majority of office programs and databases.
Here, we’re going to look at entering the data within Writer, which is the best policy for smaller mail merge operations. You can then output the data as a CSV file, so you can use it again later. Here are the steps for using mail merge:
1.Select Tools Mail Merge Wizard to start the wizard, as shown in Figure 23-6.
2.Specify your starting document, which is the document in which the merged data will appear. You can opt to use the current document, create a new document, open a document from file, or use a template as the basis for your file.
3.Choose the mail merge type. You can choose to create a merged e-mail (for sending to multiple recipients) or a merged letter.
4.You’re asked to tell Writer about your data. Writer needs to know where to find the addresses that will be merged into the document. Click the Select Address List button.
5.In the window that appears, you have a number of options. You can raid your Evolution e-mail address book for the data, click Add to select an already existing data source (such as a database or CSV file), or create a data source from scratch. Choose to create a data source to enter the data in Writer.
■Note The fourth option for choosing a mail merge data source, Filter, allows you to filter the database source you select after clicking Add, so that you can import only specific data. To learn more about this technique, browse the OpenOffice.org Help file (click Help OpenOffice.org Help) and search for Filtering Data in Databases.

350 |
C H A P T E R 2 3 ■ I N D E P T H : W R I T E R |
Figure 23-6. The Mail Merge Wizard makes creating multiple documents from a data source incredibly easy.
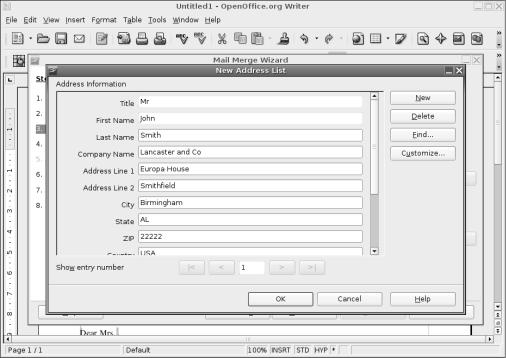
6.You’re presented with a form for entering the data for each individual you want to receive the mail-merged letter, as shown in Figure 23-7. You don’t need to fill in each field; you’ll be able to choose which data fields to use in the document later on. If you wish to enter your own specific data types in addition to address details, you can click the Customize button to add your own field to the list. Using the up and down arrows in the window that appears, position the highlight where you would like the data to appear. Then click the Add button (alternatively, if there’s a data field you’re not using, you can highlight it and select Rename to reuse it). Obviously, you should add any new data fields you want before you begin to enter data!
7.Type in the data and press Enter at the end of each line. When you get to the last field, click the New button at the top right. When you've finished entering all the data, click OK. Then accept Writer's offer to save the data as a CSV file.
8.You're returned to the data-selection screen, and your just-saved file will be at the top of the list. Click OK.
C H A P T E R 2 3 ■ I N D E P T H : W R I T E R |
351 |
Figure 23-7. Enter the data for each person you want to receive the letter.
9.You're returned to the main Mail Merge Wizard window, where you can select whether or not to include an address block. All this means is that Writer will automatically add the merge fields to your document in what it considers the correct format (for example, title, followed by first and last name, with each line of the address underneath, and so on). You can insert the merge fields manually later on if you wish; in that case, remove the check from the "This document shall contain an address block" check box. Click Next.
10.You’re invited to create the salutation that will head the letter. This will contain the merge data as well, so that you can personalize the letter. Again, you can accept the default, tweak it slightly, or choose not to have an automated salutation (so that you can create your own later).
11.Depending on your previous choices, and whether you accepted the automatic address block and salutation, you are now given the choice to adjust the layout of the document in a rough way or to actually edit it (note that even if you accepted the address block and/or salutation, you’ll get a chance to edit the document in the next step anyway).
352 |
C H A P T E R 2 3 ■ I N D E P T H : W R I T E R |
12.If you opt to edit the document, you can insert your choice of merge fields by clicking Insert Fields Other. Select the Database tab in the window that appears, and then select Mail Merge Fields on the left side of the window. Click the small plus symbol next to the data file you created earlier, which should be listed on the right, and you can then select and insert the merge fields. Once you’ve finished, click the Return to Mail Merge Wizard button.
13.Click Next to perform the merge. You’re then given a chance to edit the actual mailmerged documents (which, depending on the quantity of data entries you created earlier, could number in the tens, hundreds or even thousands!).
14.You can save or print the merged document containing the data. To save the document creating the merge fields, click Save Starting Document.
Adding Headers and Footers
You may want to add headers and footers to long documents to aid navigation. They appear at the top and bottom of each page, respectively, and can include the document title, page number, and other information. Headers and footers are created and edited independently of the main document.
As you might expect, inserting both headers and footers takes just a couple of clicks. Select Insert Header or Insert Footer, depending on which you wish to insert (documents can have both, of course). Writer will then display an editing area where you can type text to appear in the header or footer. For more options, right-click in the area, select Page, and then click the Header or Footer tab. Here, you can control the formatting and nature of the header or footer. Clicking the More button will let you apply borders or background colors.
You might wish to insert page numbers that will be updated automatically as the document progresses. OpenOffice.org refers to data that automatically updates as a field. You can insert a wide variety of fields by selecting Insert Fields, as shown in Figure 23-8. For example, along with the page number, you can insert the document title and author name (which is read from the details entered into the Options configuration dialog box, accessed from the Tools menu). In addition, you can enter mail merge fields by clicking Other (see the previous section for a description of how to associate mail merge data with a document).

C H A P T E R 2 3 ■ I N D E P T H : W R I T E R |
353 |
Figure 23-8. Automatically updating data, such as page numbers, can be inserted into headers and footers.
Summary
In this chapter, we’ve examined Writer, one of the core components of OpenOffice.org. We’ve looked at the some of the key tools, which enable quick and easy document creation. In particular, you’ve learned how to format text, use the spell-checking component, insert pictures, create and edit tables, mail merge, and add headers and footers.
In the next chapter, we move on to another vital part of OpenOffice.org: Calc, the spreadsheet component.

C H A P T E R 2 4
■ ■ ■
In Depth: Calc
Calc is the spreadsheet component of OpenOffice.org. Like most modern spreadsheet programs, it contains hundreds of features, many of which few average users will ever use. However, it doesn’t abandon its user-friendliness in the process and remains very simple for those who want to work on modest calculations, such as home finances or mortgage interest payments. In many regards, Calc is practically a clone of Excel, and anyone who has used Microsoft’s spreadsheet program will be able to get started with it immediately.
In this chapter, you’ll learn about some of the best features of Calc, as well as the basics of spreadsheet creation.
Entering and Formatting Data
As with all spreadsheets, entering data into a Calc document is simply a matter of selecting a cell and starting to type. You can enter practically anything into a cell, but a handful of symbols are not allowed. For example, you cannot enter an equal sign (=) followed by a number and have it appear in a cell, because Calc will assume that this is part of a formula.
■Tip To enter any character into a cell, including an equal sign followed by a digit, precede it with an apostrophe
(’). The apostrophe itself won’t be visible within the spreadsheet, and whatever you type won't be interpreted in any special way; it will be seen as plain text.
Entering a sequence of data across a range of cells can be automated. Start typing the sequence of numbers, highlight them, and then click and drag the small handle to the bottom right of the last cell. This will continue the sequence. You’ll see a tooltip window, indicating what the content of each cell will be. Figure 24-1 illustrates this process.
Cells can be formatted in a variety of ways. For trivial formatting changes, such as selecting a different font or changing the number format, you can use the Formatting toolbar. For example, to turn the cell into one that displays currency, click the Currency icon (remember that hovering the mouse cursor over each icon will reveal a tooltip). You can also increase or decrease the number of visible decimal places by clicking the relevant Formatting toolbar icon.
355

356 |
C H A P T E R 2 4 ■ I N D E P T H : C A L C |
For more formatting options, right-click the individual cell and select Format Cells from the menu. This displays the Format Cell dialog box, where you can change the style of the typeface, rotate text, place text at various angles, and so on. The Border tab of the Format Cell dialog box includes options for cell gridlines of varying thicknesses, which will appear when the document is eventually printed out.
Figure 24-1. You can automate the entering of data sequences by clicking and dragging.
Deleting and Inserting Data and Cells
Deleting data is also easy. Just highlight the cell or cells with the data you want to delete, and then press the Delete key. If you want to totally eradicate the cell along with its contents, rightclick it and select Delete. This will cause the data to the sides of the cell to move in. You’ll be given a choice on where you want the cells to shift from to fill the space: left, right, above, or below.
To insert a new cell, right-click where you would like to it to appear and select Insert. Again, you’ll be prompted about where you want to shift the surrounding cells in order to make space for the new cell.
Working with Formulas
Calc includes a large number of formulas. In addition to simple and complex math functions, Calc offers a range of logical functions, as well as statistical and database tools. Certain formulas can also be used to manipulate text strings, such as dates.
You can get an idea of the available functions by clicking the Function Wizard button on the Formula bar (which is just below the Formatting toolbar). This will bring up a categorized list of formulas, along with brief outlines of what function the formula performs. If you would like more details, use the help system, which contains comprehensive descriptions of most of the formulas, complete with examples of the correct syntax.

C H A P T E R 2 4 ■ I N D E P T H : C A L C |
357 |
■Note The Function Wizard is actually a continuation of the wizard system you’ve seen in other OpenOffice.org programs, and some of the functions are also available elsewhere in the suite.
You can reuse formulas simply by cutting and pasting them. Calc is intelligent enough to work out which cells the transplanted formula should refer to, but it’s always a good idea to check to make sure the correct cells are referenced.
Using the Function Wizard
To use the Function Wizard to add a function, click the relevant button on the Formula bar, select the desired type of formula from the Category drop-down list, and then double-click an entry in the Function list to select it. Following this, you’ll be prompted to input the relevant figures or define the appropriate data sources. Next to each text-entry box is a “shrink” button, which temporarily hides the wizard window, so you can select cells to be used within the formula.
Let’s look at a quick example of using the wizard to work out an average value of a number of cells.
1.Select the cell in which you want the result of the formula to appear.
2.Start the Function Wizard by clicking the button on the Formula bar. In the left-hand list of functions, double-click AVERAGE. The wizard will then present a list of fields on the right side of the dialog box, where you can enter the values to be averaged. You could type numeric values directly into these fields, but it’s more likely that you’ll want to reference individual cells from the spreadsheet.
3.Click and drag the top of the dialog box to move it so that the spreadsheet underneath is at least partially visible.
4.Click the cursor in the first field of the dialog box, and then click the first cell you want to include in the calculation. This will automatically enter that cell reference into the field.
5.Click the next field in the dialog box, and then click the next cell you wish to include.
6.Repeat step 5 until all the fields you wish to include have been added to the fields in the dialog box (up to 30 can be selected; use the scroll bar on the right side of the wizard dialog box to reveal more fields).
7.Once you’ve finished, click the OK button. Calc will insert the formula into the cell you selected at the start, showing the result of the formula.
After you’ve added a formula with the wizard, you can edit it manually by clicking it and overtyping its contents in the Formula bar editing area. Alternatively, you can use the Function Wizard once again, by clicking the button on the Formula bar.