

Beginning Ubuntu Linux - From Novice To Professional (2006)
.pdf308 |
C H A P T E R 2 0 ■ I M A G E E D I T I N G |
Figure 20-3. Set the opacity of various layers by clicking and dragging the relevant slider in the Layers dialog box.
Making Color Corrections
The first step when editing most images is to correct the brightness, contrast, and color saturation. This helps overcome some of the deficiencies that are inherent in digital photographs or scanned-in images. To do this, right-click the image and select Layers Colors. You’ll find a variety of options to let you tweak the image, allowing you a lot of control over the process.
For trivial brightness and contrast changes, selecting the Brightness/Contrast menu option will open a dialog box where clicking and dragging the sliders will alter the image. The changes you make will be previewed on the image itself, so you should be able to get things just right.
Similarly, the Hue/Saturation option will let you alter the color balance and also the strength of the colors (the saturation) by clicking and dragging sliders. By selecting the color bar options at the top of the window, you can choose individual colors to boost. Clicking the Master button will let you once again alter all colors at the same time.
The trouble with clicking and dragging sliders is that it relies on human intuition. This can easily be clouded by a badly calibrated monitor, which might be set too dark or too light. Because of this, The GIMP offers another handy option: Levels.
C H A P T E R 2 0 ■ I M A G E E D I T I N G |
309 |
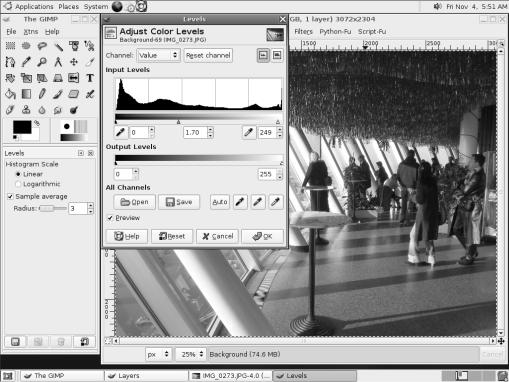
To access the Levels feature, right-click the image and select Layer Colors Levels. This presents a chart of the brightness levels in the photo and lets you set the dark, shadows, and highlight points, as shown in Figure 20-4. Three sliders beneath the chart represent, from left to right, the darkest point, the midtones (shadows), and the highlights within the picture. The first step is to set the dark and light sliders at the left and right of the edges of the chart. This will make sure that the range of brightness from the lightest point to the darkest point is set correctly. The next step is to adjust the middle slider so that it’s roughly in the middle of the highest peak within the chart. This will accurately set the midtone point, ensuring an even spread of brightness across the image.
Figure 20-4. The Levels function can be used to accurately set the brightness levels across an image.
A little artistic license is usually allowed at this stage and, depending on the effect on the photo, moving the midtone slider a little to the left and/or right of the highest peak might produce more acceptable results. However, be aware that the monitor might be showing incorrect brightness/color values.
Cropping and Cloning
After you’ve adjusted the colors, you might want to use the Crop tool (see Table 20-1) to remove any extraneous details outside the focus of the image. For example, in a portrait of someone taken from a distance away, you might choose to crop the photo to show only the person’s

310 |
C H A P T E R 2 0 ■ I M A G E E D I T I N G |
head and shoulders, or you might separate a group of people from their surroundings, as shown in Figure 20-5.
Figure 20-5. You can use the Crop tool to remove any irrelevant details surrounding the subject of your photo.
You might also want to use the Clone tool to remove facial blemishes. Start by using the Zoom tool to close in on the area. If the blemish is small, you might need to zoom in quite substantially. Then try to find an area of skin that is clear and from which you can copy. Hold down Ctrl and click in that area. Then click and draw over the blemish. The crosshair indicates the area from which you’re copying.
Sharpening
One final handy trick employed by professional image editors to give their photos a shot in the arm is to use the Sharpen filter. This has the effect of adding definition to the image and negating any slight blur caused by things such as camera shake or poor focusing. To apply the Sharpen filter, right-click the image and select Filters Enhance Sharpen.
As shown in Figure 20-6, a small preview window will show the effect of the sharpening on the image (you might need to use the scroll bars to move to an appropriate part of the image). Clicking and dragging the slider at the bottom of the dialog box will alter the severity of the

C H A P T E R 2 0 ■ I M A G E E D I T I N G |
311 |
sharpening effect. Too much sharpening can ruin a picture, so be careful. Try to use the effect subtly.
Figure 20-6. Sharpening an image can give it a professional finish by adding definition.
The Sharpen filter is just one of many filters you can apply in The GIMP, as explained in the next section.
Applying Filters
Like other image-editing programs, The GIMP includes many filters to add dramatic effects to your images with little, if any, user input. Filters are applied either to the currently selected layer or to a selection within the layer. To apply a filter, right-click the image and choose the relevant menu option. If you don’t like an effect you’ve applied, you can reverse it by selecting Edit Undo, or by pressing Ctrl+Z.
The submenus offer filters grouped by categories, as follows:
Blur: These filters add various kinds of blur to the image or selection. For example, Motion Blur can imitate the effect of photographing an object moving at speed with a slow shutter. Perhaps the most popular blur option is Gaussian Blur, which has the effect of applying a soft and subtle blur.
312 |
C H A P T E R 2 0 ■ I M A G E E D I T I N G |
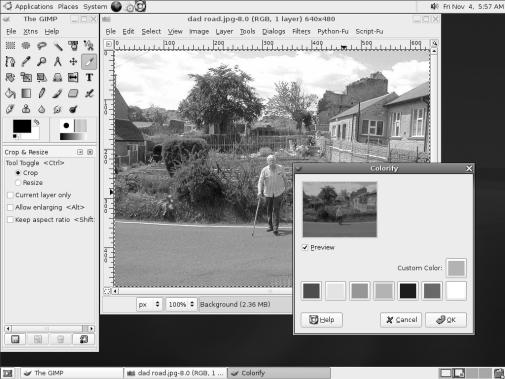
Color: This option includes many technical filters, mostly of interest to image technicians or those who want to uncover and otherwise manipulate the color breakdown within an image. However, Filter Pack might appeal to the general user. This filter can quickly adjust the hue, saturation, and other values within the image. Also of interest is Colorify, which can tint the image to any user-defined color. Figure 20-7 shows an example of using the Colorify filter.
Figure 20-7. The Colorify filter can be used to add a sepia-like effect to a picture.
Noise: This collection of filters is designed to add speckles or other types of usually unwanted artifacts to an image. These filters are offered within The GIMP for their potential artistic effects, but they can also be used to create a grainy film effect—simply click Scatter RGB.
Edge Detect: This set of filters can be used to automatically detect and delineate the edges of objects within an image. Although this type of filter can result in some interesting results that might fall into the category of special effects, it’s primarily used in conjunction with other tools and effects.
Enhance: The Enhance effects are designed to remove various artifacts from an image or otherwise improve it. For example, the Despeckle effect will attempt to remove unwanted noise within an image (such as flecks of dust in a scanned image). The Sharpen filter discussed in the previous section is located here, as is the Unsharp Mask, which offers a high degree of control over the image-sharpening process.

C H A P T E R 2 0 ■ I M A G E E D I T I N G |
313 |
Generic: In this category, you can find a handful of filters that don’t seem to fall into any other category. Of particular interest is the Convolution Matrix option, which lets you create your own filters by inputting numeric values. According to The GIMP’s programmers, this is designed primarily for mathematicians, but it can also be used by others to create random special effects. Simply input values and then preview the effect.
Glass Effects: As the name suggests, these filters can apply effects to the image to imitate the effects that come about when glass is used to produce an image. For example, the Apply Lens filter will apply the same kind of distortion caused by various wide-angle lenses used on cameras, as shown in Figure 20-8.
Figure 20-8. The Glass Effects Apply Lens filter can be used to imitate a fish-eye lens.
Light Effects: Here, you will find filters that imitate the effects that light can have on a picture, such as adding sparkle effects to highlights or imitating lens flare caused by a camera’s lens.
Distorts: As the name of this category of filters suggests, the effects here distort the image in various ways. For example, Whirl and Pinch allow you to tug and push the image to distort it (to understand what is meant here, imagine the image is printed on rubber and then pinching or pushing the surface). This category also contains other special effects, such as Pagecurl, which imitates the curl of a page at the bottom of the picture.

314 |
C H A P T E R 2 0 ■ I M A G E E D I T I N G |
Artistic: These filters allow you to add painterly effects to the image, such as making it appear as if the photo has been painted in impressionistic brushstrokes, or as if it were painted on canvas by overlaying the texture of canvas onto the picture. Figure 20-9 shows an example of applying a filter for an oil painting effect.
Figure 20-9. The Artistic effects can be used to give images an oil painting effect.
Map: These filters aim to manipulate the image by treating it like a piece of paper that can be folded in various ways and also stuck onto 3D shapes (a process referred to as mapping). Because the image is treated as if it were a piece of paper, it can also be copied, and the copies placed on top of each other to create various effects.
Render: Here, you’ll find filters designed to create new images from scratch, such as clouds or flame effects. They obliterate anything that was previously underneath on that particular layer or within that selection, and the original image has no bearing on what is generated by the filter.
Web: Here, you can create an image map for use in a web page. An image map is a single image broken up into separate hyperlinked areas, typically used on a web page as a sophisticated menu. For example, an image map is frequently used for a geographical map on which you can click to get more information about different regions.

C H A P T E R 2 0 ■ I M A G E E D I T I N G |
315 |
Animation: These filters aim to manipulate and optimize GIF images, which are commonly used to create simple animated images for use on web sites.
Combine: Here, you’ll find filters that combine two or more images into one.
Toys: These are so-called “Easter Eggs,” which aren’t designed to manipulate the image, but are present in the program as harmless animations for the user to enjoy. They’re created by the programmers of The GIMP as a way of thanking you for using their program.
■Tip The GIMP also includes Script-Fu and Python-Fu, scripting languages that can be used to daisy-chain several commands together to produce a particular effect or to automate a particular image-editing process. For more information, search for “script-fu” or “python-fu” using your favorite web search engine.
Summary
In this chapter, we took a look at image editing under Ubuntu. This has involved an examination of one of the best programs available for the task under any operating system: The GIMP.
You learned how to start The GIMP and about some of the basic principles behind it. Next, we discussed some of the functions contained within The GIMP, including the image filters provided with the program.
In the next part of the book, we move on from multimedia to look at another core component of Ubuntu: the OpenOffice.org suite, which provides word processing, spreadsheet, presentation, and other functions.

P A R T 6
■ ■ ■
Office Tasks