

SQL Server
The Microsoft database engine is another option that we can use to horizontally scale our SignalR applications. As in the previous case, we shall see that the implementation is completely trivial.
Configuring the database
The SQL Server–based backplane uses tables to store message queues circulating through the system and, optionally, the internal messaging broker for the optimized management of publications and subscriptions. It supports any version of SQL Server from 2005 onwards, both in the Express and server editions.
Creating the data structure is automatic. It will be done by the adapter when it detects that the tables and items that it needs do not exist in the database whose connection string we will supply at application startup.
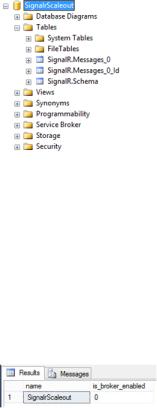
Therefore, all that we have to do is create a database and ensure that the accessing user has permissions to create schemas and tables on it. After this is done, when we run the application for the first time, we will see that the structure has been generated, as shown in Figure 8-12.
FIGURE 8-12 Database schema automatically created by SignalR.
To improve performance, it is recommended that we check that the service broker is enabled on the database that we will use. This is easy to query using the following statement:
SELECT name, is_broker_enabled FROM master.sys.databases
WHERE name='YOUR_DB_NAME_HERE'
The result could be something close to what is shown in the following screen shot of SQL Server Management Studio, where you can see that, as it often happens by default, the broker is not enabled for new databases. In this case, as you can see in Figure 8-13, we have named our database SignalrScaleout.
FIGURE 8-13 Disabled broker.
Deploying and scaling SignalR Chapter 8 |
165 |
www.it-ebooks.info
If this is the case, we can enable it just as easily:
ALTER DATABASE SignalrScaleout SET SINGLE_USER WITH ROLLBACK IMMEDIATE
ALTER DATABASE SignalrScaleout SET ENABLE_BROKER
ALTER DATABASE SignalrScaleout SET MULTI_USER
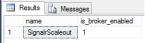
The second line of code is what enables the broker on the specified database. The first and last lines just ensure that no other users are connected when we modify the database, which would cause a concurrency deadlock. After the script is executed, if we execute the preceding query, we get the result shown in Figure 8-14.
FIGURE 8-14 Broker enabled.
Activating the backplane
For SignalR to make use of the infrastructure created on SQL Server, we must configure and activate the corresponding backplane. For this, we will first obtain the following package via NuGet:
PM> Install-package Microsoft.AspNet.SignalR.SqlServer
When the package is installed, we would just need to enter the following configuration code, with the information on the connection with SQL Server adapted to our execution environment:
public class Startup
{
public void Configuration(IAppBuilder app)
{
var connectionString = @"server=.\SQLExpress;database=DB_NAME;" +"Trusted_Connection=yes";
GlobalHost.DependencyResolver.UseSqlServer(connectionString); // ...
app.MapSignalR();
}
}
If the connection string is not valid, if the user cannot log in, or if she is not allowed to create either schemas or tables in the database, an exception will be raised each time a client connection to the SignalR service is attempted.
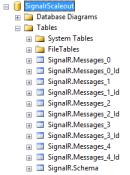
We can also use a configuration object, which is useful for providing additional information. For example, the following code indicates that five tables must be created to store messages, which can improve performance by reducing contention caused by table locks in concurrent accesses. (The table structure is shown in Figure 8-15.)
166 Chapter 8 Deploying and scaling SignalR
www.it-ebooks.info
var connectionString = @"..."; // Put your connection string here var config = new SqlScaleoutConfiguration(connectionString)
{
TableCount = 5
};
GlobalHost.DependencyResolver.UseSqlServer(config);
FIGURE 8-15 Table structure.
Redis
Redis5 is a key-value open source storage system (with BSD license) that is popular in non-Microsoft environments and that has been ported to Windows by Microsoft Open Technologies.6 Its main advantage is that it provides native mechanisms to publish and subscribe (pub/sub) on an in-memory store, which offers unmatched performance in systems that use this approach and require great immediacy, such as SignalR.
Installing Redis
From the point of view of the SignalR server, there is no difference between using Redis installed on Linux or another operating system and doing so on Windows. Therefore, the choice of server to install this software is determined by the preferences or infrastructure requirements of the system to be rolled out.
If we choose to install it on Linux (as shown in Figure 8-16), we can download the source code from the repository used and build it on the server itself:
$ wget http://redis.googlecode.com/files/redis-2.6.14.tar.gz $ tar xzf redis-2.6.14.tar.gz
$ cd redis-2.6.14 $ make
|
|
|
|
5 |
Official Redis website: http://redis.io |
|
|
6 |
Official Microsoft Open Technologies website: http://msopentech.com/ |
|
|
|
|
Deploying and scaling SignalR Chapter 8 |
167 |
www.it-ebooks.info
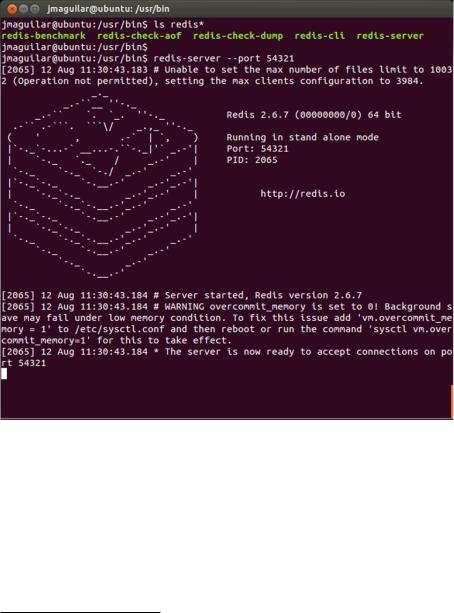
But if we want something simpler, we can also download the software from the repository of the distribution used. For example, in systems running on Ubuntu, the following statements would install and execute the server, putting it to listen on port 54321:
$ sudo apt-get install redis-server [...]
$ redis-server --port 54321
FIGURE 8-16 Redis running on Linux.
To execute it on Windows, we also have several alternatives. One is to download the source code from its GitHub repository7 and build it using Visual Studio. Another (see Figure 8-17) is to use NuGet to get the executable file and launch it directly from the console:
PM> Install-Package Redis-64
Installing 'Redis-64 2.6.12.1'.
Successfully installed 'Redis-64 2.6.12.1'.
PM> start redis-server.exe
7 Redis for Windows in GitHub: https://github.com/MSOpenTech/redis
168 Chapter 8 Deploying and scaling SignalR
www.it-ebooks.info

Note It is possible to use the Redis-32 package for 32-bit computers.
FIGURE 8-17 Launching Redis for Windows from the NuGet console.
In either case, we could begin to connect clients to these instances of Redis openly. If we prefer to specify a particular port or a password for all the clients who will use them, we can do so at com- mand-line level:
PM> start redis-server "--requirepass YOUR_PASSWORD --port 54321"
Better yet, we can enter this password in the configuration file of the component, redis.conf.
However, in both cases, it is recommended that the password be very strong, because due to the high performance of Redis, it would be possible to perform an attack by brute force, testing tens of thousands of keys per second, and the more obvious or direct passwords would be discovered very quickly.
Activating the backplane
As in the rest of backplanes, the first thing to do is to download and install the appropriate component in the project:
PM> Install-package Microsoft.AspNet.SignalR.Redis
After that, as always, we specify at application startup that we will use Redis as support for horizontal scaling. The simplest way is by specifying the basic data of the Redis server: the host, port, password, and unique string that will be used to separate messages if the server is being used by more than one application.
public class Startup
{
public void Configuration(IAppBuilder app)
{
GlobalHost.DependencyResolver.UseRedis(
Deploying and scaling SignalR Chapter 8 |
169 |
www.it-ebooks.info