

Office PowerPoint2003
.pdfM O D U L A R S Y S T E M
MICROSOFT POWERPOINT 2003
Muammer ÖKSÜZ
Hüseyin TAÞDEMÝR
Osman AY
w w w . z a m b a k . c o m
Copyright © 2005 Zambak Basým Yayýn Eðitim ve Turizm Ýþletmeleri Sanayi Ticaret A.Þ.
All rights reserved.
No part of this book may be reproduced, stored in a retrieval system, or transmitted in any form of recording without the prior written permission of the publisher.
Digital Assembly
Zambak Typesetting & Design
Page Design Özkan BÖLE
Proofreader
Emrullah TUNCA
Publisher
Zambak Basým Yayýn Eðitim ve Turizm Ýþletmeleri Sanayi Ticaret A.Þ.
Printed in Ýstanbul - TURKEY ISBN 975-266-304-4
DISTRIBUTION
ZAMBAK YAYINLARI
Bulgurlu Mah. Libadiye Cad. Haminne Çeþmesi Sok. No. 20 34696
Üsküdar / ÝSTANBUL
_______________________
Tel : +90-216 522 09 00 (pbx)
Fax : +90-216 443 98 39 www.zambak.com

1. Getting Started with PowerPoint
Introduction . . . . . . . . . . . . . . . . . . . . . . . . . . . . . . . . . . . . . . . . . 6
Starting a New Presentation . . . . . . . . . . . . . . . . . . . . . . . . . . . . 8
Creating a presentation by using AutoContent Wizard . . . 8
Applying a design template. . . . . . . . . . . . . . . . . . . . . . . . 10
Creating a Photo Album . . . . . . . . . . . . . . . . . . . . . . . . . . 11
Saving a Presentation . . . . . . . . . . . . . . . . . . . . . . . . . . . . . . . . 12
Opening a Presentation . . . . . . . . . . . . . . . . . . . . . . . . . . . . . . . 13
Closing a Presentation . . . . . . . . . . . . . . . . . . . . . . . . . . . . . . . . 13
Customizing a Presentation . . . . . . . . . . . . . . . . . . . . . . . . . . . . 13
How to deliver your presentation . . . . . . . . . . . . . . . . . . . 13
Page setup . . . . . . . . . . . . . . . . . . . . . . . . . . . . . . . . . . . . . 15
Viewing a Presentation. . . . . . . . . . . . . . . . . . . . . . . . . . . . . . . . 13
Projects . . . . . . . . . . . . . . . . . . . . . . . . . . . . . . . . . . . . . . . . . . . . 16
Review . . . . . . . . . . . . . . . . . . . . . . . . . . . . . . . . . . . . . . . . . . . . 17
Questions . . . . . . . . . . . . . . . . . . . . . . . . . . . . . . . . . . . . . . . . . . 18
2. Creating a Slide Show
Formatting Slide Design. . . . . . . . . . . . . . . . . . . . . . . . . . . . . . . 20 Adding a Slide . . . . . . . . . . . . . . . . . . . . . . . . . . . . . . . . . . . . . . 20 Working with Text. . . . . . . . . . . . . . . . . . . . . . . . . . . . . . . . . . . . 21 Adding a Text. . . . . . . . . . . . . . . . . . . . . . . . . . . . . . . . . . . 21 Formatting a Text . . . . . . . . . . . . . . . . . . . . . . . . . . . . . . . 21 Modifying a Text . . . . . . . . . . . . . . . . . . . . . . . . . . . . . . . . 23 WordArt . . . . . . . . . . . . . . . . . . . . . . . . . . . . . . . . . . . . . . . 24 Working with Images . . . . . . . . . . . . . . . . . . . . . . . . . . . . . . . . . 25 Inserting a Shape . . . . . . . . . . . . . . . . . . . . . . . . . . . . . . . 25 Inserting Clipart . . . . . . . . . . . . . . . . . . . . . . . . . . . . . . . . 26 Inserting a Picture from a File. . . . . . . . . . . . . . . . . . . . . . 27 Using Organizational Chart. . . . . . . . . . . . . . . . . . . . . . . . 27 Formatting Image Objects . . . . . . . . . . . . . . . . . . . . . . . . . 28 Working with Tables . . . . . . . . . . . . . . . . . . . . . . . . . . . . . . . . . . 29 Creating a Table. . . . . . . . . . . . . . . . . . . . . . . . . . . . . . . . . 29
Modifying a Table . . . . . . . . . . . . . . . . . . . . . . . . . . . . . . . 29
Working with Charts
Adding a Chart . . . . . . . . . . . . . . . . . . . . . . . . . . . . . . . . . . . . . . 31 Using Placeholders . . . . . . . . . . . . . . . . . . . . . . . . . . . . . . . . . . . 32 Using Slide Masters . . . . . . . . . . . . . . . . . . . . . . . . . . . . . . . . . . 32 Viewing a Show . . . . . . . . . . . . . . . . . . . . . . . . . . . . . . . . . . . . . 33 Working with Multiple Objects . . . . . . . . . . . . . . . . . . . . . . . . . . 34
Ordering the Objects . . . . . . . . . . . . . . . . . . . . . . . . . . . . . 34 Grouping the Objects . . . . . . . . . . . . . . . . . . . . . . . . . . . . . 35 Projects . . . . . . . . . . . . . . . . . . . . . . . . . . . . . . . . . . . . . . . . . . . . 36 Review . . . . . . . . . . . . . . . . . . . . . . . . . . . . . . . . . . . . . . . . . . . . 38 Questions . . . . . . . . . . . . . . . . . . . . . . . . . . . . . . . . . . . . . . . . . . 39
3. Animations, Sound and Video
Adding Effects to Text Boxes . . . . . . . . . . . . . . . . . . . . . . . . . . . . 42 Adding Effects to a Chart . . . . . . . . . . . . . . . . . . . . . . . . . . . . . . 43 Adding Effects to Other Objects . . . . . . . . . . . . . . . . . . . . . . . . . 44 Inserting Sound and Video. . . . . . . . . . . . . . . . . . . . . . . . . . . . . 45 Inserting Sound . . . . . . . . . . . . . . . . . . . . . . . . . . . . . . . . . 45 Inserting Video. . . . . . . . . . . . . . . . . . . . . . . . . . . . . . . . . . 47 Projects . . . . . . . . . . . . . . . . . . . . . . . . . . . . . . . . . . . . . . . . . . . . 48 Review . . . . . . . . . . . . . . . . . . . . . . . . . . . . . . . . . . . . . . . . . . . . 49 Questions . . . . . . . . . . . . . . . . . . . . . . . . . . . . . . . . . . . . . . . . . . 50
4. Delivering a Presentation
Slide Transition. . . . . . . . . . . . . . . . . . . . . . . . . . . . . . . . . . . . . . 52
Customizing Your Show . . . . . . . . . . . . . . . . . . . . . . . . . . . . . . . 53
Inserting a Hyperlink. . . . . . . . . . . . . . . . . . . . . . . . . . . . . 53
Action Buttons . . . . . . . . . . . . . . . . . . . . . . . . . . . . . . . . . . 54
Rehearse Timings . . . . . . . . . . . . . . . . . . . . . . . . . . . . . . . 55
Custom Show . . . . . . . . . . . . . . . . . . . . . . . . . . . . . . . . . . . 57
Projects . . . . . . . . . . . . . . . . . . . . . . . . . . . . . . . . . . . . . . . . . . . 58
Review . . . . . . . . . . . . . . . . . . . . . . . . . . . . . . . . . . . . . . . . . . . . 59
Questions . . . . . . . . . . . . . . . . . . . . . . . . . . . . . . . . . . . . . . . . . . 60
5. Viewing a Show
Navigating the Slide Show . . . . . . . . . . . . . . . . . . . . . . . . . . . . . 62 Annotating . . . . . . . . . . . . . . . . . . . . . . . . . . . . . . . . . . . . . . . . . 63 Deleting Your Drawings . . . . . . . . . . . . . . . . . . . . . . . . . . . . . . . 63 Other Options on the Popup Menu. . . . . . . . . . . . . . . . . . . . . . . 64 Go to Slide . . . . . . . . . . . . . . . . . . . . . . . . . . . . . . . . . . . . . 64 Custom Show . . . . . . . . . . . . . . . . . . . . . . . . . . . . . . . . . . . 64 Screen . . . . . . . . . . . . . . . . . . . . . . . . . . . . . . . . . . . . . . . . 64 Help . . . . . . . . . . . . . . . . . . . . . . . . . . . . . . . . . . . . . . . . . . 65 Review . . . . . . . . . . . . . . . . . . . . . . . . . . . . . . . . . . . . . . . . . . . . 65 Questions . . . . . . . . . . . . . . . . . . . . . . . . . . . . . . . . . . . . . . . . . . 66
6.Printing a Show
Printing Slides . . . . . . . . . . . . . . . . . . . . . . . . . . . . . . . . . . . . . . 68 Printing Handouts . . . . . . . . . . . . . . . . . . . . . . . . . . . . . . . . . . . 69 Printing Notes. . . . . . . . . . . . . . . . . . . . . . . . . . . . . . . . . . . . . . . 70 Printing Outlines . . . . . . . . . . . . . . . . . . . . . . . . . . . . . . . . . . . . 70 Exporting to the MS Word . . . . . . . . . . . . . . . . . . . . . . . . . . . . . 70 Package for CD . . . . . . . . . . . . . . . . . . . . . . . . . . . . . . . . . . . . . . 71 Review . . . . . . . . . . . . . . . . . . . . . . . . . . . . . . . . . . . . . . . . . . . . 73 Questions . . . . . . . . . . . . . . . . . . . . . . . . . . . . . . . . . . . . . . . . . . 74
7. Creating a Web Presentation
Creating a Group Home Page . . . . . . . . . . . . . . . . . . . . . . . . . . 76 Saving a Presentation . . . . . . . . . . . . . . . . . . . . . . . . . . . . . . . . 77 Saving as an MHT (Single File Web Archive) . . . . . . . . . . 77 Saving as a Web Site . . . . . . . . . . . . . . . . . . . . . . . . . . . . . 78 Publishing to the Internet . . . . . . . . . . . . . . . . . . . . . . . . . 79 Publishing to an FTP Address . . . . . . . . . . . . . . . . . . . . . . 80 Crossword Puzzle . . . . . . . . . . . . . . . . . . . . . . . . . . . . . . . . . . . . 82 Projects . . . . . . . . . . . . . . . . . . . . . . . . . . . . . . . . . . . . . . . . . . . . 84 Review . . . . . . . . . . . . . . . . . . . . . . . . . . . . . . . . . . . . . . . . . . . . 84 Questions . . . . . . . . . . . . . . . . . . . . . . . . . . . . . . . . . . . . . . . . . . 85
Answer Key
Index
Introduction
Presentation : The collection of slides which is shown on a screen or monitor.
Slide : Each individual page with information or message on it
Template : Default settings and formats for slides.
Within the previous years, 35mm OHP (overhead projector) was popular to aid visually demonstrating or expressing the ideas. It is a well-known fact that supporting your speech with the visual material increases the effectiveness and helps audience understand and remember the topic. Technological improvements have helped to use computer to create dynamic, colorful and visually effective presentations. These presentations consist of pages called slides. They contain information, sound, pictures with animations etc. Presentations may be shown on a screen or on a monitor directly from a computer. Using the computer also makes switching between slides easier. PowerPoint is one of the most popular presentation design programs.
If you are familiar with any other Microsoft Office products, you will get used to PowerPoint interface with a little effort\ since quite lots of tasks such as copying or saving are the same. PowerPoint is versatile not only with its effects that adds visual quality to your presentations but also with its easy-to-learn interface that enables you to create professional presentations with the help of the templates and step by step guides.
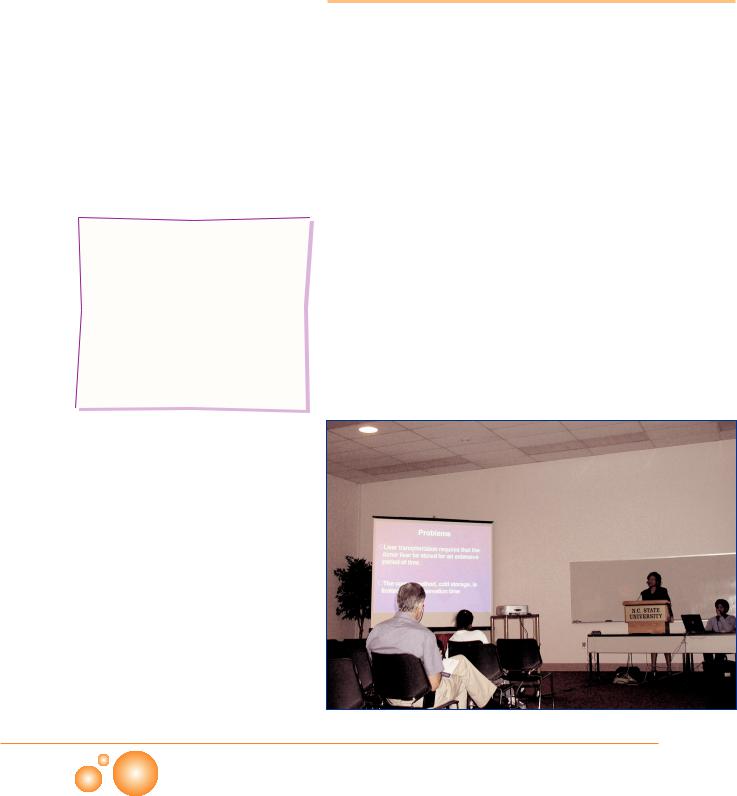
A Presentation Room
CHAPTER 1
6 P O W E R P O I N T
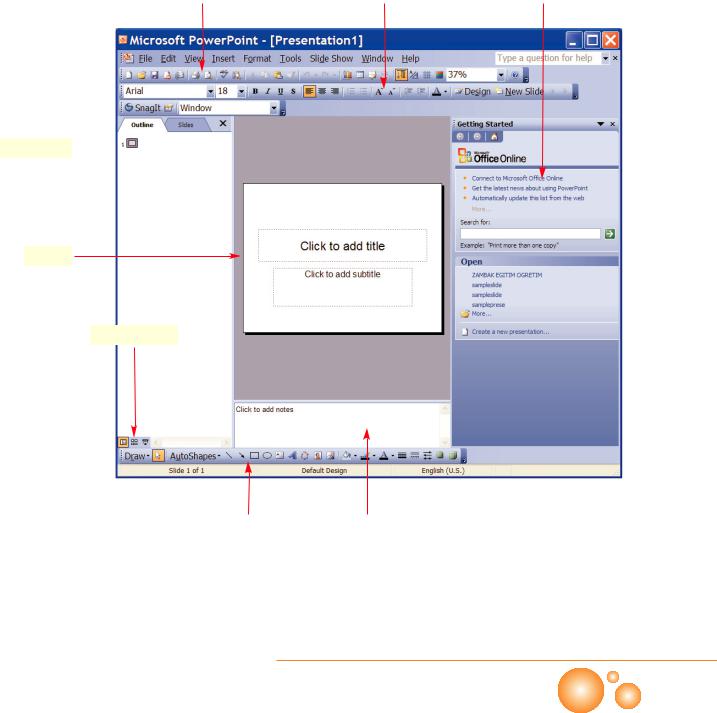
Standard toolbar |
|
Formatting toolbar |
|
Task pane |
|
|
|
|
|
View pane 
Slide
View toolbar
Drawing toolbar |
|
Notes pane |
|
|
|
PowerPoint Program Interface
GETTING STARTED WITH POWERPOINT 2003
P O W E R P O I N T |
7 |
|
|
|
|
|
|
||
|
|
|
||
|
|
|
|
|
|
|
|
|
|
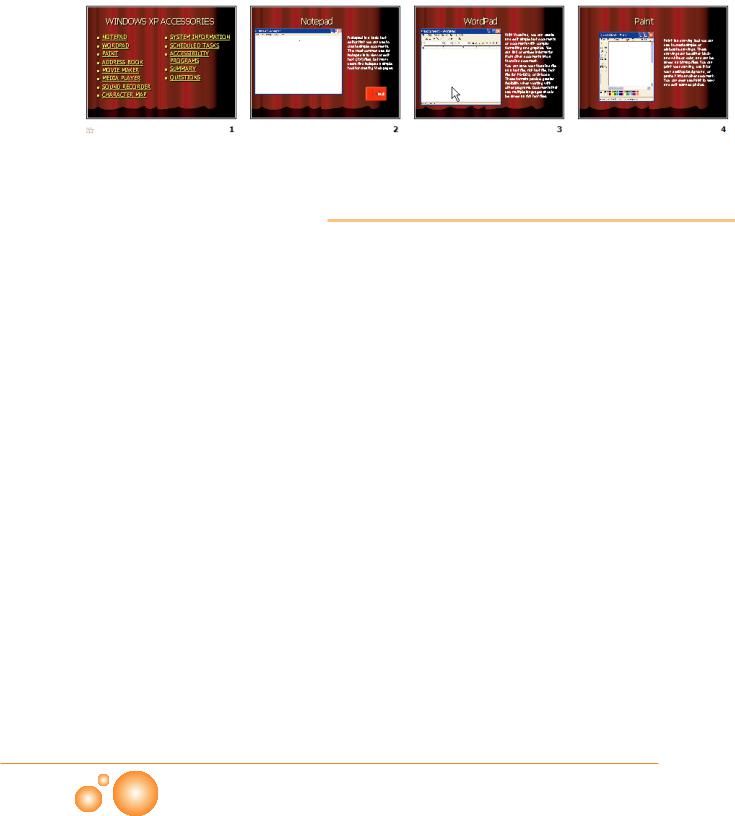
A Sample Presentation with 4 Slides.
Starting a New Presentation
PowerPoint starts with a new blank presentation with a single slide. It starts with a layout with two placeholders that prompt to enter a name and text for your presentation project. You can change the layout by selecting Format>Slide layout. Slide layout task pane appears on the right of the screen. (Starting from the Office XP, Microsoft added task pane feature to make changes.) You can choose the appropriate layout from the task pane.
When PowerPoint is open, you can start a new presentation by;
Step 1: clicking the ( ) button on standard toolbar or,
Step 2: choosing the File>New command, then clicking the New button  from the task pane or,
Step 3: using <CTRL+N> keystroke.
PowerPoint opens New Presentation Task Pane by using any of the methods above. You have several options to create a presentation.
Creating a presentation by using AutoContent Wizard
If you are new to presentation design, or you do not want to spend much time on designing a presentation, AutoContent Wizard is quite useful for you. This wizard is the most practical way to create a new presentation. It guides you through several steps that
prompt you to  . Enter the necessary information to accomplish the presentation.
CHAPTER 1
8 P O W E R P O I N T
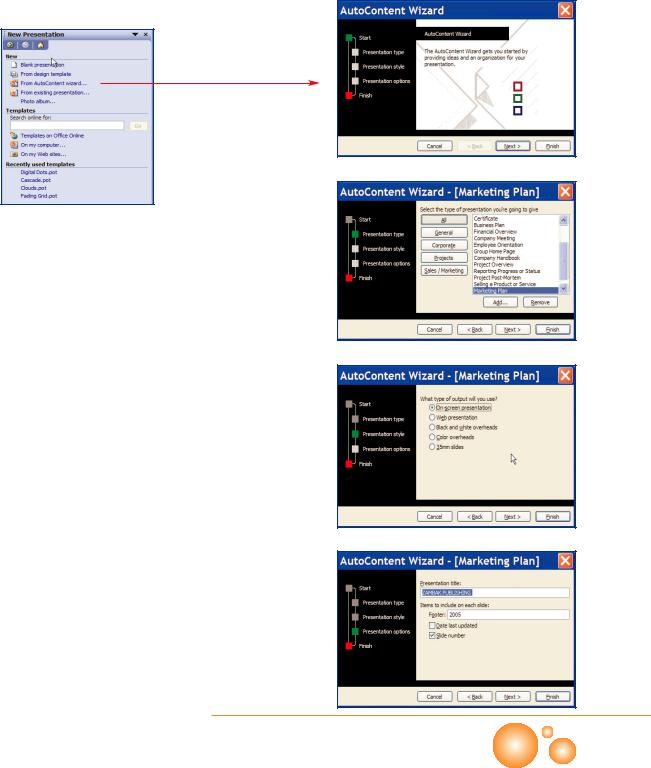
Step 1: After clicking the File>New, From the New Presentation
task pane select  . It will open "AutoContent Wizard" dialog box.
Step 2: You will be prompted to choose the presentation type. Marketing Plan has been selected (in the figure on the right) as design template. Design templates have sample text on slides. You will find this feature quite satisfying, if you need help organizing your ideas. It eases and quickens the presentation design. Besides, it offers a sample for how to create a presentation on a definite purpose such as Marketing Plan or Reporting Progress or Status. You will just replace the sample texts in the presentation with your own information. Design templates are listed under several categories. Click  to see all the design templates.
Step 3: After selecting the template, you have to choose the way of delivering this presentation. You can select 35mm slides if you print the slides on 35mm transparent paper. You will select Onscreen presentation if you plan to show the presentation from the computer. You can use Black and white overheads if you print this document on a monochrome printer.
Step 4: Enter the name of the presentation. You can add date or slide number on each slide selecting the checkboxes Date last updated and Slide number.
GETTING STARTED WITH POWERPOINT 2003
P O W E R P O I N T |
9 |
|
|
|
|
|
|
||
|
|
|
||
|
|
|
|
|
|
|
|
|
|
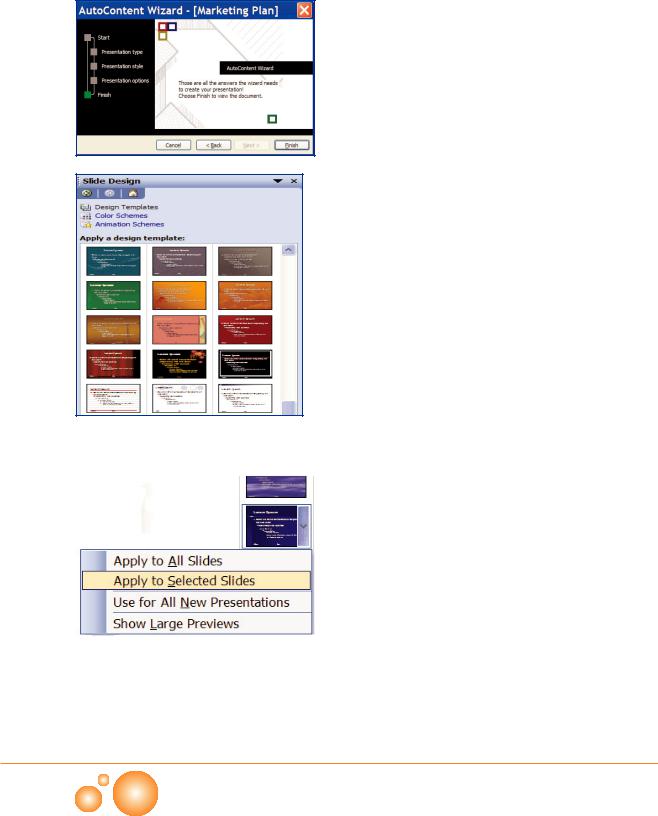
Design Templates Task Pane
Apply Options for a Template
Step 5: Click the <Finish> button and let PowerPoint create the presentation automatically. Now you can replace the sample text with your own one. Press <F5> and enjoy your PowerPoint Presentation.
Applying a design template
If you are familiar with PowerPoint, you may want to create your own slides. You can define a design template for your presentation. (You can change the template in any step of creating your presentation.) Design templates are in a pre-installed format and background for slides. You can change background, text color, header style etc. with one click.
Step 1: Click  from New Presentation task pane.
Step 2: Choose any template and apply to the new slide by double clicking on it.
You can apply a template to all Slides by clicking on it.
Step 3: If you do not want to apply the template to all slides, open the apply menu by right clicking on the template on the pane and select Apply to Selected Slides. This feature lets you apply different designs to different slides within the presentation.
CHAPTER 1
10 P O W E R P O I N T