


Chest Tube Placement |
98 |
|
|
Rajesh Chawla, Ashish Jain, and Sudha Kansal |
|
A 60-year-old male patient—a known case of chronic obstructive pulmonary disease—was admitted to the hospital with sudden onset of breathlessness. On examination he was found to be tachypneic and had cyanosis. His chest skiagram showed pneumothorax on the right side.
A chest tube placement (tube thoracostomy) is a method to insert a flexible, hollow tube into pleural space to extract air, fluid blood, or pus. It helps in maintaining negative intrapleural pressure and expansion of the lung.
Step 1: Assess the need of chest tube insertion
•Pneumothorax in any mechanically ventilated patient
•Pneumothorax after initial relief with needle aspiration
•Bilateral pneumothoraces
•Persistent or recurrent pneumothorax after simple aspiration
•Large secondary spontaneous pneumothorax
•Malignant pleural effusion
•Empyema and complicated parapneumonic pleural effusion
•Traumatic hemopneumothorax
•Chylothorax
•Postoperative—for example, thoracotomy, esophagectomy, and cardiac surgery
R. Chawla, M.D., F.C.C.M. (*)
Department of Respiratory, Critical Care & Sleep Medicine, Indraprastha Apollo Hospitals, New Delhi, India
e-mail: drchawla@hotmail.com
A. Jain, D.T.C.D., D.N.B. • S. Kansal, M.D., I.D.C.C.M.
Department of Respiratory Medicine & Critical Care, Indraprastha Apollo Hospitals, New Delhi, India
R. Chawla and S. Todi (eds.), ICU Protocols: A stepwise approach, |
785 |
DOI 10.1007/978-81-322-0535-7_98, © Springer India 2012 |
|
786 |
R. Chawla et al. |
|
|
Step 2: Rule out contraindications
There is no absolute contraindication in emergency situation:
•Bleeding diathesis (prothrombin time or partial thromboplastin time more than two times normal, platelets <50,000/ml) should be corrected in nonemergency settings.
•Inability to aspirate pleural fluid or air to confirm correct pleural space before chest drain insertion.
•Caution is required when there is a history of thoracic surgery or pleurodesis on the side of proposed chest tube insertion.
•The lung densely adherent to the chest wall throughout the hemithorax is an absolute contraindication to chest drain insertion.
Step 3: Pre-drainage risk assessments
•Risk of hemorrhage, any coagulopathy, or platelet defect should be corrected prior to chest drain insertion in nonemergency situations.
•Routine measurement of the platelet count and prothrombin time is only recommended in patients with known risk factors.
•A careful radiological differentiation between pneumothorax and bullous disease, collapse and a pleural effusion, is required.
•The drainage of a postpneumonectomy space should only be carried out by or after consultation with a cardiothoracic surgeon.
Step 4: Preparation
•Sterile gloves and gown
•Skin antiseptic solution, for example, Betadine or chlorhexidine in alcohol
•Sterile drapes, eye protection, mask, and caps
•Gauze swabs
•Intravenous catheters, tubing
•Supplemental oxygen
•Monitors (cardiac, pulse oximeter)
•A selection of syringes and needles (16–25 gauge)
•Local anesthetic, for example, lignocaine (lidocaine) 1% or 2%
•Scalpel and #10 or #15 blade
•Suture (e.g., “1–0” silk)
•Instrument for blunt dissection (e.g., curved clamp)
•Forceps and the needle holder
•The guidewire with dilators (for intercostal drainage catheter placement)
•Chest tube (No 24–40 French)
•Connecting tubing
•Closed drainage system (including sterile water if underwater seal being used)
•Dressing and adhesive
•Antiseptic ointment
•Resuscitation cart
•Drugs—benzodiazepine, anticholinergics
98 Chest Tube Placement |
787 |
|
|
Step 5: Consent and premedication
•Written and informed consent should be taken before doing the procedures.
•Intravenous analgesics or mild sedation (benzodiazepine or narcotic) and anticholinergics should be administered.
Step 6: Patient position
•The preferred position for drain insertion is the patient lying on the bed with the head up, slightly rotated, with the arm on the side of the procedure behind his/her head to expose the axillary area.
•Procedure can also be done while the patient is sitting upright leaning over an adjacent table with a pillow or in the lateral decubitus position.
Step 7: Site selection
•Careful identification of the correct patient, correct side, and correct site should be checked immediately before the procedure. Confirm the indication of chest tube insertion by reviewing the clinical signs and the chest radiograph.
•Ultrasonography can be used as adjunctive guides to the site of tube placement.
•A chest radiograph must be available at the time of drain insertion except in the case of tension pneumothorax.
•The chest tube should be inserted in the fourth to sixth intercostal space in the midaxillary line in the safe triangle.
•The safe triangle is bordered by the anterior border of the latissimus dorsi, the lateral border of the pectoralis major muscle, a line superior to the horizontal level of the nipple, and an apex below the axilla.
•This position minimizes risk to underlying structures such as the internal mammary artery and avoids damage to muscle and breast tissue resulting in unsightly scarring.
•A more posterior position may be chosen if suggested by the presence of a loculated effusion or air. While this is safe, it is not the preferred site as it is more uncomfortable for the patient to lie down after insertion and there is a risk of the drain kinking.
•For apical pneumothoraces, the second intercostal space in the midclavicular line is sometimes selected but is not recommended routinely as it may be uncomfortable for the patient and may leave an unsightly scar. This site can be chosen for needle thoracostomy in tension pneumothorax.
Step 8: Select the drain size
Drain size depends on the underlying pathology:
•Small-bore drains are recommended as they are more comfortable than largebore tubes, but there is no evidence that either is therapeutically superior. These are put in patients with pneumothorax or pleural effusion.
•Large-bore drains are recommended for drainage of acute hemothorax and empyema.

98 Chest Tube Placement |
789 |
|
|
Figs. 98.3 to 98.4 Guidewire tube thoracostomy
•Give proper position to the patient.
•Wear the cap and mask, perform hand hygiene, and wear personal protective equipment (PPE) with sterile gloves.
•Provide supplemental oxygen, secure intravenous access, and attach all monitors.
•Ensure adequate lighting.
•Arrange all equipments on a sterile workplace.
–Clean the skin of the patient with 2% chlorhexidine in alcohol preparation.
–Give a frictional scrub in a circular manner to at least 10-cm area from the insertion site.
790 |
R. Chawla et al. |
|
|
–The field can be draped using towels. In all invasive procedures, meticulous care should be taken to minimize the risk of infection.
–After locating intercostal space, infiltrate local anesthesia into the skin raising the cutaneous wheel at incision site and subcutaneous tissue.
•Anesthetize rib and pleural space in selected intercostal space.
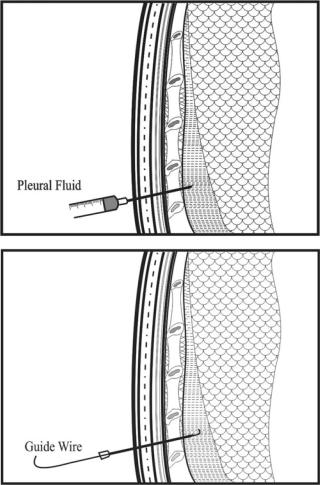
•Insert the introducer needle just superior to the appropriate rib. Stop just at the point where air or fluid is aspirated (Fig. 98.1).
•Remove the syringe keeping the needle in situ, covering the needle opening with fingers to prevent entry of air.
•Introduce the guidewire through the needle into pleural space and then remove the needle from pleural space while keeping the guidewire in situ (Fig. 98.2).
•Make a small nick at the entry site to allow introduction of dilators and the chest tube.
•Use dilators to dilate the tract over the guidewire (Fig. 98.3).
•Introduce the chest tube over the guidewire into the pleural space. Confirm that all openings are in pleural space. Remove wire.(Fig. 98.4).
•Connect the chest tube to the drainage system.
•Suture the tube in place and dress with gauze and tape.
B.Trocar tube thoracostomy
•Take written consent.
•Give local anesthesia with 2% Xylocaine.
•This method initially requires a 2–4-cm incision parallel to the superior border of the lower rib through the skin and subcutaneous tissues after local anesthesia.
•This method uses a chest tube with a trocar positioned inside the tube.
•The chest tube with the trocar can then be inserted between the ribs into the pleural cavity, directed toward the opposite shoulder with the flat edge of the stylet tip cephalad to prevent damage to the intercostal vessels.
•Because significant force is often required to insert the trocar, the hand not applying the force should be placed next to the patient’s chest wall to control the depth of penetration.
•Once the pleural cavity is entered, the inner trocar is gradually removed from the chest tube. When the proximal end of the trocar clears the chest wall, a clamp is placed between the trocar and the chest wall until the trocar can be completely withdrawn and the tube attached to a water-seal drainage system.
•In critically ill patients, one should avoid the trocar tube thoracostomy.
C.Operative tube thoracostomy
•Explain the procedure.
•Position the patient in a semi-recumbent position with the head and shoulder about 30° off the bed.
•The ipsilateral arm is placed above the head for exposure of the axilla and to increase distance between the ribs.
•Follow the first few steps as in the guidewire method.

792 |
R. Chawla et al. |
|
|
•After locating intercostal space, infiltrate local anesthesia into the skin raising the cutaneous wheel at incision site and subcutaneous tissue.
•Generously anesthetize parietal pleura and confirm entry into pleural space by aspiration of air or fluid. Then, withdraw syringes and needles.
•Make a skin incision above and parallel to the upper border of the lower rib, one space below the desired site, in intercostals space wide enough to insert a finger.
•The incision should be made down to the fascia overlying the intercostal muscle. This fascia is then incised throughout the length of the incision, with care taken not to cut the muscle.
•Once the fascia has been incised, the muscle fibers are spread with a blunttipped hemostat tracking upward until the upper desired intercostal interspace is identified. This will make a tunnel, which helps in keeping the tube in the right place (Fig. 98.5).
•An incision is made in the intercostal fascia just above the superior border of the rib over which the tube will pass.
•Again infiltrate muscle and pleura with the local anesthetic agent.
•Advance the needle into the pleural space while aspirating fluid or air to confirm the correct location.
•The parietal pleura is then dissected with a blunt-tipped hemostat, ensuring that the tip of hemostat remains on the superior aspect of the lower rib. The hole is then enlarged by means of the operator’s index finger.
•At this time, the operator should palpate the adjacent pleural space to detect any adhesions in the pleura.
•Clamp the end of the chest tube with a Kelly clamp and guide into the pleural space with its distal end clamped. Direction is anteroapical for air and inferoposterior for fluid drainage (Figs. 98.6 and 98.7).
•Attach to the external drainage system.
•Suture the tube securely with a purse-string suture to prevent tube displacement.
•Use occlusive gauze to seal the skin around the tube.
•Dress area with a generous amount of gauze and tape.
D.Single-port thoracoscopy
Chest tubes can be inserted through a single-port thoracoscopy. Then under direct visualization, the chest tube is placed into the costodiaphragmatic gutter or in the upper part of thoracic cavity.
The great advantage is the visualization of the place where the tube will be placed.
Step 10: Verification of chest tube placement
•After the chest tube has been inserted and connected to a drainage system, a chest radiograph should be obtained to verify the correctness of its position.
•Ideally, both a posteroanterior view (PA) and a lateral view should be obtained because certain ectopic locations may not be apparent on the PA view alone.

794 |
R. Chawla et al. |
|
|
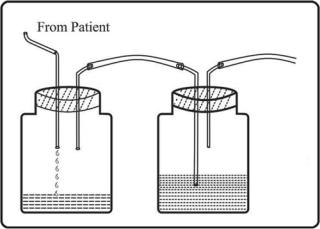
Fig. 98.9 Three-bottle drainage system
•With this system, the bottle adjacent to the patient acts as a collection bottle for the drainage, and the second bottle provides the water seal and the air vent.
•The degree of water seal does not increase as the drainage accumulates. The water-seal bottle functions identically in both the oneand two-bottle systems.
Suction and three-bottle collection systems (Fig. 98.9)
•Controlled amounts of suction (usually 15–20 cm H2O) can be readily applied to the system if a third bottle, the suction-control bottle, is added to the system.
•The amount of negative pressure in the system is equal to the depth to which the rigid straw in the suction-control bottle is submerged below the surface of water.
•It is desirable to apply negative pressure to the pleural space to facilitate reexpansion of the underlying lung or to expedite the removal of air or fluid from the pleural space.
Step 11: Care of the chest tube
Always see the following things:
•Is there bubbling through the water-seal bottle or the water-seal chamber on the disposable unit?
•Is the tube functioning? Always check for air column movement.
•What is the amount and type of drainage from the tube?
Step 12: Guidelines for removal
•Fully expanded lung
•Resolution of air leak for 24 h
•For pleural effusion, drainage less or up to 50 mL/day for 3 consecutive days