


New Ways to Handle Data
GridView control. Throughout this chapter, I show you how to use data-bound server controls with these new data source controls. Remember the principles I describe can be easily applied to the other data-bound controls as well.
The data-bound controls in ASP.NET 2.0 include
|
<asp:GridView> |
|
<asp:DropDownList> |
|
<asp:DataGrid> |
|
<asp:BulletedList> |
|
<asp:DetailsView> |
|
<asp:CheckBoxList> |
|
<asp:TreeView> |
|
<asp:RadioButtonList> |
|
<asp:Menu> |
|
<asp:ListBox> |
|
<asp:DataList> |
|
<asp:AdRotator> |
<asp:Repeater>
The next section shows you how to use some of these controls with the new data source controls.
The SqlDataSource and GridView Controls
The SqlDataSource control can be used with one of the newest data-bound controls in ASP.NET 2.0 — the GridView control. The SqlDataSource control is not only for use with Microsoft’s SQL Server, you can also use it for any SQL-capable server. For example, you can use this data source control to connect to any OleDbor ODBC-based data store or you can use it to work with Oracle.
Reading data
You can use this data source control to read data from a Microsoft SQL Server database. In this case, you can use the sample Northwind database that comes with SQL Server. To start, place a new GridView control on your page. This is the new tabular control that replaces the DataGrid control from ASP.NET 1.0/1.1. I discuss this control in detail throughout this chapter.
After the GridView is in place, change the look and feel of the control by clicking the Auto Format link in the smart tag and choosing Black & Blue 1. Next, drag and drop a SqlDataSource control onto the design surface. Because this control is not visual, it appears as a simple gray box on the design surface. Go to the page source code by clicking the Source tab in Visual Web Developer. Modify the SqlDataSource control so that it appears as shown in Listing 4-2.
Listing 4-2: Reading data from a SqlDataSource control
<%@ Page Language=”VB” %>
<html xmlns=”http://www.w3.org/1999/xhtml” >
<head runat=”server”>
<title>SqlDataSource Control Page</title> </head>
(continued)
77

Chapter 4
Listing 4-2: (continued)
<body>
<form id=”form1” runat=”server”>
<asp:Gridview ID=”GridView1” Runat=”server” DataSourceId=”SqlDataSource1” BackColor=”White” GridLines=”Vertical”
BorderStyle=”Solid” Cellpadding=”3” ForeColor=”Black” BorderColor=”#999999” BorderWidth=”1px”>
<FooterStyle BackColor=”#CCCCCC”> </FooterStyle>
<SelectedRowStyle ForeColor=”White” BackColor=”#000099” Font-Bold=”True”>
</SelectedRowStyle>
<PagerStyle ForeColor=”Black” HorizontalAlign=”Center” BackColor=”#999999”>
</PagerStyle>
<HeaderStyle ForeColor=”White” BackColor=”Black” Font-Bold=”True”> </HeaderStyle>
<AlternatingRowStyle BackColor=”#CCCCCC”> </AlternatingRowStyle>
</asp:GridView> <br />
<asp:SqlDataSource ID=”SqlDataSource1” Runat=”server” SelectCommand=”Select * From Customers” ProviderName=”System.Data.OleDb”
ConnectionString=”Provider=SQLOLEDB;Server=localhost;uid=sa;pwd=password; database=Northwind” />
</form>
</body>
</html>
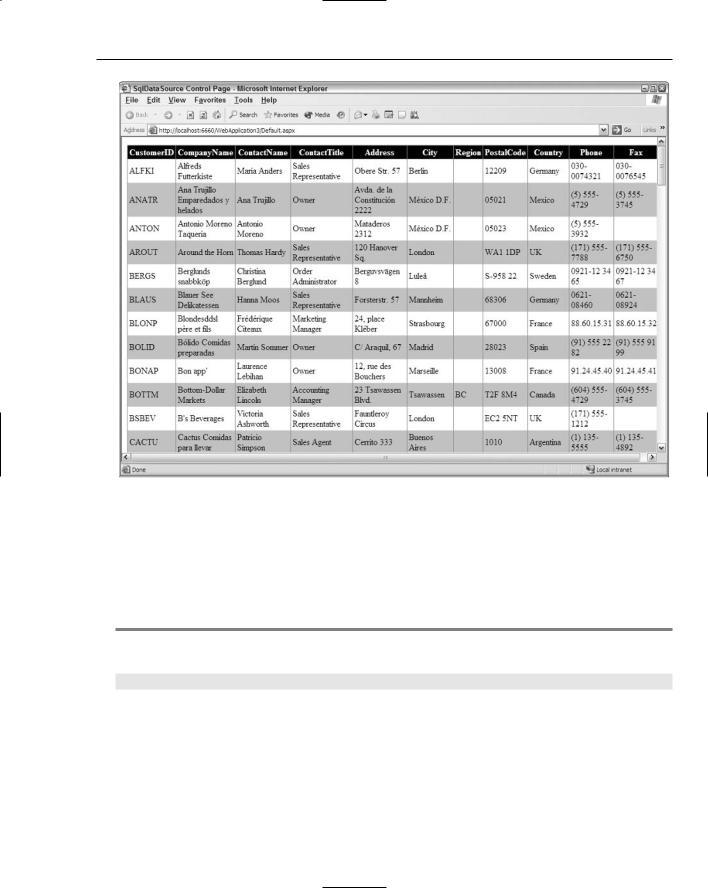
In this example, you can see that you need only a couple of attributes in the SqlDataSource control to read data from SQL Server. The first is the SelectCommand attribute. This takes a String value that is the SQL command you want the SqlDataSource control to use. In this example, you simply select everything that is in the Customers table of the Northwind database. The next important attribute is the ConnectionString attribute. This attribute takes a String value. The connection string must be the kind of string that the provider expects, which is defined in the ProviderName attribute. In this case, it is the OleDb provider.
After your SqlDataSource control is in place, you can attach any of the data-bound controls to this data source control. To do this, the GridView control on the page uses the DataSourceId attribute. The DataSourceId attribute takes a String value of the control ID of the SqlDataSource control —
SqlDataSource1.
When this table is generated in the browser, you see all the information from the Customers table in the Northwind database, as shown in Figure 4-1.
78
New Ways to Handle Data
Figure 4-1
Applying paging in the GridView
Another formerly cumbersome task for the DataGrid control was paging. With ASP.NET 2.0, the new GridView control can easily work with any of the data source controls to apply paging to the data you are working with. To apply paging to the GridView, simply use the AllowPaging attribute set to True. By default, its value is False. The use of the AllowPaging attribute is shown in Listing 4-3.
Listing 4-3: Turning on paging in the GridView control
<asp:GridView ID=”GridView1” Runat=”server” DataSourceId=”SqlDataSource1” BackColor=”White” GridLines=”Vertical” AllowPaging=”True” BorderStyle=”Solid” CellPadding=”3” ForeColor=”Black” BorderColor=”#999999” BorderWidth=”1px”>
...
<PagerStyle ForeColor=”Black” HorizontalAlign=”Center” BackColor=”#999999”> </PagerStyle>
...
</asp:GridView>
It really is as simple as that. You don’t need to make any changes to the SqlDataSource control for this to work. After the AllowPaging attribute is changed to True, the GridView appears as shown in Figure 4-2.
79

Chapter 4
Figure 4-2
In the figure, you can also see that the numbers at the bottom of the page have a style applied to them. This style is defined in the GridView control with the use of the <PagerStyle> element. Besides the <PagerStyle> element, a number of additional style elements can be utilized within the GridView control.
As you can see from the screen shot in Figure 4-2, the page numbers are shown at the bottom of the table. You can completely customize the appearance of these numbers. You can, for example, use shortcuts to change the navigation among pages in the table.
In IntelliSense, you see a collection of attributes that start with the term PagerSettings-. The
PagerSettings-mode attribute , for example, can take NextPrevious, NextPreviousFirstLast,
Numeric, or NumericFirstLast as possible values. The default value is Numeric.
Figure 4-3 shows a GridView control using NextPrevious.
80

New Ways to Handle Data
Figure 4-3
Figure 4-4 shows the use of NextPreviousFirstLast.
Figure 4-4
The PagerSettings-PageButtonCount is an interesting attribute that can be used with the two numeric settings for the PagerSettings-Mode attribute (one of which is the default setting). This attribute takes an Integer value and, when this value is set, only the specified number of page options in the list of pages is shown. Listing 4-4 is an example of this.
Listing 4-4: Showing only a specific number of page options
<asp:GridView ID=”GridView1” Runat=”server” DataSourceId=”SqlDataSource1” BackColor=”White” GridLines=”Vertical” AllowPaging=”True” PagerSettings-Mode=”Numeric” PagerSettings-PageButtonCount=”3” BorderStyle=”Solid” CellPadding=”3” ForeColor=”Black” BorderColor=”#999999” BorderWidth=”1px”>
...
<PagerStyle ForeColor=”Black” HorizontalAlign=”Center” BackColor=”#999999”> </PagerStyle>
...
</asp:GridView>
Using these attribute combinations causes the pager at the bottom of the table to appear as shown in Figure 4-5.
Figure 4-5
81